
Why You’ll Love This Strawberry Chocolate Dipped Kiwi
- Unexpected Flavor Harmony. The sweet-tart punch of the kiwi and the juicy sweetness of the strawberry create this incredible contrast against the deep, rich dark chocolate. It’s a combination that will genuinely surprise and delight your taste buds in the best way possible.
- Deceptively Elegant. These little bites look like they came from a fancy patisserie, but they are honestly so simple to make. You don’t need any special skills—just a little patience for the dipping and setting. They’re a surefire way to impress guests with minimal effort.
- Naturally Fresher Feeling. Because the star of the show is fresh fruit, these treats feel like a lighter option compared to many heavy desserts. You get that satisfying chocolate crunch followed by a juicy, vitamin-packed interior. It’s a treat you can feel good about.
- Endlessly Customizable. This is a recipe that loves to play dress-up. You can use milk chocolate, white chocolate, or even swirl them together. Then, the topping possibilities are endless—a sprinkle of sea salt, chopped nuts, or shredded coconut. It’s your edible canvas.
Ingredients & Tools
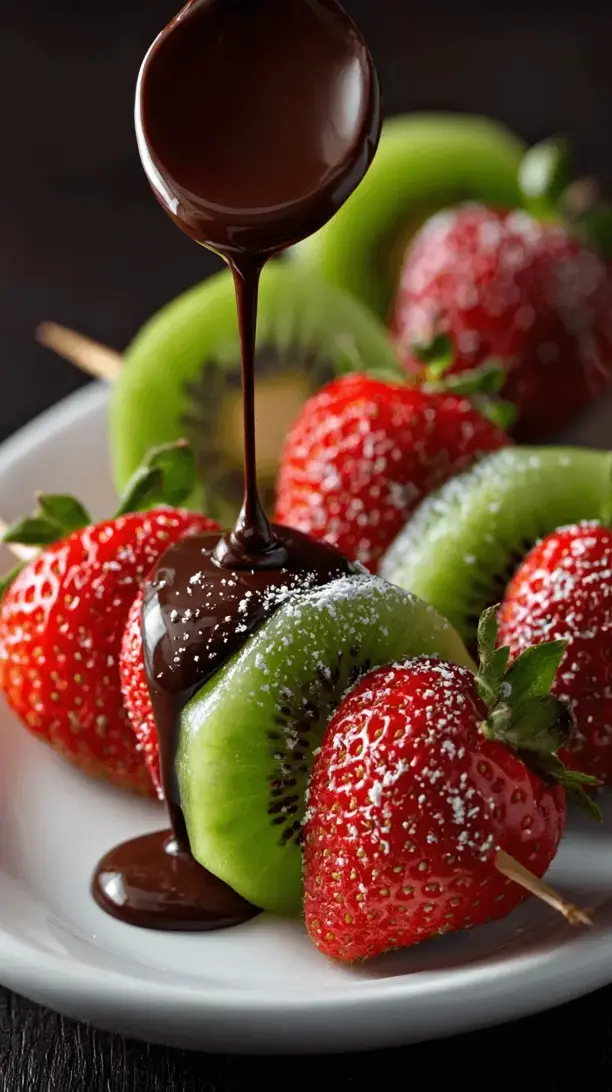
- 4 large, ripe kiwis
- 8 large, fresh strawberries
- 200 g high-quality dark chocolate (around 70%), finely chopped
- 1 tbsp coconut oil (or neutral oil)
- Optional for topping: flaky sea salt, chopped pistachios, freeze-dried strawberry powder, or shredded coconut
Tools: A sharp paring knife, cutting board, paper towels, a heatproof bowl (glass or metal), a saucepan for a double boiler, a baking sheet, and parchment or wax paper.
The quality of your chocolate really is the star here, so choose one you enjoy eating on its own. The little bit of coconut oil is our secret weapon—it makes the chocolate smoother, easier to dip with, and gives it a beautiful glossy finish as it sets. As for the fruit, look for kiwis that yield slightly to gentle pressure and strawberries that are bright red and fragrant.
Serves: 4-6 (makes about 16 pieces) | Prep Time: 20 minutes | Cook Time: 5 minutes (for melting) | Total Time: 45 minutes (includes setting time)
Before You Start: Tips & Ingredient Notes
- Dry Fruit is Non-Negotiable. This is the single most important tip. Any tiny drop of water on your fruit will cause the chocolate to “seize,” turning it from smooth and glossy to a grainy, clumpy mess. Pat your fruit pieces thoroughly with paper towels after washing and peeling.
- Chop Your Own Chocolate. While chocolate chips are convenient, they contain stabilizers that help them keep their shape, which can make melting and dipping trickier. A bar of high-quality chocolate, finely chopped, will melt more evenly and result in a much smoother, more professional-looking coating.
- Why the Coconut Oil? That tablespoon of oil is a game-changer. It thins the chocolate just enough for a delicate, snappy shell without making it watery. It also enhances the shine and helps the chocolate set faster and more firmly on the fruit.
- Ripeness Matters. You want your kiwis to be ripe but still firm. If they’re too soft, they’ll be difficult to slice and handle. The strawberries should be perfectly ripe—not mushy, but sweet and fragrant for the best flavor contrast.
How to Make Strawberry Chocolate Dipped Kiwi
Step 1: Prep Your Fruit. Start by peeling your kiwis. I find using a small spoon to scoop between the skin and the flesh works beautifully and saves a lot of the fruit. Slice each kiwi into four thick rounds, about ¾-inch thick. For the strawberries, simply hull them (remove the green stem and core) and slice them in half from top to bottom. Now, the crucial part: lay all your fruit pieces on a layer of paper towels and gently pat them completely dry. Let them air-dry for a few minutes while you move on to the chocolate. You really can’t be too thorough here.
Step 2: Melt the Chocolate. Create a simple double boiler by filling a saucepan with an inch or two of water and bringing it to a gentle simmer. Place your chopped chocolate and coconut oil into a heatproof bowl that fits snugly on top of the saucepan, ensuring the bottom of the bowl does not touch the water. Stir continuously with a dry spatula or spoon as the chocolate melts. You’ll notice it going from chunky to glossy and smooth. Once it’s fully melted and combined, immediately remove the bowl from the heat. Be careful—steam is hot! Wipe the bottom of the bowl dry before setting it on your counter.
Step 3: The Dipping Process. Line a baking sheet with parchment paper. Now, working with one piece of fruit at a time, spear a kiwi slice or strawberry half with a fork (or use a dipping tool if you have one). Dip it into the melted chocolate, swirling it gently to coat about halfway up the sides. Lift it out and let the excess chocolate drip back into the bowl for a moment. The trick is to get a nice, even coat without it being too thick.
Step 4: Add Toppings & Set. Carefully transfer the chocolate-dipped fruit to your prepared baking sheet. If you’re adding any toppings like sea salt or chopped nuts, now is the time to sprinkle them on, before the chocolate sets. Repeat with all the fruit pieces, leaving a little space between each one on the tray. Once they’re all dipped and decorated, slide the entire baking sheet into the refrigerator. They’ll need about 20-30 minutes for the chocolate to become completely firm and snappy.
Step 5: Serve and Enjoy! Once the chocolate shell is hard to the touch, your Strawberry Chocolate Dipped Kiwi bites are ready! You can arrange them on a beautiful platter for serving. They are best enjoyed the same day they are made, as the fruit will eventually start to release moisture. But honestly, they’re so delicious, I doubt they’ll last that long.
Serving Suggestions
Complementary Dishes
- A Simple Cheese Board — The creaminess of a soft goat cheese or a mild brie provides a lovely savory counterpoint to the sweet and tart fruit. It turns these bites into part of a sophisticated dessert spread.
- Lemon Sorbet or Vanilla Bean Ice Cream — Serve a few of these chocolate-dipped gems alongside a scoop of something cool and creamy. The contrast in temperatures and textures is absolutely divine.
Drinks
- Sparkling Rosé or Prosecco — The bubbles and slight dryness of a sparkling wine cut through the richness of the chocolate beautifully, while complementing the berry notes.
- Earl Grey Tea — A hot cup of Earl Grey, with its bergamot aroma, creates a wonderfully cozy and elegant pairing that highlights the fruit’s flavor without overpowering it.
Something Sweet
- Almond Shortbread Cookies — The buttery, crumbly texture of a simple shortbread cookie is a perfect, understated companion that doesn’t compete for attention but adds a nice textural element.
- Citrus-Infused Dark Chocolate Bark — For a full-on chocolate and fruit experience, serve these with some homemade chocolate bark studded with orange zest and dried cranberries. It’s a theme, and a delicious one.
Top Mistakes to Avoid
- Mistake: Not Drying the Fruit Thoroughly. I’ve said it before and I’ll say it again—this is the number one reason dips go wrong. Even a tiny bit of moisture will ruin your entire bowl of melted chocolate, turning it into a grainy, un-dippable mass. Pat, pat, and pat again.
- Mistake: Overheating the Chocolate. If you melt chocolate over too high heat or in the microwave for too long, it can burn or become thick and clumpy. Low and slow is the way to go, using the double boiler method for gentle, even heat.
- Mistake: Making Them Too Far in Advance. While you can make these a few hours ahead, they are truly best enjoyed within the day. The fruit will slowly release liquid, which can make the chocolate shell soft and cause it to separate over time.
- Mistake: A Too-Thick Chocolate Coating. It’s tempting to dunk the fruit completely, but a very thick layer of chocolate can be overwhelming and mask the fresh flavor of the fruit. A delicate, half-dip is often more balanced and elegant.
Expert Tips
- Tip: Tempering Hack (Sort Of). While true tempering is complex, adding the coconut oil helps mimic a tempered chocolate’s snap and shine. For an extra pro touch, you can “seed” your chocolate: reserve about a quarter of your chopped chocolate, melt the rest, then stir the reserved chunks in off the heat until melted. This helps stabilize the cocoa butter.
- Tip: Use a Fork or Skewer. For the cleanest dip, spear the fruit on a fork or a wooden skewer. This gives you maximum control for dipping and swirling, and makes it easy to tap off the excess chocolate without getting your fingers messy.
- Tip: Room Temperature is Key for Serving. Take the bites out of the fridge about 10-15 minutes before you plan to serve them. This allows the chocolate to lose its fridge chill, making the texture snappy but not rock-hard, and lets the full flavor of the fruit shine through.
- Tip: Get Creative with Drizzles. Once the initial chocolate layer is set, you can melt a small amount of white chocolate and drizzle it over the top with a fork for a beautiful, professional-looking finish. It adds another layer of flavor and visual appeal.
FAQs
Can I use milk or white chocolate instead?
Absolutely! The method is exactly the same. Milk chocolate will give you a sweeter, creamier result, while white chocolate offers a lovely vanilla note that pairs wonderfully with the fruit. Just be aware that white chocolate is more sensitive to heat, so melt it even more gently to avoid scorching.
How far in advance can I make these?
For the best texture and taste, I recommend making them the same day you plan to serve them, ideally within a few hours. They can be refrigerated for up to 24 hours, but the fruit may soften the chocolate shell slightly. They are not ideal for freezing, as the fruit texture will become mushy upon thawing.
My chocolate seized and became grainy. Can I fix it?
It’s a heart-breaking moment, but sometimes you can salvage it. Immediately remove it from the heat and stir in a tablespoon of warm water or a neutral oil (like vegetable oil) one teaspoon at a time, stirring vigorously after each addition. This doesn’t always work perfectly, but it can sometimes bring it back to a dippable consistency.
Can I use frozen fruit?
I wouldn’t recommend it for this particular recipe. Frozen fruit contains a lot of water and becomes very soft when thawed, which would make it difficult to handle and dip, and would almost certainly cause the chocolate to seize. Fresh, firm fruit is essential here.
What other fruits work well with this method?
This dipping method is fantastic for any firm, dry fruit! Try it with banana slices (dip them quickly as they brown), orange segments (peel and dry them extremely well), dried apricots, or even thick pineapple rings. The possibilities are endless once you master the basic technique.
Strawberry Chocolate Dipped Kiwi
Whip up stunning Strawberry Chocolate Dipped Kiwi bites! This easy, no-bake recipe combines fresh fruit & rich chocolate for an impressive yet simple treat. Perfect for parties or a quick sweet fix.
Ingredients
Ingredients
-
4 large, ripe kiwis
-
8 large, fresh strawberries
-
200 g high-quality dark chocolate (around 70%) (finely chopped)
-
1 tbsp coconut oil (or neutral oil)
-
Optional for topping (flaky sea salt, chopped pistachios, freeze-dried strawberry powder, or shredded coconut)
Instructions
-
Prep Your Fruit. Start by peeling your kiwis. I find using a small spoon to scoop between the skin and the flesh works beautifully and saves a lot of the fruit. Slice each kiwi into four thick rounds, about ¾-inch thick. For the strawberries, simply hull them (remove the green stem and core) and slice them in half from top to bottom. Now, the crucial part: lay all your fruit pieces on a layer of paper towels and gently pat them completely dry. Let them air-dry for a few minutes while you move on to the chocolate. You really can't be too thorough here.01
-
Melt the Chocolate. Create a simple double boiler by filling a saucepan with an inch or two of water and bringing it to a gentle simmer. Place your chopped chocolate and coconut oil into a heatproof bowl that fits snugly on top of the saucepan, ensuring the bottom of the bowl does not touch the water. Stir continuously with a dry spatula or spoon as the chocolate melts. You'll notice it going from chunky to glossy and smooth. Once it's fully melted and combined, immediately remove the bowl from the heat. Be careful—steam is hot! Wipe the bottom of the bowl dry before setting it on your counter.02
-
The Dipping Process. Line a baking sheet with parchment paper. Now, working with one piece of fruit at a time, spear a kiwi slice or strawberry half with a fork (or use a dipping tool if you have one). Dip it into the melted chocolate, swirling it gently to coat about halfway up the sides. Lift it out and let the excess chocolate drip back into the bowl for a moment. The trick is to get a nice, even coat without it being too thick.03
-
Add Toppings & Set. Carefully transfer the chocolate-dipped fruit to your prepared baking sheet. If you're adding any toppings like sea salt or chopped nuts, now is the time to sprinkle them on, before the chocolate sets. Repeat with all the fruit pieces, leaving a little space between each one on the tray. Once they're all dipped and decorated, slide the entire baking sheet into the refrigerator. They'll need about 20-30 minutes for the chocolate to become completely firm and snappy.04
-
Serve and Enjoy! Once the chocolate shell is hard to the touch, your Strawberry Chocolate Dipped Kiwi bites are ready! You can arrange them on a beautiful platter for serving. They are best enjoyed the same day they are made, as the fruit will eventually start to release moisture. But honestly, they're so delicious, I doubt they'll last that long.05


