
Why You’ll Love This Cacao Energy Bites
- Effortless & Quick. Honestly, you can whip these up in the time it takes to find your keys. There’s zero cooking involved, which is a lifesaver on busy days or when you just can’t face turning on the oven.
- Customisable to Your Heart’s Content. Think of this recipe as a fantastic base camp. Not a fan of almonds? Use walnuts. Want a tropical twist? Add some shredded coconut. You’re the boss of your energy bites.
- Perfect Portion Control. Each bite is a pre-portioned little powerhouse. It’s so easy to just grab one or two, which helps avoid mindlessly snacking straight from a large bag of something else.
- Seriously Satisfying Texture. We’re talking a chewy, slightly crunchy, melt-in-your-mouth situation all at once. The combination of nuts, dates, and seeds creates a texture that’s far more interesting than any store-bought bar.
Ingredients & Tools
- 200 g pitted medjool dates
- 100 g raw almonds
- 40 g rolled oats (gluten-free if needed)
- 2 tablespoons raw cacao powder
- 1 tablespoon chia seeds
- 1 tablespoon maple syrup (or agave nectar)
- 1 tablespoon almond butter (or any nut/seed butter)
- 1 teaspoon vanilla extract
- A generous pinch of sea salt
- For rolling (optional): extra cacao powder, desiccated coconut, or crushed nuts
Tools: A food processor (a high-powered blender can work in a pinch, but a processor is easier), a set of measuring spoons, and a small baking tray or plate for chilling.
The quality of your dates really makes a difference here—go for soft, sticky medjool dates if you can. They provide the natural sweetness and binding power that holds everything together beautifully. And that pinch of salt? It’s not optional, I promise. It makes the chocolate flavour pop in a way that will honestly surprise you.
Serves: Makes 12-14 bites | Prep Time: 15 minutes | Cook Time: 0 minutes | Total Time: 15 minutes (plus chilling)
Before You Start: Tips & Ingredient Notes
- Date Readiness is Key. If your dates are even a little dry or hard, they won’t blend into a sticky paste. Simply soak them in very hot water for 10 minutes, then drain and pat them thoroughly dry before using. This little trick is a game-changer.
- Raw Cacao vs. Cocoa Powder. Raw cacao powder is less processed and has a deeper, slightly fruitier chocolate flavour. Regular unsweetened cocoa powder works perfectly fine too—the bites will just have a milder, more familiar cocoa taste. It’s totally up to you!
- The Stickiness Test. The magic moment is when the mixture holds together easily when you pinch it. If it’s too crumbly, add a teaspoon more of nut butter or maple syrup. If it’s too wet, a sprinkle more oats or cacao powder will fix it.
- Why Chill Them? I know, it’s tempting to eat them straight away… but the 30-minute chill in the fridge is what transforms them from a sticky mass into firm, perfectly portable bites. It’s worth the wait, honestly.
How to Make Cacao Energy Bites
Step 1: Prep Your Base. Start by adding the almonds and rolled oats to your food processor. Pulse them about 10-15 times until they’re broken down into a coarse meal. You’re looking for a texture with some small chunks still visible—this isn’t flour, and those little bits will give a lovely crunch. You’ll hear the sound change as they break down.
Step 2: Create the Chocolatey Glue. Now, add in the pitted dates, cacao powder, chia seeds, maple syrup, almond butter, vanilla extract, and that all-important pinch of sea salt. Pop the lid back on and process everything together. At first, it’ll look like nothing is happening, but then you’ll see it start to clump together. Keep processing until the mixture balls up around the blade and looks uniformly dark and sticky.
Step 3: The Pinch Test. Stop the processor and carefully remove the blade. Pinch a small amount of the mixture between your fingers. It should hold together firmly without crumbling. If it’s too dry, add another half tablespoon of nut butter or maple syrup and pulse again. If it’s too wet (which is rare), add a tablespoon of oats and pulse to combine.
Step 4: Roll and Coat. Using a tablespoon measure or your hands, scoop out portions of the mixture and roll them into tight, smooth balls. If you’re adding a coating, now’s the time! Spread your chosen powder (cacao, coconut, etc.) on a small plate and gently roll each ball in it until lightly covered. This step is messy but fun—embrace it!
Step 5: The Essential Chill. Place your finished energy bites on a plate or small tray lined with baking paper. Pop them into the fridge for at least 30 minutes. This allows the fats from the nut butter to firm up and the oats and chia seeds to absorb any remaining moisture, resulting in that perfect, firm-yet-chewy texture we’re after.
Step 6: Store and Enjoy! Once chilled, transfer your Cacao Energy Bites to an airtight container. They’ll keep happily in the fridge for up to two weeks, or you can freeze them for up to three months. Honestly, they’re so good straight from the freezer—they have a lovely fudgy quality.
Serving Suggestions
Complementary Dishes
- A Fresh Fruit Platter — The bright, juicy acidity of berries or orange slices cuts through the rich, dense chocolate flavour beautifully, creating a really balanced snack plate.
- A Cup of Greek Yoghurt — Crumble one or two bites over a bowl of thick, tangy yoghurt for a deconstructed breakfast parfait that feels incredibly indulgent.
- A Simple Green Smoothie — Pair a bite with a smoothie for a complete, on-the-go meal. The bitterness of greens like spinach complements the sweet cacao notes perfectly.
Drinks
- Cold Brew Coffee — The deep, smooth flavour of cold brew is a match made in heaven with the earthy cacao. It’s my ultimate afternoon pick-me-up combo.
- A Glass of Almond Milk — Keeping it simple, a cold glass of your favourite plant-based milk alongside a bite feels like a wholesome, comforting treat.
- Peppermint Tea — The cool, refreshing notes of peppermint tea enhance the chocolate flavour, making it taste even more decadent than it already is.
Something Sweet
- Fresh Raspberry Sorbet — For a truly special dessert, serve a couple of bites with a scoop of sharp, fruity sorbet. The contrast in temperatures and flavours is spectacular.
- Poached Pears — The delicate, wine-poached fruit alongside the dense, chocolatey bite is an elegant and surprisingly simple dessert combination.
- A Dark Chocolate Square — For the ultimate chocoholic, enjoy a bite with a small piece of high-quality dark chocolate. It’s a rich, antioxidant-packed double bill.
Top Mistakes to Avoid
- Mistake: Using rock-hard dates. This is the number one reason a batch fails to bind. Dry dates won’t create the necessary sticky paste, leaving you with a crumbly mixture that’s impossible to roll. Always check your dates first!
- Mistake: Over-processing the nuts. If you blend the almonds for too long at the start, you’ll end up with almond butter instead of a coarse meal. We want texture! Short, sharp pulses are the way to go.
- Mistake: Skipping the chill time. I’ve been guilty of this myself, and you end up with bites that are too soft and misshapen. The fridge time is non-negotiable for the perfect firm-yet-chewy consistency.
- Mistake: Not tasting the mixture. Before you roll, taste a tiny bit! This is your chance to adjust the seasoning. Maybe it needs another pinch of salt or a tiny bit more maple syrup. Your palate is the best guide.
Expert Tips
- Tip: Toast your nuts for deeper flavour. Spread the almonds on a baking tray and toast them in a 180°C (350°F) oven for 8-10 minutes until fragrant. Let them cool completely before using. This simple step adds a whole new layer of nutty complexity.
- Tip: Get creative with add-ins. Once you’ve mastered the base, try stirring in 2 tablespoons of desiccated coconut, a handful of cacao nibs for extra crunch, or even a pinch of cinnamon or espresso powder for a flavour twist.
- Tip: Use a small cookie scoop. For perfectly uniform bites and to keep your hands relatively clean, a small (1-tablespoon) spring-loaded cookie scoop is an invaluable tool. It makes the rolling process so much faster and neater.
- Tip: Layer flavours in the jar. If you’re making a double batch and using different coatings, store them in a glass jar with layers separated by baking paper. It looks beautiful and lets you choose your flavour of the day.
FAQs
Can I make these without a food processor?
It’s tricky, but not entirely impossible. You’d need to very finely chop the dates and nuts by hand, which is quite a labour of love. Then, you’d have to mix everything in a bowl and really knead it with your hands to get it to stick together. The texture won’t be as uniform, but it can be done in a pinch. A high-powered blender can work, but you’ll likely have to stop and scrape down the sides frequently, and there’s a higher risk of over-blending.
How long do they last, and can I freeze them?
They’re perfect for making ahead! Stored in an airtight container in the fridge, they’ll stay fresh and delicious for up to two weeks. For longer storage, freeze them on a tray until solid, then transfer to a freezer bag or container. They’ll keep for up to three months. You can eat them straight from the freezer—they have a fantastic fudgy texture—or let them thaw for 10-15 minutes.
My mixture is too wet/crumbly. How can I fix it?
Don’t worry, this is easily fixed! If it’s too crumbly and won’t hold together, the mixture needs more moisture. Add another teaspoon of nut butter or maple syrup and pulse again. If it’s too wet and sticky, it needs more dry ingredients. Add a tablespoon of rolled oats or cacao powder and pulse to combine. The perfect consistency is like a stiff, mouldable playdough.
Can I use a different nut or seed butter?
Absolutely! Peanut butter, cashew butter, tahini (sesame seed butter), or sunflower seed butter all work wonderfully. Just be aware that tahini and sunflower seed butter have stronger, more distinct flavours that will come through in the final bite. Peanut butter will give you a lovely peanut-chocolate vibe.
Are these suitable for kids?
They can be a great healthy snack for kids! They’re full of natural energy. However, because they contain whole nuts and can be a choking hazard for very young children, always supervise and consider chopping the nuts more finely or using ground almonds instead. You could also roll them into smaller, pea-sized balls for little ones.
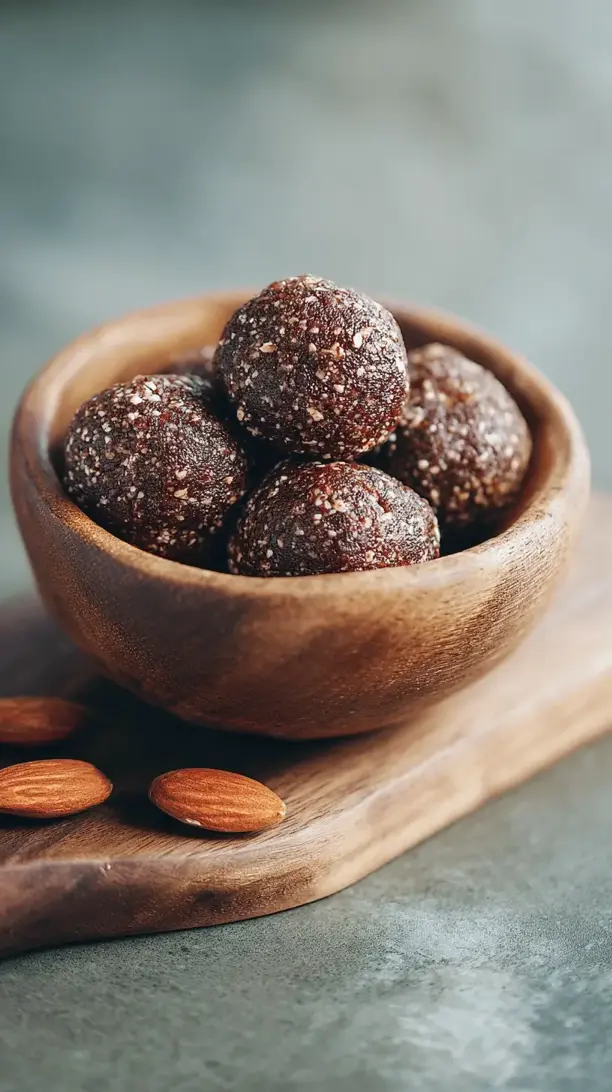
Cacao Energy Bites
Whip up no-bake Cacao Energy Bites in 15 minutes! My easy recipe uses dates, almonds & cacao for healthy snacks. Perfect for afternoon slumps & meal prep.
Ingredients
Ingredients
-
200 g pitted medjool dates
-
100 g raw almonds
-
40 g rolled oats (gluten-free if needed)
-
2 tablespoons raw cacao powder
-
1 tablespoon chia seeds
-
1 tablespoon maple syrup (or agave nectar)
-
1 tablespoon almond butter (or any nut/seed butter)
-
1 teaspoon vanilla extract
-
A generous pinch sea salt
-
extra cacao powder, desiccated coconut, or crushed nuts (for rolling (optional))
Instructions
-
Prep Your Base. Start by adding the almonds and rolled oats to your food processor. Pulse them about 10-15 times until they're broken down into a coarse meal. You're looking for a texture with some small chunks still visible—this isn't flour, and those little bits will give a lovely crunch. You'll hear the sound change as they break down.01
-
Create the Chocolatey Glue. Now, add in the pitted dates, cacao powder, chia seeds, maple syrup, almond butter, vanilla extract, and that all-important pinch of sea salt. Pop the lid back on and process everything together. At first, it'll look like nothing is happening, but then you'll see it start to clump together. Keep processing until the mixture balls up around the blade and looks uniformly dark and sticky.02
-
The Pinch Test. Stop the processor and carefully remove the blade. Pinch a small amount of the mixture between your fingers. It should hold together firmly without crumbling. If it's too dry, add another half tablespoon of nut butter or maple syrup and pulse again. If it's too wet (which is rare), add a tablespoon of oats and pulse to combine.03
-
Roll and Coat. Using a tablespoon measure or your hands, scoop out portions of the mixture and roll them into tight, smooth balls. If you're adding a coating, now's the time! Spread your chosen powder (cacao, coconut, etc.) on a small plate and gently roll each ball in it until lightly covered. This step is messy but fun—embrace it!04
-
The Essential Chill. Place your finished energy bites on a plate or small tray lined with baking paper. Pop them into the fridge for at least 30 minutes. This allows the fats from the nut butter to firm up and the oats and chia seeds to absorb any remaining moisture, resulting in that perfect, firm-yet-chewy texture we're after.05
-
Store and Enjoy! Once chilled, transfer your Cacao Energy Bites to an airtight container. They'll keep happily in the fridge for up to two weeks, or you can freeze them for up to three months. Honestly, they're so good straight from the freezer—they have a lovely fudgy quality.06


