
Why You’ll Love This Baked Zucchini Chips
- They’re genuinely crispy. Forget any past experiences with limp, steamed zucchini. We’re using a few key techniques—like salting and a low, slow bake—to draw out moisture and achieve a fantastic, chip-like crunch.
- They’re incredibly versatile. This recipe is a fantastic blank canvas. You can keep it simple with just salt and pepper, or get creative with garlic powder, smoked paprika, a pinch of cayenne, or even a sprinkle of nutritional yeast for a cheesy vibe.
- They make you feel good. It’s a snack you can genuinely feel good about eating. You’re getting a serving of vegetables in a fun, accessible form, without any heavy frying or questionable ingredients.
- They’re a crowd-pleaser. Seriously, these disappear fast. They’re a brilliant appetizer for parties or a side dish that’s guaranteed to impress, especially when served with a cool, creamy dipping sauce.
Ingredients & Tools
- 2 medium zucchinis (about 1 pound total)
- 1 tablespoon olive oil (or avocado oil)
- 1/4 cup grated Parmesan cheese (the powdery kind works best)
- 1/4 cup Panko breadcrumbs
- 1/2 teaspoon garlic powder
- 1/4 teaspoon smoked paprika (optional, for color and flavor)
- 1/4 teaspoon black pepper
- 1/2 teaspoon kosher salt, plus more for salting the zucchini
Tools: Mandoline slicer (highly recommended!), two large baking sheets, parchment paper or silicone baking mats, a clean kitchen towel or paper towels, and a couple of mixing bowls.
You’ll notice the ingredient list is short and sweet. The real stars here are the zucchini and the method. Using a mandoline is honestly a game-changer for getting those perfectly even, thin slices that are crucial for crispiness. And don’t skip the step of salting the zucchini—it’s the secret weapon against sogginess.
Serves: 2-3 as a snack | Prep Time: 20 minutes | Cook Time: 1 hour 30 minutes – 2 hours | Total Time: About 2 hours (mostly hands-off)
Before You Start: Tips & Ingredient Notes
- Why a mandoline slicer? Consistency is absolutely key for even baking. If your slices are different thicknesses, some will burn while others are still soft. A mandoline ensures they’re all the same, about 1/8-inch thick. If you don’t have one, use a very sharp knife and take your time!
- The importance of salting. Zucchini is about 95% water. If you skip the salting step, you’re basically steaming the chips in the oven. Salting draws out this excess moisture, which is the single most important step for achieving a crisp chip instead of a mushy one.
- Panko vs. Regular Breadcrumbs. Panko breadcrumbs are lighter and flakier than fine, dry breadcrumbs. They create a much crispier, airier coating that doesn’t get dense. It’s worth seeking them out for the best texture.
- Patience is a virtue. These chips bake low and slow. Rushing them by turning up the heat will just cause the outside to burn before the inside dehydrates. Embrace the slow bake—it’s mostly hands-off time anyway.
How to Make Baked Zucchini Chips
Step 1: Slice and Salt the Zucchini. First, preheat your oven to 225°F (110°C). This low temperature is crucial. Using your mandoline slicer, carefully slice the zucchini into rounds about 1/8-inch thick. Arrange the slices in a single layer on a few layers of paper towels or a clean kitchen towel. Sprinkle them generously with kosher salt on both sides. Let them sit for at least 15-20 minutes. You’ll notice beads of moisture forming on the surface—this is exactly what we want!
Step 2: Press Out the Moisture. After the zucchini has rested, take another paper towel or the other half of the kitchen towel and gently press down on each slice to blot away all the released water. You’ll be amazed at how much liquid comes out. This step is non-negotiable for crispiness, so be thorough! Transfer the dried zucchini slices to a large bowl.
Step 3: Create the Coating. In a separate bowl, combine the Panko breadcrumbs, grated Parmesan cheese, garlic powder, smoked paprika (if using), black pepper, and the 1/2 teaspoon of kosher salt. Use a fork or your fingers to mix everything together, breaking up any clumps of cheese. This creates our simple, flavorful coating.
Step 4: Toss with Oil and Coating. Drizzle the tablespoon of olive oil over the zucchini slices. Use your hands to toss them gently, ensuring every slice gets a very light, thin coating of oil. This helps the coating stick and promotes browning. Then, sprinkle the Panko-Parmesan mixture over the zucchini and toss again until the slices are evenly coated. They shouldn’t be drenched, just nicely speckled.
Step 5: Arrange and Bake. Line two large baking sheets with parchment paper or silicone mats. Arrange the coated zucchini slices in a single layer, making sure they aren’t touching or overlapping. This allows the hot air to circulate around each chip. Place the sheets in the preheated oven and bake for 1 hour. After an hour, carefully flip each chip over. You’ll notice they’ve started to dry out and shrink a little.
Step 6: Bake to Crispy Perfection. Continue baking for another 30 to 60 minutes. The total time will depend on your oven and the thickness of your slices. Start checking at the 30-minute mark. They are done when they are golden brown and crisp to the touch. They will crisp up a bit more as they cool, so let them sit on the baking sheet for 5-10 minutes before diving in.
Serving Suggestions
Complementary Dishes
- Burger Night — Swap out the standard fries for a pile of these zucchini chips. Their light crispiness is the perfect contrast to a juicy, hearty burger.
- Alongside a Sandwich — They make a fantastic side for any lunch sandwich, from a classic club to a veggie-packed hummus wrap, adding a satisfying crunch without weighing you down.
Drinks
- A Crisp Lager or Pale Ale — The light carbonation and slight bitterness of a cold beer cut through the savory, cheesy coating beautifully.
- Sparkling Water with Citrus — For a non-alcoholic option, the bubbles and zing of lemon or lime in sparkling water cleanse the palate and enhance the snackability.
Something Sweet
- Fresh Berry Salad — After a savory, salty snack, a simple bowl of mixed berries (strawberries, blueberries, raspberries) feels incredibly refreshing and light.
- A Square of Dark Chocolate — Just a small piece of high-quality dark chocolate provides a rich, bittersweet finish that contrasts wonderfully with the salty chips.
Top Mistakes to Avoid
- Mistake: Skipping the salting and drying step. This is the number one reason baked zucchini chips fail. That excess moisture will steam the chips, guaranteeing a soft, limp result. Don’t rush this part!
- Mistake: Slicing the zucchini too thick. If the slices are thicker than 1/8-inch, they’ll take forever to dehydrate and will likely burn on the outside before crisping up. Thin and even is the goal.
- Mistake: Overcrowding the baking sheet. If the chips are touching, they’ll steam each other. They need personal space for the hot air to circulate and dry them out properly. Use two sheets if needed.
- Mistake: Baking at too high a temperature. It’s tempting to crank the heat to speed things up, but you’ll just burn the coating. Low and slow is the only way to draw out the moisture and achieve a true chip texture.
Expert Tips
- Tip: Use a cooling rack for extra crispness. For the ultimate airflow, place a wire cooling rack on top of your baking sheet and arrange the chips on the rack. This allows heat to hit the chips from all sides, promoting even browning and crispiness.
- Tip: Get creative with seasonings. Once you master the basic method, the flavor world is your oyster. Try everything bagel seasoning, ranch powder, a touch of curry powder, or Italian herb blends. A little goes a long way!
- Tip: Make them in the air fryer. If you’re short on time, you can adapt this recipe for an air fryer. Cook at 350°F (175°C) for about 10-15 minutes, shaking the basket halfway through. They’ll cook faster but keep a close eye on them.
- Tip: Store them properly (if you have leftovers!). Let them cool completely, then store in a paper towel-lined airtight container at room temperature for 1-2 days. If they lose their crunch, you can pop them back in a 225°F oven for 5-10 minutes to re-crisp.
FAQs
Can I make these gluten-free?
Absolutely! This is an easy swap. Simply ensure you use certified gluten-free Panko breadcrumbs, which are widely available now. The rest of the ingredients are naturally gluten-free, so you’ll have perfect gluten-free zucchini chips in no time.
Why are my chips still soft after baking?
This almost always means there was still too much moisture in the zucchini. Next time, be more diligent with the salting and pressing step. Also, make sure your slices are thin enough and that you baked them long enough. They might need an extra 15-20 minutes depending on your oven. Remember, they continue to crisp up as they cool!
Can I use yellow squash instead of zucchini?
Yes, you can! Yellow summer squash works just as well and will give you a beautiful color. The method is identical. You could even do a mix of green and yellow for a really vibrant snack platter.
Are these chips keto-friendly?
They can be, with one modification. The Panko breadcrumbs add carbs. To make them keto, simply omit the breadcrumbs and use just the Parmesan cheese and seasonings. They’ll be a bit more delicate but still wonderfully crispy and flavorful.
What’s the best dip for these?
Oh, the possibilities! A simple marinara sauce is a classic choice. A cool, creamy ranch or tzatziki sauce is fantastic. For something a bit different, try a spicy sriracha mayo or even a creamy avocado cilantro dip. Honestly, they’re so good they hardly need a dip at all.
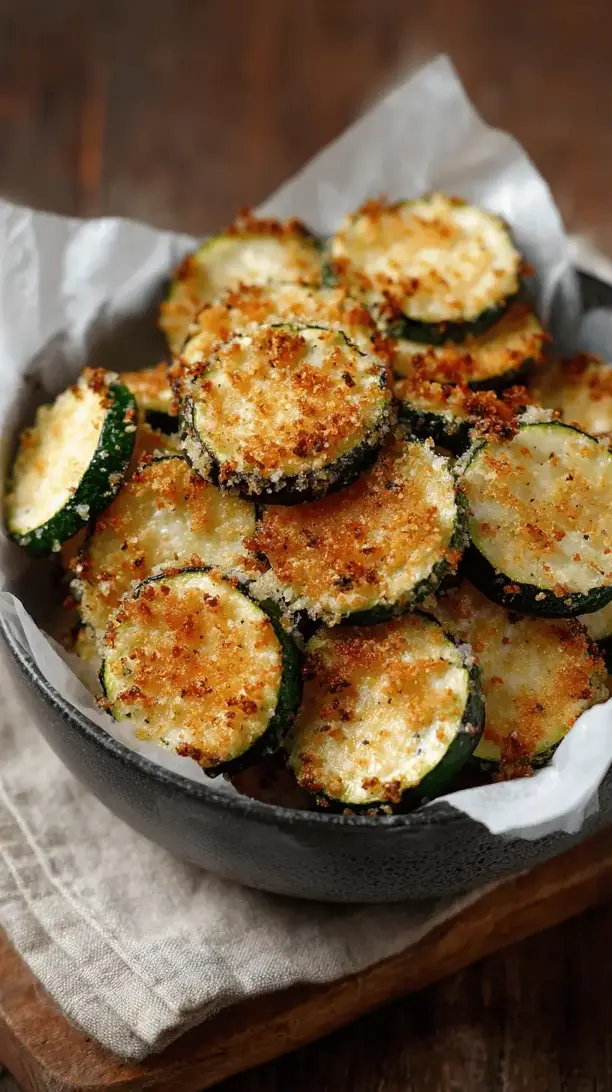
Baked Zucchini Chips
Craving a crunch? My foolproof baked zucchini chips are genuinely crispy, not soggy! A healthy, addictive snack made with simple ingredients. Get the secret to perfect chips!
Ingredients
Ingredients
-
2 medium zucchinis (about 1 pound total)
-
1 tablespoon olive oil (or avocado oil)
-
1/4 cup grated Parmesan cheese (the powdery kind works best)
-
1/4 cup Panko breadcrumbs
-
1/2 teaspoon garlic powder
-
1/4 teaspoon smoked paprika (optional, for color and flavor)
-
1/4 teaspoon black pepper
-
1/2 teaspoon kosher salt (plus more for salting the zucchini)
Instructions
-
Slice and Salt the Zucchini. First, preheat your oven to 225°F (110°C). This low temperature is crucial. Using your mandoline slicer, carefully slice the zucchini into rounds about 1/8-inch thick. Arrange the slices in a single layer on a few layers of paper towels or a clean kitchen towel. Sprinkle them generously with kosher salt on both sides. Let them sit for at least 15-20 minutes. You'll notice beads of moisture forming on the surface—this is exactly what we want!01
-
Press Out the Moisture. After the zucchini has rested, take another paper towel or the other half of the kitchen towel and gently press down on each slice to blot away all the released water. You'll be amazed at how much liquid comes out. This step is non-negotiable for crispiness, so be thorough! Transfer the dried zucchini slices to a large bowl.02
-
Create the Coating. In a separate bowl, combine the Panko breadcrumbs, grated Parmesan cheese, garlic powder, smoked paprika (if using), black pepper, and the 1/2 teaspoon of kosher salt. Use a fork or your fingers to mix everything together, breaking up any clumps of cheese. This creates our simple, flavorful coating.03
-
Toss with Oil and Coating. Drizzle the tablespoon of olive oil over the zucchini slices. Use your hands to toss them gently, ensuring every slice gets a very light, thin coating of oil. This helps the coating stick and promotes browning. Then, sprinkle the Panko-Parmesan mixture over the zucchini and toss again until the slices are evenly coated. They shouldn't be drenched, just nicely speckled.04
-
Arrange and Bake. Line two large baking sheets with parchment paper or silicone mats. Arrange the coated zucchini slices in a single layer, making sure they aren't touching or overlapping. This allows the hot air to circulate around each chip. Place the sheets in the preheated oven and bake for 1 hour. After an hour, carefully flip each chip over. You'll notice they've started to dry out and shrink a little.05
-
Bake to Crispy Perfection. Continue baking for another 30 to 60 minutes. The total time will depend on your oven and the thickness of your slices. Start checking at the 30-minute mark. They are done when they are golden brown and crisp to the touch. They will crisp up a bit more as they cool, so let them sit on the baking sheet for 5-10 minutes before diving in.06


