Why You’ll Love This Vegan Thumbprint Cookies
- Incredibly Simple & Approachable. You don’t need any fancy equipment or hard-to-find ingredients. The process is straightforward, making it a fantastic recipe to bake with kids or when you just need a quick, satisfying project.
- The Perfect Texture Trio. You get a tender, slightly crumbly shortbread base that’s not overly dense, a crisp edge, and that burst of soft, fruity jam in the center. It’s a textural experience in every single bite.
- Endlessly Customizable. The flavor possibilities are honestly limitless. Use whatever jam or preserve you love most—raspberry, apricot, strawberry, even a spicy pepper jelly for a kick. You can also roll the dough in different things like shredded coconut or chopped nuts for extra flair.
- Crowd-Pleasing & Allergy-Friendly. These cookies are naturally egg-free and dairy-free, making them a safe and delicious option for many friends and family members. No one will guess they’re vegan—they’re just downright delicious cookies.
Ingredients & Tools
- 210 g all-purpose flour
- 100 g refined coconut oil, solid
- 80 g granulated sugar
- 3 tbsp plant-based milk (almond, oat, or soy work great)
- 1 tsp vanilla extract
- ½ tsp baking powder
- ¼ tsp salt
- ~6 tbsp your favorite jam or preserves
Tools: A mixing bowl, a baking sheet, parchment paper, a small bowl for the jam, and a rounded ½ teaspoon measure (or the end of a wooden spoon handle!).
The key here is the solid coconut oil—it acts as the butter replacement and creates that signature shortbread texture. Using a good quality jam really makes a difference, too, as it’s the star of the show in the center.
Nutrition (per serving)
- Calories: 120 kcal
- Protein: 1 g
- Fat: 5 g
- Carbohydrates: 18 g
- Fiber: 0.5 g
Serves: 18 cookies | Prep Time: 15 minutes | Cook Time: 15 minutes | Total Time: 30 minutes
Before You Start: Tips & Ingredient Notes
- Is your coconut oil the right texture? This is the most important step! Your coconut oil needs to be solid, like the consistency of softened butter. If it’s liquid, pop the jar in the fridge for 20-30 minutes until it firms up. If it’s rock hard, let it sit on the counter for a bit.
- Why refined coconut oil? Refined coconut oil has a neutral scent and taste, so your cookies won’t have a coconut flavor. If you don’t mind a subtle coconut note, unrefined (virgin) works too, but refined is generally preferred for a classic thumbprint taste.
- Choosing your jam. A thicker jam or preserve works best as it’s less likely to bubble over and burn. If your jam is very runny, you can simmer it in a small pan for a few minutes to thicken it up slightly before using.
- Don’t skip the chill time. I know it’s tempting to rush, but chilling the dough for even 15-20 minutes makes a world of difference. It prevents the cookies from spreading too much and helps them hold their shape and that perfect thumbprint indentation.
How to Make Vegan Thumbprint Cookies
Step 1: Start by preheating your oven to 350°F (175°C) and lining a baking sheet with parchment paper. In a medium mixing bowl, whisk together the flour, baking powder, and salt. This ensures your leavening and salt are evenly distributed throughout the dough, which is key for a consistent texture.
Step 2: In a separate, larger bowl, you’ll combine the solid coconut oil and granulated sugar. Use a fork, a pastry cutter, or even your clean fingertips to work them together. You’re aiming for a texture that resembles coarse, wet sand. It won’t be perfectly creamy like butter and sugar, and that’s totally fine—you’ll notice little bits of coconut oil, which is exactly what you want.
Step 3: Now, pour in the plant-based milk and vanilla extract. Stir everything with a spatula until it’s just combined. The mixture might look a little shaggy or crumbly at this point. That’s your cue to add the dry ingredients.
Step 4: Add the flour mixture to the wet ingredients. Gently fold and stir until a soft dough forms. Don’t overmix! As soon as there are no more dry patches of flour, stop. The dough should hold together when you press it between your fingers. If it seems too dry and crumbly, add another teaspoon of plant-based milk.
Step 5: This is the chill step—trust me, it’s worth it. Cover the bowl with plastic wrap or a lid and pop it into the refrigerator for at least 15 minutes. This firms up the coconut oil, making the dough much easier to roll and preventing flat, sad cookies.
Step 6: Once chilled, scoop the dough by the tablespoonful and roll it into smooth balls between your palms. Place them on your prepared baking sheet, spacing them about 2 inches apart as they will spread a little.
Step 7: Now for the namesake step! Use your thumb, the rounded end of a ½ teaspoon measure, or the handle of a wooden spoon to press a deep, clear indentation into the center of each dough ball. Don’t be shy—press almost to the bottom, but not all the way through, or the jam will leak out.
Step 8: Spoon your jam into a small bowl and give it a quick stir to loosen it up. Using a small spoon, carefully fill each thumbprint with about ½ teaspoon of jam. Try not to overfill, as the jam will bubble and expand a bit during baking.
Step 9: Bake for 14-16 minutes, or until the edges of the cookies are just starting to turn a very light golden brown. The centers will still look soft, and that’s perfect. They’ll firm up as they cool. Let the cookies cool on the baking sheet for 10 minutes before transferring them to a wire rack to cool completely. This resting time is crucial for them to set properly.
Serving Suggestions
Complementary Dishes
- A simple fruit platter — The fresh, bright acidity of berries or citrus segments provides a lovely, clean contrast to the rich, sweet cookies.
- A scoop of vegan vanilla ice cream — Serve a warm cookie slightly à la mode for the ultimate comforting dessert experience. The melting ice cream with the jam is divine.
- A sharp, tangy vegan cheeseboard — The saltiness and umami from aged nut-based cheeses pair surprisingly well with the fruity sweetness of the cookies.
Drinks
- Oat milk latte — The creamy, warm coffee is a classic partner for any sweet pastry, cutting through the richness perfectly.
- Earl Grey tea — The bergamot notes in the tea elevate the fruity jam flavors and make the whole affair feel wonderfully sophisticated.
- A glass of chilled almond milk — Sometimes, the simplest pairing is the best, especially for an afternoon snack that feels both nostalgic and wholesome.
Something Sweet
- Vegan lemon bars — The zesty, tart punch of a lemon bar creates a fantastic flavor duo with the sweet, fruity jam center of the cookies.
- Dark chocolate-dipped strawberries — This is an easy, elegant addition to a dessert platter that complements the red fruit jams beautifully.
- A small bowl of coconut yogurt with a drizzle of maple syrup — For a lighter finish, this offers a creamy and subtly sweet option that doesn’t overwhelm the palate.
Top Mistakes to Avoid
- Using liquid coconut oil. If your oil is melted, the dough will be a greasy, soupy mess and your cookies will spread into thin, flat puddles in the oven. I’ve messed this up before too—it’s a sad sight. Always ensure it’s solid.
- Overmixing the dough. Once the flour is incorporated, stop stirring. Overworking the dough develops more gluten, which can make the cookies tough instead of tender and crumbly.
- Skipping the chill time. This step is non-negotiable for the best texture and shape. Warm dough spreads excessively, leading to cookies that merge into each other and lose their defined thumbprint.
- Overfilling the thumbprints. It’s tempting to load them up with jam, but too much will bubble over the sides and burn on the baking sheet, creating a sticky, bitter mess.
Expert Tips
- Tip: For a more complex flavor, toast your flour. Spread the flour on a baking sheet and bake at 350°F for about 5 minutes, stirring once, until it’s lightly fragrant. Let it cool completely before using. This gives the cookies a deeper, nuttier taste.
- Tip: Create a “flavor roll.” After you’ve formed your dough balls, roll them in finely chopped pecans, pistachios, or unsweetened shredded coconut before making the thumbprint. It adds fantastic texture and visual appeal.
- Tip: Make a “double-thumbprint.” After the cookies have cooled completely, you can add a second, tiny dollop of fresh jam right in the center of the baked jam. This makes the color pop and adds an extra burst of fresh fruit flavor.
- Tip: If your dough is too soft after chilling, it might be a warm kitchen issue. Work quickly, and if needed, pop the shaped cookies on the sheet into the fridge for 5-10 minutes right before they go in the oven.
FAQs
Can I make these cookies gluten-free?
Absolutely! You can substitute the all-purpose flour with a 1:1 gluten-free baking blend. Look for one that contains xanthan gum, as this helps bind the dough similarly to gluten. The texture might be slightly more delicate, so handle them with care when making the thumbprint indentations.
Can I use a different type of sugar?
Yes, but it will affect the texture and color. Granulated sugar gives the classic crisp edge. Coconut sugar will work but will result in a darker, softer cookie with a deeper, molasses-like flavor. I wouldn’t recommend liquid sweeteners like maple syrup, as they will make the dough too wet.
Why did my jam bubble over so much?
This usually happens for one of two reasons: the jam was too runny, or the thumbprint wasn’t deep enough. Next time, try using a thicker preserve and really press a good, deep well into the dough ball. You can also try baking at a slightly lower temperature, say 325°F, for a minute or two longer.
How should I store these cookies, and how long do they last?
Store them in an airtight container at room temperature for up to 5 days. You can layer them with parchment paper to prevent sticking. For longer storage, they freeze beautifully for up to 3 months. Just thaw at room temperature for an hour before serving.
My dough is too crumbly and won’t hold together. What do I do?
This is a common issue, often due to the specific brand of coconut oil or flour. Don’t worry! Simply add more plant-based milk, one teaspoon at a time, and mix until the dough just comes together. It should feel like Play-Doh and hold its shape when rolled.
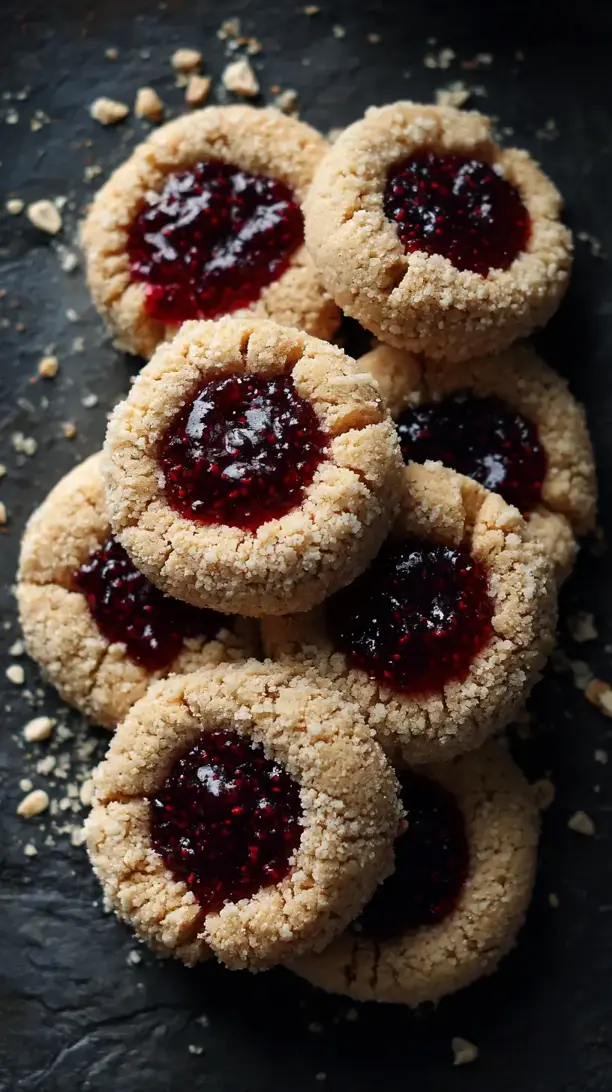
Vegan Thumbprint Cookies
Make perfect Vegan Thumbprint Cookies with this easy recipe! They're buttery, crumbly, and filled with jam. A classic treat made dairy-free. Bake a batch today!
Ingredients
For the Cookies:
-
210 g all-purpose flour
-
100 g refined coconut oil (solid)
-
80 g granulated sugar
-
3 tbsp plant-based milk (almond, oat, or soy work great)
-
1 tsp vanilla extract
-
½ tsp baking powder
-
¼ tsp salt
-
~6 tbsp your favorite jam or preserves
Instructions
-
Start by preheating your oven to 350°F (175°C) and lining a baking sheet with parchment paper. In a medium mixing bowl, whisk together the flour, baking powder, and salt.01
-
In a separate, larger bowl, combine the solid coconut oil and granulated sugar. Use a fork, a pastry cutter, or even your clean fingertips to work them together until the texture resembles coarse, wet sand.02
-
Pour in the plant-based milk and vanilla extract. Stir everything with a spatula until it’s just combined.03
-
Add the flour mixture to the wet ingredients. Gently fold and stir until a soft dough forms and there are no more dry patches of flour.04
-
Cover the bowl and refrigerate the dough for at least 15 minutes.05
-
Scoop the dough by the tablespoonful and roll it into smooth balls between your palms. Place them on your prepared baking sheet, spacing them about 2 inches apart.06
-
Use your thumb, the rounded end of a ½ teaspoon measure, or the handle of a wooden spoon to press a deep, clear indentation into the center of each dough ball.07
-
Spoon your jam into a small bowl and give it a quick stir to loosen it up. Carefully fill each thumbprint with about ½ teaspoon of jam.08
-
Bake for 14-16 minutes, or until the edges of the cookies are just starting to turn a very light golden brown. Let the cookies cool on the baking sheet for 10 minutes before transferring them to a wire rack to cool completely.09