Why You’ll Love This Vegan Eggnog Cookies
- They’re incredibly soft and chewy. The texture is just dreamy—a little crisp on the very edges giving way to a wonderfully soft and tender center that practically melts in your mouth.
- They pack a serious flavor punch. We’re not being shy with the spices here. Freshly grated nutmeg is the star, supported by cinnamon and a touch of rum extract that creates that classic, nostalgic eggnog taste without any actual alcohol.
- They’re surprisingly simple to make. No chilling the dough required! You can go from bowl to oven in about 15 minutes, which is a lifesaver when you have a last-minute cookie craving or an unexpected guest.
- They make your whole house smell like the holidays. Honestly, the aroma of these cookies baking is half the experience. It’s warm, spiced, and utterly comforting—a scent that just wraps you up in a cozy blanket of festive cheer.
Ingredients & Tools
- 115 g vegan butter, softened
- 150 g light brown sugar, packed
- 50 g granulated sugar
- 60 mL plant-based milk (oat or soy works best)
- 2 tsp rum extract
- 1 tsp vanilla extract
- 210 g all-purpose flour
- 1/2 tsp baking soda
- 1/2 tsp baking powder
- 1/2 tsp salt
- 1 1/2 tsp ground nutmeg (freshly grated is ideal)
- 1/2 tsp ground cinnamon
- For the glaze: 120 g powdered sugar, 2-3 tbsp plant-based milk, a pinch of nutmeg
Tools: Mixing bowls, electric hand mixer or stand mixer, baking sheets, parchment paper, cooling rack.
Using softened, not melted, vegan butter is the real key to the perfect texture here—it helps create that lovely chewy center. And while pre-ground nutmeg works, if you can get a whole nutmeg and grate it fresh… wow. The difference in aroma and flavor is honestly night and day.
Nutrition (per serving)
- Calories: 145 kcal
- Protein: 1.5 g
- Fat: 5 g
- Carbohydrates: 24 g
- Fiber: 0.5 g
Serves: 18 cookies | Prep Time: 15 minutes | Cook Time: 10-12 minutes | Total Time: 30 minutes
Before You Start: Tips & Ingredient Notes
- Get your butter to the right temperature. Your vegan butter should be soft enough that you can easily make an indentation with your finger, but not so soft that it’s oily or melted. This is crucial for achieving the perfect cookie texture and preventing them from spreading too much.
- Don’t skip the rum extract. I know it might seem like an optional ingredient, but it’s what gives these cookies that authentic, “eggnoggy” flavor. It doesn’t taste alcoholic—it just adds a warm, deep, and complex note that vanilla alone can’t provide.
- Measure your flour correctly. The trick is to spoon your flour into the measuring cup and level it off with a knife. Scooping directly from the bag can pack in too much flour, leading to dry, cakey cookies instead of soft and chewy ones.
- Freshness of spices matters. Ground spices lose their potency over time. If your nutmeg and cinnamon have been in the cupboard for over a year, their flavor will be muted. For the best, most vibrant taste, try to use spices that are less than six months old.
How to Make Vegan Eggnog Cookies
Step 1: First, preheat your oven to 175°C (350°F) and line your baking sheets with parchment paper. This little step is a lifesaver for cleanup and prevents any sticking. In a medium-sized bowl, whisk together your flour, baking soda, baking powder, salt, nutmeg, and cinnamon. Giving these dry ingredients a good whisk ensures the leavening agents and spices are evenly distributed, so every single cookie is perfectly spiced and rises just right.
Step 2: Now, in a larger bowl, add your softened vegan butter, brown sugar, and granulated sugar. Using an electric mixer, beat them together on medium speed for about 1-2 minutes. You’ll notice the mixture becomes paler in color and looks a little fluffy—this is what we want! It helps incorporate air, which contributes to a lighter cookie texture. You don’t need to cream it for a super long time, just until it’s well combined and smooth.
Step 3: To the butter and sugar mixture, pour in the plant-based milk, rum extract, and vanilla extract. Mix again on low speed until everything is just combined. It might look a little curdled or separated at this point—don’t panic! That’s completely normal and it will all come together beautifully once you add the dry ingredients.
Step 4: Here’s where we bring it all home. Gradually add your bowl of dry ingredients to the wet ingredients, mixing on low speed. The trick is to mix only until you no longer see streaks of flour. A few tiny flour spots are okay—overmixing is the enemy of a tender cookie! The dough will be quite soft and slightly sticky, which is exactly what we’re looking for.
Step 5: Using a cookie scoop or a tablespoon, portion out mounds of dough (about 1.5 tablespoons each) onto your prepared baking sheets, leaving about 5 cm (2 inches) between them. They don’t need to be perfectly round balls; a rough mound is fine as they will spread and settle as they bake.
Step 6: Bake for 10-12 minutes. You’ll know they’re done when the edges are set and look lightly golden, but the centers still appear soft and puffy. They might look a little underdone, but trust the process! They will continue to set up as they cool on the hot baking sheet. Let them rest on the pan for 5 full minutes before transferring them to a wire rack to cool completely.
Step 7: While the cookies cool, make the simple glaze. In a small bowl, whisk together the powdered sugar and 2 tablespoons of plant-based milk. You’re aiming for a thick but pourable consistency—if it’s too thick, add another half tablespoon of milk. Drizzle this glaze over the completely cooled cookies and finish with an extra tiny sprinkle of nutmeg on top for that beautiful, festive look.
Serving Suggestions
Complementary Dishes
- A platter of seasonal fruit — The bright, fresh acidity of clementines or pomegranate seeds provides a lovely contrast to the rich, spiced sweetness of the cookies.
- Vegan cheese board — A sharp, creamy vegan cashew cheese and some crunchy crackers create a sophisticated sweet-and-savory pairing that’s perfect for a holiday gathering.
- Spiced roasted nuts — A bowl of warm nuts tossed with rosemary and a touch of maple syrup echoes the warm spices in the cookies and adds a wonderful textural element.
Drinks
- Hot spiced apple cider — The warm, autumnal spices in the cider are a natural best friend to the nutmeg and rum flavors in the cookie, making each bite and sip feel extra cozy.
- Oat milk latte — The creamy, slightly sweet coffee cuts through the cookie’s sweetness perfectly, making for a delightful afternoon pick-me-up.
- Peppermint tea — The cool, refreshing notes of peppermint provide a crisp, clean finish that resets your palate after the rich, spiced cookie.
Something Sweet
- Vegan gingerbread — The bold molasses and ginger notes create a fantastic spice-forward duo that feels like a complete holiday dessert experience on a plate.
- Dark chocolate bark — A few pieces of simple, crunchy dark chocolate bark with sea salt offer a bitter counterpoint that makes the cookie’s sweetness truly sing.
- Vanilla bean ice cream — Sandwich a scoop of creamy vegan vanilla ice cream between two cookies for the ultimate, decadent ice cream sandwich that’s pure bliss.
Top Mistakes to Avoid
- Using melted butter. This is probably the number one reason cookies spread too much and become greasy. Softened butter creams with the sugar to create structure; melted butter just makes a puddle.
- Overbaking the cookies. I’ve messed this up before too—it’s so tempting to leave them in until they look “done.” But taking them out when the centers still look soft is the secret to a chewy, not crunchy, cookie. They firm up as they cool.
- Overmixing the dough. Once you add the flour, mix only until it’s incorporated. Overmixing develops the gluten in the flour, which can lead to tough, dense cookies instead of tender, delicate ones.
- Adding the glaze to warm cookies. If the cookies are even slightly warm, the glaze will just melt, slide right off, and create a sticky mess. Patience is key—let them cool completely on a rack first.
Expert Tips
- Tip: For an extra flavor boost, brown your vegan butter. Simply melt it in a saucepan over medium heat and continue to cook, swirling the pan, until it turns a deep golden brown and smells nutty. Let it re-solidify in the fridge before using. This adds a incredible depth of flavor that pairs wonderfully with the nutmeg.
- Tip: If your dough feels too soft or sticky to handle after mixing, you can pop the whole bowl in the fridge for 10-15 minutes. This will firm up the fats just enough to make scooping easier, without requiring a full chill.
- Tip: Use a cookie scoop! It’s not just for neatness. Using a scoop ensures all your cookies are the same size, which means they’ll bake evenly and all be done at the same time. No more half-burnt, half-underdone batches.
- Tip: Want a more pronounced “eggnog” flavor? Add a tiny pinch of ground cloves or allspice to the dry ingredients. A little goes a long way, but it can really amplify that classic holiday spice profile.
FAQs
Can I make these cookies without rum extract?
You can, but the flavor profile will be different. The rum extract is what gives that distinct, non-alcoholic “eggnog” taste. If you need to skip it, you could try using 1 teaspoon of vanilla extract and 1 teaspoon of almond extract for a different, but still delicious, nuanced flavor. You won’t get the same classic eggnog hit, but the cookies will still be wonderfully spiced and soft.
How should I store these cookies and how long do they last?
Once the glaze has fully set, store them in an airtight container at room temperature. They’ll stay soft and delicious for about 4-5 days. You can stack them with a small piece of parchment paper between layers to keep the glaze from sticking. Honestly, they’re best within the first three days, when the texture is at its peak chewiness.
Can I freeze the cookie dough?
Absolutely! This is a great make-ahead trick. Scoop the dough balls onto a parchment-lined tray and freeze them solid. Then, transfer the frozen dough balls to a freezer bag. You can bake them straight from frozen—just add 1-2 extra minutes to the baking time. It’s perfect for having fresh, warm cookies on demand during the busy holiday season.
My cookies didn’t spread much. What happened?
This usually points to the flour. If you measured your flour by scooping directly from the bag, you likely used too much, which absorbs more moisture and prevents spreading. Another culprit could be butter that wasn’t soft enough. Next time, try the spoon-and-level method for flour and make sure your butter is properly softened.
What’s the best plant-based milk to use here?
I find that oat milk and soy milk work best because of their higher fat and protein content, which mimics the richness of dairy milk more closely. Almond milk can work in a pinch, but it might result in a slightly less tender cookie. I’d avoid very thin milks like rice milk, as they can throw off the dough’s hydration.
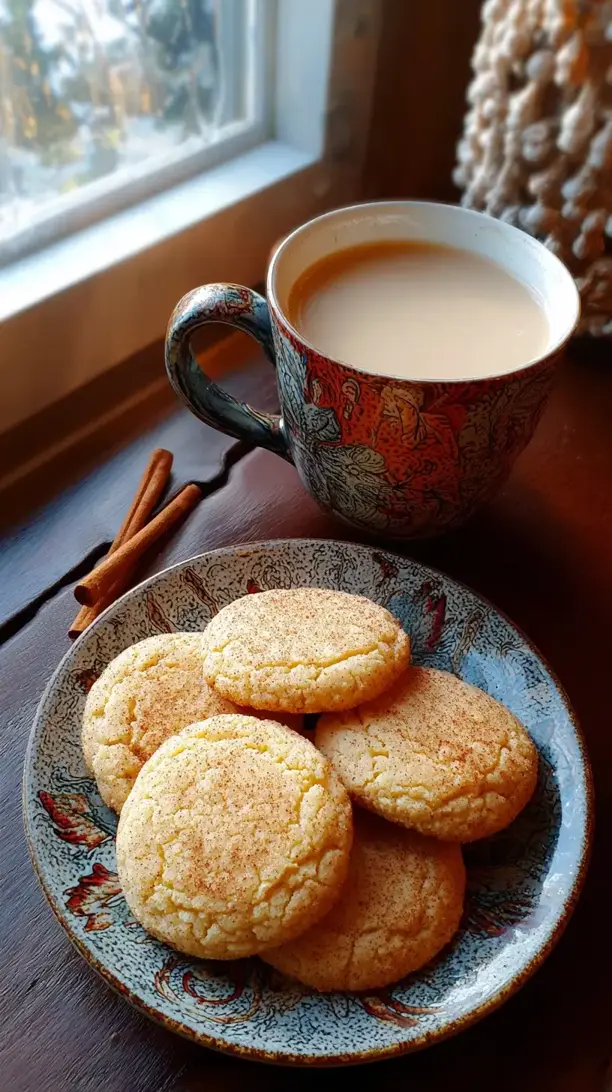
Vegan Eggnog Cookies
Bake the perfect soft & chewy Vegan Eggnog Cookies! This easy recipe captures classic holiday flavors without dairy or eggs. Get the festive recipe now!
Ingredients
For the cookies:
-
115 g vegan butter (softened)
-
150 g light brown sugar (packed)
-
50 g granulated sugar
-
60 mL plant-based milk (oat or soy works best)
-
2 tsp rum extract
-
1 tsp vanilla extract
-
210 g all-purpose flour
-
1/2 tsp baking soda
-
1/2 tsp baking powder
-
1/2 tsp salt
-
1 1/2 tsp ground nutmeg (freshly grated is ideal)
-
1/2 tsp ground cinnamon
For the glaze:
-
120 g powdered sugar
-
2-3 tbsp plant-based milk
-
a pinch nutmeg
Instructions
-
First, preheat your oven to 175°C (350°F) and line your baking sheets with parchment paper. In a medium-sized bowl, whisk together your flour, baking soda, baking powder, salt, nutmeg, and cinnamon.01
-
Now, in a larger bowl, add your softened vegan butter, brown sugar, and granulated sugar. Using an electric mixer, beat them together on medium speed for about 1-2 minutes.02
-
To the butter and sugar mixture, pour in the plant-based milk, rum extract, and vanilla extract. Mix again on low speed until everything is just combined.03
-
Gradually add your bowl of dry ingredients to the wet ingredients, mixing on low speed. Mix only until you no longer see streaks of flour.04
-
Using a cookie scoop or a tablespoon, portion out mounds of dough (about 1.5 tablespoons each) onto your prepared baking sheets, leaving about 5 cm (2 inches) between them.05
-
Bake for 10-12 minutes. Let them rest on the pan for 5 full minutes before transferring them to a wire rack to cool completely.06
-
While the cookies cool, make the simple glaze. In a small bowl, whisk together the powdered sugar and 2 tablespoons of plant-based milk. Drizzle this glaze over the completely cooled cookies and finish with an extra tiny sprinkle of nutmeg on top.07