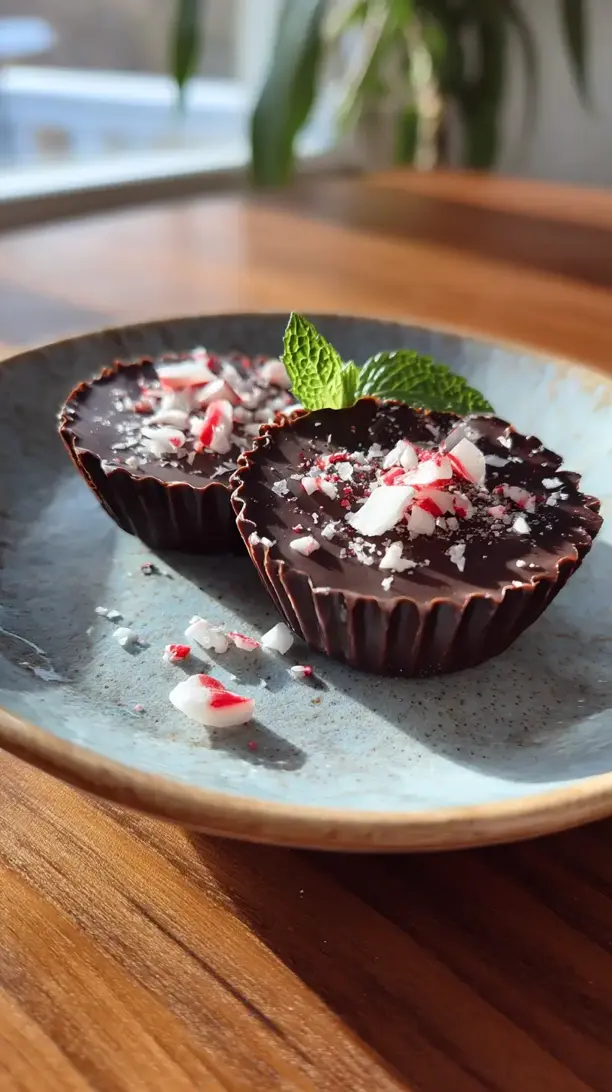
Why You’ll Love This Vegan Chocolate Peppermint Cups
- Incredibly Easy to Customize. You can make these as minty or as chocolate-forward as you like. Feel like adding a sprinkle of sea salt on top? Go for it. It’s your kitchen, your rules.
- Surprisingly Simple Process. Honestly, if you can melt chocolate and stir a filling, you’ve got this. There’s no baking involved, and the active time is really minimal—most of the work is just waiting for them to set.
- The Perfect Make-Ahead Treat. These cups freeze beautifully, meaning you can have a stash of homemade chocolate treats ready for any occasion, from a last-minute guest to a serious need for something sweet.
- A Textural Dream. You get the crisp snap of the dark chocolate shell, the velvety-smooth peppermint filling, and the delightful crunch from the crushed candy canes. It’s a party in your mouth.
Ingredients & Tools
- 200 g high-quality vegan dark chocolate (at least 70% cocoa), chopped
- 1/2 cup full-fat coconut milk (from a can, well-shaken)
- 1/4 cup coconut oil, refined for no coconut taste
- 2–3 tbsp maple syrup, or to taste
- 1 tsp pure peppermint extract
- A pinch of sea salt
- 2 vegan candy canes or 1/4 cup crushed peppermint candies, for topping
Tools: Silicone mini muffin mold or paper liners, small saucepan, heatproof bowl, small whisk, rolling pin or food processor for crushing candy.
The quality of your chocolate really is the star here, so don’t skimp. A good vegan dark chocolate will give you that professional-looking snap and deep flavor. And using refined coconut oil ensures you get all the magic of its setting properties without any competing coconut flavor.
Nutrition (per serving)
- Calories: 145 kcal
- Protein: 1 g
- Fat: 10 g
- Carbohydrates: 14 g
- Fiber: 2 g
Serves: 12 | Prep Time: 20 mins | Cook Time: 5 mins | Total Time: 1 hour 25 mins (includes setting)
Before You Start: Tips & Ingredient Notes
- Chocolate Choice is Key. Read the label to ensure it’s dairy-free. Chocolate chips often have stabilizers that can make tempering tricky, so a good baking bar that you chop yourself is your best bet for a perfect shell.
- Don’t Skip the Sea Salt. That tiny pinch does wonders. It cuts through the sweetness and enhances both the chocolate and mint flavors, making everything pop in a more sophisticated way.
- Controlling the Mint. Peppermint extract potency can vary. Start with a teaspoon, mix your filling, and taste. You can always add more, but you can’t take it out. Remember, the flavor will mellow slightly as it sets.
- The Magic of Your Molds. A silicone mold is a dream for this—they pop out effortlessly. If you’re using paper liners in a muffin tin, that works too, but the final shape might be a little less defined.
How to Make Vegan Chocolate Peppermint Cups
Step 1: First, prepare your peppermint candy topping. Unwrap your vegan candy canes and place them in a sturdy zip-top bag. Use a rolling pin to crush them into small, festive pieces. You want a mix of fine powder and little chunks for that great texture. Set this aside for later—it’s the finishing touch that makes them look so pretty.
Step 2: Now, let’s create the chocolate shells. Place about two-thirds of your chopped chocolate and half of the coconut oil in a heatproof bowl. Set this bowl over a small saucepan of gently simmering water, making sure the bottom of the bowl doesn’t touch the water. Stir gently and consistently until the chocolate is completely melted and glossy. This is your base layer.
Step 3: Using a small spoon, carefully spoon the melted chocolate into your 12 mini muffin molds. You want to coat the bottom and push the chocolate up the sides to form a little cup. Don’t make it too thick, or you’ll run out of chocolate! Once all molds have their base, tap the tray firmly on the counter to settle the chocolate and remove any air bubbles.
Step 4: This is the crucial chilling step. Pop the entire tray into the freezer for about 15 minutes. You’ll know they’re ready when the chocolate has set firm and lost its shine. This creates a solid barrier so the filling won’t seep through later.
Step 5: While the shells are setting, make the peppermint filling. In a clean bowl, whisk together the coconut milk, the remaining coconut oil, maple syrup, peppermint extract, and that all-important pinch of sea salt. Whisk until it’s completely smooth and emulsified. Give it a taste—this is your chance to adjust the mint or sweetness to your liking.
Step 6: Take your set chocolate shells out of the freezer. Carefully spoon the peppermint filling into the center of each cup, leaving a small border at the top. You don’t want to overfill them, or the final chocolate layer won’t seal properly. A little goes a long way here.
Step 7: Time for the final chocolate layer. Gently re-melt the remaining one-third of your chopped chocolate with the last bit of coconut oil. Once smooth, spoon it over the peppermint filling, sealing the edges completely. Act relatively quickly before the filling starts to warm the base. The top should be smooth and covered.
Step 8: Immediately after adding the top chocolate layer, sprinkle your crushed candy canes generously over each cup. The chocolate is still soft, so the candy will stick perfectly. This is where they transform from simple cups to beautiful, festive treats.
Step 9: Back into the freezer they go for the final set. Let them chill for at least 45 minutes to an hour, until they are completely firm throughout. Patience is a virtue here—if you try to pop them out too early, they might break.
Step 10: The grand finale! Remove the cups from the freezer. If using a silicone mold, they should pop out with a gentle push from the bottom. If they’re being stubborn, let them sit at room temperature for just a minute. Transfer to a plate and let them sit for about 5 minutes before serving to take the deep freeze edge off. Enjoy that perfect snap!
Serving Suggestions
Complementary Dishes
- A warm mug of spiced chai — The warm spices of cardamom and cinnamon create a cozy contrast to the cool, refreshing mint in the cups, making for a wonderfully balanced flavor experience.
- A simple fruit platter with oranges and pears — The bright, fresh acidity of the fruit cuts through the richness of the chocolate, cleansing the palate and making each bite of the cup taste new again.
Drinks
- Iced oat milk latte — The creamy, slightly nutty flavor of the latte complements the dark chocolate beautifully without overpowering the delicate peppermint notes.
- Sparkling water with a lime twist — Sometimes you just need something clean and bubbly to reset your taste buds between indulgent bites, and this does the job perfectly.
Something Sweet
- Chewy ginger molasses cookies — The warm, spicy kick of ginger is a classic partner for both chocolate and mint, creating a holiday-themed dessert platter that feels incredibly special.
- Vanilla bean coconut ice cream — Serving a cup perched on a small scoop of ice cream turns it into a next-level sundae. The vanilla provides a creamy, neutral base that lets the cups truly shine.
Top Mistakes to Avoid
- Mistake: Rushing the setting time. I’ve been impatient too, but if the chocolate shell isn’t fully set before you add the filling, the two layers will mix and you’ll lose that beautiful defined look and texture.
- Mistake: Using low-quality chocolate. Since chocolate is the main ingredient, a waxy or poorly flavored bar will result in a waxy and poorly flavored final product. It’s worth the extra dollar for a good one.
- Mistake> Overheating the chocolate. If you get it too hot, it can seize or become grainy. Gentle, indirect heat is the name of the game. If it does seize, a tiny splash of neutral oil can sometimes save it.
- Mistake: Adding the candy topping too late. If you wait until the final chocolate layer has started to set, the candy pieces won’t stick and will just roll right off. Sprinkle immediately!
Expert Tips
- Tip: Create a double boiler with a bowl. If you don’t have a dedicated double boiler, just place a heatproof bowl on top of a saucepan with simmering water. It gives you the gentle, controlled heat you need for perfect chocolate melting.
- Tip: Use a piping bag for neat layers. For the absolute tidiest cups, put your melted chocolate and filling into separate piping bags or zip-top bags with a corner snipped off. You’ll have so much more control.
- Tip: Grate a little chocolate for a different look. If you’re out of candy canes or want a less crunchy top, finely grate a little extra vegan chocolate over the top before it sets for an elegant, professional finish.
- Tip: Warm your spoon for the filling. Dipping your spoon in hot water and drying it quickly before scooping the coconut milk filling makes it glide off the spoon smoothly, preventing messy drips.
FAQs
Can I use milk chocolate instead of dark?
You absolutely can, just double-check that the vegan milk chocolate you choose melts well. The cups will be significantly sweeter, so you might want to reduce the maple syrup in the peppermint filling by about a tablespoon to balance it out. The contrast between the sweet shell and minty center will be different, but still delicious.
How long do these keep, and where should I store them?
These are best stored in an airtight container in the freezer for up to a month. The freezer is key because it keeps the perfect snappy texture. In the fridge, they’ll be a bit softer and can sometimes develop condensation. Let them sit at room temperature for 5-10 minutes before eating for the ideal bite.
My coconut milk filling is separating, what did I do wrong?
This usually happens if your ingredients are at wildly different temperatures. Make sure your coconut milk and coconut oil are both at room temperature before you whisk them together. If it does separate, don’t panic—just keep whisking vigorously. It should eventually come together into a smooth, homogenous mixture.
Can I make these without any added sugar?
You can, but the texture and setting ability will change. The maple syrup adds body and sweetness to the filling. If you omit it, the filling will be much softer and less creamy. You could experiment with a sugar-free syrup alternative, but I haven’t tested that myself, so results may vary.
Is there a substitute for coconut oil?
Coconut oil is what gives the chocolate its firm, snappy texture at room temperature and its easy-melting quality. It’s hard to replicate. Cacao butter would be the only real substitute, but it has a distinct flavor and can be harder to find. I’d really recommend sticking with the coconut oil for the best results.
Vegan Chocolate Peppermint Cups
Make these easy Vegan Chocolate Peppermint Cups with a creamy peppermint filling and crunchy candy topping. A dairy-free holiday treat everyone will love. Get the recipe!
Ingredients
For the Ingredients
-
200 g high-quality vegan dark chocolate (at least 70% cocoa, chopped)
-
1/2 cup full-fat coconut milk (from a can, well-shaken)
-
1/4 cup coconut oil (refined for no coconut taste)
-
2–3 tbsp maple syrup (or to taste)
-
1 tsp pure peppermint extract
-
A pinch sea salt
-
2 vegan candy canes (or 1/4 cup crushed peppermint candies, for topping)
Instructions
-
First, prepare your peppermint candy topping. Unwrap your vegan candy canes and place them in a sturdy zip-top bag. Use a rolling pin to crush them into small, festive pieces. You want a mix of fine powder and little chunks for that great texture. Set this aside for later—it’s the finishing touch that makes them look so pretty.01
-
Now, let's create the chocolate shells. Place about two-thirds of your chopped chocolate and half of the coconut oil in a heatproof bowl. Set this bowl over a small saucepan of gently simmering water, making sure the bottom of the bowl doesn't touch the water. Stir gently and consistently until the chocolate is completely melted and glossy. This is your base layer.02
-
Using a small spoon, carefully spoon the melted chocolate into your 12 mini muffin molds. You want to coat the bottom and push the chocolate up the sides to form a little cup. Don't make it too thick, or you'll run out of chocolate! Once all molds have their base, tap the tray firmly on the counter to settle the chocolate and remove any air bubbles.03
-
This is the crucial chilling step. Pop the entire tray into the freezer for about 15 minutes. You’ll know they’re ready when the chocolate has set firm and lost its shine. This creates a solid barrier so the filling won’t seep through later.04
-
While the shells are setting, make the peppermint filling. In a clean bowl, whisk together the coconut milk, the remaining coconut oil, maple syrup, peppermint extract, and that all-important pinch of sea salt. Whisk until it’s completely smooth and emulsified. Give it a taste—this is your chance to adjust the mint or sweetness to your liking.05
-
Take your set chocolate shells out of the freezer. Carefully spoon the peppermint filling into the center of each cup, leaving a small border at the top. You don’t want to overfill them, or the final chocolate layer won’t seal properly. A little goes a long way here.06
-
Time for the final chocolate layer. Gently re-melt the remaining one-third of your chopped chocolate with the last bit of coconut oil. Once smooth, spoon it over the peppermint filling, sealing the edges completely. Act relatively quickly before the filling starts to warm the base. The top should be smooth and covered.07
-
Immediately after adding the top chocolate layer, sprinkle your crushed candy canes generously over each cup. The chocolate is still soft, so the candy will stick perfectly. This is where they transform from simple cups to beautiful, festive treats.08
-
Back into the freezer they go for the final set. Let them chill for at least 45 minutes to an hour, until they are completely firm throughout. Patience is a virtue here—if you try to pop them out too early, they might break.09
-
The grand finale! Remove the cups from the freezer. If using a silicone mold, they should pop out with a gentle push from the bottom. If they’re being stubborn, let them sit at room temperature for just a minute. Transfer to a plate and let them sit for about 5 minutes before serving to take the deep freeze edge off. Enjoy that perfect snap!10