Why You’ll Love This Turkey Chili with White Beans
- It’s a lighter, brighter take on classic chili. By using lean ground turkey, we’re creating a dish that’s satisfying but won’t leave you feeling weighed down. The flavor profile is somehow both robust and fresh, which is a really nice change of pace.
- The texture is absolutely spot-on. The combination of the finely crumbled turkey and the creamy, soft white beans is just perfect. You get a wonderful mix in every single spoonful, and it’s not at all mushy.
- It’s a true one-pot wonder. From browning the turkey to simmering the final chili, everything happens in one sturdy pot. That means less cleanup and more time to enjoy that incredible smell wafting from your kitchen.
- It’s incredibly versatile and meal-prep friendly. This chili is fantastic right after you make it, but honestly, it might be even better the next day. The flavors have time to really get to know each other, and it reheats like a dream for easy lunches or dinners.
Ingredients & Tools
- 1 tbsp olive oil or avocado oil
- 1 large yellow onion, finely diced
- 1 red bell pepper, diced
- 3 cloves garlic, minced
- 1 lb lean ground turkey (93/7 works great)
- 2 tbsp tomato paste
- 1 tbsp chili powder
- 1 ½ tsp ground cumin
- 1 tsp dried oregano
- ½ tsp smoked paprika
- 1 (28 oz) can crushed tomatoes
- 2 cups chicken or vegetable broth, low sodium
- 2 (15 oz) cans cannellini beans, rinsed and drained
- 1 bay leaf (optional, but lovely)
- Kosher salt and freshly ground black pepper, to taste
- For serving: Fresh cilantro, diced avocado, a squeeze of lime juice, plain Greek yogurt or sour cream
Tools: A large Dutch oven or heavy-bottomed soup pot is essential here.
A quick note on the beans—cannellini beans are my favorite for their creamy texture, but great northern beans would work just as well. And don’t skip rinsing them! It removes that excess sodium and the liquid they’re packed in, so your chili isn’t cloudy or too salty. The smoked paprika is also a little secret weapon; it adds a subtle depth that makes the whole dish sing.
Serves: 4-6 | Prep Time: 15 minutes | Cook Time: 35 minutes | Total Time: 50 minutes
Before You Start: Tips & Ingredient Notes
- Why lean ground turkey? Using a leaner grind (like 93/7) means there’s less fat to drain off after browning. It keeps things light and ensures the spices and other flavors are the stars of the show, not the grease.
- Don’t rush the onion and pepper. Taking the time to sauté the onion and bell pepper until they’re truly soft and sweet is a foundational step. It builds a flavor base that you just can’t get if they’re still crunchy.
- The tomato paste needs a minute to cook. After you add the tomato paste to the turkey and veggies, let it cook for a full minute, stirring constantly. You’ll notice its color darken slightly—this cooks out any raw, tinny taste and gives it a richer, sweeter flavor.
- Toast your spices! Adding the chili powder, cumin, oregano, and smoked paprika directly to the pot and stirring them for 30 seconds before adding the liquid wakes them up. The heat releases their essential oils, making their flavor much more pronounced and aromatic.
How to Make Turkey Chili with White Beans
Step 1: Heat the oil in your large Dutch oven or pot over medium heat. Once the oil shimmers, add the diced onion and red bell pepper. Cook, stirring occasionally, for about 5-7 minutes, until they’ve softened and the onion turns translucent. You’ll notice the kitchen starting to smell amazing already. Add the minced garlic and cook for just one more minute until it’s fragrant—be careful not to let it burn!
Step 2: Push the vegetables to the side of the pot and add the ground turkey to the center. Use a wooden spoon or spatula to break it up into small crumbles. Let it cook undisturbed for a minute or two to get a little color on one side, then continue to break it up and cook until it’s no longer pink, about 5-6 minutes total.
Step 3: This is where the magic happens. Add the tomato paste to the turkey and vegetable mixture. Stir it in so everything is coated and let it cook for a full minute. You should see the paste darken a shade. Now, sprinkle all the dried spices—the chili powder, cumin, oregano, and smoked paprika—over everything. Stir constantly for about 30 seconds. The aroma will be incredible, I promise.
Step 4: Pour in the crushed tomatoes and the broth, and give everything a good stir to combine, scraping up any browned bits from the bottom of the pot—that’s pure flavor! Add the rinsed cannellini beans and the bay leaf, if using. Bring the chili to a boil, then immediately reduce the heat to low so it maintains a gentle simmer.
Step 5: Partially cover the pot with a lid and let the chili simmer for at least 20-25 minutes. This isn’t just about cooking the ingredients; it’s about letting the flavors meld and the liquid reduce slightly to a thicker, heartier consistency. Stir it occasionally to prevent sticking. Taste it and season generously with salt and pepper—this is crucial as it brings all the flavors into balance.
Step 6: Once the chili has thickened to your liking, turn off the heat. Remove the bay leaf. Let it sit for about 5 minutes before serving; this allows it to settle and cool down to the perfect eating temperature. Ladle it into bowls and top with all your favorite fixings. The contrast of the cool, creamy avocado and the bright lime juice is just perfection.
Serving Suggestions
Complementary Dishes
- A simple green salad with a lime vinaigrette — The crisp, acidic salad cuts through the richness of the chili beautifully and adds a fresh element to the meal.
- Skillet cornbread or warm tortillas — Something soft and bready is perfect for sopping up every last bit of chili from the bowl. The slight sweetness of cornbread is a classic pairing for a reason.
- Seasonal roasted vegetables — If you want to keep it super light, a side of roasted broccoli or zucchini adds a nice textural contrast and makes the meal feel even more well-rounded.
Drinks
- A crisp, Mexican lager — The light, clean flavor of a beer like this is a fantastic palate cleanser between bites of the spiced chili.
- Sparkling water with a wedge of lime — For a non-alcoholic option, the bubbles and citrus are incredibly refreshing and help balance the warmth of the spices.
- A light-bodied red wine like a Pinot Noir — It has enough fruitiness to complement the tomatoes without overpowering the delicate turkey flavor.
Something Sweet
- Orange slices sprinkled with cinnamon — It’s a simple, healthy, and surprisingly delightful way to end the meal. The citrus feels clean and bright.
- A small square of dark chocolate — A little bite of something rich and slightly bitter is the perfect finish after a savory, spiced main course.
- Churros or cinnamon sugar dusted tortilla chips — If you’re feeling indulgent, this carries the Mexican-inspired theme through to dessert in the most delicious way.
Top Mistakes to Avoid
- Mistake: Not browning the turkey properly. If you just stir the turkey constantly from the second it hits the pan, it will steam and turn gray rather than developing those tasty, browned bits. Let it sit for a minute to get some color—it makes a huge difference in flavor.
- Mistake: Adding the spices with the liquid. I’ve messed this up before too… if you add the spices directly to the broth, their flavor doesn’t get a chance to bloom and will taste muted. Toasting them in the fat is non-negotiable for the best flavor.
- Mistake: Skipping the taste and season step at the end. Canned tomatoes and broths have varying salt levels. Waiting until the end to add salt allows you to season it perfectly for your palate. Undersalting is the number one reason a homemade chili can taste bland.
- Mistake: Boiling the chili vigorously after adding the beans. A gentle simmer is all you need. A rolling boil can cause the beans to break down and become mushy, and we want them to stay whole and creamy.
Expert Tips
- Tip: Make it a day ahead. Seriously, the flavor development overnight is incredible. Just cool it completely, store it in the fridge, and gently reheat it the next day. It’s a meal-prepper’s dream.
- Tip: Use an immersion blender for a thicker chili. If you prefer a less brothy, more cohesive chili, use an immersion blender to pulse it just a few times right in the pot. This will break down some of the beans and tomatoes to create a thicker base while still leaving plenty of texture.
- Tip: Freeze individual portions. This chili freezes exceptionally well. Let it cool completely, then portion it into freezer-safe containers or bags. It’s a lifesaver for a future quick dinner—just thaw and reheat.
- Tip: Amp up the heat if you like it spicy. Feel free to add a diced jalapeño (with seeds for more heat) along with the bell pepper, or add a pinch of cayenne pepper with the other spices. Customize it to your preferred spice level.
FAQs
Can I use ground chicken instead of turkey?
Absolutely! Lean ground chicken would work perfectly here as a substitute. The flavor and texture are very similar. You could even use a mix of the two if you have some of each to use up. The cooking method and times would remain exactly the same. The key is just to use a lean protein that will absorb all those wonderful spices.
Can I make this chili in a slow cooker?
Yes, you can! You’ll want to complete the first three steps on the stovetop—sautéing the veggies, browning the turkey, and toasting the spices and tomato paste. This step is important for building flavor. Then, transfer everything to your slow cooker, add the beans and broth, and stir. Cook on LOW for 6-7 hours or on HIGH for 3-4 hours. It’s a great hands-off method.
My chili is too thin. How can I thicken it?
The easiest way is to let it simmer uncovered for an additional 10-15 minutes to allow more liquid to evaporate. If you’re still in a hurry, you can make a quick slurry: mix one tablespoon of cornstarch with two tablespoons of cold water until smooth, then stir it into the simmering chili. It should thicken up within a minute or two. The slurry trick is a real lifesaver!
What other beans can I use?
While cannellini beans are classic for white chili, you have options! Great Northern beans are almost identical. For a slightly different texture, you could try navy beans. I’d avoid kidney beans in this particular recipe as they have a much stronger, earthier flavor that might overpower the more delicate turkey and spices. Stick with the mild, creamy white beans.
How long will leftovers last in the fridge?
Stored in an airtight container, your turkey chili will keep beautifully in the refrigerator for 3-4 days. You’ll probably find it tastes even better on day two or three. When reheating, do so gently on the stovetop over medium-low heat, or in the microwave, stirring occasionally until heated through. If it seems a bit thick, just add a splash of broth or water to loosen it up.
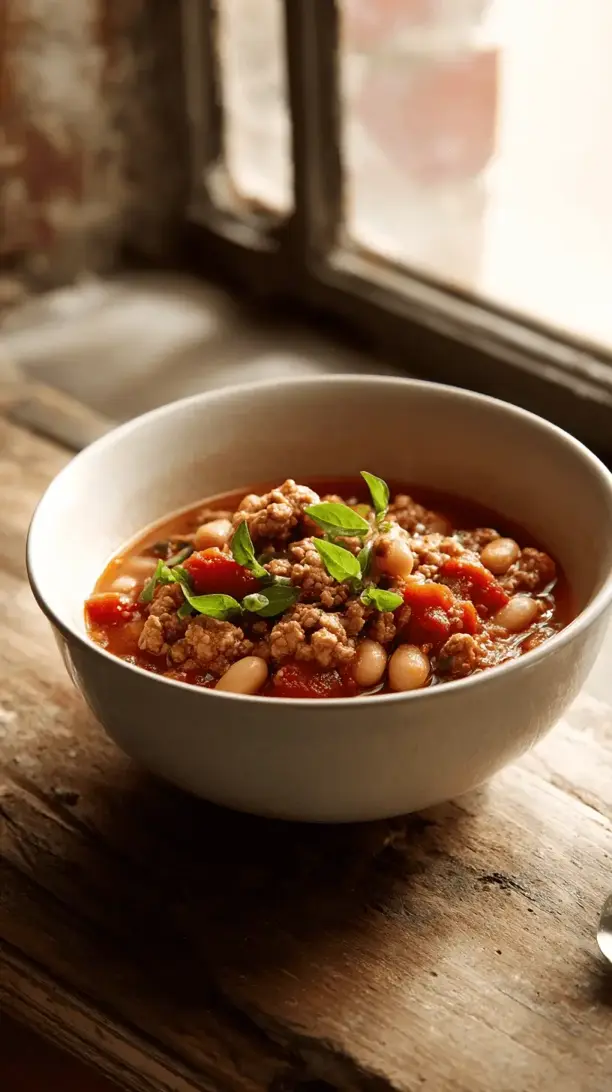
Turkey Chili With White Beans
Whip up this hearty Turkey Chili with White Beans! A lighter twist on classic chili that's packed with flavor. Easy one-pot meal ready in 50 minutes. Perfect for cozy dinners & meal prep.
Ingredients
Ingredients
-
1 tbsp olive oil or avocado oil
-
1 large yellow onion (finely diced)
-
1 red bell pepper (diced)
-
3 cloves garlic (minced)
-
1 lb lean ground turkey (93/7 works great)
-
2 tbsp tomato paste
-
1 tbsp chili powder
-
1.5 tsp ground cumin
-
1 tsp dried oregano
-
0.5 tsp smoked paprika
-
1 can crushed tomatoes (28 oz can)
-
2 cups chicken or vegetable broth (low sodium)
-
2 cans cannellini beans (15 oz cans, rinsed and drained)
-
1 bay leaf (optional, but lovely)
-
Kosher salt and freshly ground black pepper (to taste)
Instructions
-
Heat the oil in your large Dutch oven or pot over medium heat. Once the oil shimmers, add the diced onion and red bell pepper. Cook, stirring occasionally, for about 5-7 minutes, until they've softened and the onion turns translucent. You'll notice the kitchen starting to smell amazing already. Add the minced garlic and cook for just one more minute until it's fragrant—be careful not to let it burn!01
-
Push the vegetables to the side of the pot and add the ground turkey to the center. Use a wooden spoon or spatula to break it up into small crumbles. Let it cook undisturbed for a minute or two to get a little color on one side, then continue to break it up and cook until it's no longer pink, about 5-6 minutes total.02
-
This is where the magic happens. Add the tomato paste to the turkey and vegetable mixture. Stir it in so everything is coated and let it cook for a full minute. You should see the paste darken a shade. Now, sprinkle all the dried spices—the chili powder, cumin, oregano, and smoked paprika—over everything. Stir constantly for about 30 seconds. The aroma will be incredible, I promise.03
-
Pour in the crushed tomatoes and the broth, and give everything a good stir to combine, scraping up any browned bits from the bottom of the pot—that's pure flavor! Add the rinsed cannellini beans and the bay leaf, if using. Bring the chili to a boil, then immediately reduce the heat to low so it maintains a gentle simmer.04
-
Partially cover the pot with a lid and let the chili simmer for at least 20-25 minutes. This isn't just about cooking the ingredients; it's about letting the flavors meld and the liquid reduce slightly to a thicker, heartier consistency. Stir it occasionally to prevent sticking. Taste it and season generously with salt and pepper—this is crucial as it brings all the flavors into balance.05
-
Once the chili has thickened to your liking, turn off the heat. Remove the bay leaf. Let it sit for about 5 minutes before serving; this allows it to settle and cool down to the perfect eating temperature. Ladle it into bowls and top with all your favorite fixings. The contrast of the cool, creamy avocado and the bright lime juice is just perfection.06