
Why You’ll Love This Strawberry Banana Smoothie Cup
- It’s a textural dream. Unlike a drinkable smoothie, this cup has a wonderfully thick, almost mousse-like consistency that’s incredibly satisfying to eat with a spoon. Every bite is a mix of creamy base and little bursts of fresh fruit.
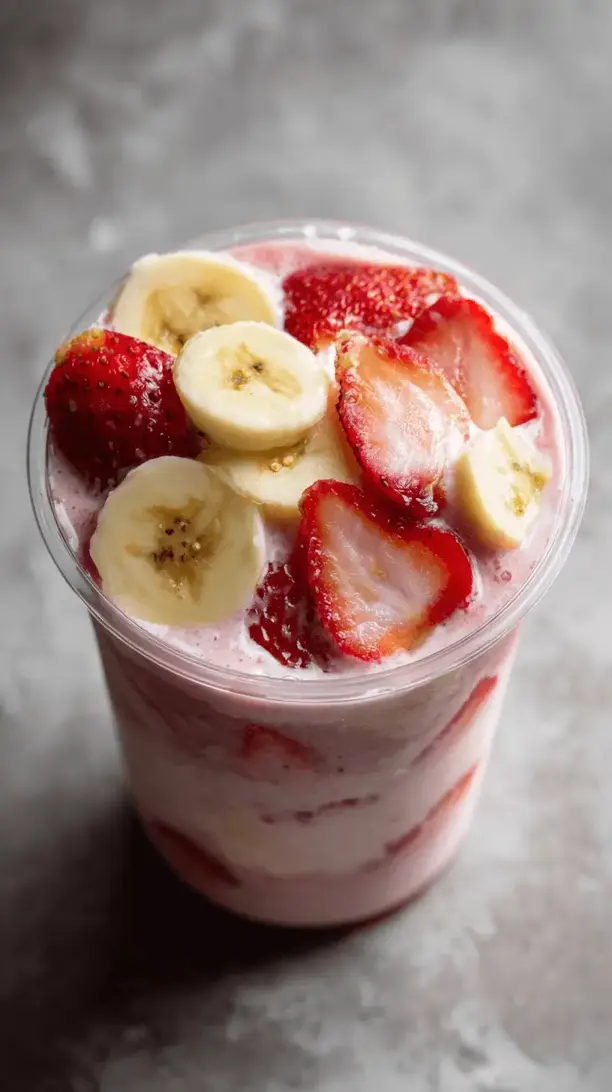
- Endlessly customizable. This recipe is your perfect canvas. Once you’ve got the base down, you can go wild with toppings—granola for crunch, chia seeds for a boost, or extra berries for a fresh, tart pop.
- Meal prep magic. You can whip up a couple of these cups the night before, keep them in the fridge, and wake up to a no-fuss, ready-to-eat breakfast. It’s a lifesaver for busy mornings.
- Naturally sweet and satisfying. The ripe banana and strawberries provide all the sweetness you need, making this a treat that feels indulgent without any added sugars. It’s honestly the kind of healthy habit that’s easy to stick with.
Ingredients & Tools
- 1 large ripe banana (the spottier, the better!)
- 1 cup frozen strawberries
- 1/2 cup thick Greek yogurt (plain or vanilla)
- 1/4 cup milk (dairy or your favorite plant-based alternative)
- 1 tablespoon honey or maple syrup (optional, depending on your sweetness preference)
- 1/2 teaspoon vanilla extract
Tools: A good blender, a spatula, and your favorite serving cups or jars.
The frozen strawberries are the real key here—they eliminate the need for ice, which can water things down, and instead give us that gloriously thick, scoopable texture. And that ripe banana? It’s not just for sweetness; it’s the secret to the creamy, smooth body of the cup. A little goes a long way.
Serves: 1 | Prep Time: 5 minutes | Cook Time: 0 minutes | Total Time: 5 minutes
Before You Start: Tips & Ingredient Notes
- Banana ripeness is non-negotiable. You really want that banana to be covered in brown spots. This ensures maximum natural sweetness and the creamiest possible blend. A green-tipped banana will leave your smoothie cup tasting a bit bland and starchy.
- Why frozen fruit? Using frozen strawberries is the trick to achieving a thick, spoonable consistency without dilution. If you only have fresh berries, you’ll need to add a handful of ice cubes, but the texture won’t be quite as luxuriously dense.
- The yogurt matters. Go for a thick, strained yogurt like Greek or Icelandic skyr. Thinner yogurts will make your smoothie cup too runny. The thickness here acts as a stabilizer, giving the cup its structure.
- Taste before you sweeten. Blend everything first, then give it a taste. Between the ripe banana and potentially sweetened yogurt, you might find you don’t need the extra honey or maple syrup at all. It’s all about your personal preference.
How to Make Strawberry Banana Smoothie Cup
Step 1: Get everything ready. This is the “mise en place” moment—it makes the whole process lightning fast. Add your frozen strawberries, the peeled ripe banana (break it into chunks as you drop it in), the Greek yogurt, milk, and vanilla extract directly into the blender jar. If you’re using the optional sweetener, add it now. You’ll notice the order doesn’t matter too much, but starting with the frozen fruit on the bottom can help your blender get a better grip.
Step 2: The initial pulse. Now, here’s a pro tip: don’t just blast it on high speed right away. Start by pulsing the blender a few times. This breaks up the big frozen pieces without straining the motor. You’ll hear a chunky, crumbly sound at first—that’s exactly what you want. After a few pulses, the mixture should look like coarse, colorful gravel.
Step 3: Blend to creamy perfection. Once the big chunks are broken down, you can switch the blender to a continuous low speed, gradually increasing to high. You might need to stop and use your spatula to scrape down the sides once. The trick is to blend until the mixture is completely smooth, thick, and has a soft-serve ice cream consistency. It should mound on a spoon and not immediately run off.
Step 4: The taste test and texture check. Stop the blender and dip a spoon in. Taste it! Is it sweet enough? If not, add a drizzle of your sweetener and blend for another 10 seconds. The texture should be incredibly thick—if it’s too thick for your blender to process, add just one more tablespoon of milk to help it along. Remember, we can add liquid, but we can’t take it away.
Step 5: Assemble and enjoy immediately. Use your spatula to scoop every last bit of that beautiful pink creaminess into your serving cup. If you’re adding toppings, now’s the time to get creative. Then, grab a spoon and dive right in. The beauty of this recipe is its instant gratification—it’s best enjoyed fresh when the texture is at its peak.
Serving Suggestions
Complementary Dishes
- A side of whole-grain toast with almond butter — The toast adds a warm, savory element and some staying power, making your smoothie cup part of a more complete and satisfying breakfast.
- A soft-boiled egg — For a fantastic protein-packed balance, the richness of the egg yolk contrasts beautifully with the bright, fruity flavors of the cup.
- A small handful of savory roasted nuts — Something like rosemary-roasted almonds on the side provides a salty, crunchy counterpoint that makes the smoothie cup taste even sweeter and more dessert-like.
Drinks
- A hot cup of green tea — The slight bitterness and earthy notes of the tea cleanse the palate between spoonfuls and enhance the fruity freshness without competing.
- A glass of sparkling water with a lime wedge — The effervescence is incredibly refreshing and acts as a palate cleanser, making each bite of the smoothie cup taste brand new.
- A cold brew coffee — If you’re a coffee person, the deep, smooth flavor of cold brew is a classic and perfect pairing for this morning treat.
Something Sweet
- A small, dark chocolate square — Let a piece of high-cocoa dark chocolate melt on your tongue after your last spoonful. It’s a sophisticated, barely-there sweet finish that doesn’t overwhelm.
- A drizzle of warm almond butter on top — This blurs the line between ingredient and dessert, adding a rich, nutty sweetness that feels incredibly indulgent.
- A few fresh raspberries — Their tartness is a perfect little burst after the creamy, sweet main event, leaving a clean, fresh taste in your mouth.
Top Mistakes to Avoid
- Mistake: Using fresh fruit instead of frozen. This is the number one reason a smoothie cup turns out runny. Fresh berries contain a lot of water, and without the frozen element, you’ll end up with a drinkable smoothie, not a spoonable cup. I’ve messed this up before too, thinking a handful of ice would save it—it doesn’t quite work the same.
- Mistake: Over-blending. Once your mixture is smooth and thick, stop the blender! Continuing to blend can actually warm the ingredients up with the friction from the blades, causing it to thin out slightly. We want it cold and dense.
- Mistake: Using a runny yogurt. If your yogurt is thin and pourable, your smoothie cup will be, too. The structure relies on the thick, almost glue-like quality of Greek yogurt to hold its shape. This is not the time for a regular pot of yogurt.
- Mistake: Not tasting before serving. Ingredients vary so much—the sweetness of your fruit, the tang of your yogurt. Always do a quick taste test and adjust. It takes two seconds and ensures your cup is perfect for you.
Expert Tips
- Tip: Freeze your banana too. For the absolute thickest, ice-cream-like texture, peel your ripe banana, break it into chunks, and freeze it solid on a parchment-lined tray before using. This is a total game-changer for creaminess.
- Tip: Chill your cup. For an extra refreshing experience, pop your empty serving cup or jar into the freezer for 10-15 minutes before you make the smoothie cup. It will keep everything colder for longer as you eat.
- Tip: Layer in your toppings. For a fun surprise, try layering! Add a spoonful of the blended mixture to the cup, then a sprinkle of granola, then more mixture. You get a delightful crunch in the middle.
- Tip: Add a secret nutrient boost. A handful of spinach blends in perfectly without altering the taste or color—honestly, you won’t even know it’s there, but you’ll get that extra green goodness.
FAQs
Can I make this ahead of time?
You can, but with a caveat. It’s best enjoyed immediately for optimal texture. If you must prep it, make it the night before, transfer it to an airtight container, and expect it to thicken significantly in the fridge—almost like a pudding. You might need to let it sit on the counter for 5-10 minutes before eating, or stir in a tiny splash of milk to loosen it up. The toppings, however, should always be added right before serving to maintain their crunch.
Can I use a different type of fruit?
Absolutely! This recipe is wonderfully adaptable. Frozen mango and peach work beautifully for a tropical twist. Just try to stick with fruits that freeze well and have a similar water content to strawberries. Very watery fruits like watermelon or citrus segments aren’t ideal as they’ll make the texture too icy or slushy. Berries and stone fruits are your best bet.
My smoothie cup is too thin. How can I fix it?
Don’t worry, we can rescue it! The easiest fix is to add more frozen fruit. Toss in another 1/4 to 1/2 cup of frozen strawberries and blend again. If you don’t have more fruit, you can try adding a tablespoon of chia seeds or rolled oats and blending—they’ll absorb some excess liquid and thicken it up, though it will change the flavor slightly.
Is this suitable for a vegan diet?
Yes, it’s very easy to make vegan! Simply use a plant-based yogurt (coconut yogurt is famously thick and creamy) and plant-based milk. For the sweetener, opt for maple syrup instead of honey. All the other ingredients are naturally plant-based, so you’ll end up with a delicious vegan-friendly treat.
Can I turn this into a smoothie bowl instead?
You’ve basically already made one! A smoothie bowl is just a smoothie cup served in a wider, shallower bowl, which is better for holding lots of toppings. If you prefer that presentation, simply blend your mixture to a slightly thicker consistency (use a little less milk) and pour it into a bowl. Then, go to town with your topping creations—the wider surface area is perfect for artistic arrangements.


