
Why You’ll Love This Roasted Sweet Potato Fries
- They’re a healthier indulgence. By roasting instead of deep-frying, you get all the satisfaction of fries with a fraction of the oil. You can feel good about serving these up any day of the week.
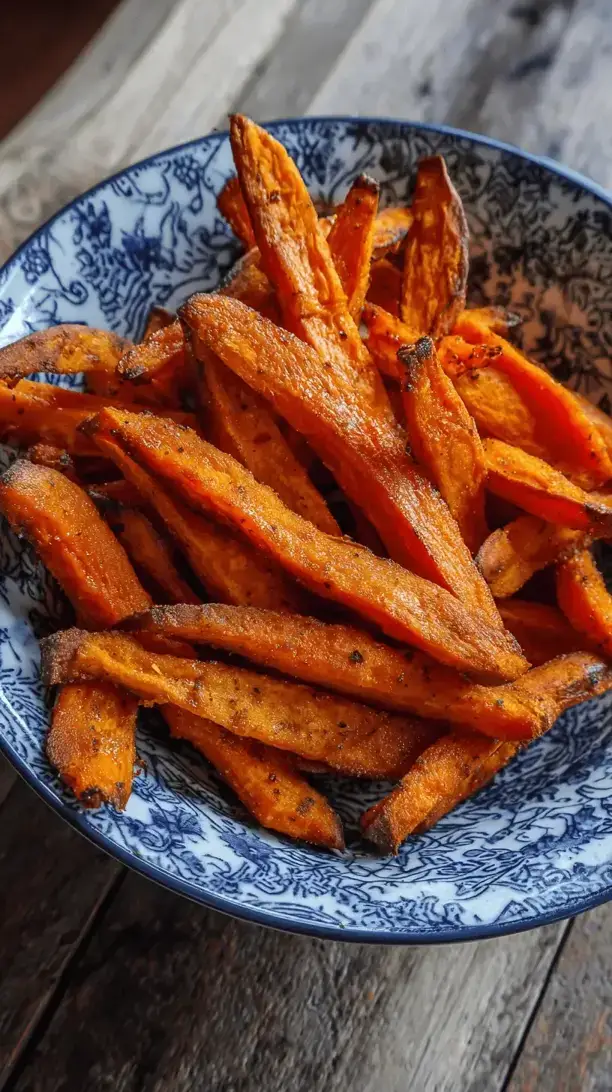
- The flavor is naturally incredible. Sweet potatoes caramelize beautifully in the oven, creating these little crispy, sweet-edged bits that are honestly better than any seasoning you can buy.
- They’re incredibly versatile. These fries are the ultimate culinary chameleon. They can be a side for a burger, a base for a nourishing bowl, or even a snack all on their own with your favorite dip.
- They make your kitchen smell amazing. The warm, sweet aroma that fills your home while these are roasting is pure comfort. It’s the kind of smell that makes everyone ask, “What’s cooking?!” with genuine excitement.
Ingredients & Tools
- 2 large sweet potatoes (about 1.5 lbs or 700g)
- 2 tablespoons olive oil or avocado oil
- 1 teaspoon cornstarch or arrowroot powder
- 1/2 teaspoon garlic powder
- 1/2 teaspoon smoked paprika
- 3/4 teaspoon fine sea salt, plus more for finishing
- 1/4 teaspoon freshly ground black pepper
Tools: 1-2 large rimmed baking sheets, parchment paper or a silicone baking mat, a large mixing bowl
You’ll notice the cornstarch might seem like a strange addition, but a little goes a long way here—it’s our secret weapon for extra crispiness! As for the sweet potatoes, try to pick ones that are firm and relatively uniform in shape; it just makes cutting them into even fries so much easier.
Serves: 3-4 | Prep Time: 15 minutes | Cook Time: 25-35 minutes | Total Time: 40-50 minutes
Before You Start: Tips & Ingredient Notes
- Choosing your sweet potatoes. Look for firm potatoes with smooth, taut skin. There are different varieties, like the orange-fleshed Beauregard or the white-fleshed Hannah, but the standard orange ones give you that classic sweet flavor and vibrant color we all love.
- The cornstarch secret. Honestly, don’t skip this! Cornstarch (or arrowroot for a paleo option) absorbs excess moisture from the potato surface, which is the key to getting those crispy edges instead of steamed, soft fries. It makes a world of difference.
- Why space is non-negotiable. This might be the most important tip. If you crowd the fries on the pan, they’ll steam instead of roast. Using two baking sheets is totally worth the extra washing up for perfectly crispy results.
- Patience with the oven. Let your oven preheat fully! A properly hot oven is crucial for that initial blast of heat that starts the crisping process immediately. Don’t rush it.
How to Make Roasted Sweet Potato Fries
Step 1: First things first, preheat your oven to a nice and hot 425°F (220°C). This is the perfect temperature for achieving caramelization without burning the spices. While it’s heating up, line your baking sheets with parchment paper or a silicone mat—this prevents sticking and makes cleanup an absolute breeze.
Step 2: Now, let’s tackle the sweet potatoes. Give them a good scrub under cold water to remove any dirt—we’re leaving the nutrient-rich skin on! Pat them completely dry. The trick is to cut them into even-sized sticks, about 1/4 to 1/2-inch thick. Uneven pieces will cook at different rates, so taking a moment here ensures they all finish at the same time.
Step 3: Place your cut fries into a large mixing bowl. Drizzle with the oil and toss gently with your hands to coat every surface. You’ll notice the oil helps the seasonings stick. Now, sprinkle the cornstarch, garlic powder, smoked paprika, salt, and pepper over the fries. Toss, toss, toss again until every single fry is lightly and evenly coated with the powdery mixture.
Step 4: Here’s the crucial part: arrange the fries in a single layer on your prepared baking sheets. Make sure they aren’t touching or overlapping. If they’re too crowded, they’ll steam. It’s far better to use two sheets than to pile them onto one. This space is what gives you that coveted crispy texture.
Step 5: Slide the baking sheets into the preheated oven. Roast for 15 minutes. You’ll start to smell that amazing aroma. After 15 minutes, carefully remove the pans and flip the fries. A thin spatula works great for this. This flipping step ensures even browning on all sides.
Step 6: Return the pans to the oven, rotating their positions (top rack to bottom, and vice versa) for even cooking. Roast for another 10-20 minutes. Keep a close eye on them towards the end—they’re done when the edges are crispy and caramelized, and the centers are tender when pierced with a fork.
Step 7: As soon as you take them out of the oven, let them rest on the pan for a minute or two. This helps them firm up a bit. Then, transfer them to a serving bowl and taste for seasoning, adding another tiny pinch of salt if you like. Serve them immediately while they’re hot and wonderfully crisp!
Serving Suggestions
Complementary Dishes
- A Classic Burger or Veggie Burger — The sweet and smoky fries are the perfect partner to a juicy, savory burger. They add a wonderful color and flavor contrast to the whole plate.
- Grilled Chicken or Tofu — For a lighter meal, these fries alongside some simply grilled protein and a big green salad is a balanced and utterly satisfying dinner.
- A “Fry” Bowl — Pile the fries into a bowl with black beans, corn, avocado, and a creamy cilantro-lime dressing for a fun, deconstructed meal.
Drinks
- A Crisp Lager or Pale Ale — The bitterness of a cold beer cuts through the sweetness of the potatoes beautifully, creating a really refreshing combination.
- Sparkling Water with Lemon — For a non-alcoholic option, the bubbles and citrus are fantastic for cleansing the palate between each delicious, savory bite.
- Iced Green Tea — The slight earthy bitterness of green tea complements the sweet, caramelized notes of the fries in a surprisingly elegant way.
Something Sweet
- A Simple Fruit Sorbet — After a meal centered on warm, earthy flavors, a light and tangy raspberry or mango sorbet feels like the perfect, refreshing finale.
- Dark Chocolate Squares — Just a few pieces of high-quality dark chocolate provide a rich, bittersweet endnote that contrasts wonderfully with the meal you just enjoyed.
- Baked Apples with Cinnamon — It keeps the cozy, warm-spice theme going but in dessert form. It’s like a hug for your taste buds.
Top Mistakes to Avoid
- Mistake: Skipping the cornstarch. I’ve messed this up before too, thinking it wouldn’t matter. But it really is the difference between a soft bake and a crisp fry. It’s the single best tip for texture.
- Mistake: Crowding the baking sheet. This is the most common error! If the fries are piled on top of each other, the moisture they release has nowhere to go, and they’ll steam. Give them their personal space.
- Mistake: Not preheating the oven. Putting fries into a lukewarm oven is a one-way ticket to soggy town. That initial blast of high heat is essential for locking in the crispiness.
- Mistake: Cutting the fries unevenly. If some are thin and some are thick, the thin ones will burn before the thick ones are cooked through. Take your time to cut them uniformly.
Expert Tips
- Tip: Soak the fries (for the ultra-committed). For the absolute crispiest results, you can soak the cut fries in cold water for 30 minutes to an hour before drying and seasoning. This removes excess surface starch, leading to even more crunch. It’s an extra step, but a game-changer.
- Tip: Use an oil with a high smoke point. While olive oil works, avocado oil is even better because it can withstand the high heat without breaking down, promoting better browning.
- Tip: Get creative with seasonings. The spice blend here is a classic, but don’t be afraid to experiment. A little chili powder for heat, some rosemary for an earthy note, or even a sprinkle of nutritional yeast for a cheesy flavor are all fantastic.
- Tip: The two-spatula flip. When it’s time to flip the fries, using two thin spatulas makes the job quick and easy, ensuring you don’t miss any and they all get evenly cooked.
FAQs
Why are my sweet potato fries soggy?
This almost always comes down to one of three things: overcrowding the pan (which causes steaming), not using a high enough oven temperature, or skipping the cornstarch. The cornstarch is a real pro-move because it creates a delicate crust that protects the fry from its own internal moisture. Also, make sure you’re patting the cut fries completely dry before adding oil and seasonings. Every little bit of surface moisture is working against that crispiness we crave.
Can I make these ahead of time?
You can prep the sweet potatoes ahead of time! Cut them into fries and keep them submerged in a bowl of cold water in the fridge for up to 24 hours. This actually helps them get crispier. When you’re ready to cook, drain them and pat them *very* dry. The seasoning and roasting are best done right before serving, as they lose their crisp texture if they sit for too long after cooking.
What’s the best dip for sweet potato fries?
Oh, the possibilities! A classic garlic aioli or a creamy sriracha mayo are always winners. For a lighter option, a cool, plain Greek yogurt with a squeeze of lemon and some dill is fantastic. And honestly, sometimes a good old-fashioned ketchup or even a spicy barbecue sauce is exactly what you need. It really depends on your mood!
Can I use frozen sweet potato fries instead?
You can, but the result will be quite different. Frozen fries are often pre-cooked and designed for a specific texture. This recipe is all about the fresh, caramelized flavor and the ability to control the crispiness and seasonings from scratch. Homemade will always have a superior taste and texture, in my opinion, but frozen is a convenient shortcut when you’re in a pinch.
How do I store and reheat leftovers?
Let any cooled leftovers cool completely, then store them in an airtight container in the fridge for up to 3 days. To reheat, do NOT use the microwave—it will make them soft and rubbery. Instead, spread them on a baking sheet and re-crisp them in a 400°F (200°C) oven for about 5-10 minutes. They won’t be quite as perfect as fresh, but they’ll be much, much better.
Roasted Sweet Potato Fries
Crave crispy roasted sweet potato fries? My foolproof recipe delivers perfect, caramelized fries every time! A healthier, baked side dish that's a total crowd-pleaser. Get the secret to crispy edges!
Ingredients
Ingredients
-
2 large sweet potatoes (about 1.5 lbs or 700g)
-
2 tablespoons olive oil or avocado oil
-
1 teaspoon cornstarch or arrowroot powder
-
1/2 teaspoon garlic powder
-
1/2 teaspoon smoked paprika
-
3/4 teaspoon fine sea salt (plus more for finishing)
-
1/4 teaspoon freshly ground black pepper
Instructions
-
First things first, preheat your oven to a nice and hot 425°F (220°C). This is the perfect temperature for achieving caramelization without burning the spices. While it's heating up, line your baking sheets with parchment paper or a silicone mat—this prevents sticking and makes cleanup an absolute breeze.01
-
Now, let's tackle the sweet potatoes. Give them a good scrub under cold water to remove any dirt—we're leaving the nutrient-rich skin on! Pat them completely dry. The trick is to cut them into even-sized sticks, about 1/4 to 1/2-inch thick. Uneven pieces will cook at different rates, so taking a moment here ensures they all finish at the same time.02
-
Place your cut fries into a large mixing bowl. Drizzle with the oil and toss gently with your hands to coat every surface. You'll notice the oil helps the seasonings stick. Now, sprinkle the cornstarch, garlic powder, smoked paprika, salt, and pepper over the fries. Toss, toss, toss again until every single fry is lightly and evenly coated with the powdery mixture.03
-
Here's the crucial part: arrange the fries in a single layer on your prepared baking sheets. Make sure they aren't touching or overlapping. If they're too crowded, they'll steam. It's far better to use two sheets than to pile them onto one. This space is what gives you that coveted crispy texture.04
-
Slide the baking sheets into the preheated oven. Roast for 15 minutes. You'll start to smell that amazing aroma. After 15 minutes, carefully remove the pans and flip the fries. A thin spatula works great for this. This flipping step ensures even browning on all sides.05
-
Return the pans to the oven, rotating their positions (top rack to bottom, and vice versa) for even cooking. Roast for another 10-20 minutes. Keep a close eye on them towards the end—they're done when the edges are crispy and caramelized, and the centers are tender when pierced with a fork.06
-
As soon as you take them out of the oven, let them rest on the pan for a minute or two. This helps them firm up a bit. Then, transfer them to a serving bowl and taste for seasoning, adding another tiny pinch of salt if you like. Serve them immediately while they're hot and wonderfully crisp!07


