
Why You’ll Love This Roasted Shallots with Thyme
- Effortless Elegance. This dish looks and tastes incredibly gourmet, but the process couldn’t be simpler. It’s the perfect way to elevate a weeknight dinner or impress guests without any stress.
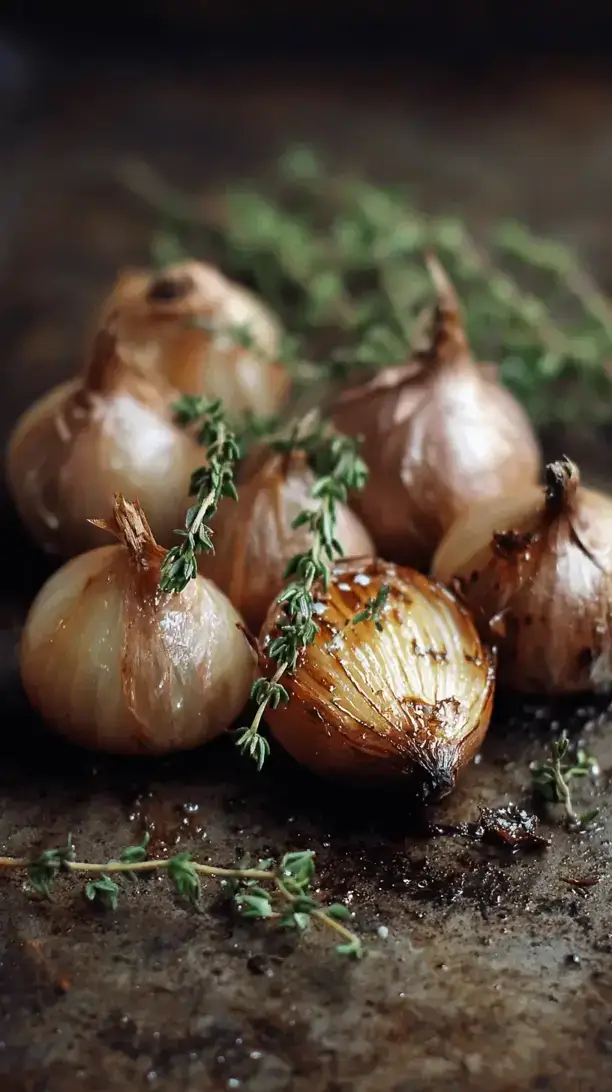
- That Incredible Texture. The goal here is a beautiful contrast: soft, almost meltingly tender insides with slightly crisp, caramelized edges. It’s a textural dream that adds so much interest to your plate.
- The Most Incredible Aroma. As these roast, the sweet, savory scent of caramelizing shallots and woody thyme will make your entire home smell like a professional kitchen. It’s honestly half the pleasure of making them.
- Surprisingly Versatile. Once you have a batch of these, you’ll find yourself adding them to everything—toss them into pastas, mash them onto crostini, or stir them into a gravy for an unbelievable depth of flavor.
Ingredients & Tools
- 1 lb shallots, peeled and halved (or quartered if large)
- 3 tablespoons extra virgin olive oil
- 4-5 sprigs fresh thyme, plus more for garnish
- 1 tablespoon balsamic vinegar (optional, but highly recommended)
- 1 teaspoon honey or maple syrup
- ½ teaspoon kosher salt, plus more to taste
- ¼ teaspoon freshly cracked black pepper
- 2 tablespoons water or vegetable broth
Tools: A medium baking sheet, parchment paper (for easy cleanup), a small bowl for mixing.
The quality of your olive oil really shines here, so use a good one you enjoy. And don’t skip the fresh thyme—dried just won’t provide the same aromatic, earthy fragrance. The honey and balsamic are our secret weapons for creating a gorgeous, sticky glaze.
Serves: 4 as a side | Prep Time: 10 minutes | Cook Time: 35-40 minutes | Total Time: 45-50 minutes
Before You Start: Tips & Ingredient Notes
- Choosing Your Shallots. Look for shallots that are firm and heavy for their size, with dry, papery skins. Avoid any that are soft, sprouting, or have dark spots. You’ll want them to be roughly similar in size for even cooking.
- To Peel or Not to Peel? You absolutely need to peel them! The papery skins won’t become tender. A pro tip: after trimming the ends, you can often make a shallow slit lengthwise and the skin will peel off more easily, especially if you soak them in warm water for a minute.
- Why Halve or Quarter? Cutting the shallots exposes more surface area to the heat of the oven, which is key for achieving that beautiful caramelization. If they’re too small, you can leave them whole, but just know they’ll take a bit longer to cook through.
- The Power of Fresh Thyme. Using whole sprigs, not just the leaves, is a game-changer. The woody stems infuse the oil with a subtle, herby flavor that’s less aggressive than just the leaves. We’ll strip some leaves off at the end for a fresh garnish.
How to Make Roasted Shallots with Thyme
Step 1: First, preheat your oven to 400°F (200°C). This relatively high heat is perfect for getting some good color on our shallots without burning them. While the oven heats up, line your baking sheet with parchment paper—this isn’t just for easy cleanup; it also prevents the sugary glaze from sticking and burning onto the pan.
Step 2: Now, let’s prepare the shallots. Trim off the root end and the tip, then peel away the papery skin. If a shallot is particularly large (more than about 1.5 inches in diameter), go ahead and quarter it so everything cooks evenly. Place all your peeled and halved shallots in a single layer on the prepared baking sheet. You want them to have some space—if they’re too crowded, they’ll steam instead of roast.
Step 3: In a small bowl, whisk together the olive oil, balsamic vinegar, honey, salt, and pepper. This is our flavor-packed glaze. Drizzle this mixture evenly over the shallots on the baking sheet. Then, use your hands or a spoon to toss everything together, making sure each shallot piece is nicely coated. It might feel a little messy, but that’s part of the fun!
Step 4: Nestle the fresh thyme sprigs amongst the shallots. They’ll roast along with everything else, releasing their amazing aroma. Now, pour the 2 tablespoons of water or broth onto the pan around the shallots. This little bit of liquid creates steam in the hot oven, which helps the shallots become tender and soft on the inside before the outside gets too dark.
Step 5: Roast for 20 minutes. After this time, you’ll notice the edges just starting to brown. Carefully remove the pan from the oven (it’s hot!) and give everything a good stir or flip the shallots over. This ensures even browning on all sides. The aroma at this point is just incredible.
Step 6: Return the pan to the oven and roast for another 15-20 minutes. Keep a close eye on them during the last 5 minutes. You’re looking for the shallots to be deeply golden brown, caramelized around the edges, and tender enough to be easily pierced with a fork. The glaze will have reduced and become sticky.
Step 7: Once they’re perfectly roasted, take the pan out of the oven. Discard the now-crispy thyme sprigs. To finish, you can sprinkle the shallots with a little extra fresh thyme leaves for a pop of color and a fresh herbal note. Taste one and add an extra pinch of salt if needed. Serve them warm, straight from the pan.
Serving Suggestions
Complementary Dishes
- Simple Roast Chicken — The juicy, savory chicken and the sweet, jammy shallots are a classic, unbeatable pairing. The shallots can almost act as a built-in side dish and condiment.
- Pan-Seared Pork Chops or Steak — Spoon these shallots and their sticky pan juices right over the top of your protein. They add a sweet and acidic component that cuts through the richness beautifully.
- Creamy Polenta or Mashed Potatoes — The soft, creamy base is the perfect vehicle for these flavorful shallots. They sink in and create little pockets of sweet and savory goodness in every bite.
Drinks
- A Light-Bodied Red Wine — Think Pinot Noir or Gamay. The fruity notes and bright acidity in these wines complement the sweetness of the shallots without overpowering them.
- A Crisp Hard Cider — The apple notes and effervescence are a surprisingly fantastic match for the caramelized flavors. It’s a refreshing and fun pairing.
- Sparkling Water with Lemon — For a non-alcoholic option, the bubbles and citrus help cleanse the palate between bites of the rich, sweet shallots.
Something Sweet
- Poached Pears — Continue the elegant, autumnal theme with pears poached in a little red wine and spices. It feels like a natural, light progression after the savory main course.
- Dark Chocolate Pot de Crème — The deep, bitter notes of dark chocolate provide a sophisticated and rich contrast to the sweet and savory notes of the meal.
- A Simple Berry Galette — Rustic, fruity, and not too sweet, a galette is a lovely, homestyle way to end a meal featuring these roasted shallots.
Top Mistakes to Avoid
- Mistake: Crowding the Pan. If you pile all the shallots on top of each other, they’ll release steam and boil in their own juices. You’ll end up with steamed, pale shallots instead of beautifully roasted and caramelized ones. A single layer is non-negotiable!
- Mistake: Skipping the Water/Broth. That small amount of liquid seems insignificant, but it’s crucial. It creates a burst of steam that ensures the inside of the shallot cooks through and becomes tender before the outside burns. Without it, you risk a burnt exterior and a crunchy, undercooked center.
- Mistake: Not Stirring Halfway. Ovens have hot spots. If you don’t give the shallots a stir or a flip about halfway through, the ones on the edges might get too dark while the ones in the center remain pale. This simple step guarantees even browning.
- Mistake: Using Old, Dried-Out Shallots. Shallots that have been sitting in your pantry for too long can become bitter when roasted. Always use fresh, firm shallots for the best, sweetest result.
Expert Tips
- Tip: Make a Double Batch. Roasted shallots keep wonderfully in the fridge for up to 4 days. Make extra to have on hand—they are fantastic chopped up and stirred into scrambled eggs, mixed into grain bowls, or even blended into a vinaigrette.
- Tip: Add a Splash of Vinegar at the End. For an extra burst of brightness, drizzle a tiny bit of high-quality balsamic vinegar over the shallots right after they come out of the oven. The acidity will balance the sweetness perfectly.
- Tip: Get Creative with Flavors. Once you’ve mastered the basic recipe, try adding other aromatics to the pan. A few unpeeled garlic cloves or some sliced mushrooms roasted alongside the shallots add another dimension of flavor.
- Tip: Use the Leftover Oil. The oil left on the baking sheet is infused with shallot and thyme goodness. Don’t waste it! Use it to drizzle over crusty bread or as a base for a salad dressing.
FAQs
Can I use dried thyme instead of fresh?
You can, but the flavor profile will be different. Fresh thyme gives a brighter, more aromatic quality, while dried thyme is more earthy and potent. If you must substitute, use about 1 teaspoon of dried thyme, but I’d really recommend seeking out the fresh stuff for this particular recipe—it makes a noticeable difference in the final aroma and taste.
How do I store leftovers and how long do they keep?
Let the shallots cool completely, then transfer them to an airtight container. They’ll keep in the refrigerator for 3-4 days. Reheat them gently in a skillet over low heat or in a 300°F (150°C) oven until warmed through. You can also reheat them in the microwave, but they might lose a bit of their crispness.
My shallots are burning before they get tender. What happened?
This usually means your oven temperature is too high, or your shallots were cut too small. Oven thermostats can be inaccurate, so an oven thermometer is a great tool. If they’re browning too quickly, tent the pan loosely with aluminum foil for the remainder of the cooking time to slow down the browning and allow the insides to catch up.
Can I freeze roasted shallots?
Yes, you can! They will become quite soft upon thawing, so they’re best used in applications where texture isn’t the main focus—think stirred into soups, stews, or sauces. Freeze them in a single layer on a parchment-lined sheet first, then transfer to a freezer bag. This prevents them from freezing into one solid clump.
What’s the difference between roasting shallots and roasting onions?
Shallots have a more delicate, subtle, and slightly sweeter flavor than most onions. They also contain more sugar and water, which means they caramelize beautifully and achieve that wonderful jammy texture more readily. Onions are great roasted too, but they have a stronger, more pungent flavor that stands up more on its own.
Roasted Shallots With Thyme
Transform simple shallots into a sweet, jammy, & elegant side dish with this easy roasted shallots recipe. Perfect with roast chicken or steak. Only 10 minutes of prep!
Ingredients
Ingredients
-
1 lb shallots (peeled and halved (or quartered if large))
-
3 tablespoons extra virgin olive oil
-
4-5 sprigs fresh thyme (plus more for garnish)
-
1 tablespoon balsamic vinegar (optional, but highly recommended)
-
1 teaspoon honey or maple syrup
-
½ teaspoon kosher salt (plus more to taste)
-
¼ teaspoon freshly cracked black pepper
-
2 tablespoons water or vegetable broth
Instructions
-
First, preheat your oven to 400°F (200°C). This relatively high heat is perfect for getting some good color on our shallots without burning them. While the oven heats up, line your baking sheet with parchment paper—this isn't just for easy cleanup; it also prevents the sugary glaze from sticking and burning onto the pan.01
-
Now, let's prepare the shallots. Trim off the root end and the tip, then peel away the papery skin. If a shallot is particularly large (more than about 1.5 inches in diameter), go ahead and quarter it so everything cooks evenly. Place all your peeled and halved shallots in a single layer on the prepared baking sheet. You want them to have some space—if they're too crowded, they'll steam instead of roast.02
-
In a small bowl, whisk together the olive oil, balsamic vinegar, honey, salt, and pepper. This is our flavor-packed glaze. Drizzle this mixture evenly over the shallots on the baking sheet. Then, use your hands or a spoon to toss everything together, making sure each shallot piece is nicely coated. It might feel a little messy, but that's part of the fun!03
-
Nestle the fresh thyme sprigs amongst the shallots. They'll roast along with everything else, releasing their amazing aroma. Now, pour the 2 tablespoons of water or broth onto the pan around the shallots. This little bit of liquid creates steam in the hot oven, which helps the shallots become tender and soft on the inside before the outside gets too dark.04
-
Roast for 20 minutes. After this time, you'll notice the edges just starting to brown. Carefully remove the pan from the oven (it's hot!) and give everything a good stir or flip the shallots over. This ensures even browning on all sides. The aroma at this point is just incredible.05
-
Return the pan to the oven and roast for another 15-20 minutes. Keep a close eye on them during the last 5 minutes. You're looking for the shallots to be deeply golden brown, caramelized around the edges, and tender enough to be easily pierced with a fork. The glaze will have reduced and become sticky.06
-
Once they're perfectly roasted, take the pan out of the oven. Discard the now-crispy thyme sprigs. To finish, you can sprinkle the shallots with a little extra fresh thyme leaves for a pop of color and a fresh herbal note. Taste one and add an extra pinch of salt if needed. Serve them warm, straight from the pan.07


