Why You’ll Love This Raspberry Coconut Bars
- Perfect Texture Harmony. You get a firm, buttery base, a soft and slightly gooey raspberry center, and a chewy, crispy coconut topping. It’s a triple threat of textures that is just so satisfying to eat.
- Incredibly Versatile. Honestly, these bars are a dream because they work with whatever you have. No fresh raspberries? Frozen work beautifully. Out of almond extract? Vanilla is a perfect substitute. They’re forgiving and adaptable.
- Make-Ahead Magic. These bars actually taste even better the next day, once the flavors have had a chance to really meld together. You can bake them a day before you need them, making party planning or weekend treats completely stress-free.
- Visually Stunning. The deep red raspberry layer peeking through the golden-brown coconut topping is just gorgeous. They look like you spent hours in a fancy bakery, but the secret is how straightforward they really are to assemble.
Ingredients & Tools
- 200 g all-purpose flour
- 100 g granulated sugar
- 115 g cold unsalted butter, cubed
- 1 large egg yolk
- 350 g raspberries (fresh or frozen)
- 100 g granulated sugar (for the raspberry layer)
- 15 ml lemon juice
- 10 g cornstarch
- 200 g sweetened shredded coconut
- 2 large egg whites
- 1 tsp almond extract (or vanilla)
- 1/4 tsp fine sea salt
Tools: 8×8 inch (20×20 cm) baking pan, parchment paper, medium saucepan, two mixing bowls, whisk, fork or pastry cutter
A couple of ingredient notes—using cold butter is non-negotiable for a crumbly, shortbread-like base, and that almond extract? It adds a subtle, bakery-quality depth that really makes the coconut sing. You’ll notice the difference.
Nutrition (per serving)
- Calories: 280 kcal
- Protein: 3 g
- Fat: 15 g
- Carbohydrates: 35 g
- Fiber: 4 g
Serves: 12 | Prep Time: 25 minutes | Cook Time: 40 minutes | Total Time: 1 hour 5 minutes (plus cooling)
Before You Start: Tips & Ingredient Notes
- Cold butter is your best friend. For the base to be tender and crumbly, not greasy, your butter needs to be straight-from-the-fridge cold. I sometimes even pop the cubed butter in the freezer for 10 minutes before I start.
- Don’t skip the cornstarch. This is the secret agent in your raspberry layer. It thickens the juicy berries beautifully, preventing a soggy base and giving you that perfect, sliceable jammy consistency.
- Toasting the coconut (optional but recommended). If you have an extra five minutes, toasting the shredded coconut in a dry pan until lightly golden before adding it to the topping will amplify its flavor and crunch exponentially.
- Line your pan properly. Using parchment paper with overhanging edges isn’t just a suggestion—it’s a lifesaver. It guarantees you can lift the entire slab of bars out cleanly for easy, mess-free slicing.
How to Make Raspberry Coconut Bars
Step 1: First, preheat your oven to 350°F (175°C) and line your 8×8 inch baking pan with parchment paper, letting the edges hang over two opposite sides like little handles. This will make your life so much easier later, trust me. In a medium bowl, whisk together the flour, 100g of sugar, and salt.
Step 2: Now, add your cold, cubed butter to the flour mixture. Using a pastry cutter, a fork, or even your fingertips, work the butter into the flour until the mixture looks like coarse, wet sand with some pea-sized butter pieces remaining. Stir in the egg yolk until a crumbly dough forms.
Step 3: Press this dough firmly and evenly into the bottom of your prepared pan. You want to really compact it—the back of a measuring cup works great for this. Pop it in the preheated oven and bake for about 15-18 minutes, just until the edges are very lightly golden. It will look pale, and that’s perfect.
Step 4: While the base is baking, let’s make the raspberry layer. In your saucepan, combine the raspberries, the second 100g of sugar, and lemon juice. Cook over medium heat, stirring often, until the berries break down and become juicy, about 5-7 minutes.
Step 5: In a small bowl, mix the cornstarch with a tablespoon of water to create a smooth slurry. Slowly whisk this slurry into the bubbling raspberry mixture. Keep cooking and stirring for another 2-3 minutes until the filling thickens noticeably and becomes glossy. Remove it from the heat and let it cool slightly.
Step 6: For the glorious coconut topping, simply whisk the egg whites in a clean bowl until they are frothy—no need for stiff peaks. Then, stir in the shredded coconut, almond extract, and a tiny pinch of salt until everything is well combined. It will be a thick, sticky mixture.
Step 7: Now for the assembly! Spread the warm raspberry filling evenly over the hot par-baked crust. Then, carefully drop spoonfuls of the coconut mixture over the raspberry layer and gently spread it out to cover the surface. Don’t press down too hard; you just want an even, fluffy blanket.
Step 8: Return the pan to the oven and bake for another 20-25 minutes. You’re looking for the coconut topping to be a beautiful, deep golden brown all over. The smell in your kitchen will be absolutely incredible at this point.
Step 9: This is the hardest part—you must let the bars cool completely in the pan on a wire rack. I know it’s tempting, but if you cut into them while they’re warm, the layers won’t have set and you’ll have a delicious but messy crumble. For clean, perfect bars, patience is key.
Step 10: Once completely cool, use the parchment paper handles to lift the entire block out of the pan. Place it on a cutting board and use a sharp knife to slice it into 12 squares. For the cleanest cuts, wipe the knife blade clean between each slice.
Serving Suggestions
Complementary Dishes
- A simple green salad with a citrus vinaigrette — The sharp, fresh acidity of the salad cuts through the sweetness of the bars beautifully if you’re serving them as part of a larger brunch spread.
- Vanilla bean or coconut milk ice cream — Serving a bar slightly warmed with a scoop of cold ice cream on top is a next-level dessert experience. The contrast in temperatures is divine.
- A cheese plate with soft goat cheese and almonds — The tangy cheese and nutty almonds create a sophisticated flavor bridge that makes these bars feel like a gourmet offering.
Drinks
- Earl Grey tea — The bergamot in the tea has a citrusy, floral note that complements the raspberry and coconut without overpowering them. It’s a wonderfully cozy pairing.
- A crisp Prosecco or dry Rosé — The bubbles and acidity in these wines act as a perfect palate cleanser, making each bite of the rich, sweet bar taste fresh and new.
- Iced coffee with a splash of cream — The bitterness of the coffee provides a fantastic counterpoint to the sweetness, making for a very balanced afternoon treat.
Something Sweet
- Dark chocolate-dipped strawberries — This keeps the berry theme going but introduces a different kind of chocolatey richness that feels very luxurious alongside the bars.
- Lemon sorbet — If you’ve had a rich meal, a small scoop of intensely tart lemon sorbet alongside the bar is a refreshing and light way to end the evening.
- Mini almond biscotti — The crunch of the biscotti echoes the texture of the coconut topping, and the almond flavor is a natural friend to both raspberry and coconut.
Top Mistakes to Avoid
- Mistake: Using melted or softened butter for the base. This is the number one reason for a greasy, tough bottom layer. The cold butter creates steam as it bakes, which is what gives you that lovely, tender, crumbly texture.
- Mistake: Spreading the coconut topping too thickly. You want a fluffy, even layer, not a dense, heavy blanket. A thick layer won’t crisp up properly and can make the bars overly sweet and difficult to slice through.
- Mistake: Cutting the bars while they’re still warm. I’ve messed this up before too, and you end up with a delicious but soupy mess. The raspberry and coconut layers need time to cool and set fully so they hold their shape when cut.
- Mistake: Skipping the cornstarch in the raspberry filling. Without it, the raspberry juices won’t thicken enough, and they’ll soak into your beautiful crust, making it soggy instead of firm and buttery.
Expert Tips
- Tip: Use a glass to press the crust. For a perfectly even and compact base, use the flat bottom of a heavy glass or measuring cup to press the dough into the pan. It gives you more leverage than your fingers and prevents uneven spots.
- Tip: Add a pinch of cardamom. For a little twist, add a quarter teaspoon of ground cardamom to the flour for the base. It adds a warm, complex flavor that pairs magically with both the berry and the coconut.
- Tip: Create a marbled effect. Instead of spreading the coconut topping evenly, try dropping it in dollops and then swirling it lightly with a knife into the raspberry layer before baking. You’ll get beautiful marbled sections.
- Tip: Freeze for perfect slices. For absolutely pristine, photogenic bars, pop the completely cooled block (before slicing) into the freezer for about 20 minutes. This firms everything up and allows your knife to glide through without dragging the layers.
FAQs
Can I use frozen raspberries?
Absolutely, and it’s a great option! You don’t even need to thaw them first. Just add the frozen berries directly to the saucepan. You might need to add a minute or two to the cooking time for them to break down and release their juices. The result is just as delicious and jammy as using fresh berries, making this a fantastic year-round recipe.
Can I make these bars gluten-free?
Yes, you can! A simple one-to-one gluten-free all-purpose flour blend works wonderfully as a direct substitute for the regular flour in the crust. Just make sure your blend contains a binder like xanthan gum. The texture of the base might be slightly more delicate, but it will still be delicious and hold together well once cooled.
How should I store these, and how long do they keep?
Store them in an airtight container at room temperature for up to 3 days. For longer storage, I recommend keeping them in the fridge for up to a week—the cooler temperature helps the layers stay firm. They can also be frozen for up to 3 months; just thaw in the refrigerator overnight before serving.
My coconut topping isn’t browning evenly. What can I do?
This is a common oven quirk! If you notice the topping is browning too quickly in one spot, simply rotate your pan halfway through the final baking time. If the edges are getting dark but the center is still pale, you can tent the edges loosely with a little foil for the last 5-10 minutes of baking.
Can I use a different type of jam or fruit?
You sure can. While raspberry is classic, other tart fruits like blackberries, cherries, or a mix of berries work beautifully. If using a pre-made jam, you’ll need about 1 1/4 cups. Just skip the cooking steps and spread the jam directly over the par-baked crust before adding the coconut topping.
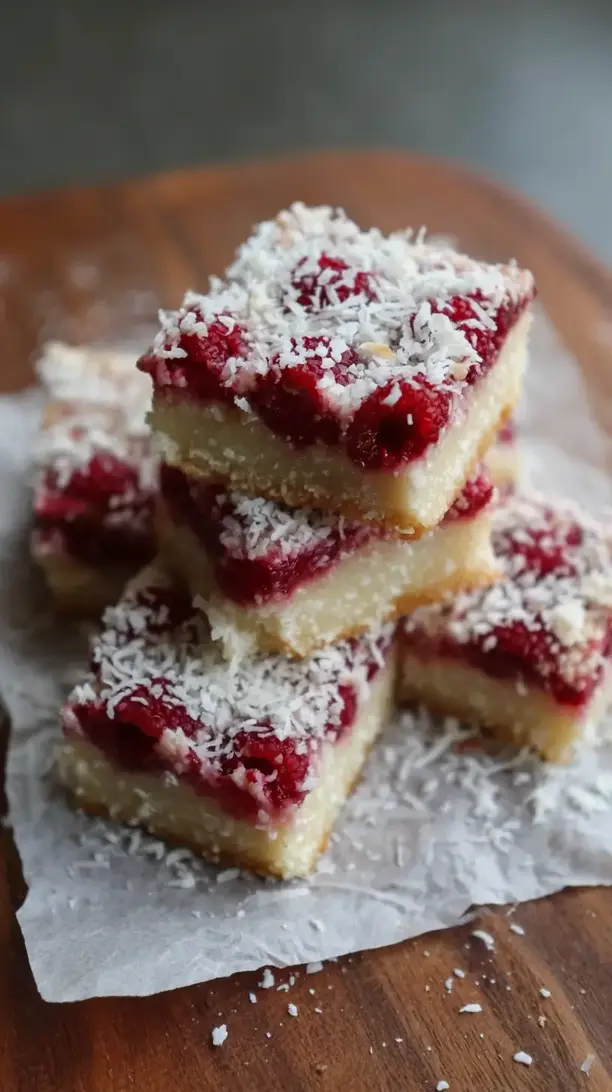
Raspberry Coconut Bars
Make these easy Raspberry Coconut Bars with a buttery crust, jammy raspberry layer, and toasted coconut topping. Get the simple recipe and bake this crowd-pleasing treat today!
Ingredients
For the base:
-
200 g all-purpose flour
-
100 g granulated sugar
-
115 g cold unsalted butter (cubed)
-
1 large egg yolk
-
1/4 tsp fine sea salt
For the raspberry layer:
-
350 g raspberries (fresh or frozen)
-
100 g granulated sugar (for the raspberry layer)
-
15 ml lemon juice
-
10 g cornstarch
For the coconut topping:
-
200 g sweetened shredded coconut
-
2 large egg whites
-
1 tsp almond extract (or vanilla)
-
1/4 tsp fine sea salt
Instructions
-
First, preheat your oven to 350°F (175°C) and line your 8x8 inch baking pan with parchment paper, letting the edges hang over two opposite sides like little handles. This will make your life so much easier later, trust me. In a medium bowl, whisk together the flour, 100g of sugar, and salt.01
-
Now, add your cold, cubed butter to the flour mixture. Using a pastry cutter, a fork, or even your fingertips, work the butter into the flour until the mixture looks like coarse, wet sand with some pea-sized butter pieces remaining. Stir in the egg yolk until a crumbly dough forms.02
-
Press this dough firmly and evenly into the bottom of your prepared pan. You want to really compact it—the back of a measuring cup works great for this. Pop it in the preheated oven and bake for about 15-18 minutes, just until the edges are very lightly golden. It will look pale, and that's perfect.03
-
While the base is baking, let's make the raspberry layer. In your saucepan, combine the raspberries, the second 100g of sugar, and lemon juice. Cook over medium heat, stirring often, until the berries break down and become juicy, about 5-7 minutes.04
-
In a small bowl, mix the cornstarch with a tablespoon of water to create a smooth slurry. Slowly whisk this slurry into the bubbling raspberry mixture. Keep cooking and stirring for another 2-3 minutes until the filling thickens noticeably and becomes glossy. Remove it from the heat and let it cool slightly.05
-
For the glorious coconut topping, simply whisk the egg whites in a clean bowl until they are frothy—no need for stiff peaks. Then, stir in the shredded coconut, almond extract, and a tiny pinch of salt until everything is well combined. It will be a thick, sticky mixture.06
-
Now for the assembly! Spread the warm raspberry filling evenly over the hot par-baked crust. Then, carefully drop spoonfuls of the coconut mixture over the raspberry layer and gently spread it out to cover the surface. Don't press down too hard; you just want an even, fluffy blanket.07
-
Return the pan to the oven and bake for another 20-25 minutes. You're looking for the coconut topping to be a beautiful, deep golden brown all over. The smell in your kitchen will be absolutely incredible at this point.08
-
This is the hardest part—you must let the bars cool completely in the pan on a wire rack. I know it's tempting, but if you cut into them while they're warm, the layers won't have set and you'll have a delicious but messy crumble. For clean, perfect bars, patience is key.09
-
Once completely cool, use the parchment paper handles to lift the entire block out of the pan. Place it on a cutting board and use a sharp knife to slice it into 12 squares. For the cleanest cuts, wipe the knife blade clean between each slice.10