
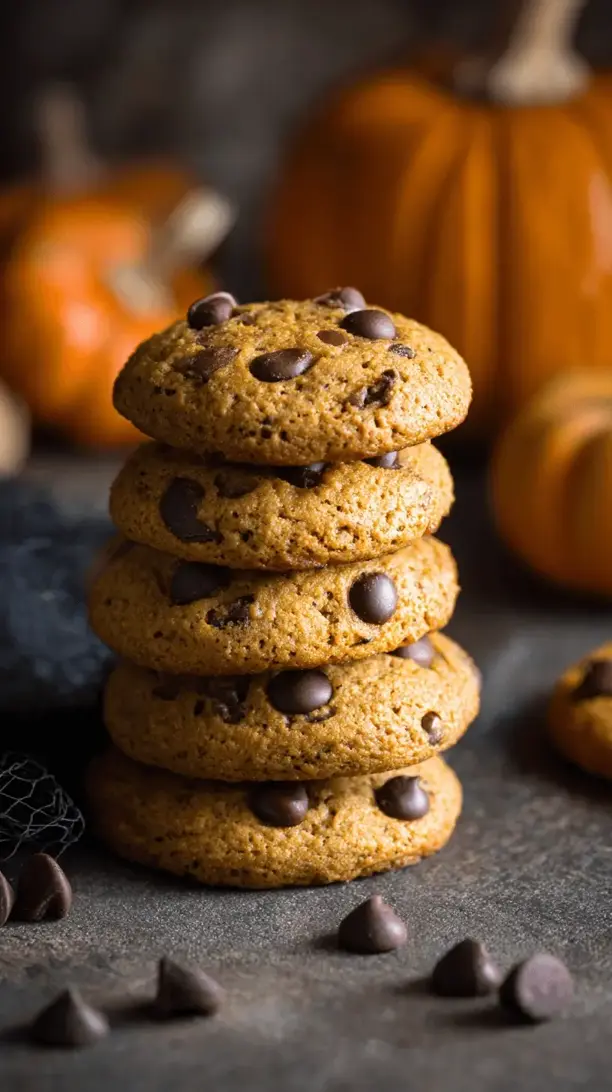
Why You’ll Love This Pumpkin Chocolate Chip Cookies
- They’re the ultimate texture experience. These cookies are wonderfully soft and tender, with a cake-like crumb that just melts in your mouth. The chocolate chips add little bursts of gooey richness, creating a contrast that’s honestly irresistible.
- They fill your home with the best autumn aroma. The combination of pumpkin puree, cinnamon, and nutmeg is just… pure comfort. As they bake, your whole house will smell like a cozy sweater and happy memories. It’s honestly half the fun of making them.
- They’re surprisingly simple to whip up. You don’t need any fancy equipment or complicated techniques. It’s a straightforward, one-bowl kind of situation that comes together in minutes. Perfect for a last-minute bake sale contribution or a sudden cookie craving.
- They’re a fantastic way to use that can of pumpkin. We’ve all been there—you open a can for a recipe and have a little left over. This is the perfect destination for that leftover pumpkin, turning it into something truly special instead of letting it languish in the fridge.
Ingredients & Tools
- 1/2 cup (1 stick or 113 g) unsalted butter, softened to room temperature
- 1/2 cup (100 g) granulated sugar
- 1/4 cup (50 g) light brown sugar, packed
- 1/2 cup (122 g) pure pumpkin puree (not pumpkin pie filling)
- 1 large egg, at room temperature
- 1 teaspoon pure vanilla extract
- 1 1/2 cups (188 g) all-purpose flour
- 1/2 teaspoon baking soda
- 1/4 teaspoon baking powder
- 1/2 teaspoon salt
- 1 teaspoon ground cinnamon
- 1/4 teaspoon ground nutmeg
- 1/8 teaspoon ground ginger
- 1 cup (170 g) semi-sweet chocolate chips
Tools: A large mixing bowl, a hand mixer or stand mixer, a spatula, measuring cups/spoons, a baking sheet, and parchment paper or a silicone baking mat.
Getting your ingredients to the right state is key here—room temperature butter and egg will cream together beautifully with the sugars, creating a light base for your cookies. And that pumpkin puree… make sure it’s the plain, unsweetened kind. You’re adding the spices yourself, which gives you so much more control over the final flavor.
Serves: 24 cookies | Prep Time: 15 minutes | Cook Time: 12-14 minutes | Total Time: 30 minutes
Before You Start: Tips & Ingredient Notes
- Pumpkin Puree vs. Pie Filling. This is the most important distinction! Pumpkin pie filling is pre-sweetened and spiced. You want 100% pure pumpkin puree for this recipe. It has a much cleaner, earthier flavor that allows our added spices to shine.
- Why room temperature ingredients matter. When your butter and egg are at room temperature, they emulsify much more easily with the sugar, trapping air and creating a lighter cookie. Cold butter won’t cream properly, and a cold egg can cause the batter to curdle. If you forgot to take them out, you can quickly bring an egg to room temp by placing it in a bowl of warm water for 5-10 minutes.
- Don’t overmix the flour. Once you add the dry ingredients, mix just until the flour streaks disappear. Overmixing develops the gluten in the flour, which can lead to tough, dense cookies instead of the soft, cakey texture we’re after.
- The power of the chill. This dough is quite soft. I highly recommend chilling it for at least 30 minutes before baking. This prevents the cookies from spreading too much in the oven, giving them a thicker, prettier shape.
How to Make Pumpkin Chocolate Chip Cookies
Step 1: Cream the Butter and Sugars. In your large mixing bowl, combine the softened butter, granulated sugar, and brown sugar. Using a hand mixer or stand mixer fitted with the paddle attachment, beat them together on medium speed for about 2-3 minutes. You’ll know it’s ready when the mixture becomes pale, fluffy, and well-combined. This step is crucial for building the structure of your cookie, so don’t rush it!
Step 2: Add the Wet Ingredients. Scrape down the sides of the bowl with a spatula. Add the pumpkin puree, egg, and vanilla extract to the butter-sugar mixture. Mix on medium speed until everything is fully incorporated. The batter might look a little curdled at this point—that’s perfectly normal because of the added moisture from the pumpkin. It will all come together once we add the dry ingredients.
Step 3: Whisk the Dry Ingredients. In a separate bowl, whisk together the flour, baking soda, baking powder, salt, cinnamon, nutmeg, and ginger. Whisking ensures the leavening agents and spices are evenly distributed throughout the flour, so you get a consistent flavor and rise in every single cookie. A little goes a long way here.
Step 4: Combine Wet and Dry. With your mixer on low speed, gradually add the dry ingredients to the wet ingredients. Mix just until no streaks of flour remain. Be careful not to overmix! As soon as it looks combined, stop the mixer. The dough will be quite soft and sticky—that’s exactly what we want.
Step 5: Fold in the Chocolate Chips. Now for the best part! Switch to a spatula and gently fold in the chocolate chips until they’re evenly distributed throughout the dough. I like to reserve a small handful to press onto the tops of the cookie dough balls right before baking—it makes them look extra bakery-worthy.
Step 6: Chill the Dough. Cover the bowl with plastic wrap and chill the dough in the refrigerator for at least 30 minutes, or up to 24 hours. Chilling is the secret weapon for a thicker cookie. It solidifies the butter, which means the cookies won’t spread as rapidly when they hit the hot oven.
Step 7: Preheat and Scoop. While the dough chills, preheat your oven to 350°F (175°C). Line a baking sheet with parchment paper or a silicone baking mat. Using a cookie scoop or a tablespoon, portion out the dough into rounded balls, placing them about 2 inches apart on the prepared baking sheet. If you saved some chocolate chips, press a few onto the top of each ball now.
Step 8: Bake to Perfection. Bake for 12-14 minutes. The cookies are done when the edges look set and are just starting to turn a light golden brown. The centers will still look very soft and slightly underdone—that’s perfect! They will continue to set up as they cool on the baking sheet. This is the trick to achieving that wonderfully soft, cake-like texture.
Step 9: Cool and Enjoy. Allow the cookies to cool on the baking sheet for at least 5-10 minutes before transferring them to a wire rack to cool completely. This resting time on the hot pan is essential for them to firm up. Then, dig in! They’re amazing warm, when the chocolate is still gooey, or at room temperature.
Serving Suggestions
Complementary Dishes
- A simple vanilla bean ice cream — Placing a still-warm cookie underneath a scoop of cold, creamy ice cream creates an incredible hot-and-cold, soft-and-creamy contrast that is just divine. The vanilla is a classic pairing for both the pumpkin and chocolate.
- A warm mug of apple cider — The tart, spiced notes of a good apple cider complement the warm spices in the cookie beautifully. It feels like the essence of autumn in a single bite and sip.
- A sharp cheddar cheese plate — This might sound unusual, but trust me. The sharp, salty tang of a good aged cheddar is a fantastic counterpoint to the sweet, spiced, and chocolatey cookie. It’s a sophisticated little snack for a gathering.
Drinks
- A glass of cold milk — It’s a classic for a reason. The creaminess of the milk cuts through the richness of the chocolate and complements the soft texture of the cookie perfectly. It’s the ultimate comfort combination.
- A pumpkin spice latte — Go all-in on the cozy vibes! The coffee bitterness balances the sweetness, and the shared spice profile makes for a wonderfully harmonious experience.
- A bold cup of chai tea — The black tea and spice blend in chai mirrors the warm spices in the cookie, creating a layered and deeply aromatic pairing that feels incredibly nurturing.
Something Sweet
- A small square of dark chocolate — For the true chocolate lover, enjoying a piece of high-quality dark chocolate (70% or higher) alongside the cookie intensifies the chocolate experience and provides a slightly bitter, sophisticated finish.
- A dollop of lightly sweetened whipped cream — For a simpler, lighter option than ice cream, a fluffy cloud of whipped cream on the side adds a touch of decadence without overwhelming the cookie’s own delicate flavors.
- A spiced poached pear — For a truly elegant dessert, serve a cookie with a half of a pear poached in red wine and spices. The soft, wine-infused fruit adds a beautiful, grown-up sweetness.
Top Mistakes to Avoid
- Mistake: Using pumpkin pie filling. This is the number one error! Pie filling will make your cookies far too sweet and alter the spice balance completely, resulting in a cloying, off-tasting cookie. Always double-check the can label.
- Mistake: Skipping the chill time. I know it’s tempting to bake them right away, but this dough is very soft. Without chilling, the cookies will spread into thin, flat puddles instead of rising into soft, plump mounds. Patience is key here.
- Mistake: Overbaking. These cookies are meant to be soft. If you wait for the centers to look fully cooked in the oven, they will be dry and cakey by the time they cool. Take them out when the edges are just set and the centers are still puffy and soft.
- Mistake: Overmixing the dough after adding the flour. This develops gluten, which is the enemy of a tender cookie. Mix on low speed and stop the moment the flour disappears. A few stray streaks are better than overmixing.
Expert Tips
- Tip: Brown your butter for a nutty depth. Take your butter a step further by browning it first. Melt it in a saucepan over medium heat until it foams and turns a golden amber color with little brown bits at the bottom. Let it cool slightly before using. It adds an incredible, warm, nutty flavor that pairs amazingly with pumpkin.
- Tip: Use a cookie scoop for uniformity. Not only is it faster and less messy, but using a scoop ensures all your cookies are the same size. This means they will bake evenly, so you don’t end up with some underdone and some overdone cookies on the same tray.
- Tip: Add a pinch of orange zest. The bright, citrusy notes of orange zest are a secret weapon with chocolate and pumpkin. Just the zest from half an orange, finely grated into the batter, will make the flavors pop in a really surprising and delightful way.
- Tip: Make an ice cream sandwich. Let the cookies cool completely, then sandwich a scoop of your favorite vanilla or cinnamon ice cream between two cookies. Wrap them individually and freeze for the ultimate frozen treat.
FAQs
Can I make these cookies gluten-free?
Absolutely! You can substitute the all-purpose flour with a 1:1 gluten-free baking blend. I’ve had great success with brands like Bob’s Red Mill or King Arthur Measure for Measure. The texture might be a tad more crumbly, but they will still be delicious. Just make sure your blend includes xanthan gum, which helps bind the ingredients similarly to gluten.
Why are my cookies cakey and not chewy?
That’s the nature of this particular recipe! The addition of pumpkin puree adds a significant amount of moisture, which steam-leavens the cookies during baking, giving them a softer, more cake-like texture. If you’re looking for a chewier cookie, you’d want a recipe with less liquid and more brown sugar. Embrace the cakey-ness—it’s what makes them unique and perfect for autumn.
Can I freeze the cookie dough?
Yes, this dough freezes beautifully. Scoop the dough balls onto a parchment-lined baking sheet and freeze them solid. Then, transfer the frozen dough balls to a zip-top freezer bag. You can bake them straight from the freezer—just add 1-2 minutes to the baking time. This is fantastic for having fresh-baked cookies on demand!
My dough is really sticky. Is that normal?
Yes, it is perfectly normal! Pumpkin puree has a high water content, so this dough is much softer and stickier than a standard chocolate chip cookie dough. This is exactly why the chilling step is so important. It firms up the butter, making the dough much easier to handle and preventing excessive spread.
Can I use milk chocolate or dark chocolate chips instead?
Of course! Feel free to use your favorite chocolate. Milk chocolate will make the cookies sweeter, while dark chocolate (60-70% cacao) will provide a deeper, less sweet chocolate flavor that contrasts nicely with the spiced pumpkin. You could even use a mix of semi-sweet and white chocolate chips for a fun twist.
Pumpkin Chocolate Chip Cookies
Bake the ultimate autumn treat with these soft, cake-like Pumpkin Chocolate Chip Cookies. My perfected recipe delivers warm spice & melty chocolate in every bite. Easy, one-bowl method!
Ingredients
Ingredients
-
1/2 cup unsalted butter (softened to room temperature (1 stick or 113 g))
-
1/2 cup granulated sugar (100 g)
-
1/4 cup light brown sugar (packed, 50 g)
-
1/2 cup pure pumpkin puree (not pumpkin pie filling, 122 g)
-
1 large egg (at room temperature)
-
1 teaspoon pure vanilla extract
-
1 1/2 cups all-purpose flour (188 g)
-
1/2 teaspoon baking soda
-
1/4 teaspoon baking powder
-
1/2 teaspoon salt
-
1 teaspoon ground cinnamon
-
1/4 teaspoon ground nutmeg
-
1/8 teaspoon ground ginger
-
1 cup semi-sweet chocolate chips (170 g)
Instructions
-
Cream the Butter and Sugars. In your large mixing bowl, combine the softened butter, granulated sugar, and brown sugar. Using a hand mixer or stand mixer fitted with the paddle attachment, beat them together on medium speed for about 2-3 minutes. You'll know it's ready when the mixture becomes pale, fluffy, and well-combined. This step is crucial for building the structure of your cookie, so don't rush it!01
-
Add the Wet Ingredients. Scrape down the sides of the bowl with a spatula. Add the pumpkin puree, egg, and vanilla extract to the butter-sugar mixture. Mix on medium speed until everything is fully incorporated. The batter might look a little curdled at this point—that's perfectly normal because of the added moisture from the pumpkin. It will all come together once we add the dry ingredients.02
-
Whisk the Dry Ingredients. In a separate bowl, whisk together the flour, baking soda, baking powder, salt, cinnamon, nutmeg, and ginger. Whisking ensures the leavening agents and spices are evenly distributed throughout the flour, so you get a consistent flavor and rise in every single cookie. A little goes a long way here.03
-
Combine Wet and Dry. With your mixer on low speed, gradually add the dry ingredients to the wet ingredients. Mix just until no streaks of flour remain. Be careful not to overmix! As soon as it looks combined, stop the mixer. The dough will be quite soft and sticky—that's exactly what we want.04
-
Fold in the Chocolate Chips. Now for the best part! Switch to a spatula and gently fold in the chocolate chips until they're evenly distributed throughout the dough. I like to reserve a small handful to press onto the tops of the cookie dough balls right before baking—it makes them look extra bakery-worthy.05
-
Chill the Dough. Cover the bowl with plastic wrap and chill the dough in the refrigerator for at least 30 minutes, or up to 24 hours. Chilling is the secret weapon for a thicker cookie. It solidifies the butter, which means the cookies won't spread as rapidly when they hit the hot oven.06
-
Preheat and Scoop. While the dough chills, preheat your oven to 350°F (175°C). Line a baking sheet with parchment paper or a silicone baking mat. Using a cookie scoop or a tablespoon, portion out the dough into rounded balls, placing them about 2 inches apart on the prepared baking sheet. If you saved some chocolate chips, press a few onto the top of each ball now.07
-
Bake to Perfection. Bake for 12-14 minutes. The cookies are done when the edges look set and are just starting to turn a light golden brown. The centers will still look very soft and slightly underdone—that's perfect! They will continue to set up as they cool on the baking sheet. This is the trick to achieving that wonderfully soft, cake-like texture.08
-
Cool and Enjoy. Allow the cookies to cool on the baking sheet for at least 5-10 minutes before transferring them to a wire rack to cool completely. This resting time on the hot pan is essential for them to firm up. Then, dig in! They're amazing warm, when the chocolate is still gooey, or at room temperature.09


