
Why You’ll Love This Pumpkin Cheesecake Bites
- Perfect Portion Control. Let’s face it, slicing a cheesecake can be a messy affair. With these bites, every piece is a perfect, neat little square of joy, making them ideal for parties or when you just want a taste without overindulging.
- No-Fuss, No-Crack Baking. The anxiety of a cracked cheesecake is real, but baking these in a square pan and cutting them into bites completely eliminates that worry. They’re forgiving and come out perfectly smooth every single time.
- Make-Ahead Magic. These bites are actually better when made a day in advance, allowing the flavors to meld and intensify in the fridge. This is a huge win for busy hosts—you can cross dessert off your list long before guests arrive.
- Endlessly Customizable. Feel like a drizzle of caramel? A dollop of whipped cream? A sprinkle of toasted pecans? The simple, classic base of these bites is the perfect canvas for your favorite toppings, making them a new dessert every time.
Ingredients & Tools
- 200 g graham cracker crumbs (about 1 ½ cups)
- 60 g granulated sugar (about ⅓ cup)
- 115 g unsalted butter, melted (½ cup or 1 stick)
- 450 g full-fat cream cheese, softened to room temperature (two 8-oz blocks)
- 150 g light brown sugar, packed (about ¾ cup)
- 240 g pure pumpkin puree (1 cup – not pumpkin pie filling)
- 2 large eggs, at room temperature
- 1 tsp vanilla extract
- 1 ½ tsp ground cinnamon
- ½ tsp ground ginger
- ¼ tsp ground nutmeg
- ¼ tsp ground cloves
- ¼ tsp salt
Tools: 8×8 inch square baking pan, parchment paper, mixing bowls, electric hand mixer or stand mixer, spatula
A quick note on the ingredients—using full-fat cream cheese and room temperature ingredients isn’t just a suggestion, it’s the secret to that ultra-smooth, lump-free texture we’re after. And honestly, the blend of warm spices here is everything; it’s what gives these bites their soul-warming, classic flavor.
Serves: 16 bites | Prep Time: 20 minutes | Cook Time: 35-40 minutes | Total Time: 4+ hours (including chilling)
Before You Start: Tips & Ingredient Notes
- Room Temperature is Non-Negotiable. I can’t stress this enough. Taking the cream cheese and eggs out of the fridge at least an hour before you start is the single most important step for a silky, non-lumpy filling. Cold cream cheese will never blend smoothly, no matter how hard you mix.
- Pumpkin Puree vs. Pumpkin Pie Filling. This is a crucial distinction! You want 100% pure pumpkin puree, which is just cooked, mashed pumpkin. Pumpkin pie filling comes pre-sweetened and spiced, which will throw off the balance of our recipe completely.
- Parchment Paper is Your Best Friend. Lining your pan with parchment paper, with a little overhang on two sides, creates a “sling” that makes lifting the entire baked cheesecake out of the pan effortless. This is the trick to getting clean, beautiful cuts.
- Don’t Overmix the Filling. Once you add the eggs, mix just until they are incorporated. Overbeating incorporates too much air, which can cause the cheesecake to puff up and then fall, potentially leading to cracks. A gentle hand is key.
How to Make Pumpkin Cheesecake Bites
Step 1: Prep the Pan and Make the Crust. First, preheat your oven to 325°F (160°C). Line your 8×8 inch pan with parchment paper, letting the paper hang over two opposite sides—this will be your handle later. In a medium bowl, stir together the graham cracker crumbs and granulated sugar. Pour in the melted butter and mix until the crumbs are evenly moistened and resemble wet sand. Pour this mixture into your prepared pan and press it down firmly and evenly into one compact layer. I like to use the bottom of a flat measuring cup to really pack it in. Pre-bake this crust for 10 minutes, then set it aside to cool slightly while you make the filling.
Step 2: Create the Creamy Filling. In a large bowl, using an electric mixer on medium speed, beat the softened cream cheese until it’s completely smooth and creamy, about 2 minutes. Scrape down the sides and the bottom of the bowl with a spatula—this is important to avoid hidden lumps. Add the packed brown sugar and beat for another minute until well combined and smooth. Now, add the pumpkin puree, vanilla extract, cinnamon, ginger, nutmeg, cloves, and salt. Beat on medium-low speed until everything is beautifully incorporated and the mixture is a uniform, warm orange color.
Step 3: Incorporate the Eggs. This is the final mixing stage. Add the room-temperature eggs one at a time, beating on low speed after each addition just until the yolk disappears into the batter. Remember, the goal here is to avoid overmixing. Once the second egg is in, mix for just another 10-15 seconds until the batter is smooth. You’ll notice it’s thick, creamy, and pourable. Give the bowl one last scrape to ensure homogeneity.
Step 4: Bake to Perfection. Pour the filling over the pre-baked crust and spread it into an even layer with your spatula. Gently tap the pan on the counter a couple of times to release any large air bubbles. Place the pan in the preheated oven and bake for 35-40 minutes. The edges should look set, but the center will still have a slight jiggle to it—like Jell-O—when you gently shake the pan. This is exactly what you want! The residual heat will continue to cook the center as it cools.
Step 5: The All-Important Cool Down. Once baked, turn off the oven, crack the oven door open, and let the cheesecake sit inside for about an hour. This gradual cooling helps prevent drastic temperature changes that can cause cracking. After an hour, remove the pan from the oven and let it cool completely on a wire rack. Then, cover it with plastic wrap or foil and refrigerate for at least 4 hours, but honestly, overnight is best for the flavor and texture to fully develop.
Step 6: Slice and Serve. When you’re ready to serve, use the parchment paper sling to lift the entire cheesecake block out of the pan and onto a cutting board. Using a large, sharp knife, wipe the blade clean with a hot, damp cloth between each cut for super clean edges. Slice into 16 even squares (4 rows by 4 rows). And there you have it—perfect, portable Pumpkin Cheesecake Bites.
Serving Suggestions
Complementary Dishes
- A Spiced Chai Latte — The warm, cardamom-forward notes of a chai latte are a fantastic companion to the pumpkin spices in the cheesecake, creating a cozy and aromatic experience.
- Simple Vanilla Bean Ice Cream — For a delightful contrast, serve a bite slightly warmed with a scoop of cold, high-quality vanilla ice cream. The hot-and-cold, creamy-on-creamy combination is simply divine.
Drinks
- Hot Apple Cider — The tartness of the apple cider cuts through the richness of the cheesecake beautifully, and it’s a classic fall pairing that never fails.
- Bourbon or Rye Whiskey — For an adults-only option, a small glass of bourbon neat or on the rocks offers oaky, caramel notes that complement the brown sugar and spice profile incredibly well.
Something Sweet
- Dark Chocolate-Dipped Orange Slices — The bright, citrusy burst from the orange provides a refreshing palate cleanser that prepares you for the next delicious cheesecake bite.
- Simple Candied Pecans — A small bowl of these on the side adds a wonderful crunchy, sweet, and salty element that elevates the entire dessert plate.
Top Mistakes to Avoid
- Mistake: Using cold ingredients. This is the number one cause of a lumpy cheesecake filling. Cold cream cheese will never blend smoothly, and cold eggs can cause the fat in the cream cheese to seize up, leading to an uneven texture.
- Mistake: Overbaking the cheesecake. You want the center to still be a little wobbly when you take it out of the oven. It will continue to set as it cools. A fully firm center in the oven means a dry, overcooked cheesecake.
- Mistake: Skipping the gradual cooling step. Taking the cheesecake from a hot oven directly to a cool countertop is a shock that often results in cracks. Letting it cool down slowly in the turned-off oven is a simple trick for a flawless surface.
- Mistake: Cutting with a dirty knife. Trying to slice through the creamy filling with a blunt or dirty knife will result in messy, squashed bites. A hot, clean knife is the secret to those picture-perfect edges.
Expert Tips
- Tip: Weigh your ingredients. For the most consistent results, especially with flour-like ingredients such as graham cracker crumbs, using a kitchen scale is a game-changer. Volume measurements can vary wildly, but weight is precise.
- Tip: Toast your spices. If you have a spare minute, gently toast your ground cinnamon, ginger, nutmeg, and cloves in a dry skillet over low heat for about 30 seconds before adding them to the filling. This wakes up their essential oils and intensifies their flavor dramatically.
- Tip: Use a water bath for ultimate creaminess. If you want to go the extra mile for the silkiest texture imaginable, you can place your square pan inside a larger roasting pan and pour hot water into the larger pan until it comes about halfway up the sides of the square pan. This creates a steamy environment for gentle, even baking.
- Tip: Get creative with toppings post-bake. After slicing, drizzle bites with caramel sauce, melted chocolate, or a dusting of cinnamon sugar. You can even roll the edges in finely chopped toasted nuts for an elegant touch.
FAQs
Can I make these gluten-free?
Absolutely! The crust is the only component that contains gluten. Simply swap the graham crackers for an equal weight of your favorite gluten-free graham-style crackers or gluten-free digestive biscuits. The filling is naturally gluten-free, so you’re good to go. Just always check the labels on your spices and pumpkin puree to be 100% sure they’re certified gluten-free if you have a severe allergy.
How long do these bites last in the fridge?
Stored in an airtight container, these Pumpkin Cheesecake Bites will keep beautifully in the refrigerator for up to 5 days. The flavor actually improves after a day or two. I don’t recommend freezing them after they are baked and sliced, as the texture of the creamy filling can become a bit grainy upon thawing.
My cream cheese is still a bit cold. What can I do?
If you’re short on time, you can gently soften the foil-wrapped blocks of cream cheese in a bowl of warm (not hot) water for about 10-15 minutes. For the eggs, place them in a bowl of warm water for 5-10 minutes to take the chill off. Just make sure they are completely dry before using.
Can I use a different pan size?
You can, but it will affect the baking time and the final texture. An 8×8 inch pan gives you the perfect thickness for a bite-sized treat. Using a 9×9 inch pan will result in a thinner cheesecake that will bake much faster, so keep a close eye on it. A 9-inch round springform pan will work, but you’ll get wedge-shaped pieces instead of neat bites.
Why did my cheesecake sink in the middle?
This usually happens for one of two reasons. First, if it was overbaked, the structure can collapse as it cools. Second, and more commonly, if the batter was overmixed after the eggs were added, too much air was incorporated. This air expands in the oven, then deflates as the cheesecake cools, causing the sinkage. Remember, mix just until combined!
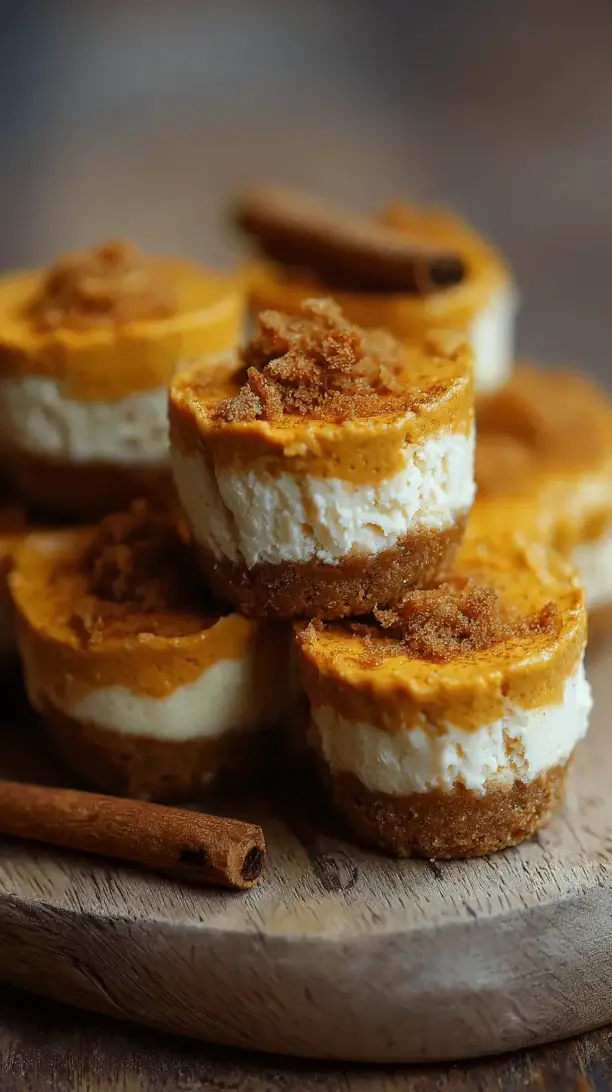
Pumpkin Cheesecake Bites
Creamy, no-crack Pumpkin Cheesecake Bites! Perfectly portioned for parties. Easy recipe with a graham cracker crust & warm spices. The ultimate make-ahead fall dessert.
Ingredients
Ingredients
-
200 g graham cracker crumbs (about 1 ½ cups)
-
60 g granulated sugar (about ⅓ cup)
-
115 g unsalted butter (melted (½ cup or 1 stick))
-
450 g full-fat cream cheese (softened to room temperature (two 8-oz blocks))
-
150 g light brown sugar (packed (about ¾ cup))
-
240 g pure pumpkin puree (1 cup – not pumpkin pie filling)
-
2 large eggs (at room temperature)
-
1 tsp vanilla extract
-
1 ½ tsp ground cinnamon
-
½ tsp ground ginger
-
¼ tsp ground nutmeg
-
¼ tsp ground cloves
-
¼ tsp salt
Instructions
-
Prep the Pan and Make the Crust. First, preheat your oven to 325°F (160°C). Line your 8x8 inch pan with parchment paper, letting the paper hang over two opposite sides—this will be your handle later. In a medium bowl, stir together the graham cracker crumbs and granulated sugar. Pour in the melted butter and mix until the crumbs are evenly moistened and resemble wet sand. Pour this mixture into your prepared pan and press it down firmly and evenly into one compact layer. I like to use the bottom of a flat measuring cup to really pack it in. Pre-bake this crust for 10 minutes, then set it aside to cool slightly while you make the filling.01
-
Create the Creamy Filling. In a large bowl, using an electric mixer on medium speed, beat the softened cream cheese until it's completely smooth and creamy, about 2 minutes. Scrape down the sides and the bottom of the bowl with a spatula—this is important to avoid hidden lumps. Add the packed brown sugar and beat for another minute until well combined and smooth. Now, add the pumpkin puree, vanilla extract, cinnamon, ginger, nutmeg, cloves, and salt. Beat on medium-low speed until everything is beautifully incorporated and the mixture is a uniform, warm orange color.02
-
Incorporate the Eggs. This is the final mixing stage. Add the room-temperature eggs one at a time, beating on low speed after each addition just until the yolk disappears into the batter. Remember, the goal here is to avoid overmixing. Once the second egg is in, mix for just another 10-15 seconds until the batter is smooth. You'll notice it's thick, creamy, and pourable. Give the bowl one last scrape to ensure homogeneity.03
-
Bake to Perfection. Pour the filling over the pre-baked crust and spread it into an even layer with your spatula. Gently tap the pan on the counter a couple of times to release any large air bubbles. Place the pan in the preheated oven and bake for 35-40 minutes. The edges should look set, but the center will still have a slight jiggle to it—like Jell-O—when you gently shake the pan. This is exactly what you want! The residual heat will continue to cook the center as it cools.04
-
The All-Important Cool Down. Once baked, turn off the oven, crack the oven door open, and let the cheesecake sit inside for about an hour. This gradual cooling helps prevent drastic temperature changes that can cause cracking. After an hour, remove the pan from the oven and let it cool completely on a wire rack. Then, cover it with plastic wrap or foil and refrigerate for at least 4 hours, but honestly, overnight is best for the flavor and texture to fully develop.05
-
Slice and Serve. When you're ready to serve, use the parchment paper sling to lift the entire cheesecake block out of the pan and onto a cutting board. Using a large, sharp knife, wipe the blade clean with a hot, damp cloth between each cut for super clean edges. Slice into 16 even squares (4 rows by 4 rows). And there you have it—perfect, portable Pumpkin Cheesecake Bites.06


