
Why You’ll Love This Peanut Butter Greek Yogurt Dip
- It’s unbelievably quick and simple. Honestly, if you can stir, you can make this dip. There’s no cooking, no complicated techniques—just a bowl, a spoon, and a few minutes of your time. It’s the perfect solution for when a craving strikes or when you need a last-minute snack for guests.
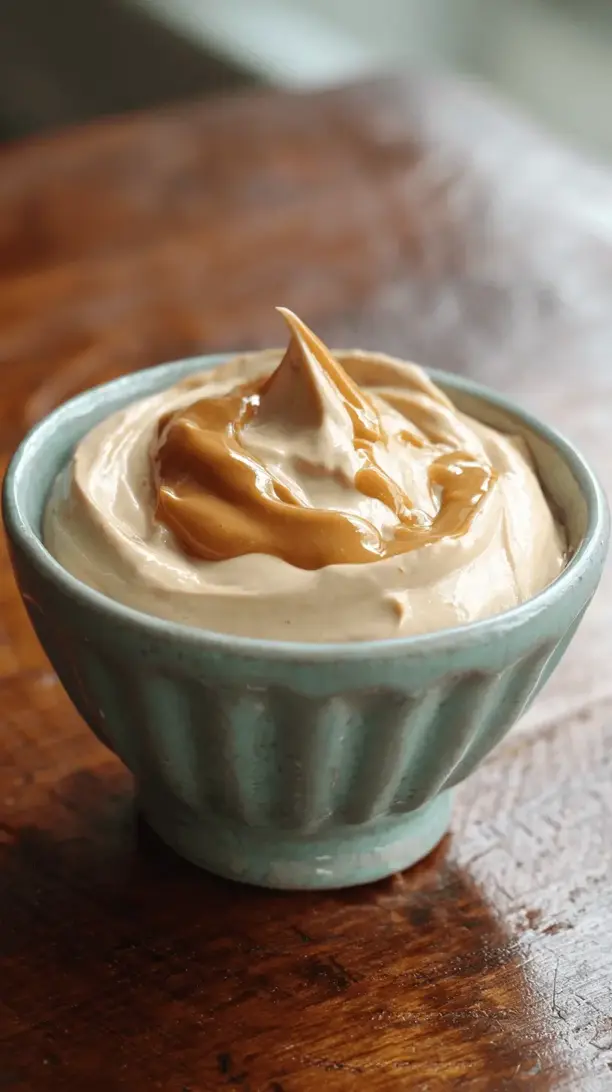
- The texture is magically creamy and satisfying. The combination of thick Greek yogurt and creamy peanut butter creates a luxuriously smooth dip that clings perfectly to whatever you’re dunking into it. It’s substantial without being heavy, which is a pretty fantastic balance to achieve.
- It’s a fantastic blank canvas for flavors. Love a hint of cinnamon? Add it. Want a drizzle of honey or a sprinkle of sea salt? Go for it. This base recipe is wonderfully adaptable, allowing you to tweak it to your exact mood and preference every single time.
- It feels like a treat but acts like a fuel. With a great hit of protein from the yogurt and healthy fats from the peanut butter, this dip provides lasting energy. It’s the kind of snack that truly satisfies, stopping you from mindlessly reaching for something less nourishing an hour later.
Ingredients & Tools
- 1 cup plain Greek yogurt (full-fat for ultimate creaminess)
- 1/4 cup creamy peanut butter (see notes below!)
- 1-2 tablespoons maple syrup or honey (adjust to your sweetness preference)
- 1/2 teaspoon vanilla extract (the real stuff makes a difference)
- 1 pinch of fine sea salt (to balance and enhance all the flavors)
- Optional add-ins: a dash of cinnamon, a tablespoon of mini chocolate chips, a teaspoon of chia seeds.
Tools: A medium-sized mixing bowl, a flexible spatula or spoon, and a small whisk (helpful for getting it super smooth).
The quality of your two main ingredients really matters here. Using a thick, strained Greek yogurt prevents the dip from being watery, and choosing a natural peanut butter (the kind where the oil separates) gives you the purest, most peanut-forward flavor. A little goes a long way in making this dip exceptional.
Serves: 4 | Prep Time: 5 minutes | Cook Time: 0 minutes | Total Time: 5 minutes
Before You Start: Tips & Ingredient Notes
- Yogurt consistency is key. If your Greek yogurt seems a bit watery, give it a good stir right in the container first. For an even thicker dip, you can place the yogurt in a fine-mesh strainer lined with a paper towel over a bowl for 10-15 minutes to drain off any excess liquid.
- What’s the deal with peanut butter? I highly recommend using a natural peanut butter that’s just peanuts and salt. The oil will likely be separated, so you’ll need to stir it really, really well before measuring. This ensures a smooth, pourable consistency that incorporates beautifully into the yogurt.
- Sweeten to taste, gradually. Start with one tablespoon of your chosen sweetener, mix everything together, and then taste. You can always add more, but you can’t take it out! Remember, the sweetness of your dippers (like very ripe fruit) will also play a role.
- Don’t skip the salt! Even if your peanut butter is salted, that tiny extra pinch of fine sea salt will work wonders. It sharpens the peanut flavor, cuts through the richness, and makes the sweetness taste more complex. It’s the secret weapon.
How to Make Peanut Butter Greek Yogurt Dip
Step 1: First, get your peanut butter ready. If you’re using natural peanut butter, give it a vigorous stir in its jar until the oil is fully incorporated and the texture is smooth and homogenous. This is the most important step for a lump-free dip. Scoop out the measured amount into your mixing bowl.
Step 2: Now, add the Greek yogurt right on top of the peanut butter. I like to add the maple syrup or honey and the vanilla extract at this stage too. The trick is to not start stirring wildly just yet. You want to gently incorporate the ingredients to avoid a splatter.
Step 3: Using your spatula or a small whisk, start folding the ingredients together. Begin from the center and slowly work your way outwards. You’ll notice the mixture might look a little streaky or separated at first—this is totally normal. Just keep stirring with patience.
Step 4: Continue mixing until the dip is completely uniform in color and texture. There should be no visible streaks of white yogurt or dark peanut butter. It should look creamy, smooth, and utterly inviting. This is when you add that all-important pinch of salt.
Step 5: Give it one final stir to distribute the salt, and then—this is the best part—taste it. Dip a clean finger or a spoon in and assess. Does it need more sweetness? A bit more salt? Maybe a dash of cinnamon? Now is the time to adjust. Once you’re happy, your dip is ready to serve immediately, or you can pop it in the fridge to let the flavors meld for a bit.
Serving Suggestions
Complementary Dishes
- Fresh Fruit Platter — The classic pairing. Crisp apple slices, firm pear spears, and sturdy banana chunks are fantastic. The fresh, juicy sweetness of the fruit is a perfect contrast to the rich, creamy dip.
- Crudités & Pretzels — For a more savory-leaning snack, try celery sticks, carrot batons, and cucumber rounds. The salty crunch of pretzel rods or twists also provides a wonderful textural contrast.
- Toast or Rice Cakes — Use it as a spread! A thick layer on whole-wheat toast or a brown rice cake, topped with sliced banana and a drizzle of honey, makes for a seriously satisfying breakfast or lunch.
Drinks
- Cold Milk or a Milk Alternative — It’s a timeless combination for a reason. The cool, clean taste of milk is the ultimate palate cleanser between bites of the rich, peanutty dip.
- Iced Coffee or Black Tea — The slight bitterness of coffee or strong tea complements the sweetness of the dip beautifully, making this a sophisticated afternoon snack combo.
Something Sweet
- Dark Chocolate-Covered Espresso Beans — For a real grown-up treat, the intense, bitter notes of dark chocolate and coffee are a stunning match for the creamy dip, creating a mocha-like experience.
- Simple Shortbread Cookies — The buttery, crumbly texture of a simple shortbread cookie is a delightful vehicle for the dip, turning it into an instant, elegant dessert.
Top Mistakes to Avoid
- Mistake: Using a thin, runny yogurt. This is the number one reason for a watery dip. If your yogurt isn’t thick, the final consistency will be more of a dressing than a dip, and it won’t cling properly to your dippers.
- Mistake: Not stirring the peanut butter first. I’ve messed this up before too, and you end up with a clumpy, oily mess. Taking that extra minute to fully incorporate the oil in natural peanut butter is non-negotiable for a silky-smooth result.
- Mistake: Adding all the sweetener at once without tasting. Sweetness is so personal! What’s perfect for me might be too sweet for you. Always start conservatively, mix, taste, and then decide if you need more. You can’t reverse an overly sweet dip.
- Mistake: Skipping the salt. It might seem counterintuitive in a sweet-ish recipe, but salt is a flavor enhancer. Without it, the dip can taste flat and one-dimensional. That pinch is what makes the flavors pop.
Expert Tips
- Tip: Let it rest. If you have just five extra minutes, cover the dip and let it sit in the fridge for a bit. This allows the flavors to fully meld together and the dip to firm up slightly, making it even more scoopable.
- Tip: Make it a smoothie bowl base. Thin out a portion of the dip with a splash of milk or water, pour it into a bowl, and top with granola, berries, and coconut flakes for an incredibly quick and delicious smoothie bowl.
- Tip: Use it as a fruit salad dressing. Thin it out with a little orange or apple juice to create a creamy, protein-packed dressing for a fruit salad. It’s a game-changer for potlucks.
- Tip: Freeze it for a healthy “ice cream”. Pour the dip into a parchment-lined container and freeze for a few hours. Scoop it out for a frozen yogurt-like treat that’s high in protein and incredibly satisfying.
FAQs
Can I use a different nut or seed butter?
Absolutely! This recipe is very adaptable. Almond butter, cashew butter, or even sunflower seed butter would work wonderfully. Just keep in mind that each will impart its own distinct flavor. If using sunflower seed butter, be aware that it can sometimes cause baked goods to turn green (a harmless chemical reaction), but it’s fine for a dip eaten immediately.
How long does this dip last in the fridge?
Stored in an airtight container, it will keep well for 3-4 days. You might notice a little liquid separation after a day or two—this is normal. Just give it a good stir before serving, and it will be as good as new. I don’t recommend freezing the mixed dip, as the yogurt’s texture can become grainy upon thawing.
Is this dip suitable for a packed lunch?
It’s perfect for a packed lunch! To prevent sogginess, pack the dip in a separate small container from your dippers (like apple slices). You can even put a little lemon juice on cut apples to keep them from browning. It’s a much healthier and more satisfying alternative to many store-bought dips.
My dip turned out too thick. How can I thin it?
No problem at all! Simply whisk in a teaspoon at a time of milk (dairy or non-dairy), water, or even a little apple juice until it reaches your desired consistency. Go slowly—you can always add more liquid, but you can’t take it out.
Can I make this dairy-free or vegan?
Yes, very easily! Simply use a thick, plain plant-based Greek-style yogurt (like those made from coconut or soy) and maple syrup instead of honey. The method and result will be virtually identical, making it a fantastic inclusive option for almost any diet.
Peanut Butter Greek Yogurt Dip
Whip up this creamy Peanut Butter Greek Yogurt Dip in just 5 minutes! A healthy, protein-packed snack perfect with apples or celery. Your new go-to for easy, delicious fuel.
Ingredients
Ingredients
-
1 cup plain Greek yogurt (full-fat for ultimate creaminess)
-
1/4 cup creamy peanut butter (see notes below!)
-
1-2 tablespoons maple syrup or honey (adjust to your sweetness preference)
-
1/2 teaspoon vanilla extract (the real stuff makes a difference)
-
1 pinch fine sea salt (to balance and enhance all the flavors)
-
Optional add-ins (a dash of cinnamon, a tablespoon of mini chocolate chips, a teaspoon of chia seeds)
Instructions
-
First, get your peanut butter ready. If you're using natural peanut butter, give it a vigorous stir in its jar until the oil is fully incorporated and the texture is smooth and homogenous. This is the most important step for a lump-free dip. Scoop out the measured amount into your mixing bowl.01
-
Now, add the Greek yogurt right on top of the peanut butter. I like to add the maple syrup or honey and the vanilla extract at this stage too. The trick is to not start stirring wildly just yet. You want to gently incorporate the ingredients to avoid a splatter.02
-
Using your spatula or a small whisk, start folding the ingredients together. Begin from the center and slowly work your way outwards. You'll notice the mixture might look a little streaky or separated at first—this is totally normal. Just keep stirring with patience.03
-
Continue mixing until the dip is completely uniform in color and texture. There should be no visible streaks of white yogurt or dark peanut butter. It should look creamy, smooth, and utterly inviting. This is when you add that all-important pinch of salt.04
-
Give it one final stir to distribute the salt, and then—this is the best part—taste it. Dip a clean finger or a spoon in and assess. Does it need more sweetness? A bit more salt? Maybe a dash of cinnamon? Now is the time to adjust. Once you're happy, your dip is ready to serve immediately, or you can pop it in the fridge to let the flavors meld for a bit.05


