
Why You’ll Love These Peanut Butter Energy Oat Bars
- They’re seriously simple. Honestly, if you can stir things together in a bowl, you can make these bars. There’s no baking involved, which means less mess and less waiting around for the oven to preheat.
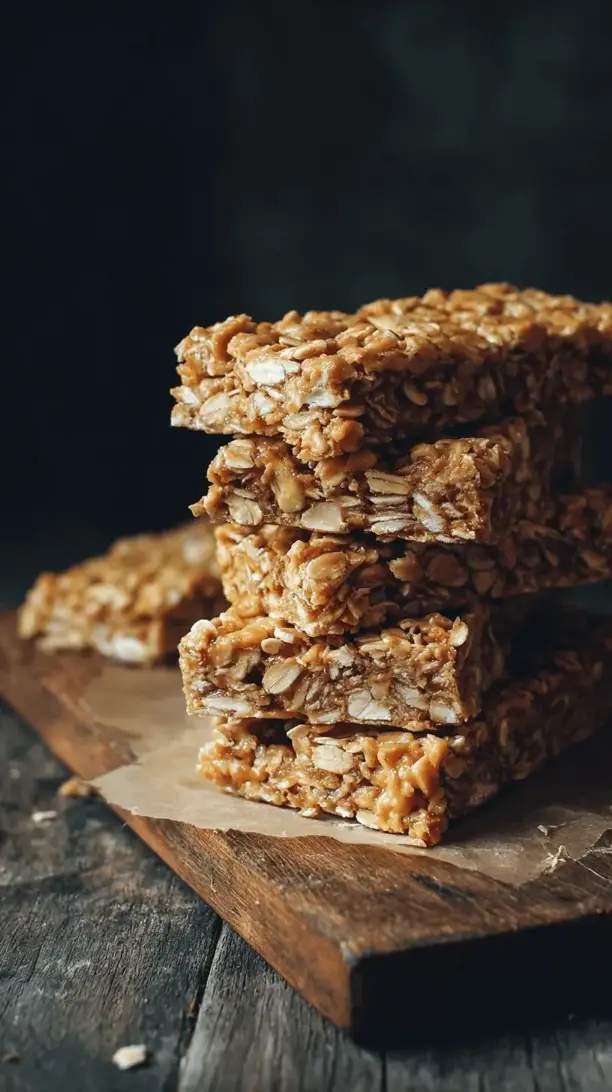
- The perfect texture combo. You get the chewiness from the oats, a little crunch from any add-ins you choose, and a wonderfully dense, satisfying bite that really sticks with you.
- Endlessly customizable. This recipe is a fantastic blueprint. Love chocolate? Toss in some chips. Feeling fancy? Add dried cherries and a pinch of sea salt. It’s your snack, your rules.
- They actually give you energy. Unlike a sugar-laden candy bar that leads to a crash, these bars provide a steady release of energy thanks to the complex carbs in the oats and the healthy fats from the peanut butter.
Ingredients & Tools
- 250 g old-fashioned rolled oats (not quick oats)
- 150 g creamy peanut butter (the natural, runny kind works best)
- 120 ml honey or maple syrup
- 2 tbsp coconut oil or unsalted butter
- 1 tsp pure vanilla extract
- ½ tsp fine sea salt
- 80 g mix-ins like chocolate chips, chopped nuts, or dried fruit (optional)
Tools: 8×8 inch baking pan, parchment paper, medium saucepan, large mixing bowl, spatula
The quality of your peanut butter really makes a difference here—the kind with just peanuts and salt gives the cleanest, nuttiest flavor. And using rolled oats instead of quick oats is key for that perfect chewy texture; quick oats can get a bit mushy.
Serves: 9 bars | Prep Time: 10 minutes | Set Time: 2 hours | Total Time: 2 hours 10 minutes
Before You Start: Tips & Ingredient Notes
- Why natural peanut butter? The oils in natural peanut butter help create a better binding mixture with the honey and coconut oil. If you use a stabilized brand (like Skippy or Jif), the bars can turn out a bit drier and crumbly.
- Can I use quick oats? You can, but the texture will be different—softer and less chewy. Rolled oats give that classic, substantial feel that holds up really well.
- The importance of the “glue”. Don’t be tempted to skimp on the honey or peanut butter. This mixture is what holds everything together once it cools. If your mixture seems too dry after combining, add another tablespoon of peanut butter.
- Line that pan! This is non-negotiable. Parchment paper with a little overhang is your best friend here. It makes lifting the whole slab of bars out for cutting an absolute breeze.
How to Make Peanut Butter Energy Oat Bars
Step 1: First, get your pan ready. Line your 8×8 inch baking pan with parchment paper, leaving some overhang on two opposite sides. This creates little “handles” that will make it super easy to lift the whole block out later. Give the parchment a very light spray with cooking oil or a quick rub with butter—this just ensures nothing sticks. Set the pan aside.
Step 2: Now, for the warm, gooey glue that binds everything. In your medium saucepan, combine the peanut butter, honey (or maple syrup), and coconut oil. Place it over low heat. You’ll want to warm this gently, stirring almost constantly, just until everything is melted, smooth, and combined. It should take about 3-4 minutes. The second it’s liquidy and uniform, take it off the heat—you don’t want it to boil. Stir in the vanilla extract and salt. The aroma at this point is just… heavenly.
Step 3: Pour the rolled oats into your large mixing bowl. If you’re using any add-ins like chocolate chips or nuts, hold off on adding them just yet if it’s very warm—you don’t want the chocolate to melt completely. Pour the warm peanut butter mixture over the oats. Using a spatula, start folding everything together. You’ll notice the oats quickly get coated in that glossy, sticky sauce. Keep folding until there are no dry spots of oats left.
Step 4: This is the add-in moment! If your mixture has cooled down a bit (you can touch the bottom of the bowl), now is the time to stir in your chocolate chips, dried fruit, or nuts. Fold them in evenly so every bar gets a little bit of everything.
Step 5: Transfer the mixture to your prepared pan. Use the spatula to spread it into an even layer. Now, here’s a pro tip for perfect bars: take a piece of parchment paper and place it directly on top of the mixture. Then, use something flat—like the bottom of a measuring cup or a glass—to press down firmly and compact the mixture. Really press hard! This is the secret to bars that hold their shape and don’t crumble. Press from the center outwards to ensure it’s even.
Step 6: Patience is key. Place the pan in the refrigerator for at least 2 hours, or until the bars are completely firm. Don’t try to cut them early—they’ll just fall apart. Once they’re rock solid, use the parchment paper handles to lift the entire block out of the pan onto a cutting board. Use a sharp knife to slice it into 9 even squares (or 12 smaller rectangles).
Serving Suggestions
Complementary Dishes
- A fresh fruit salad — The bright, juicy acidity of berries or citrus cuts through the richness of the peanut butter beautifully, making for a really balanced snack or light breakfast.
- A creamy Greek yogurt parfait — Crumble a bar over a bowl of plain Greek yogurt and some berries. It adds fantastic texture and turns your yogurt into a much more substantial meal.
Drinks
- A cold glass of milk — It’s a classic for a reason. The creaminess of milk is the perfect partner to the nutty, sweet flavors of the bar. Almond milk works wonderfully too for a dairy-free option.
- A strong cup of black coffee — The bitterness of the coffee contrasts with the sweetness of the bar in the most delightful way, making for an ideal mid-morning pick-me-up.
Something Sweet
- A small square of dark chocolate — If you’re looking for a more decadent treat, enjoy a bar with a piece of high-quality dark chocolate. It feels indulgent but is still relatively simple.
Top Mistakes to Avoid
- Mistake: Not compacting the mixture enough. I’ve messed this up before too—a few lazy presses and you end up with crumbly granola instead of neat bars. That firm press is non-negotiable for a solid, sliceable texture.
- Mistake: Using the wrong peanut butter. Highly processed peanut butters with lots of added sugars and stabilizers can prevent the mixture from binding properly. Stick to the natural stuff for the best results.
- Mistake: Skipping the chill time. It’s tempting to cut into them after an hour, but they need that full two hours (or even more) in the fridge to set up correctly. Rushing this step is a recipe for a sticky, messy situation.
- Mistake: Adding chocolate chips to a very hot mixture. If you stir in chocolate chips right after adding the warm liquid, they’ll melt into a swirl. If you want distinct chips, let the oat mixture cool for a few minutes first.
Expert Tips
- Tip: Toast your oats. For a next-level flavor boost, spread the rolled oats on a baking sheet and toast them in a 350°F (175°C) oven for 8-10 minutes before starting. It gives them a wonderful nutty depth that takes these bars from great to incredible.
- Tip: Make a double batch for freezing. These bars freeze beautifully. Individually wrap them in parchment paper and store them in a freezer bag. They’ll thaw in your lunchbox by midday, or you can even eat them semi-frozen for a fun, firmer texture.
- Tip: Get creative with mix-ins. Think beyond chocolate chips. Try sunflower seeds for crunch, chopped pretzels for a salty twist, or even a tablespoon of chia seeds or flaxseed meal for an extra nutritional punch.
- Tip: For clean cuts, use a hot knife. Dip your knife in very hot water and wipe it dry before each cut. The heat will glide through the sticky bars smoothly, giving you perfectly clean edges every single time.
FAQs
Can I make these bars vegan?
Absolutely! It’s an easy swap. Just use maple syrup instead of honey, and ensure your chocolate chips (if using) are vegan-friendly. The coconut oil version is already plant-based, so you’re good to go. The bars will have a slightly different, but still delicious, flavor profile with the maple syrup.
How should I store these energy bars?
They need to be stored in an airtight container in the refrigerator. The cool temperature keeps them firm. They’ll last for up to two weeks this way. You can also store them at room temperature for a few days if your kitchen is cool, but they will be much softer and more prone to falling apart.
My bars are too crumbly. What happened?
This usually means one of two things: either the mixture wasn’t pressed firmly enough into the pan, or there wasn’t quite enough of the “wet” binding mixture. Next time, really put some muscle into the pressing step, and if the mixture seems dry, add an extra tablespoon of peanut butter or honey during the cooking stage.
Can I use almond butter or sunflower seed butter instead?
Yes, you can! Any nut or seed butter will work in a 1:1 substitution. Just be aware that the flavor will change accordingly. Sunflower seed butter is a great nut-free option. The bars might also be a tad softer depending on the butter you choose.
Are these suitable for a gluten-free diet?
Yes, as long as you use certified gluten-free oats. Oats are naturally gluten-free, but they are often processed in facilities that also handle wheat, so cross-contamination can be an issue for those with celiac disease or a severe sensitivity. Always check the packaging to be safe.


