
Why You’ll Love This Peanut Butter Date Truffles
- Effortless Elegance. Seriously, these look and taste like they came from a fancy chocolatier, but they require zero special skills or equipment. It’s the ultimate “fake it till you make it” dessert that will impress everyone.
- Naturally Sweetened Goodness. We’re letting the dates do all the heavy lifting here. Their deep, caramel-like sweetness means there’s no need for refined sugars, giving you a clean, sustained energy release rather than a sugary crash.
- Endlessly Customizable. This is your playground! Feel like a crunch? Add some chopped nuts. Want a chocolate shell? Go for a dip. The base recipe is a perfect canvas for your creativity, so you can make a new version every single time.
- The Perfect Healthy Snack. They’re portable, packed with fiber and healthy fats, and incredibly satisfying. Keep a batch in the fridge for a grab-and-go option that actually feels like a treat, not a compromise.
Ingredients & Tools
- 200 g (about 1 ½ cups) Medjool dates, pitted
- 120 g (½ cup) smooth, natural peanut butter
- 30 g (¼ cup) almond flour or oat flour
- 1 tsp pure vanilla extract
- A generous pinch of fine sea salt
- For rolling (optional): Unsweetened cocoa powder, desiccated coconut, crushed peanuts, or melted dark chocolate.
Tools: A food processor, a medium bowl, a baking sheet or plate, and parchment paper.
The quality of your peanut butter really matters here—look for one with just peanuts and maybe a little salt. And those Medjool dates? They should be soft and sticky; if they’re a bit dry, a quick soak in hot water will bring them back to life. These two ingredients are the heart of the recipe, so using good ones makes all the difference.
Serves: Makes 12-14 truffles | Prep Time: 20 minutes | Chill Time: 30 minutes | Total Time: 50 minutes
Before You Start: Tips & Ingredient Notes
- Pit Those Dates! It sounds obvious, but it’s the one step you really don’t want to forget. Give each date a gentle squeeze to check for the hard pit before tossing them into the food processor—it’s a simple check that saves your blades!
- The Stickiness Factor. If your dough is too wet and sticky to handle, don’t panic. Just add another tablespoon of almond or oat flour until it reaches a play-dough-like consistency. Conversely, if it’s crumbly, a teaspoon of water or maple syrup can help bring it together.
- Natural Peanut Butter is Key. Avoid using peanut butter with added oils or sugars. The kind you have to stir is perfect because it helps create the right texture and allows the natural sweetness of the dates to shine through without any competing flavors.
- Chill Out for Perfect Rolling. If you have a few extra minutes, pop the mixed dough in the fridge for 15-20 minutes before rolling. A slightly firmer dough is much easier to handle and will result in smoother, more uniform truffles.
How to Make Peanut Butter Date Truffles
Step 1: Prepare Your Dates. First things first, make sure all your dates are pitted. If they feel a little dry or firm, place them in a bowl and cover with hot water for about 10 minutes. This will rehydrate them and make them super soft and sticky, which is exactly what we want. After soaking, drain them thoroughly and pat them dry with a paper towel. You’ll notice they’re much more pliable now.
Step 2: Create the Base Dough. Add the softened dates to the bowl of your food processor. Pulse a few times to break them down into a thick paste. Scrape down the sides with a spatula to ensure everything is incorporated. Next, add the peanut butter, almond flour, vanilla extract, and that all-important pinch of salt. Process everything for a minute or two, until the mixture comes together into a cohesive, slightly sticky ball. It should look like a thick, fudgy cookie dough.
Step 3: Test the Texture. Stop the processor and pinch a small amount of the dough between your fingers. It should hold together easily without being overly wet. If it’s too sticky, add another tablespoon of almond flour and pulse to combine. If it’s too dry and crumbly, add a teaspoon of water or a dab more peanut butter. This is the time to get the texture just right.
Step 4: Roll the Truffles. Line a baking sheet or plate with parchment paper. Using a small cookie scoop or a tablespoon, portion out the dough. Roll each portion between your palms to form a smooth, round ball. If the dough is sticking to your hands, a very light coating of neutral oil or damp hands can help. Place each finished truffle on the prepared sheet. You should get about 12 to 14 evenly sized truffles.
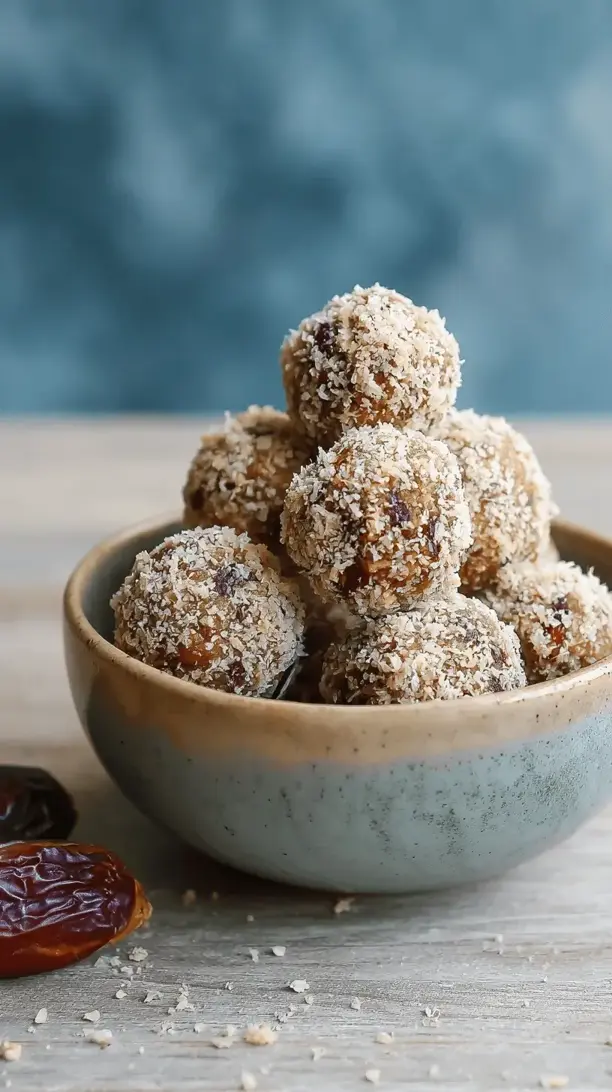
Step 5: The Coating (Optional but Recommended!). Now for the fun part! Pour your chosen coatings into small, shallow bowls. You can roll the truffles in unsweetened cocoa powder for a classic, bitter contrast, or in desiccated coconut for a tropical twist. For a crunch, try finely crushed peanuts. For ultimate decadence, dip them in melted dark chocolate and place them back on the parchment paper to set.
Step 6: Set and Serve. Once all your truffles are rolled and coated, transfer the baking sheet to the refrigerator for at least 30 minutes to allow them to firm up. This chilling step is crucial for that perfect, firm-yet-fudgy texture. After they’ve set, they’re ready to enjoy! Store any leftovers in an airtight container in the fridge.
Serving Suggestions
Complementary Dishes
- A Fresh Fruit Platter — The bright, juicy acidity of berries, orange segments, or sliced apples cuts through the richness of the truffles beautifully, creating a lovely balance on a dessert board.
- A Cheese Board Tangent — Believe it or not, a sharp aged cheddar or a creamy goat cheese can be a surprisingly fantastic partner to the sweet, nutty flavors of these truffles, offering a sophisticated savory counterpoint.
Drinks
- A Strong Cup of Coffee — The bitterness of a good espresso or black coffee is a match made in heaven for the sweet, fudgy center of these truffles, making them an ideal afternoon pick-me-up.
- Cold Oat or Almond Milk — For a non-caffeinated option, a glass of cold, creamy plant-based milk complements the peanut butter flavor and makes the whole experience feel like a grown-up, healthy version of cookies and milk.
Something Sweet
- Orange Segments in Dark Chocolate — If you’re building a full dessert spread, these provide a contrasting zesty and juicy element that plays wonderfully against the dense, nutty truffles.
- Simple Almond Biscotti — The crunchy, not-too-sweet texture of biscotti offers a nice textural variation and echoes the nutty theme without overwhelming the palate.
Top Mistakes to Avoid
- Mistake: Using the wrong peanut butter. Skippy or Jif-style peanut butters with added sugars and hydrogenated oils will make the truffles far too sweet and can prevent the dough from setting properly. Stick to natural varieties.
- Mistake: Skipping the salt. I know it seems like a tiny detail, but that pinch of salt is non-negotiable. It balances the sweetness of the dates and enhances the peanut butter flavor, taking your truffles from “good” to “can’t-stop-eating-them” great.
- Mistake: Not processing the dates enough. If there are large chunks of date left in the mixture, your truffles won’t be smooth and might be difficult to roll. Process until the mixture is completely uniform for the best texture.
- Mistake: Skipping the chill time. I’ve been impatient before too, but rolling truffles with warm dough is a sticky mess. The brief time in the fridge firms everything up, making the process cleaner and the final product much more professional.
Expert Tips
- Tip: Toast your coatings. If you’re using coconut or nuts for rolling, toast them lightly in a dry pan first. This simple step unlocks incredible depth of flavor and aroma, adding a whole new layer of complexity to your truffles.
- Tip: Add a flavor boost. Feel free to experiment with a pinch of spice! A little cinnamon, cardamom, or even a tiny bit of espresso powder blended into the dough can create a wonderfully warm and intriguing flavor profile.
- Tip: Use a cookie scoop. For truffles that are all exactly the same size (which makes them look super pro), use a small cookie scoop or melon baller to portion the dough. It’s faster, less messy, and ensures even chilling and setting.
- Tip: Freeze for long-term storage. These truffles freeze beautifully! Place them in a single layer on a parchment-lined tray to freeze solid, then transfer to a freezer bag. They’ll keep for up to 3 months, so you can have a healthy treat on demand.
FAQs
Can I use a different nut butter?
Absolutely! This recipe is very adaptable. Almond butter, cashew butter, or even sunflower seed butter (for a nut-free version) work wonderfully. Just make sure they are the natural, drippy kind. The flavor will change, of course—almond butter will give a slightly milder, marzipan-like taste, which is also delicious. The texture might vary slightly, so you may need to adjust with a touch more flour or a splash of water to get the perfect consistency.
My dough is too crumbly and won’t hold together. What did I do wrong?
This usually happens if the dates were a bit on the dry side to begin with. Don’t worry, it’s an easy fix! Add a teaspoon of water, maple syrup, or even a little more peanut butter to the food processor and pulse again. Start with a small amount—you can always add more, but you can’t take it out. The mixture should quickly come together into a pliable dough.
How long will these truffles keep fresh?
Stored in an airtight container in the refrigerator, these truffles will stay fresh and delicious for up to two weeks. They actually tend to get even better after a day or two as the flavors meld. Because they are made with natural ingredients without preservatives, I don’t recommend leaving them out at room temperature for more than a couple of hours, especially if your kitchen is warm.
Can I make these without a food processor?
You can, but it requires a bit more elbow grease! If your dates are very soft, you can try mashing them thoroughly with a fork in a bowl and then stirring in the other ingredients. It might not be as perfectly smooth as the food processor method, but it will still work. Using a stand mixer with a paddle attachment is another good alternative if you have one.
Is the almond flour necessary? What can I use instead?
The almond flour primarily acts as a binder and helps absorb excess moisture from the dates and peanut butter, making the dough easier to handle. You can substitute it with an equal amount of oat flour (which you can make by grinding rolled oats in a blender), or even coconut flour. If using coconut flour, be aware it’s highly absorbent, so start with half the amount and add more only if needed.
Peanut Butter Date Truffles
Whip up decadent Peanut Butter Date Truffles in 20 minutes! This no-bake, healthy snack is naturally sweetened & endlessly customizable. Your new go-to energy bite!
Ingredients
Ingredients
-
200 g Medjool dates (pitted (about 1 ½ cups))
-
120 g smooth, natural peanut butter ((½ cup))
-
30 g almond flour or oat flour ((¼ cup))
-
1 tsp pure vanilla extract
-
1 pinch fine sea salt (generous)
-
Unsweetened cocoa powder, desiccated coconut, crushed peanuts, or melted dark chocolate (for rolling (optional))
Instructions
-
Prepare Your Dates. First things first, make sure all your dates are pitted. If they feel a little dry or firm, place them in a bowl and cover with hot water for about 10 minutes. This will rehydrate them and make them super soft and sticky, which is exactly what we want. After soaking, drain them thoroughly and pat them dry with a paper towel. You'll notice they're much more pliable now.01
-
Create the Base Dough. Add the softened dates to the bowl of your food processor. Pulse a few times to break them down into a thick paste. Scrape down the sides with a spatula to ensure everything is incorporated. Next, add the peanut butter, almond flour, vanilla extract, and that all-important pinch of salt. Process everything for a minute or two, until the mixture comes together into a cohesive, slightly sticky ball. It should look like a thick, fudgy cookie dough.02
-
Test the Texture. Stop the processor and pinch a small amount of the dough between your fingers. It should hold together easily without being overly wet. If it's too sticky, add another tablespoon of almond flour and pulse to combine. If it's too dry and crumbly, add a teaspoon of water or a dab more peanut butter. This is the time to get the texture just right.03
-
Roll the Truffles. Line a baking sheet or plate with parchment paper. Using a small cookie scoop or a tablespoon, portion out the dough. Roll each portion between your palms to form a smooth, round ball. If the dough is sticking to your hands, a very light coating of neutral oil or damp hands can help. Place each finished truffle on the prepared sheet. You should get about 12 to 14 evenly sized truffles.04
-
The Coating (Optional but Recommended!). Now for the fun part! Pour your chosen coatings into small, shallow bowls. You can roll the truffles in unsweetened cocoa powder for a classic, bitter contrast, or in desiccated coconut for a tropical twist. For a crunch, try finely crushed peanuts. For ultimate decadence, dip them in melted dark chocolate and place them back on the parchment paper to set.05
-
Set and Serve. Once all your truffles are rolled and coated, transfer the baking sheet to the refrigerator for at least 30 minutes to allow them to firm up. This chilling step is crucial for that perfect, firm-yet-fudgy texture. After they've set, they're ready to enjoy! Store any leftovers in an airtight container in the fridge.06


