
Why You’ll Love This Peanut Butter Chocolate Pancakes
- It’s a Dessert-for-Breakfast Dream. Seriously, these pancakes capture the iconic flavor combination of peanut butter and chocolate in a form you can totally justify eating first thing in the morning. They’re indulgent but still feel like a proper breakfast.
- The Texture is Absolutely Perfect. We’re aiming for a beautifully fluffy, tender crumb that’s studded with pockets of melted chocolate. The peanut butter is incorporated in a way that adds richness and a subtle nutty flavor without weighing the batter down.
- They’re Surprisingly Simple to Make. You don’t need any fancy techniques or equipment. If you can make basic pancakes, you can absolutely master these. The process is straightforward and, honestly, kind of therapeutic.
- They’re Incredibly Versatile. Love dark chocolate? Use it! Prefer milk chocolate chips? Go for it. You can even make them with crunchy peanut butter for a little extra texture. This recipe is a fantastic canvas for your personal preferences.
Ingredients & Tools
- 1 ½ cups all-purpose flour
- 2 tablespoons granulated sugar
- 1 tablespoon baking powder
- ½ teaspoon fine sea salt
- 1 ¼ cups milk (whole or 2%)
- ½ cup creamy peanut butter
- 1 large egg
- 2 tablespoons unsalted butter, melted (plus more for cooking)
- 1 teaspoon vanilla extract
- ¾ cup semi-sweet chocolate chips
- For serving: maple syrup, sliced bananas, extra peanut butter
Tools: A large mixing bowl, a medium mixing bowl, a whisk, a ladle or ¼ cup measure, a large non-stick skillet or griddle, a spatula.
A quick note on the peanut butter—I really recommend using a standard, no-stir creamy variety for the most consistent results. The natural, oily kinds can sometimes separate and affect the batter’s texture. And for the chocolate, chips are great because they hold their shape, but if you chop up a bar, you’ll get those lovely, uneven pools of melted chocolate.
Serves: 3-4 (makes about 10-12 pancakes) | Prep Time: 10 minutes | Cook Time: 15 minutes | Total Time: 25 minutes
Before You Start: Tips & Ingredient Notes
- Don’t Overmix the Batter! This is the golden rule of fluffy pancakes. A few lumps are totally fine—in fact, they’re desirable. Overmixing develops the gluten in the flour and leads to tough, flat pancakes.
- Why Room Temperature Matters. If you can, let your milk and egg sit out for 15-20 minutes before you start. Cold ingredients can cause the melted butter to solidify into little bits, which can sometimes lead to uneven cooking.
- The Peanut Butter Integration. The trick is to whisk the peanut butter with the wet ingredients first until it’s completely smooth. This ensures it’s evenly distributed throughout the batter, rather than leaving clumpy streaks.
- Test Your Pan’s Heat. The perfect pancake temperature is medium-low. Too hot, and the outside burns before the inside cooks. A good test? Flick a few drops of water onto the skillet—if they sizzle and dance, you’re good to go.
How to Make Peanut Butter Chocolate Pancakes
Step 1: Combine your dry ingredients. In your large mixing bowl, whisk together the flour, sugar, baking powder, and salt. You’ll want to do this thoroughly to ensure the baking powder is evenly distributed—that’s what gives us those beautiful, airy bubbles. Give it a good whisk for about 30 seconds. Set this bowl aside for a moment.
Step 2: Whisk the wet ingredients. In the medium bowl, combine the milk and the creamy peanut butter. Now, this might take a minute of vigorous whisking to get the peanut butter fully incorporated into the milk and create a smooth, homogenous mixture. Once that’s done, whisk in the egg, followed by the melted butter and vanilla extract. The mixture should look creamy and well-combined.
Step 3: Bring it all together. Pour the wet peanut butter mixture into the bowl with the dry ingredients. Now, this is the crucial part: use your whisk or a spatula and gently fold the batter together. Stir just until the flour disappears. You’ll notice lumps—that’s perfect! Stop immediately. Overmixing is the enemy of fluffiness. Finally, gently fold in the chocolate chips until they’re just distributed.
Step 4: Preheat and grease your cooking surface. Place your skillet or griddle over medium-low heat. Add a small pat of butter and let it melt and coat the surface. You’ll know it’s ready when a drop of water sizzles on contact. A properly heated pan is key for a golden-brown exterior.
Step 5: Cook the pancakes. Using a ladle or a ¼ cup measure, pour the batter onto the hot skillet. I like to do one test pancake first to check the heat. You’ll see little bubbles start to form on the surface of the pancake after about 2-3 minutes. Wait until the bubbles pop and the edges look set before you flip.
Step 6: The Flip and Second Side. Slide your spatula underneath and confidently flip the pancake. It should be a lovely golden brown. Cook for another 1-2 minutes on the second side until it’s equally golden and cooked through. You can peek by gently pressing the center—it should spring back.
Step 7: Keep them warm. As you cook the rest of the batch, transfer the finished pancakes to a wire rack placed on a baking sheet in a 200°F (95°C) oven. This keeps them warm and crispy without getting soggy. Add a little more butter to the pan as needed between batches.
Serving Suggestions
Complementary Dishes
- Crispy Bacon or Sausage — The salty, savory crunch is the perfect counterpoint to the sweet, rich pancakes. It creates a fantastic balance on the plate.
- Fresh Fruit Platter — A big bowl of berries, orange segments, and sliced apples adds a refreshing, light element that cuts through the decadence beautifully.
- Whipped Cream or Greek Yogurt — A dollop of lightly sweetened whipped cream or tangy Greek yogurt adds another layer of texture and flavor that’s just divine.
Drinks
- Cold Glass of Milk — It’s a classic for a reason. The cool, creamy milk is the ultimate partner for the warm chocolate and peanut butter flavors.
- Strong Black Coffee — The bitterness of a good brew helps to balance the sweetness of the pancakes and chocolate, making each bite feel even more satisfying.
- Berry Smoothie — For a full-on breakfast feast, a vibrant berry smoothie adds a fruity, healthy kick that complements the meal perfectly.
Something Sweet
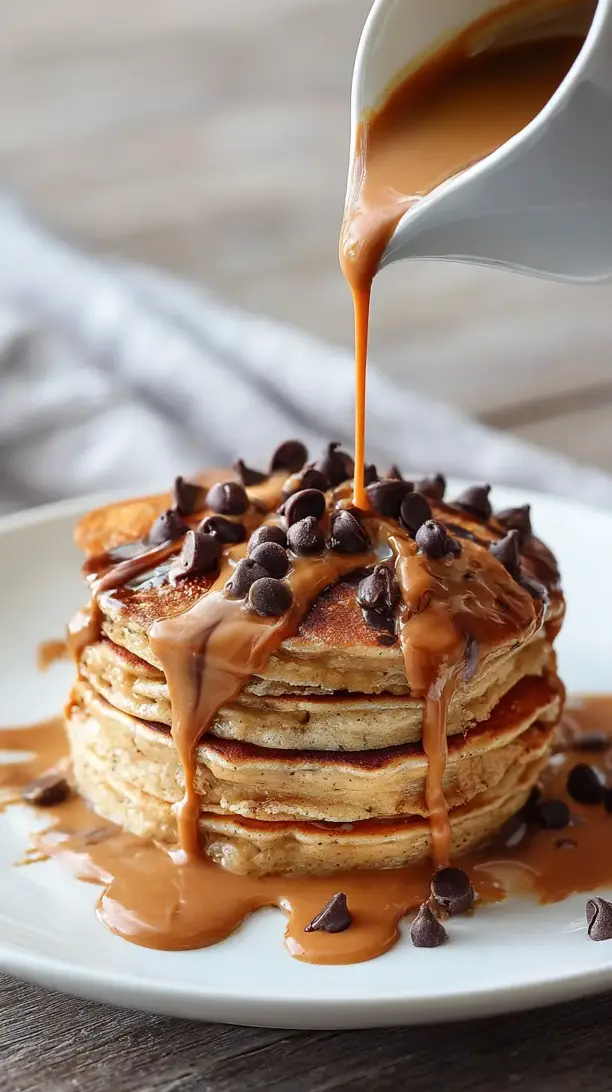
- Drizzle of Salted Caramel Sauce — If you really want to lean into the dessert vibe, a drizzle of salted caramel over the top takes these pancakes to a whole new level of indulgence.
- Warm Maple Syrup — You can’t go wrong with the classic. Warming the syrup beforehand makes it soak into the pancakes wonderfully.
- A Dusting of Powdered Sugar — Simple, elegant, and adds a little extra sweetness. It looks beautiful against the dark chocolate chips.
Top Mistakes to Avoid
- Mistake: Overmixing the batter. I know I’ve said it, but it’s the number one pancake killer. Lumpy batter is good batter. It means you haven’t overworked the gluten, which is essential for a tender, fluffy texture.
- Mistake: Cooking on too high heat. This will give you pancakes that are burnt on the outside and raw in the middle. Patience is key! A medium-low heat allows the inside to cook through before the exterior gets too dark.
- Mistake: Pressing down on the pancakes with the spatula. I’ve messed this up before too… you flip the pancake and then press it down, thinking it will cook faster. All this does is squeeze out the air bubbles, making the pancake dense. Just let it be!
- Mistake: Using an unstable peanut butter. If you use a natural peanut butter that has a lot of separated oil, it can make your batter greasy and inconsistent. A standard, homogenized creamy peanut butter gives the best results.
Expert Tips
- Tip: Let the batter rest for 5 minutes. After you’ve mixed it, just walk away. This allows the flour to fully hydrate and the baking powder to start working, resulting in a slightly taller, more relaxed pancake.
- Tip: Use a cookie scoop for chocolate chips. To avoid the chocolate chips all sinking to the bottom of the batter, toss them in a teaspoon of flour before folding them in. The light coating helps them stay suspended throughout the pancakes.
- Tip: Keep finished pancakes on a wire rack in the oven. As mentioned, this is a game-changer. If you stack them on a plate, they’ll steam and get soggy. The wire rack allows air to circulate, keeping them perfect until you’re ready to serve.
- Tip: Make a double batch for the freezer. These pancakes freeze incredibly well. Let them cool completely, then layer them between parchment paper in a freezer bag. Reheat in the toaster for a quick and amazing weekday breakfast.
FAQs
Can I make the batter the night before?
I wouldn’t recommend it for the best results. The baking powder will lose its leavening power overnight, and the batter can become gray and gummy. For a make-ahead option, mix the dry ingredients and wet ingredients in separate containers the night before. In the morning, just combine them and cook—it takes less than a minute and makes a world of difference in fluffiness.
Can I use a different nut butter?
Absolutely! Almond butter or cashew butter would work wonderfully here. Just make sure it’s a creamy, well-stirred variety. The flavor profile will change, of course, but it will still be delicious. Sunflower seed butter is a great nut-free alternative that pairs surprisingly well with chocolate.
My pancakes are turning out flat. What did I do wrong?
Flat pancakes are usually caused by one of two things. First, your baking powder might be old and lost its potency—it’s good practice to replace it every 6 months. Second, the pan might not be hot enough. If the pan is too cool, the pancakes will spread out too much before the bubbles have a chance to set the structure.
How can I make these dairy-free?
It’s super easy! Use your favorite plant-based milk (oat or almond milk work great) and replace the melted butter with an equal amount of melted coconut oil or vegan butter. Just double-check that your chocolate chips are dairy-free.
Can I add anything else to the batter?
Of course! This is a great base recipe. Try adding a mashed ripe banana for banana bread vibes, a handful of oats for more texture, or even a teaspoon of cinnamon for a warm spice note. Get creative and make it your own!
Peanut Butter Chocolate Pancakes
Whip up the ultimate weekend treat with these fluffy Peanut Butter Chocolate Pancakes! My easy, from-scratch recipe delivers dessert-for-breakfast perfection in under 30 minutes.
Ingredients
Ingredients
-
1 ½ cups all-purpose flour
-
2 tablespoons granulated sugar
-
1 tablespoon baking powder
-
½ teaspoon fine sea salt
-
1 ¼ cups milk (whole or 2%)
-
½ cup creamy peanut butter
-
1 large egg
-
2 tablespoons unsalted butter (melted (plus more for cooking))
-
1 teaspoon vanilla extract
-
¾ cup semi-sweet chocolate chips
-
maple syrup (for serving)
-
sliced bananas (for serving)
-
extra peanut butter (for serving)
Instructions
-
Combine your dry ingredients. In your large mixing bowl, whisk together the flour, sugar, baking powder, and salt. You'll want to do this thoroughly to ensure the baking powder is evenly distributed—that's what gives us those beautiful, airy bubbles. Give it a good whisk for about 30 seconds. Set this bowl aside for a moment.01
-
Whisk the wet ingredients. In the medium bowl, combine the milk and the creamy peanut butter. Now, this might take a minute of vigorous whisking to get the peanut butter fully incorporated into the milk and create a smooth, homogenous mixture. Once that's done, whisk in the egg, followed by the melted butter and vanilla extract. The mixture should look creamy and well-combined.02
-
Bring it all together. Pour the wet peanut butter mixture into the bowl with the dry ingredients. Now, this is the crucial part: use your whisk or a spatula and gently fold the batter together. Stir just until the flour disappears. You'll notice lumps—that's perfect! Stop immediately. Overmixing is the enemy of fluffiness. Finally, gently fold in the chocolate chips until they're just distributed.03
-
Preheat and grease your cooking surface. Place your skillet or griddle over medium-low heat. Add a small pat of butter and let it melt and coat the surface. You'll know it's ready when a drop of water sizzles on contact. A properly heated pan is key for a golden-brown exterior.04
-
Cook the pancakes. Using a ladle or a ¼ cup measure, pour the batter onto the hot skillet. I like to do one test pancake first to check the heat. You'll see little bubbles start to form on the surface of the pancake after about 2-3 minutes. Wait until the bubbles pop and the edges look set before you flip.05
-
The Flip and Second Side. Slide your spatula underneath and confidently flip the pancake. It should be a lovely golden brown. Cook for another 1-2 minutes on the second side until it's equally golden and cooked through. You can peek by gently pressing the center—it should spring back.06
-
Keep them warm. As you cook the rest of the batch, transfer the finished pancakes to a wire rack placed on a baking sheet in a 200°F (95°C) oven. This keeps them warm and crispy without getting soggy. Add a little more butter to the pan as needed between batches.07