
Why You’ll Love This Peanut Butter Banana Pancakes
- They’re secretly wholesome. We’re using whole wheat flour and oats for a fiber boost, and the natural sweetness comes from ripe bananas and a touch of maple syrup. You get all the comfort without the sugar crash.
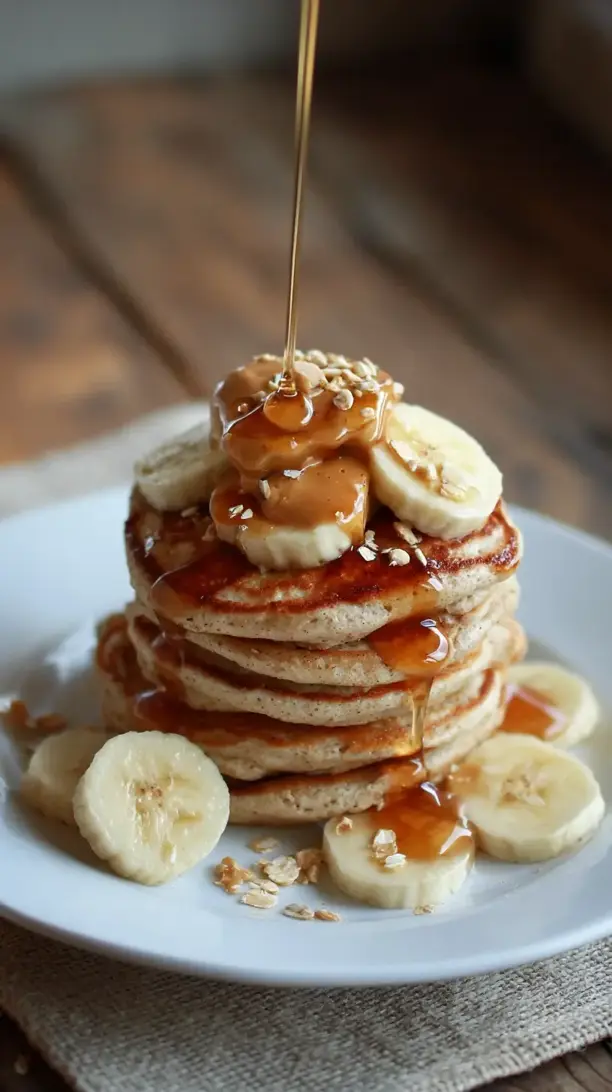
- The texture is absolutely dreamy. The mashed banana keeps the pancakes incredibly moist and tender, while the peanut butter adds a subtle richness that makes them feel decadent. They’re fluffy, but with a satisfying heartiness.
- They’re a fantastic make-ahead option. You can whip up a double batch and freeze the extras for a quick, healthy breakfast on busy mornings. Just pop them in the toaster—they reheat beautifully.
- It’s a complete flavor experience. The combination of sweet banana and savory peanut butter is a classic for a reason. Drizzle a little extra maple syrup and a sprinkle of chopped peanuts on top, and you’ve got a perfect balance of flavors and textures in every single bite.
Ingredients & Tools
- 2 large, very ripe bananas (the spottier, the better!)
- 2 large eggs
- 1/2 cup creamy, natural peanut butter (the kind that’s just peanuts and salt)
- 1 1/4 cups buttermilk (see tips for a quick substitute)
- 2 tbsp pure maple syrup, plus more for serving
- 1 tsp pure vanilla extract
- 1 cup whole wheat pastry flour (or all-purpose)
- 1/2 cup old-fashioned rolled oats
- 1 tsp baking powder
- 1/2 tsp baking soda
- 1/2 tsp ground cinnamon
- 1/4 tsp fine sea salt
- Butter or coconut oil for cooking
- Optional toppings: sliced bananas, chopped peanuts, extra peanut butter.
Tools: A large mixing bowl, a medium mixing bowl, a whisk, a fork or potato masher, a non-stick skillet or griddle, and a spatula.
The quality of your peanut butter and the ripeness of your bananas are the real stars here. Using natural peanut butter ensures the peanut flavor shines through without added oils or sugar, and those super-ripe bananas are naturally sweeter and mash into a smoother puree.
Serves: 3-4 (makes about 12 pancakes) | Prep Time: 10 minutes | Cook Time: 15 minutes | Total Time: 25 minutes
Before You Start: Tips & Ingredient Notes
- Banana Ripeness is Key. Don’t even think about using yellow bananas! You want them deeply spotted, even black in places. This isn’t just for sweetness; overripe bananas mash easily and incorporate seamlessly into the batter, giving you a smoother texture and more intense banana flavor.
- What’s the deal with buttermilk? Buttermilk’s acidity reacts with the baking soda, creating tons of little air bubbles that make the pancakes incredibly light and fluffy. If you don’t have any, no panic! Make a quick “soured milk” by adding 1 tablespoon of white vinegar or lemon juice to a measuring cup, then filling it with regular milk to the 1 1/4 cup line. Let it sit for 5 minutes before using.
- To sift or not to sift? I’m a firm believer in whisking the dry ingredients together really, really well. This is your “sifting” step. It ensures the baking powder and soda are evenly distributed, so you don’t get any bitter bites and your pancakes rise uniformly.
- Natural vs. Conventional Peanut Butter. This recipe is tested with natural, stir-before-using peanut butter. If you use a conventional, stabilized kind (like Jif or Skippy), your batter will be slightly thicker and sweeter. It will still work, but the flavor profile will be different—a bit sweeter and less intensely peanutty.
How to Make Peanut Butter Banana Pancakes
Step 1: The Wet Team. In your large mixing bowl, take those very ripe bananas and mash them thoroughly with a fork until you have a relatively smooth puree with just a few small lumps. A few lumps are okay—they’ll create lovely little pockets of banana flavor. To the bananas, add the eggs, peanut butter, buttermilk, maple syrup, and vanilla extract. Now, whisk it all together with some enthusiasm! You want everything to be fully incorporated. The mixture might look a little curdled at first because of the peanut butter, but keep whisking—it will come together into a thick, homogenous liquid.
Step 2: The Dry Team. In your medium bowl, combine the whole wheat flour, rolled oats, baking powder, baking soda, cinnamon, and salt. Grab your whisk again and give this a really good, vigorous whisking for at least 30 seconds. You’re not just mixing; you’re aerating the flour and making sure those leavening agents are perfectly distributed. This is the secret to a light, even rise.
Step 3: The Gentle Merge. This is the most crucial step: do not overmix! Pour the dry ingredients into the wet ingredients. Using a spatula, gently fold the two together. You’ll see streaks of flour—that’s what you want. Switch to a folding motion, going around the bowl and under the batter, just until the last traces of flour disappear. The batter will be thick and lumpy. I promise, lumpy batter makes for fluffy pancakes. A smooth batter means you’ve overworked the gluten and your pancakes will be tough.
Step 4: The Preheated Pan. Place your skillet or griddle over medium heat. This is important—if the pan is too hot, the outside will burn before the inside cooks. Let it heat up for a good 3-4 minutes. To test if it’s ready, flick a few drops of water onto the surface; they should dance and evaporate quickly. Add a small pat of butter or a teaspoon of coconut oil and swirl to coat the surface.
Step 5: Cooking to Perfection. Using a 1/4-cup measuring cup, pour batter onto the hot skillet. You’ll notice the batter is thick, so you might need to use a spoon to help nudge it into a circular shape. Let the pancakes cook until you see bubbles forming on the surface and the edges look set and slightly dry—this usually takes about 2-3 minutes. Don’t rush this! This is your sign that the bottom is perfectly golden brown. Now, slide your spatula underneath and flip with confidence. Cook for another 1-2 minutes on the second side until golden and cooked through. You can peek to check the color.
Step 6: Keeping Them Warm. As you cook the pancakes in batches, transfer them to a wire rack set on a baking sheet in a 200°F (95°C) oven. This keeps them warm and, crucially, prevents the bottoms from getting soggy—a wire rack is much better than a plate for this! Continue with the remaining batter, adding more butter or oil to the pan as needed.
Serving Suggestions
Complementary Dishes
- Crispy Turkey Bacon or Tempeh Strips — The salty, savory crunch is the perfect counterpoint to the sweet, soft pancakes, creating a truly balanced plate.
- A Bright Fruit Salad — Something with berries or citrus segments cuts through the richness and adds a refreshing, juicy element to your breakfast spread.
- Scrambled Eggs with Chives — For a protein-packed brunch, simple fluffy eggs seasoned with fresh herbs complement the pancakes without competing for flavor attention.
Drinks
- A Strong Cup of Coffee — The bitterness of coffee is a classic pairing with sweet breakfast foods, enhancing the peanut butter and banana notes beautifully.
- Cold Glass of Milk — It’s a nostalgic combo that just works. The creaminess of the milk is a perfect palate cleanser between bites.
- Freshly Squeezed Orange Juice — The acidity and bright citrus flavor provide a fantastic contrast, making each bite of pancake taste new again.
Something Sweet
- Dark Chocolate Chips Melting on Top — A handful of chocolate chips scattered over the hot pancakes right after flipping creates pockets of melted, bittersweet chocolate that take this dish to dessert-level decadence.
- A Dollop of Greek Yogurt — Instead of more syrup, the tangy creaminess of yogurt offers a sophisticated and lighter topping option.
- Warm Berry Compote — Gently heating frozen berries with a splash of maple syrup until they burst creates a vibrant, saucy topping that feels elegant and fruity.
Top Mistakes to Avoid
- Mistake: Overmixing the batter. This is the number one pancake killer. Overmixing develops the gluten in the flour, leading to tough, chewy pancakes instead of light, fluffy ones. A few lumps are your friend!
- Mistake: Cooking on too high heat. Impatience leads to burnt outsides and raw, gummy insides. Medium heat is your sweet spot—it gives the pancakes time to cook through and rise properly before the exterior gets too dark.
- Mistake: Pressing down on the pancakes with the spatula. I know it’s tempting, but you’re not making hamburgers! Pressing down squeezes out all the precious air bubbles you worked so hard to create, resulting in dense pancakes.
- Mistake: Using underripe bananas. Yellow bananas lack the necessary sweetness and don’t mash as well, leading to a less flavorful batter and chunks of firm banana in your final pancake.
- Mistake: Flipping too early. Wait for those bubbles to form on the surface and the edges to look set. If you try to flip too soon, the pancake will tear and you’ll have a mess. Trust the process.
Expert Tips
- Tip: Let the batter rest for 5 minutes. After you’ve mixed it, just walk away. This allows the oats to hydrate a little and the flour to fully absorb the liquid, which gives you a more tender pancake.
- Tip: Use an ice cream scoop for perfect portions. A trigger-release ice cream scoop is a game-changer for evenly sized pancakes that cook at the same rate. It’s so much cleaner than using a measuring cup.
- Tip: Add mix-ins after pouring. If you want to add chocolate chips, blueberries, or chopped nuts, sprinkle them onto the pancakes right after you pour the batter onto the griddle. This prevents them from sinking to the bottom or discoloring the entire batch of batter.
- Tip: Test one pancake first. The first pancake is always the test pancake! Use it to check your heat level and timing. Adjust accordingly before you commit to a whole batch.
- Tip: Freeze for later like a pro. Let the pancakes cool completely, then layer them between sheets of parchment paper in a freezer bag. They’ll keep for up to 3 months. Reheat directly from frozen in a toaster or a 350°F oven for a quick breakfast.
FAQs
Can I make this batter the night before?
I don’t recommend it for the best results. The baking powder will lose its potency overnight, and the oats will absorb too much liquid, resulting in a very thick batter and dense pancakes. For a make-ahead option, mix the dry ingredients and wet ingredients in separate containers the night before. In the morning, just combine them—it takes 30 seconds and you get the benefit of fresh, fluffy pancakes.
Can I make these pancakes gluten-free?
Absolutely! You can easily substitute the whole wheat flour with a 1:1 gluten-free all-purpose flour blend. Make sure the blend contains xanthan gum, which helps with binding. The oats are naturally gluten-free, but if you have a severe allergy, be sure to use certified gluten-free oats to avoid cross-contamination.
My batter is really thick—is that normal?
Yes, it is! This is a thick batter because of the peanut butter and oats. That’s what gives the pancakes their hearty, satisfying texture. Don’t be tempted to thin it out with more milk, or you’ll end up with flat, floppy pancakes. Just use a spoon to help spread the batter slightly into a circle on the griddle.
Can I use a different nut butter?
Of course! Almond butter or cashew butter would work wonderfully here. Sunflower seed butter is a great nut-free alternative that will give you a similar result. Just be aware that different nut butters have varying levels of oil and sweetness, so the batter’s consistency might change slightly.
How can I tell if the pancakes are cooked through without cutting them open?
The best method is the “peak test.” Gently press the center of the pancake with your fingertip or the back of your spatula. If it springs back immediately, it’s done. If it leaves an indentation, it needs another minute. Also, look for a steady stream of steam coming from the edges—that’s a good sign the inside is cooking properly.
Peanut Butter Banana Pancakes
Whip up the ultimate weekend breakfast with these fluffy Peanut Butter Banana Pancakes! My from-scratch recipe is easy, wholesome, and tastes like a warm hug. Perfect for a family brunch.
Ingredients
Ingredients
-
2 large, very ripe bananas (the spottier, the better!)
-
2 large eggs
-
1/2 cup creamy, natural peanut butter (the kind that's just peanuts and salt)
-
1 1/4 cups buttermilk (see tips for a quick substitute)
-
2 tbsp pure maple syrup (plus more for serving)
-
1 tsp pure vanilla extract
-
1 cup whole wheat pastry flour (or all-purpose)
-
1/2 cup old-fashioned rolled oats
-
1 tsp baking powder
-
1/2 tsp baking soda
-
1/2 tsp ground cinnamon
-
1/4 tsp fine sea salt
-
Butter or coconut oil (for cooking)
-
Optional toppings (sliced bananas, chopped peanuts, extra peanut butter)
Instructions
-
The Wet Team. In your large mixing bowl, take those very ripe bananas and mash them thoroughly with a fork until you have a relatively smooth puree with just a few small lumps. A few lumps are okay—they'll create lovely little pockets of banana flavor. To the bananas, add the eggs, peanut butter, buttermilk, maple syrup, and vanilla extract. Now, whisk it all together with some enthusiasm! You want everything to be fully incorporated. The mixture might look a little curdled at first because of the peanut butter, but keep whisking—it will come together into a thick, homogenous liquid.01
-
The Dry Team. In your medium bowl, combine the whole wheat flour, rolled oats, baking powder, baking soda, cinnamon, and salt. Grab your whisk again and give this a really good, vigorous whisking for at least 30 seconds. You're not just mixing; you're aerating the flour and making sure those leavening agents are perfectly distributed. This is the secret to a light, even rise.02
-
The Gentle Merge. This is the most crucial step: do not overmix! Pour the dry ingredients into the wet ingredients. Using a spatula, gently fold the two together. You'll see streaks of flour—that's what you want. Switch to a folding motion, going around the bowl and under the batter, just until the last traces of flour disappear. The batter will be thick and lumpy. I promise, lumpy batter makes for fluffy pancakes. A smooth batter means you've overworked the gluten and your pancakes will be tough.03
-
The Preheated Pan. Place your skillet or griddle over medium heat. This is important—if the pan is too hot, the outside will burn before the inside cooks. Let it heat up for a good 3-4 minutes. To test if it's ready, flick a few drops of water onto the surface; they should dance and evaporate quickly. Add a small pat of butter or a teaspoon of coconut oil and swirl to coat the surface.04
-
Cooking to Perfection. Using a 1/4-cup measuring cup, pour batter onto the hot skillet. You'll notice the batter is thick, so you might need to use a spoon to help nudge it into a circular shape. Let the pancakes cook until you see bubbles forming on the surface and the edges look set and slightly dry—this usually takes about 2-3 minutes. Don't rush this! This is your sign that the bottom is perfectly golden brown. Now, slide your spatula underneath and flip with confidence. Cook for another 1-2 minutes on the second side until golden and cooked through. You can peek to check the color.05
-
Keeping Them Warm. As you cook the pancakes in batches, transfer them to a wire rack set on a baking sheet in a 200°F (95°C) oven. This keeps them warm and, crucially, prevents the bottoms from getting soggy—a wire rack is much better than a plate for this! Continue with the remaining batter, adding more butter or oil to the pan as needed.06