Why You’ll Love This One-Bowl Healthy Apple Cake
- Minimal cleanup is a game-changer. Seriously, one bowl means you spend less time washing up and more time enjoying that first warm slice straight from the oven. It’s the ultimate lazy baker’s dream.
- It’s naturally sweetened and wonderfully moist. We’re using maple syrup and the natural sugars from the apples themselves, which keeps everything tender and gives you that deep, caramel-like flavor without being overly sugary.
- The texture is just perfect. You get little pockets of soft, baked apple in every bite, and the cake itself is dense yet light—it’s not dry or crumbly at all. It’s the kind of cake that stays moist for days, if it even lasts that long!
- It’s incredibly versatile. Feel like adding walnuts? Go for it. A dash of nutmeg? Why not. This recipe is a fantastic base that welcomes your own little twists, making it your new favorite blank canvas.
Ingredients & Tools
- 2 large eggs
- ½ cup pure maple syrup
- ⅓ cup melted coconut oil (or light olive oil)
- 1 tsp vanilla extract
- ½ cup plain yogurt (Greek or regular both work)
- 1 ½ cups white whole wheat flour (or all-purpose)
- 1 tsp baking soda
- 1 ½ tsp ground cinnamon
- ¼ tsp salt
- 2 cups finely chopped apples (about 2 medium apples, I like a mix of Granny Smith and Honeycrisp)
Tools: One large mixing bowl, a whisk or spatula, an 8×8 inch baking pan, and parchment paper.
The ingredients here are really straightforward, but each one plays a special role. The yogurt adds a lovely tang and keeps the crumb super moist, while the maple syrup gives it that deep, rich sweetness. And don’t skip the salt—it might seem small, but it makes all the spices and sweetness pop.
Nutrition (per serving)
- Calories: 210 kcal
- Protein: 4 g
- Fat: 8 g
- Carbohydrates: 32 g
- Fiber: 3 g
Serves: 9 | Prep Time: 15 minutes | Cook Time: 35 minutes | Total Time: 50 minutes
Before You Start: Tips & Ingredient Notes
- What’s the best apple to use? I really love a mix for texture and flavor. Granny Smith holds its shape and gives a little tartness, while something sweeter like Honeycrisp or Fuji melts down beautifully. Using just one type is fine, but a combo is magic.
- Does the type of yogurt matter? Not hugely! Greek yogurt will give a slightly denser, protein-packed crumb, while regular yogurt keeps it a touch lighter. Both work wonderfully, so use what you have.
- Can I make this gluten-free? Absolutely. A 1:1 gluten-free flour blend works perfectly here. Just make sure it has a binder like xanthan gum already in it for the best texture.
- Why melt the coconut oil? You want it in liquid form to mix evenly into the batter. If it’s solid, just gently warm it—but let it cool a bit before adding to the eggs so you don’t cook them!
How to Make One-Bowl Healthy Apple Cake
Step 1: Start by preheating your oven to 350°F (175°C). Then, grab your 8×8 inch baking pan and line it with parchment paper, leaving a little overhang on two sides. This little trick makes it so easy to lift the whole cake out later for clean slicing. Honestly, it’s a game-changer for presentation.
Step 2: In your large mixing bowl, crack in the eggs and add the maple syrup, melted (and slightly cooled) coconut oil, and vanilla extract. Whisk it all together until it’s smooth and well combined. You’ll notice the mixture might look a little separated at first—that’s totally normal. Just keep whisking until it comes together into a glossy, homogenous liquid.
Step 3: Now, spoon in the yogurt and give it another good stir. The batter will thicken up slightly and take on a pale, creamy color. This is where you add all the dry ingredients directly into the same bowl—no sifting needed! Just dump in the flour, baking soda, cinnamon, and salt right on top.
Step 4: Use a spatula to gently fold the dry ingredients into the wet. The key here is to mix just until you no longer see streaks of flour. A few lumps are okay—overmixing can make the cake tough. The batter will be quite thick, almost like a brownie batter, which is exactly what you want.
Step 5: Now for the star of the show: the apples! Add your finely chopped apples to the batter and fold them in until they’re evenly distributed. You’ll see the batter become even thicker, studded with all those lovely apple pieces. Don’t worry if it seems like a lot of apple—it bakes down beautifully.
Step 6: Scrape the batter into your prepared pan and use the spatula to spread it into an even layer, pushing it into the corners. The top might look a little rustic and bumpy—that’s perfect. It gives the cake a lovely, homemade texture once baked.
Step 7: Pop the pan into the preheated oven and bake for 30-35 minutes. You’ll know it’s done when the top is golden brown, the edges are pulling away from the pan slightly, and a toothpick inserted into the center comes out clean or with just a few moist crumbs attached.
Step 8: Let the cake cool in the pan on a wire rack for at least 20 minutes before you attempt to slice it. I know it’s tempting to dive right in, but this resting time allows the structure to set, so you get clean, beautiful slices instead of a crumbly mess.
Serving Suggestions
Complementary Dishes
- A simple green salad with a sharp vinaigrette — The acidity and freshness cut through the cake’s sweetness beautifully, making it a lovely light lunch or dinner combo.
- A scoop of vanilla bean ice cream — The classic warm-cold contrast is just unbeatable. It melts into the cake and creates this incredible saucy situation.
- A dollop of thick, Greek yogurt — For a breakfast or snack vibe, the tangy yogurt adds a lovely freshness and makes it feel a little more substantial.
Drinks
- Hot chai tea — The warm spices in the chai echo the cinnamon in the cake, creating a really cozy, aromatic experience.
- A cold glass of milk — It’s a classic for a reason. The creaminess is the perfect partner to the soft, spiced crumb.
- Black coffee — The bitterness of a good, strong brew provides a fantastic counterpoint to the cake’s natural sweetness.
Something Sweet
- Dark chocolate-dipped strawberries — They feel elegant and provide a different kind of fruity, chocolatey note that doesn’t compete with the apple.
- A small bowl of vanilla panna cotta — The silky, cool texture is a dream next to the dense, warm cake.
- Cinnamon-dusted apple chips — For an extra apple kick, these add a delightful crunch and keep the theme going in a fun, textural way.
Top Mistakes to Avoid
- Overmixing the batter. Once you add the flour, you just want to mix until it’s combined. Overworking the gluten will give you a tough, chewy cake instead of a tender, soft crumb. A few lumps are your friend!
- Using giant apple chunks. If you chop the apples too large, they won’t soften properly during the relatively short bake time. You want small, bite-sized pieces that melt into the cake seamlessly.
- Not letting the cake cool before slicing. I know, the wait is hard. But if you cut into it while it’s piping hot, it’s still setting and will likely fall apart. Patience rewards you with perfect slices.
- Substituting the maple syrup with a liquid artificial sweetener. The maple syrup adds moisture and flavor depth. Artificial sweeteners can sometimes leave a weird aftertaste and alter the texture significantly.
Expert Tips
- Tip: For an extra flavor boost, toast your spices. Before adding the cinnamon to the dry ingredients, warm it in a dry pan for 30-60 seconds until fragrant. It unlocks deeper, more complex notes that make the cake taste like it came from a professional bakery.
- Tip: Grate half an apple into the wet ingredients. This is a little secret for maximum moisture! The grated apple practically dissolves into the batter, ensuring every single bite is incredibly soft and never dry.
- Tip: Add a crunchy streusel topping. Mix 2 tbsp oats, 1 tbsp flour, 1 tbsp maple syrup, and 1 tbsp cold cubed butter with your fingers until crumbly. Sprinkle it over the batter before baking for a delightful texture contrast.
- Tip: Use an ice cream scoop to portion the batter into the pan. It helps you get an even layer without struggling with a spatula, and it’s just… satisfying. Plus, it minimizes the mess.
FAQs
Can I make this cake ahead of time?
Absolutely, and it actually gets better! The flavors meld and the texture becomes even more moist the next day. Just let it cool completely, then wrap it tightly in plastic wrap or store it in an airtight container at room temperature for up to 2 days, or in the fridge for up to 5 days. You can also freeze the whole cake or individual slices for up to 3 months.
My cake is dense in the middle. What happened?
This usually means it needed a few more minutes in the oven. Ovens can vary, so if your toothpick test came out with wet batter (not just moist crumbs), it needed more time. The center is the last part to cook through. Next time, trust the toothpick more than the timer and add 3-5 minutes if needed.
Can I use a different type of oil?
Yes, definitely. A light-tasting olive oil, avocado oil, or even a neutral vegetable oil will work perfectly. The key is to use a liquid fat. Just avoid strongly flavored oils like extra virgin olive oil, as their flavor can be a bit overpowering for this delicate spiced cake.
Is it okay to use all-purpose flour instead of whole wheat?
Of course! All-purpose flour will give you a slightly lighter, more traditional cake texture. The whole wheat adds a bit of nuttiness and fiber, but the recipe works beautifully with either. You can use them in a direct 1:1 swap without any other adjustments.
Can I add nuts or other mix-ins?
Please do! This cake is a fantastic base for additions. A half cup of chopped walnuts or pecans would be lovely for crunch. You could also stir in a handful of raisins or even some shredded carrot for a carrot-cake twist. Just fold them in with the apples at the end.
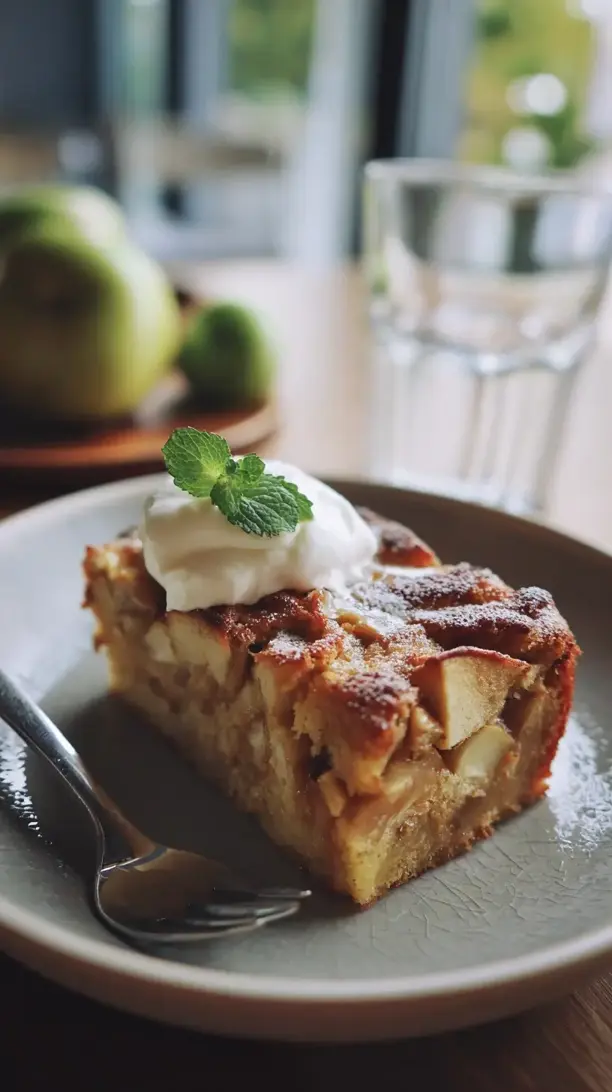
One Bowl Healthy Apple Cake
Make this easy One-Bowl Healthy Apple Cake with simple ingredients for a moist, naturally sweetened dessert. Minimal cleanup, maximum flavor. Get the recipe now!
Ingredients
For the Ingredients
-
2 large eggs
-
1/2 cup pure maple syrup
-
1/3 cup melted coconut oil (or light olive oil)
-
1 tsp vanilla extract
-
1/2 cup plain yogurt (Greek or regular both work)
-
1 1/2 cups white whole wheat flour (or all-purpose)
-
1 tsp baking soda
-
1 1/2 tsp ground cinnamon
-
1/4 tsp salt
-
2 cups finely chopped apples (about 2 medium apples, I like a mix of Granny Smith and Honeycrisp)
Instructions
-
Start by preheating your oven to 350°F (175°C). Then, grab your 8x8 inch baking pan and line it with parchment paper, leaving a little overhang on two sides.01
-
In your large mixing bowl, crack in the eggs and add the maple syrup, melted (and slightly cooled) coconut oil, and vanilla extract. Whisk it all together until it’s smooth and well combined.02
-
Now, spoon in the yogurt and give it another good stir. This is where you add all the dry ingredients directly into the same bowl—no sifting needed! Just dump in the flour, baking soda, cinnamon, and salt right on top.03
-
Use a spatula to gently fold the dry ingredients into the wet. The key here is to mix just until you no longer see streaks of flour. A few lumps are okay—overmixing can make the cake tough.04
-
Now for the star of the show: the apples! Add your finely chopped apples to the batter and fold them in until they’re evenly distributed.05
-
Scrape the batter into your prepared pan and use the spatula to spread it into an even layer, pushing it into the corners.06
-
Pop the pan into the preheated oven and bake for 30-35 minutes. You’ll know it’s done when the top is golden brown, the edges are pulling away from the pan slightly, and a toothpick inserted into the center comes out clean or with just a few moist crumbs attached.07
-
Let the cake cool in the pan on a wire rack for at least 20 minutes before you attempt to slice it.08