
Why You’ll Love This Oatmeal Chocolate Chip Energy Cookies
- They’re the perfect fuel. Unlike many store-bought snacks that are full of refined sugars, these cookies are packed with slow-release energy from oats and healthy fats, keeping you full and focused for longer.
- Incredibly easy to make. Honestly, there’s no fancy equipment or complicated techniques here. It’s a simple mix-and-scoop situation—you can have them in the oven in about 10 minutes flat.
- They freeze like a dream. I always double the batch and freeze half. Having a stash of these in the freezer means a healthy snack is never more than a few minutes away—just let one thaw on the counter or pop it in the microwave for 15 seconds.
- Endlessly customizable. The base recipe is a fantastic canvas. Feel like adding nuts, seeds, or dried fruit? Go for it. You can really make these your own based on what you have in the pantry.
Ingredients & Tools
- 2 very ripe medium bananas, mashed (about 1 cup)
- 1/3 cup creamy almond butter (or any nut/seed butter you like)
- 1/4 cup pure maple syrup
- 1 tsp pure vanilla extract
- 1 1/2 cups old-fashioned rolled oats (certified gluten-free if needed)
- 1/2 tsp ground cinnamon
- 1/4 tsp fine sea salt
- 1/2 cup dark chocolate chips (at least 70% cacao for less sugar)
- 1/4 cup chopped walnuts or pecans (optional, for crunch)
- 2 tbsp ground flaxseed or chia seeds (optional, for an extra nutrient boost)
Tools: A medium mixing bowl, a fork or potato masher, a baking sheet, and parchment paper or a silicone baking mat.
The beauty of this list is its simplicity. The mashed bananas and almond butter act as the binder instead of eggs and butter, making these cookies naturally vegan and gluten-free (with GF oats). Using really ripe bananas—the kind with lots of brown spots—is key for natural sweetness and moisture.
Serves: 12 cookies | Prep Time: 10 minutes | Cook Time: 15 minutes | Total Time: 25 minutes
Before You Start: Tips & Ingredient Notes
- Banana ripeness is non-negotiable. Seriously, don’t use yellow bananas. The blacker the spots, the sweeter and easier to mash they’ll be. This is the secret to avoiding added sugars.
- What’s the deal with oat types? Old-fashioned rolled oats give the best texture—chewy and substantial. Quick oats will work but result in a softer, less textured cookie. Avoid using steel-cut oats, as they won’t soften enough during baking.
- Choosing your nut butter. I love almond butter for its neutral taste, but peanut butter works wonderfully for a more classic flavor. Just make sure it’s the natural, drippy kind, not the super-stiff, sugary varieties.
- To chill or not to chill? This dough is quite forgiving. If you’re in a hurry, you can scoop and bake right away. But if you have 15 extra minutes, chilling the dough helps the cookies hold their shape a bit better.
How to Make Oatmeal Chocolate Chip Energy Cookies
Step 1: First, preheat your oven to 350°F (175°C). This is a quick-baking recipe, so you want the oven ready to go. Line your baking sheet with parchment paper or a silicone mat—this prevents sticking and makes cleanup a breeze. No greasing required!
Step 2: Now, let’s tackle the bananas. Peel them and add them to your mixing bowl. Use a fork or a potato masher to mash them until they’re relatively smooth, with just a few small lumps for texture. You’ll notice the aroma is sweet and fragrant already.
Step 3: To the mashed banana, add the almond butter, maple syrup, and vanilla extract. Stir everything together until it’s well combined and looks like a thick, creamy, homogenous mixture. The trick is to make sure the nut butter is fully incorporated—no streaks!
Step 4: It’s time for the dry ingredients. Add the rolled oats, cinnamon, and salt directly into the wet mixture. If you’re using the optional flax or chia seeds, add them now. Stir everything together until the oats are fully coated. The mixture will be thick and sticky, which is exactly what you want.
Step 5: Gently fold in the dark chocolate chips and the chopped nuts, if using. Try to distribute them evenly so every cookie gets its fair share of chocolatey goodness. Don’t overmix at this point—just a few folds will do.
Step 6: Using a cookie scoop or a heaping tablespoon, drop mounds of dough onto your prepared baking sheet. You should get about 12 cookies. Gently press down on each mound to flatten them slightly—they won’t spread much on their own, so this helps them bake evenly.
Step 7: Bake for 12-15 minutes, or until the edges are lightly golden brown and the tops look set. They might still feel a bit soft in the center, and that’s perfect—they’ll firm up as they cool. This is the key to a chewy, not crunchy, cookie.
Step 8: This is the hardest part: let the cookies cool on the baking sheet for at least 10 minutes before transferring them to a wire rack to cool completely. They are very fragile when hot but will set up beautifully as they cool. The wait is worth it, I promise!
Serving Suggestions
Complementary Dishes
- A bowl of Greek yogurt with berries — The creamy, tangy yogurt contrasts wonderfully with the sweet, chewy cookie, making for a balanced and protein-packed breakfast or snack.
- A warm cup of apple cider or chai tea — The spices in the drink will echo the cinnamon in the cookies, creating a wonderfully cozy and autumnal flavor combination.
Drinks
- A cold glass of almond milk — It’s a classic for a reason. The nutty flavor of the milk complements the almond butter in the cookies perfectly.
- A strong cup of black coffee — The bitterness of the coffee cuts through the sweetness of the banana and chocolate, making each bite taste even more indulgent.
Something Sweet
- A small bowl of mixed fresh fruit — For when you want to keep things light. The natural sweetness of mango or pineapple pairs surprisingly well with the oat and chocolate flavors.
- A scoop of vanilla bean coconut milk ice cream — For a truly decadent (but still dairy-free) treat, sandwich a slightly warmed cookie around a scoop of ice cream. It’s next-level.
Top Mistakes to Avoid
- Mistake: Using underripe bananas. This is the number one reason these cookies might turn out bland or not sweet enough. The ripe banana is your primary sweetener, so its job is crucial.
- Mistake: Overbaking. I’ve messed this up before too—you want golden edges, not dark brown. Overbaking will make the cookies dry and hard instead of soft and chewy. They continue to cook a bit on the hot tray after you take them out.
- Mistake: Substituting quick oats 1:1 for old-fashioned. While you can use quick oats, the texture will be much denser and more like a muffin top. If you do use them, you might need a touch less, as they absorb more moisture.
- Mistake: Skipping the cooling time. I know it’s tempting, but if you try to move the cookies right out of the oven, they’ll likely fall apart. They need those few minutes on the pan to set up.
Expert Tips
- Tip: Toast your oats. For a deeper, nuttier flavor, spread the rolled oats on a baking sheet and toast them in the 350°F oven for 5-7 minutes before adding them to the recipe. Let them cool slightly first. It’s a simple step that adds a huge flavor payoff.
- Tip: Make them uniform. Using a cookie scoop isn’t just for neatness—it ensures all your cookies bake at the same rate. No more burnt small ones and doughy large ones!
- Tip: Add a pinch of flaky salt on top. After you take the cookies out of the oven, while they’re still hot, sprinkle a tiny bit of flaky sea salt over each one. It enhances the chocolate flavor and balances the sweetness perfectly.
- Tip: For a crispier cookie, flatten them more. If you prefer a crisper edge, press the dough mounds down until they’re about 1/4-inch thick before baking. They’ll have more surface area to get crispy.
FAQs
Can I make these without bananas?
This is a tricky one, as the banana is a key binder and sweetener. You could try substituting with an equal amount of unsweetened applesauce, but the cookies will be much softer and cakier, and you may need to add a bit more oat flour (blended oats) to thicken the batter. The flavor will also be different, so it’s a bit of an experiment!
How should I store these energy cookies?
They keep best in an airtight container at room temperature for 2-3 days. Because they’re so moist, I actually prefer to store them in the fridge, where they’ll stay fresh for up to a week. They become delightfully firm and chewy when cold. For longer storage, freeze them in a single layer on a baking sheet, then transfer to a freezer bag for up to 3 months.
My cookies turned out too soft/mushy. What happened?
This usually points to two things: either the bananas were extremely large and added too much moisture, or the cookies needed a bit more baking time. Next time, if your bananas are huge, use one and a half instead of two. Also, make sure you’re using old-fashioned oats, not instant, which can sometimes lead to a gummier texture.
Can I use honey instead of maple syrup?
Absolutely! Honey works as a great 1:1 substitute for maple syrup. The flavor will be a bit different—a little more floral—but just as delicious. Just note that if you’re aiming to keep the recipe vegan, you’ll want to stick with maple syrup.
Are these cookies suitable for meal prep?
They are a meal prep superstar! I make a double batch almost every weekend. They are perfect for grabbing throughout the week. You can even portion the dough into balls and freeze them raw on a baking sheet. Then, you can bake frozen cookies anytime—just add 2-3 minutes to the baking time. It’s like having fresh, warm cookies on demand.
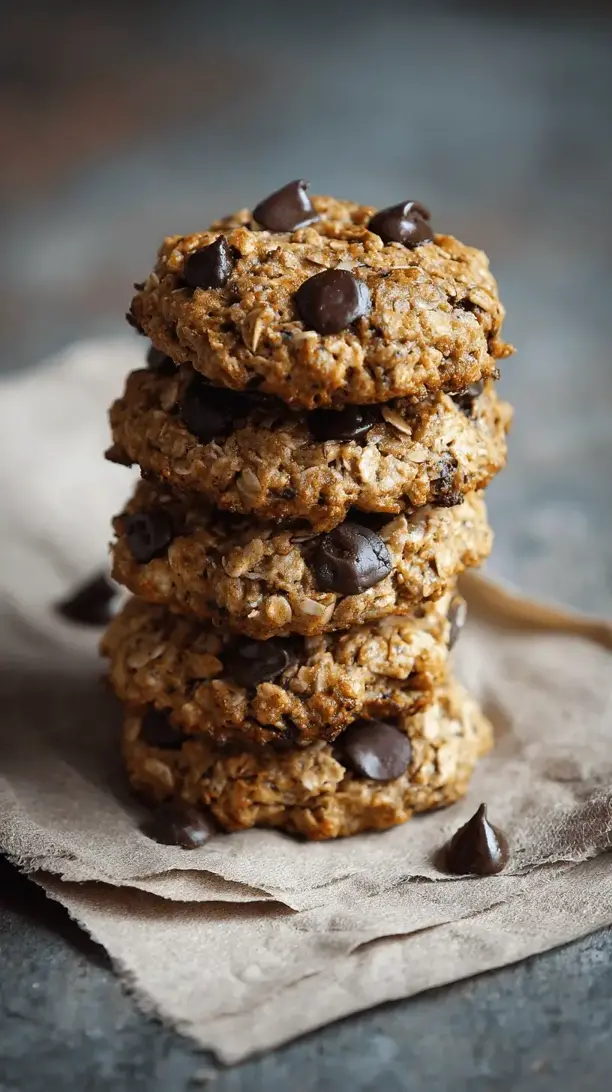
Oatmeal Chocolate Chip Energy Cookies
Whip up these chewy Oatmeal Chocolate Chip Energy Cookies! A healthy, vegan snack packed with bananas, oats & dark chocolate. Perfect for pre-workout fuel or a 3 p.m. pick-me-up.
Ingredients
Ingredients
-
2 very ripe medium bananas, mashed (about 1 cup)
-
1/3 cup creamy almond butter (or any nut/seed butter you like)
-
1/4 cup pure maple syrup
-
1 tsp pure vanilla extract
-
1 1/2 cups old-fashioned rolled oats (certified gluten-free if needed)
-
1/2 tsp ground cinnamon
-
1/4 tsp fine sea salt
-
1/2 cup dark chocolate chips (at least 70% cacao for less sugar)
-
1/4 cup chopped walnuts or pecans (optional, for crunch)
-
2 tbsp ground flaxseed or chia seeds (optional, for an extra nutrient boost)
Instructions
-
First, preheat your oven to 350°F (175°C). This is a quick-baking recipe, so you want the oven ready to go. Line your baking sheet with parchment paper or a silicone mat—this prevents sticking and makes cleanup a breeze. No greasing required!01
-
Now, let's tackle the bananas. Peel them and add them to your mixing bowl. Use a fork or a potato masher to mash them until they're relatively smooth, with just a few small lumps for texture. You'll notice the aroma is sweet and fragrant already.02
-
To the mashed banana, add the almond butter, maple syrup, and vanilla extract. Stir everything together until it's well combined and looks like a thick, creamy, homogenous mixture. The trick is to make sure the nut butter is fully incorporated—no streaks!03
-
It's time for the dry ingredients. Add the rolled oats, cinnamon, and salt directly into the wet mixture. If you're using the optional flax or chia seeds, add them now. Stir everything together until the oats are fully coated. The mixture will be thick and sticky, which is exactly what you want.04
-
Gently fold in the dark chocolate chips and the chopped nuts, if using. Try to distribute them evenly so every cookie gets its fair share of chocolatey goodness. Don't overmix at this point—just a few folds will do.05
-
Using a cookie scoop or a heaping tablespoon, drop mounds of dough onto your prepared baking sheet. You should get about 12 cookies. Gently press down on each mound to flatten them slightly—they won't spread much on their own, so this helps them bake evenly.06
-
Bake for 12-15 minutes, or until the edges are lightly golden brown and the tops look set. They might still feel a bit soft in the center, and that's perfect—they'll firm up as they cool. This is the key to a chewy, not crunchy, cookie.07
-
This is the hardest part: let the cookies cool on the baking sheet for at least 10 minutes before transferring them to a wire rack to cool completely. They are very fragile when hot but will set up beautifully as they cool. The wait is worth it, I promise!08


