
Why You’ll Love This Oatmeal Apple Pie Bars
- They’re the ultimate easy-bake dessert. No pastry skills required here. The crust and topping come from the same bowl, making the process incredibly simple and satisfying.
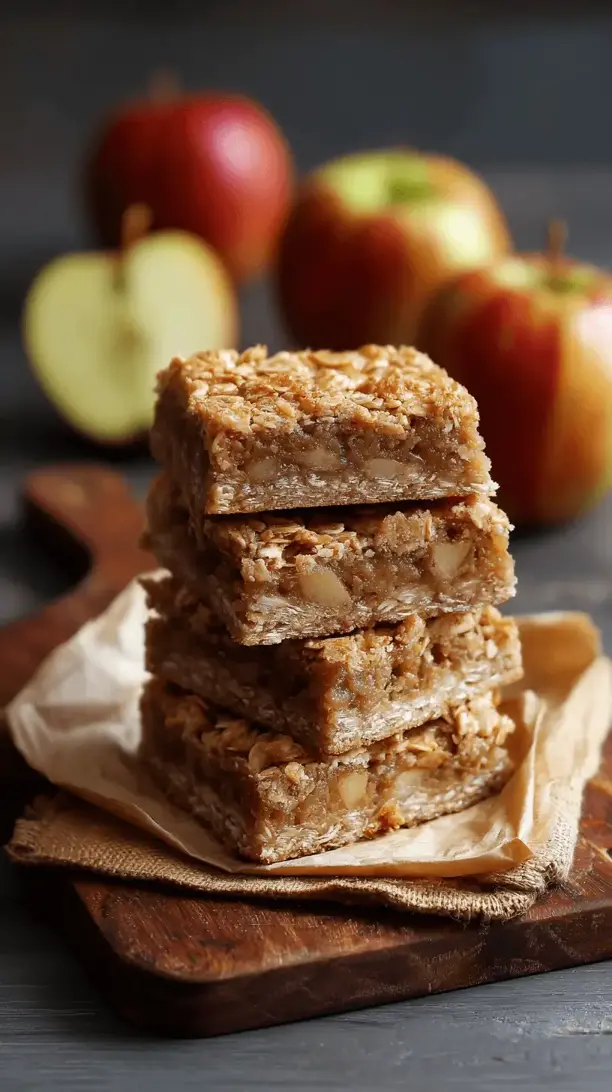
- Perfect texture in every bite. You get the soft, jammy apple filling sandwiched between a firm, buttery base and a crunchy oat topping. It’s a fantastic contrast that keeps you coming back for just one more square.
- They fill your kitchen with the best aroma. Baking these bars is an experience. The combination of baking oats, brown sugar, and warm cinnamon is honestly better than any scented candle.
- Incredibly versatile for any occasion. They’re just as welcome at a casual coffee morning as they are for an after-school snack or a dressed-up dessert with a scoop of vanilla ice cream.
Ingredients & Tools
- 300 g old-fashioned rolled oats
- 250 g all-purpose flour
- 200 g light brown sugar, packed
- 1 tsp baking soda
- 1/2 tsp fine sea salt
- 1 tsp ground cinnamon
- 225 g unsalted butter, melted and slightly cooled
- 800 g apples (about 4-5 medium), peeled, cored, and thinly sliced
- 2 tbsp fresh lemon juice
- 50 g granulated sugar
- 2 tbsp cornstarch
- 1/2 tsp ground nutmeg
Tools: 9×13 inch (23×33 cm) baking pan, parchment paper, two mixing bowls, a sharp knife or mandoline for the apples.
Using old-fashioned oats is key here—they give the bars that wonderful chewy texture. And for the apples, a mix of varieties like Granny Smith and Honeycrisp gives you the perfect balance of tart and sweet, which really makes the filling sing.
Serves: 12 | Prep Time: 25 minutes | Cook Time: 45 minutes | Total Time: 1 hour 10 minutes
Before You Start: Tips & Ingredient Notes
- Which apples are best? I really love a combination. Using a tart apple like Granny Smith holds its shape well, while a sweeter one like Fuji or Gala breaks down a little more for a jammy texture. A mix is your best bet for a complex filling.
- Don’t skip the cornstarch. It might seem like a small amount, but it’s the secret to a filling that holds together beautifully instead of being runny. It thickens the natural juices from the apples as they bake.
- Why cooled, melted butter? Melting the butter ensures an even, crumbly texture throughout the oat mixture. Letting it cool for a few minutes is important so it doesn’t “cook” the other ingredients when you mix it in.
- The lemon juice does double duty. It adds a subtle brightness that cuts through the sweetness, but it also helps prevent the apple slices from browning while you’re prepping everything else. A little goes a long way!
How to Make Oatmeal Apple Pie Bars
Step 1: First, preheat your oven to 350°F (175°C). Line your 9×13 inch baking pan with parchment paper, leaving a little overhang on two opposite sides. This is your secret weapon for lifting the entire slab of bars out of the pan later for clean, easy cutting. A quick spritz of cooking spray on the paper helps it stay put.
Step 2: Now, let’s make the oat mixture—which is both the crust and the topping! In a large bowl, whisk together the rolled oats, flour, brown sugar, baking soda, salt, and cinnamon. You’ll notice the smell is already fantastic. Pour in the slightly cooled, melted butter. Use a fork or your hands to mix until everything is thoroughly combined and clumps form. The texture should be like a coarse, damp sand.
Step 3: Time for the apples. In your second bowl, toss the thinly sliced apples with the lemon juice right away. This stops them from oxidizing. Then, sprinkle in the granulated sugar, cornstarch, and nutmeg. Toss, toss, toss until every apple slice has a light, powdery coating. This is what will create that gorgeous, glossy filling.
Step 4: Press about two-thirds of the oat mixture firmly into the bottom of your prepared pan. Really press it down—this forms the solid base for your bars. I like to use the bottom of a measuring cup to get it even and compact. Then, spread the apple mixture evenly over the crust.
Step 5: Sprinkle the remaining one-third of the oat mixture over the apples. Don’t press it down—you want this top layer to stay loose and crumbly so it bakes up nice and crisp. It’s okay if some apple peeks through; that’s part of the charm.
Step 6: Bake for 40-45 minutes, or until the top is a deep golden brown and the filling is bubbly around the edges. Your kitchen will smell absolutely incredible. The trick is to let the pan cool completely on a wire rack—this is non-negotiable for clean slices. The filling needs time to set up.
Step 7: Once completely cool, use the parchment paper overhang to lift the entire block of bars onto a cutting board. Slice into squares with a sharp knife. Honestly, the patience is worth it—you’ll get perfect, neat bars every time.
Serving Suggestions
Complementary Dishes
- A sharp cheddar cheese plate — The classic pairing of apple pie and cheese works beautifully here. The salty, tangy cheese contrasts wonderfully with the sweet, spiced bars.
- A simple green salad with a cider vinaigrette — For a lovely brunch or light lunch, the freshness of a salad balances the richness of the dessert perfectly.
Drinks
- Hot coffee or black tea — The bitterness of a strong brew is the ideal companion to the sweet, buttery bars, making for a truly cozy moment.
- A glass of cold milk — Sometimes the classic option is the best. It’s a nostalgic pairing that never fails to satisfy.
Something Sweet
- A scoop of vanilla bean ice cream — Serving a warm bar à la mode turns this simple treat into a decadent dessert. The melting ice cream over the spiced apples is pure bliss.
- A dollop of lightly sweetened whipped cream — For a lighter touch, fresh whipped cream adds a cloud-like creaminess without overpowering the apple and oat flavors.
Top Mistakes to Avoid
- Mistake: Using quick-cook oats instead of old-fashioned. Quick oats absorb moisture differently and can make the crust and topping a bit mushy and pasty. The sturdier texture of old-fashioned oats is essential for that perfect crumble.
- Mistake: Pressing the topping down. I’ve messed this up before too—you get excited and want to pat everything down. But that top layer needs to be loose and clumpy to achieve that desirable crispy, crunchy texture.
- Mistake: Slicing the bars while they’re warm. It’s so tempting, I know! But if you cut into them before they’re fully cooled, the filling will ooze out and you’ll end up with a messy, albeit delicious, crumble instead of neat bars.
- Mistake: Skipping the cornstarch. Without it, the apple juices won’t thicken properly, and you’ll have a soupy bottom layer. It’s a small ingredient that plays a huge role in the final texture.
Expert Tips
- Tip: Toast your oats for a deeper flavor. Spread the rolled oats on a baking sheet and toast them in a 350°F (175°C) oven for 5-7 minutes before starting. Let them cool slightly. This adds a wonderful nutty dimension to the entire bar.
- Tip: Add a handful of chopped nuts to the topping. For extra crunch and flavor, stir in about 1/2 cup of chopped walnuts or pecans into the portion of the oat mixture you’ll use for the topping.
- Tip: Make them ahead and freeze! These bars freeze beautifully. Cool completely, then wrap individual bars tightly in plastic wrap and store in a freezer bag for up to 3 months. Thaw at room temperature or warm gently in the oven.
- Tip: For a pretty finish, dust with powdered sugar. Just before serving, a light dusting of powdered sugar over the cooled bars makes them look bakery-quality and adds a subtle extra sweetness.
FAQs
Can I make these gluten-free?
Absolutely! You can easily make these gluten-free by using a 1-to-1 gluten-free all-purpose flour blend in place of the regular flour. Just double-check that your oats are certified gluten-free, as oats are often processed in facilities that also handle wheat.
How should I store these bars, and how long will they keep?
Store the cooled bars in an airtight container at room temperature for up to 3 days. For longer storage, I recommend keeping them in the fridge for up to a week. They’re delicious cold, or you can let them come to room temperature for a softer texture. You can also freeze them as mentioned in the tips!
My apple filling is a little runny. What happened?
This usually happens for one of two reasons: either the bars weren’t allowed to cool completely before cutting (the filling needs time to set), or there wasn’t quite enough cornstarch relative to the juiciness of your apples. Different apple varieties release different amounts of liquid. Next time, you can try increasing the cornstarch by another half tablespoon if you know your apples are very juicy.
Can I use frozen apples?
You can, but I’d recommend thawing them completely and draining off any excess liquid first. Frozen apples release a lot of water as they thaw, which could make your filling too wet. Pat them dry with a paper towel before tossing with the sugar and cornstarch.
Can I reduce the amount of sugar?
You can, but keep in mind it will affect both the sweetness and the texture. The sugar in the oat mixture helps it crisp up. I wouldn’t recommend reducing the brown sugar by more than a quarter. For the filling, you could reduce the granulated sugar slightly, especially if your apples are very sweet, but the sugar also helps macerate the apples and create the syrupy sauce.
Oatmeal Apple Pie Bars
Easy oatmeal apple pie bars with buttery oat crust & spiced apple filling. Perfect handheld dessert without the pie crust fuss! Simple recipe with step-by-step instructions.
Ingredients
Ingredients
-
300 g old-fashioned rolled oats
-
250 g all-purpose flour
-
200 g light brown sugar (packed)
-
1 tsp baking soda
-
1/2 tsp fine sea salt
-
1 tsp ground cinnamon
-
225 g unsalted butter (melted and slightly cooled)
-
800 g apples (about 4-5 medium, peeled, cored, and thinly sliced)
-
2 tbsp fresh lemon juice
-
50 g granulated sugar
-
2 tbsp cornstarch
-
1/2 tsp ground nutmeg
Instructions
-
First, preheat your oven to 350°F (175°C). Line your 9x13 inch baking pan with parchment paper, leaving a little overhang on two opposite sides. This is your secret weapon for lifting the entire slab of bars out of the pan later for clean, easy cutting. A quick spritz of cooking spray on the paper helps it stay put.01
-
Now, let's make the oat mixture—which is both the crust and the topping! In a large bowl, whisk together the rolled oats, flour, brown sugar, baking soda, salt, and cinnamon. You'll notice the smell is already fantastic. Pour in the slightly cooled, melted butter. Use a fork or your hands to mix until everything is thoroughly combined and clumps form. The texture should be like a coarse, damp sand.02
-
Time for the apples. In your second bowl, toss the thinly sliced apples with the lemon juice right away. This stops them from oxidizing. Then, sprinkle in the granulated sugar, cornstarch, and nutmeg. Toss, toss, toss until every apple slice has a light, powdery coating. This is what will create that gorgeous, glossy filling.03
-
Press about two-thirds of the oat mixture firmly into the bottom of your prepared pan. Really press it down—this forms the solid base for your bars. I like to use the bottom of a measuring cup to get it even and compact. Then, spread the apple mixture evenly over the crust.04
-
Sprinkle the remaining one-third of the oat mixture over the apples. Don't press it down—you want this top layer to stay loose and crumbly so it bakes up nice and crisp. It's okay if some apple peeks through; that's part of the charm.05
-
Bake for 40-45 minutes, or until the top is a deep golden brown and the filling is bubbly around the edges. Your kitchen will smell absolutely incredible. The trick is to let the pan cool completely on a wire rack—this is non-negotiable for clean slices. The filling needs time to set up.06
-
Once completely cool, use the parchment paper overhang to lift the entire block of bars onto a cutting board. Slice into squares with a sharp knife. Honestly, the patience is worth it—you'll get perfect, neat bars every time.07


