Why You’ll Love This No-Bake Gingerbread Truffles
- Incredibly easy and fuss-free. No baking required means you can whip these up even on the busiest of days. The process is straightforward—mix, roll, dip, and enjoy. It’s honestly that simple.
- Deep, warm, and cozy flavors. The combination of molasses, ginger, cinnamon, and a hint of nutmeg creates that classic gingerbread taste we all adore, but in a creamy, truffle form. It’s like a hug in a bite.
- Perfect for making ahead. These truffles keep beautifully in the fridge or freezer, so you can make a batch days (or even weeks) before you need them. They’re a lifesaver during the festive rush.
- Endlessly customizable. Feel like rolling them in crushed nuts, sprinkles, or cocoa powder instead of dipping in chocolate? Go for it! This recipe is wonderfully adaptable to what you have on hand.
Ingredients & Tools
- 200 g digestive biscuits or graham crackers
- 100 g full-fat cream cheese, softened
- 3 tbsp molasses (not blackstrap)
- 2 tbsp maple syrup or honey
- 1 tsp ground ginger
- 1 tsp ground cinnamon
- 1/4 tsp ground nutmeg
- 1/8 tsp ground cloves
- Pinch of salt
- 150 g dark or milk chocolate, chopped
- 1 tsp coconut oil (optional, for a smoother chocolate coating)
Tools: Food processor, medium mixing bowl, baking sheet, parchment paper, small microwave-safe bowl or double boiler.
The quality of your spices really matters here—since they’re the star of the show, using fresh, fragrant ones will make all the difference in the world. And that pinch of salt? It’s not optional; it makes the spices pop and balances the sweetness perfectly.
Nutrition (per serving)
- Calories: 98 kcal
- Protein: 1 g
- Fat: 5 g
- Carbohydrates: 13 g
- Fiber: 1 g
Serves: 20 truffles | Prep Time: 30 minutes | Chill Time: 1 hour | Total Time: 1 hour 30 minutes
Before You Start: Tips & Ingredient Notes
- Why can’t I use blackstrap molasses? Blackstrap molasses has a very robust, slightly bitter flavor that can overpower the delicate balance of these truffles. Regular, light, or dark molasses provides a smoother, sweeter gingerbread taste that works perfectly here.
- Does the cream cheese need to be room temperature? Absolutely. If it’s too cold, you’ll end up with a lumpy mixture that’s difficult to combine and roll. Let it sit out for about 30 minutes before you begin for the creamiest, smoothest texture.
- Can I use a different type of biscuit? Digestive biscuits or graham crackers are ideal because they’re not too sweet and have a neutral, crumbly texture. If you substitute, avoid anything too buttery or sugary, as it will change the final flavor and consistency.
- What’s the deal with the coconut oil? Adding a small amount of coconut oil to your melting chocolate creates a thinner, more fluid consistency that’s easier for dipping. It also gives the finished coating a lovely glossy sheen and a satisfying snap.
How to Make No-Bake Gingerbread Truffles
Step 1: Create the Crumbs. Place your digestive biscuits or graham crackers into the bowl of a food processor. Pulse them until you have fine, even crumbs—you don’t want any big chunks. You’ll know it’s ready when it looks like coarse sand. If you don’t have a food processor, you can place the biscuits in a sturdy zip-top bag and roll over them with a rolling pin until finely crushed.
Step 2: Combine the Filling. In a medium mixing bowl, add the soft cream cheese, molasses, and maple syrup. Use a spatula or wooden spoon to beat them together until they’re completely smooth and well incorporated. You shouldn’t see any streaks of white cream cheese. Now, add all your spices—the ginger, cinnamon, nutmeg, cloves, and that all-important pinch of salt. Stir until the spices are evenly distributed throughout the mixture.
Step 3: Bring It All Together. Pour the fine biscuit crumbs into the wet mixture. Now, switch to using your hands—it’s the best tool for the job here! Mix and knead gently until a soft, uniform dough forms. It should hold together when you pinch it and not feel overly sticky. If it seems too wet, you can add another tablespoon of biscuit crumbs. If it’s too dry, a tiny drizzle of maple syrup will help.
Step 4: Chill and Shape. Cover the bowl with plastic wrap and pop it into the refrigerator for at least 30 minutes. This chilling time is crucial—it firms up the dough, making it much easier to handle and roll. Once chilled, use a small cookie scoop or a tablespoon to portion out the dough. Roll each portion between your palms to form a smooth, round ball. Place them on a parchment-lined baking sheet.
Step 5: The Second Chill. Once all your truffles are rolled, place the entire baking sheet back into the fridge for another 15-20 minutes. This second chill ensures they are firm and won’t fall apart when you dip them into the warm chocolate. Cold truffles are the secret to a perfect, non-messy coating.
Step 6: Melt the Chocolate. While the truffles are chilling, melt your chocolate. You can do this in a microwave in 20-second bursts, stirring well between each, or use a double boiler over simmering water. The trick is to melt it gently so it doesn’t seize. If using, stir in the teaspoon of coconut oil once the chocolate is mostly melted—it will blend in smoothly and make the chocolate wonderfully dippable.
Step 7: The Grand Dip. Remove the truffles from the fridge. Using a fork or a dipping tool, lower one truffle into the melted chocolate. Swirl it around to coat completely, then gently tap the fork on the edge of the bowl to remove any excess chocolate. Carefully slide the coated truffle back onto the parchment-lined sheet. Repeat with all truffles. If you’re feeling fancy, you can sprinkle a little extra cinnamon or some crushed biscuit on top before the chocolate sets.
Step 8: Set and Serve. Allow the chocolate to set completely at room temperature, which can take about an hour, or you can speed up the process by placing them in the fridge for 15 minutes. Once the chocolate shell is firm to the touch, they’re ready to be devoured! Store any leftovers in an airtight container in the fridge.
Serving Suggestions
Complementary Dishes
- A simple cheese board — The sharpness of a good cheddar or the creaminess of brie provides a lovely savory contrast that makes the spicy sweetness of the truffles even more pronounced.
- Spiced pear and walnut salad — The fresh, crisp elements of the salad are a perfect palate cleanser between bites of the rich, decadent truffle.
- Warm apple cider — Served in mugs, the hot, spiced cider echoes the gingerbread flavors and turns the truffles into a truly cozy dessert experience.
Drinks
- Chai latte — The cardamom and black tea notes in a chai latte are a beautiful companion to the ginger and cinnamon in the truffles.
- Dark roast coffee — A strong cup of coffee cuts through the sweetness beautifully and highlights the deep, bitter notes of the dark chocolate coating.
- Sweet dessert wine — A sip of a late-harvest Riesling or a Moscato d’Asti alongside a truffle feels incredibly luxurious and celebratory.
Something Sweet
- Vanilla bean ice cream — Placing a truffle or two on top of a scoop of cold, creamy ice cream creates an amazing temperature and texture contrast.
- Cinnamon-dusted shortbread cookies — These offer a different, crumbly texture that pairs wonderfully with the soft, fudgy center of the truffles.
- Poached pears — The gentle, wine-poached fruit is light enough to follow the rich truffles, making for a well-rounded dessert course.
Top Mistakes to Avoid
- Mistake: Skipping the chilling steps. I know it’s tempting to rush, but if the dough isn’t properly chilled, it will be too soft to roll into neat balls and will melt into the chocolate coating, creating a messy puddle.
- Mistake: Over-processing the biscuit crumbs. If you blend the biscuits for too long, they can start to release their oils and become a paste rather than fine crumbs. Pulse just until you get that sandy texture.
- Mistake: Using cold cream cheese. Cold cream cheese won’t blend smoothly with the other ingredients, leaving you with a lumpy, uneven truffle mixture that’s difficult to work with.
- Mistake: Getting water in the melting chocolate. Even a single drop of water can cause the chocolate to “seize,” turning it into a thick, grainy mess. Always ensure your bowls and utensils are completely dry.
Expert Tips
- Tip: For perfectly round truffles, roll the chilled dough between your palms, but don’t over-handle it. The heat from your hands can start to soften the mixture. If it gets too sticky, just pop the balls back in the fridge for 5 minutes to firm up again.
- Tip: If your chocolate coating is too thick, a tiny bit more coconut oil (about 1/2 tsp at a time) will thin it out. If it’s too thin, let it cool slightly or add a little more grated chocolate to thicken it up.
- Tip: Use a fork for dipping, but also keep a toothpick handy. If a truffle gets stuck, a gentle poke with the toothpick can help release it without damaging the shape.
- Tip: For a professional finish, after dipping, transfer the truffle to a clean spot on the parchment paper. This prevents a messy “foot” from forming around the base and makes them look store-bought (in the best way!).
FAQs
Can I make these truffles vegan?
Absolutely! You can easily create a vegan version. Use vegan digestive biscuits, substitute the cream cheese with a plant-based alternative (just make sure it’s a firm, block-style one), and use maple syrup instead of honey. For the coating, simply ensure your chocolate is dairy-free. The method remains exactly the same, and they taste just as delicious.
How far in advance can I make them?
These truffles are fantastic for making ahead. They will keep beautifully in an airtight container in the refrigerator for up to one week. For longer storage, you can freeze them for up to three months. Place them in a single layer on a baking sheet to freeze solid first, then transfer to a freezer bag. Thaw in the fridge overnight before serving.
My mixture is too wet/sticky. What should I do?
Don’t worry, this happens! The moisture content in cream cheese and molasses can vary slightly. If your mixture is too sticky to roll, simply add more crushed biscuits, one tablespoon at a time, until the dough is firm enough to handle. Chilling it thoroughly will also make it much less sticky.
Can I use white chocolate instead of dark?
Of course! White chocolate creates a lovely sweet and spicy contrast with the gingerbread filling. Just be aware that white chocolate can be a bit more temperamental to melt, so go even slower with the heat and consider adding the coconut oil to help it stay smooth.
Why did my chocolate coating turn streaky or dull?
This is usually a sign that the chocolate was overheated or cooled too quickly. To avoid this, melt your chocolate gently and slowly. If it does happen, it’s purely a cosmetic issue—the truffles will still taste amazing. For a guaranteed glossy finish, you can use chocolate specifically designed for tempering, but for home purposes, it’s not necessary.
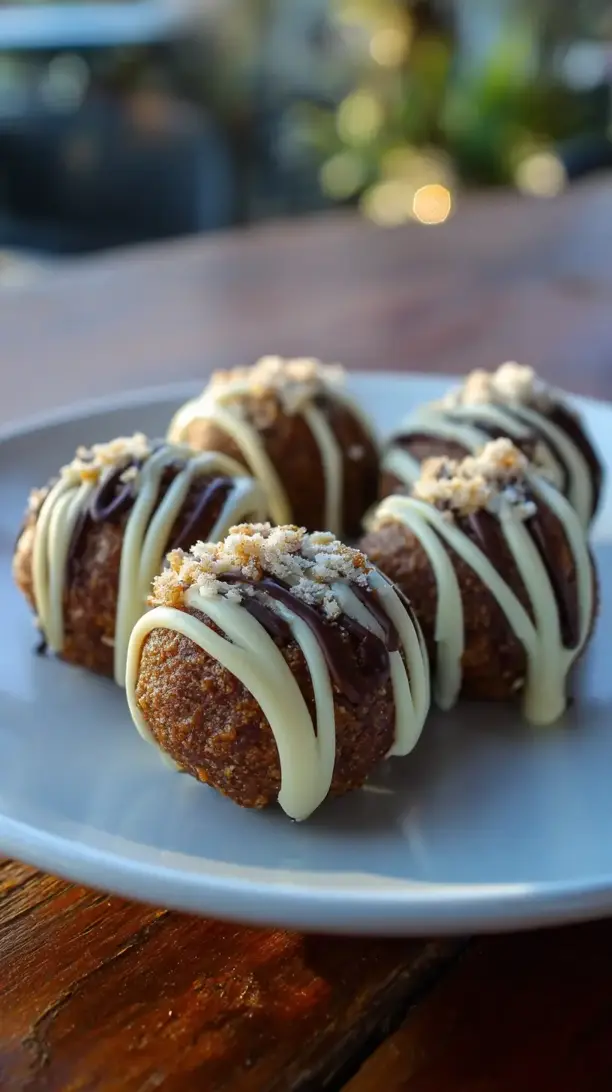
No Bake Gingerbread Truffles
Make easy No-Bake Gingerbread Truffles in 30 minutes! These creamy, spiced bites are dipped in chocolate for the perfect holiday treat. Get the simple recipe now!
Ingredients
For the truffles:
-
200 g digestive biscuits or graham crackers
-
100 g full-fat cream cheese (softened)
-
3 tbsp molasses (not blackstrap)
-
2 tbsp maple syrup or honey
-
1 tsp ground ginger
-
1 tsp ground cinnamon
-
0.25 tsp ground nutmeg
-
0.125 tsp ground cloves
-
salt (pinch)
For the coating:
-
150 g dark or milk chocolate (chopped)
-
1 tsp coconut oil (optional, for a smoother chocolate coating)
Instructions
-
Place your digestive biscuits or graham crackers into the bowl of a food processor. Pulse them until you have fine, even crumbs—you don’t want any big chunks. You’ll know it’s ready when it looks like coarse sand. If you don’t have a food processor, you can place the biscuits in a sturdy zip-top bag and roll over them with a rolling pin until finely crushed.01
-
In a medium mixing bowl, add the soft cream cheese, molasses, and maple syrup. Use a spatula or wooden spoon to beat them together until they’re completely smooth and well incorporated. You shouldn’t see any streaks of white cream cheese. Now, add all your spices—the ginger, cinnamon, nutmeg, cloves, and that all-important pinch of salt. Stir until the spices are evenly distributed throughout the mixture.02
-
Pour the fine biscuit crumbs into the wet mixture. Now, switch to using your hands—it’s the best tool for the job here! Mix and knead gently until a soft, uniform dough forms. It should hold together when you pinch it and not feel overly sticky. If it seems too wet, you can add another tablespoon of biscuit crumbs. If it’s too dry, a tiny drizzle of maple syrup will help.03
-
Cover the bowl with plastic wrap and pop it into the refrigerator for at least 30 minutes. This chilling time is crucial—it firms up the dough, making it much easier to handle and roll. Once chilled, use a small cookie scoop or a tablespoon to portion out the dough. Roll each portion between your palms to form a smooth, round ball. Place them on a parchment-lined baking sheet.04
-
Once all your truffles are rolled, place the entire baking sheet back into the fridge for another 15-20 minutes. This second chill ensures they are firm and won’t fall apart when you dip them into the warm chocolate. Cold truffles are the secret to a perfect, non-messy coating.05
-
While the truffles are chilling, melt your chocolate. You can do this in a microwave in 20-second bursts, stirring well between each, or use a double boiler over simmering water. The trick is to melt it gently so it doesn’t seize. If using, stir in the teaspoon of coconut oil once the chocolate is mostly melted—it will blend in smoothly and make the chocolate wonderfully dippable.06
-
Remove the truffles from the fridge. Using a fork or a dipping tool, lower one truffle into the melted chocolate. Swirl it around to coat completely, then gently tap the fork on the edge of the bowl to remove any excess chocolate. Carefully slide the coated truffle back onto the parchment-lined sheet. Repeat with all truffles. If you’re feeling fancy, you can sprinkle a little extra cinnamon or some crushed biscuit on top before the chocolate sets.07
-
Allow the chocolate to set completely at room temperature, which can take about an hour, or you can speed up the process by placing them in the fridge for 15 minutes. Once the chocolate shell is firm to the touch, they’re ready to be devoured! Store any leftovers in an airtight container in the fridge.08