
Why You’ll Love This No Bake Energy Brownie Bars
- They’re incredibly fast and foolproof. Seriously, if you can press a button on a food processor, you can make these. There’s no baking soda to measure incorrectly, no risk of over-mixing, and absolutely no chance of burning the edges. It’s the most stress-free “baking” you’ll ever do.
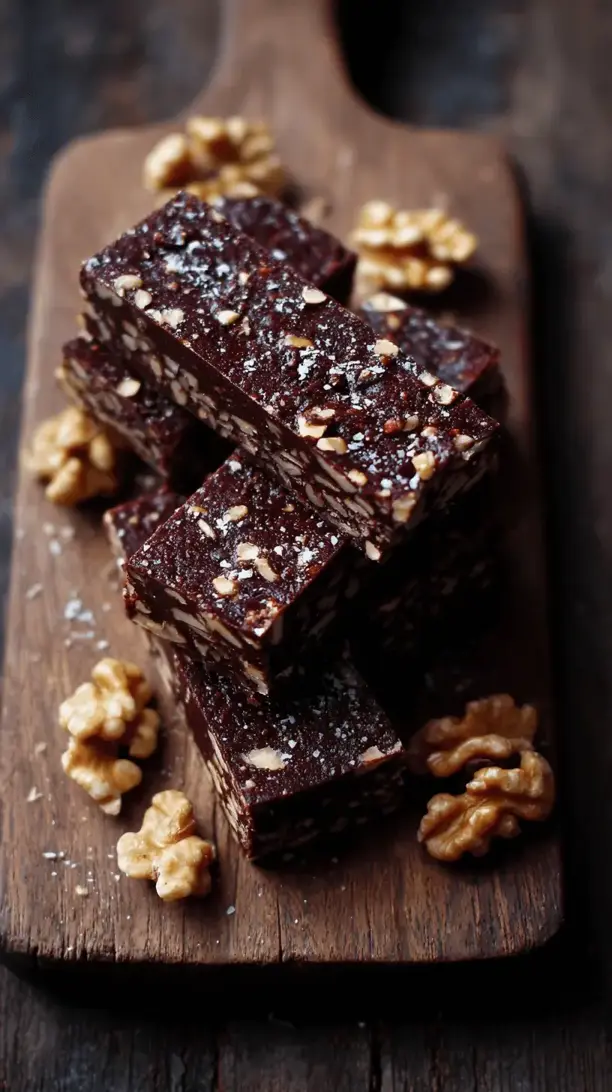
- The texture is pure fudgy bliss. We’re talking a dense, chewy, melt-in-your-mouth experience that rivals any traditional baked brownie. The combination of sticky dates and ground nuts creates this incredible base that holds together perfectly without being crumbly.
- They’re a powerhouse of natural energy. Forget the sugar crash from a candy bar. These bars are sweetened naturally with dates and a touch of maple syrup, and packed with sustained energy from nuts and seeds. You’ll feel satisfied and fueled, not sluggish.
- They’re endlessly customizable. Don’t like walnuts? Use almonds. Want a chocolate chip crunch? Toss some in. Feeling adventurous? A pinch of flaky sea salt on top takes them to a whole new level of deliciousness. This recipe is your playground.
Ingredients & Tools
- 300 g (about 2 cups packed) Medjool dates, pitted
- 150 g (1 ½ cups) raw walnuts or almonds
- 60 g (½ cup) unsweetened cocoa powder or cacao powder
- 2 tbsp pure maple syrup or agave nectar
- 2 tbsp coconut oil, melted
- 1 tsp pure vanilla extract
- A generous pinch of fine sea salt
- Optional add-ins: 3 tbsp dark chocolate chips, 2 tbsp chia seeds or hemp hearts, 1 tbsp instant coffee granules for a mocha twist.
Tools: A food processor (a high-powered blender can work but a processor is easier), an 8×8 inch baking pan, and parchment paper.
The quality of your cocoa powder really makes a difference here—since it’s a dominant flavor, using a good one will give you a much richer, deeper chocolate taste. And don’t skip the pinch of salt; it’s the secret weapon that makes all the chocolate notes pop.
Serves: 9 bars | Prep Time: 20 minutes | Chill Time: 1 hour | Total Time: 1 hour 20 minutes (mostly hands-off)
Before You Start: Tips & Ingredient Notes
- Your dates need to be soft. If your Medjool dates are at all dry or hard, they won’t blend into a sticky paste. Simply soak them in very hot water for 10 minutes, then drain and pat them thoroughly dry before using. This little step ensures a perfectly fudgy texture.
- Toasting the nuts is a game-changer. It’s an optional step, but honestly, it adds a incredible depth of flavor. Just spread the nuts on a baking sheet and toast at 175°C (350°F) for 8-10 minutes, until fragrant. Let them cool completely before processing.
- Cocoa vs. Cacao? You can use either! Cacao powder is less processed and has a slightly fruitier, more intense chocolate flavor. Standard unsweetened cocoa powder will give you a more classic, familiar brownie taste. Both work beautifully.
- Why coconut oil? It helps the bars firm up beautifully in the fridge and adds a subtle richness. If you don’t have it, you can omit it, but the bars might be a tad stickier. The melted state is key for easy mixing.
How to Make No Bake Energy Brownie Bars
Step 1: Prep Your Pan and Ingredients. First things first, line your 8×8 inch pan with parchment paper, leaving some overhang on two opposite sides. This creates little “handles” that will make lifting the whole slab of brownie out later an absolute breeze. Then, make sure your dates are pitted and your nuts are measured out. Having everything ready to go makes the process seamless.
Step 2: Pulse the Nuts. Add your walnuts or almonds to the bowl of your food processor. Pulse them until they resemble a coarse meal. You’re looking for a texture similar to coarse sand—you don’t want a fine nut butter, but you also don’t want large, identifiable chunks. This creates the perfect crumb for our brownie base. You’ll know it’s ready when it looks evenly ground.
Step 3: Create the Sticky Base. Now, add the pitted dates to the food processor with the ground nuts. Pulse everything together until the mixture starts to clump and look crumbly. This might take a minute or two. Stop and scrape down the sides as needed. The goal is to break down the dates completely so they can act as the glue for our bars.
Step 4: Bring in the Chocolate. It’s time for the good stuff! Add the cocoa powder, maple syrup, melted coconut oil, vanilla extract, and that all-important pinch of salt. If you’re using any add-ins like chocolate chips or seeds, hold off on those for now. Process the mixture again. At first, it will look dry and dusty, but keep the processor running. After about 1-2 minutes, you’ll see a magical transformation—the mixture will suddenly come together into a dark, sticky ball that rolls around the bowl.
Step 5: The Final Mix-In. Once the dough has formed a ball, add your optional add-ins. Pulse just a few times until they are evenly distributed. You don’t want to over-process and break the chocolate chips down completely. The dough will be very thick and sticky, which is exactly what you want.
Step 6: Press and Shape. Turn the dough out into your prepared parchment-lined pan. This is where a little muscle comes in handy! Using slightly wet hands (this prevents sticking), press the mixture firmly and evenly into the pan. Really press down hard—this ensures the bars hold their shape and have that dense, fudgy texture we’re after. Get it as smooth and level as you can.
Step 7: The Chill. This is the crucial “no-bake” step. Cover the pan with cling film or a lid and refrigerate for at least one hour, or until the slab is very firm. This allows the coconut oil to solidify and all the flavors to meld together beautifully. You can even leave it overnight if you’re planning ahead.
Step 8: Slice and Serve. Using the parchment paper handles, lift the entire brownie slab out of the pan and onto a cutting board. Use a sharp knife to slice it into 9 or 12 bars. For super clean cuts, you can warm the knife under hot water and wipe it dry between slices. Enjoy immediately, and store the rest in an airtight container in the fridge.
Serving Suggestions
Complementary Dishes
- A bowl of fresh berries — The bright, tart acidity of raspberries or strawberries cuts through the rich chocolate beautifully, creating a perfect balance.
- A dollop of Greek yogurt or coconut yogurt — The cool, creamy tang provides a lovely contrast to the dense, fudgy bar, making it feel like a more complete snack or light dessert.
Drinks
- A cold glass of almond milk — It’s a classic for a reason. The nutty flavor complements the bars perfectly and washes everything down smoothly.
- A hot cup of black coffee — The bitterness of a good brew makes the chocolate taste even richer and more complex, especially if you added the optional coffee granules to the mix.
Something Sweet
- A small scoop of vanilla bean ice cream — For a truly decadent treat, place a slightly chilled bar next to a scoop of ice cream. The combination of temperatures and textures is heavenly.
- A drizzle of salted caramel sauce — If you’re really leaning into dessert territory, a little caramel takes these from an energy bar to a gourmet indulgence.
Top Mistakes to Avoid
- Mistake: Using old, hard dates. This is the number one reason the mixture won’t come together. If your dates aren’t soft and sticky, the bars will be crumbly and dry. The quick soak in hot water is a non-negotiable fix for this.
- Mistake: Not processing the mixture long enough. When you first add the wet ingredients, it will look hopelessly dry. Have faith! Keep the processor running until it suddenly balls up on the blade. Stopping too early means a grainy, non-cohesive texture.
- Mistake: Pressing the mixture lightly into the pan. A firm, strong press is what gives these bars their signature dense, brownie-like chew. If you just pat it down gently, the bars may be too fragile and fall apart when you pick them up.
- Mistake: Skipping the chill time. I know it’s tempting to slice right in, but the refrigeration step is essential for the bars to set properly. Without it, they’ll be messy and difficult to handle.
Expert Tips
- Tip: For ultra-fudgy bars, use a mix of nuts. Try half walnuts for their rich flavor and half almonds for a slightly firmer texture. This combination creates a more complex depth and the perfect chew.
- Tip: Roll them into bliss balls instead. If you’re short on time or don’t feel like slicing bars, simply roll the mixture into tablespoon-sized balls. They’ll set faster in the fridge and are perfect for popping straight into a lunchbox.
- Tip: Add a texture surprise. After you’ve pulsed in the main ingredients, stir in 2-3 tablespoons of roughly chopped nuts or cacao nibs by hand. This gives you little pockets of crunch in every bite.
- Tip: Freeze for long-term storage. These bars freeze exceptionally well. Slice them, layer them between parchment paper in an airtight container, and freeze for up to 3 months. They thaw in minutes for an instant treat.
FAQs
Can I make these without a food processor?
It’s tricky, but a high-powered blender can work if you pulse very carefully and scrape down the sides constantly. The mixture is so thick that it can strain blender motors, so a food processor is highly recommended. If you have neither, you could try very finely chopping the dates and nuts by hand and then kneading all the ingredients together in a bowl—it will be a serious arm workout, but it’s possible!
How long do these bars keep?
Stored in an airtight container in the refrigerator, they will stay fresh and perfect for about 2 weeks. Because of the natural ingredients and lack of preservatives, they are best kept cool. You can also store them at room temperature for a day or two if you’re taking them on a trip, but the fridge is best for maintaining texture.
My mixture is too dry and won’t stick together. What can I do?
This usually means your dates weren’t quite sticky enough. Don’t worry, it’s an easy fix! Add another tablespoon of melted coconut oil or maple syrup, one teaspoon at a time, and process again. It should come together. If it’s really stubborn, adding a teaspoon of water can also help, but go slowly to avoid making it wet.
Can I make these vegan?
They already are! This recipe is naturally vegan as long as you use dairy-free chocolate chips if you’re adding them. It’s one of the things I love most about it—it’s a treat that everyone can enjoy without any substitutions needed.
Are these suitable for kids?
Absolutely! They are a fantastic, whole-food alternative to sugary store-bought snacks. You can even get them involved in the making process—pitting the dates, pressing the mixture into the pan—it’s a great way to introduce them to healthy baking. Just be mindful of nut allergies if you’re packing them for school.
No Bake Energy Brownie Bars
Craving brownies but no time to bake? These no-bake energy brownie bars are ready in 20 mins! Fudgy, healthy & packed with natural energy. Perfect snack or breakfast!
Ingredients
Ingredients
-
300 g Medjool dates, pitted (about 2 cups packed)
-
150 g raw walnuts or almonds (1 ½ cups)
-
60 g unsweetened cocoa powder or cacao powder (½ cup)
-
2 tbsp pure maple syrup or agave nectar
-
2 tbsp coconut oil, melted
-
1 tsp pure vanilla extract
-
A generous pinch fine sea salt
-
3 tbsp dark chocolate chips (optional add-in)
-
2 tbsp chia seeds or hemp hearts (optional add-in)
-
1 tbsp instant coffee granules (optional add-in for mocha twist)
Instructions
-
Line an 8×8 inch pan with parchment, leaving overhang as handles. Pit dates and measure nuts.01
-
Pulse walnuts or almonds in a food processor to a coarse meal (like coarse sand).02
-
Add pitted dates and pulse until the mixture clumps and the dates are fully broken down, scraping sides as needed.03
-
Add cocoa powder, maple syrup, melted coconut oil, vanilla, and a pinch of salt. Process 1–2 minutes until a cohesive, sticky ball forms.04
-
Optional: add chocolate chips or seeds and pulse briefly to distribute.05
-
Press the dough very firmly and evenly into the lined pan using slightly wet hands.06
-
Chill at least 1 hour (or overnight) until very firm.07
-
Lift out with parchment and slice into 9–12 bars. Store refrigerated in an airtight container.08


