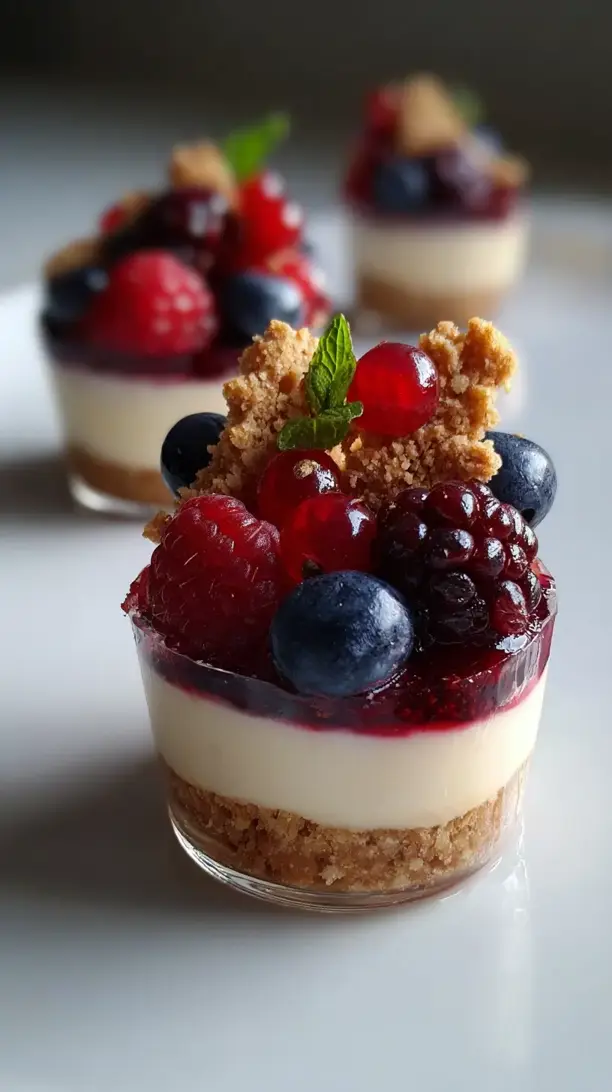
Why You’ll Love This No-Bake Berry Cheesecake Cups
- Effortless Elegance. These little cups look like they came from a patisserie, but they are deceptively simple to assemble. No water baths, no cracked tops, no oven anxiety—just pure, uncomplicated deliciousness.
- The Perfect Texture Combo. You get a fantastic play of textures in every spoonful. The crunchy biscuit base gives way to the impossibly smooth and rich cheesecake layer, which is then topped with a juicy, slightly tart berry compote. It’s a real party for your palate.
- Incredibly Customizable. Not a fan of berries? No problem. You can swap the berry compote for a drizzle of salted caramel, a chocolate ganache, or even some stewed stone fruits like peaches or plums. The base is your canvas.
- Make-Ahead Marvel. These are actually better when made a day in advance, making them the ultimate stress-free dessert for entertaining. Just pull them out of the fridge when your guests arrive.
Ingredients & Tools
- 150 g digestive biscuits or graham crackers
- 60 g unsalted butter, melted
- 300 g full-fat cream cheese, at room temperature
- 100 g icing sugar
- 1 tsp vanilla extract
- 250 ml double cream or heavy whipping cream, cold
- 200 g mixed fresh or frozen berries (like strawberries, raspberries, blueberries)
- 2 tbsp granulated sugar
- 1 tbsp lemon juice
- 1 tsp cornflour, mixed with 1 tbsp water to form a slurry
Tools: A food processor or zip-top bag and rolling pin, electric hand mixer or stand mixer, small saucepan, 4-6 serving glasses or jars.
Using full-fat cream cheese and cold double cream is non-negotiable for that luxuriously thick and stable filling that holds its shape. The cornflour slurry is our little secret for a compote that’s glossy and thick, not runny.
Nutrition (per serving)
- Calories: 520 kcal
- Protein: 6 g
- Fat: 38 g
- Carbohydrates: 42 g
- Fiber: 2 g
Serves: 6 | Prep Time: 25 minutes | Chill Time: 4 hours | Total Time: 4 hours 25 minutes
Before You Start: Tips & Ingredient Notes
- Room Temperature is Key. Take your cream cheese out of the fridge at least an hour before you start. If it’s too cold, it will be lumpy when you try to mix it, and you’ll end up over-beating the cream to compensate.
- Cold Cream for the Win. Your double cream must be ice-cold to whip up properly and hold air. I sometimes even chill my mixing bowl and beaters for about 15 minutes beforehand. It makes a noticeable difference in volume and stability.
- Don’t Skip the Cornflour Slurry. It might seem like a small step, but mixing the cornflour with cold water first prevents it from forming lumps when it hits the hot berry mixture. This is the trick to a compote that clings to the cheesecake, not a syrup that pools at the bottom.
- Get Creative with the Base. Digestive biscuits are classic, but ginger nut biscuits add a lovely spice, and Oreos (filling removed) make for a fantastic chocolatey base. Just keep the butter-to-biscuit ratio the same.
How to Make No-Bake Berry Cheesecake Cups
Step 1: Create the Crumb Base. First, we need to turn our biscuits into fine crumbs. You can do this in a food processor for a few pulses, or if you’re going the rustic route, pop them into a sturdy zip-top bag and crush them with a rolling pin until you have a sand-like consistency. Pour the crumbs into a bowl and drizzle in the melted butter. Mix it really well with a fork until every last crumb is coated and the mixture holds together when you pinch it. This buttery base is the foundation of our cups.
Step 2: Whip the Cream. In a clean, cool bowl, pour in your cold double cream. Using an electric mixer, whip the cream on medium-high speed until it forms soft peaks. You’ll know it’s ready when you lift the beaters and the cream holds its shape but the tip still curls over softly. Be careful not to over-whip it into butter! Scoop this whipped cream into a separate bowl for now. We’ll come back to it.
Step 3: Make the Cheesecake Filling. In the same bowl you used for the cream (no need to wash it!), beat the room-temperature cream cheese, icing sugar, and vanilla extract together. Start on low speed to avoid a sugar cloud, then increase to medium-high. Beat for a good 2-3 minutes until the mixture is completely smooth, pale, and there are absolutely no lumps. Scrape down the sides of the bowl to make sure everything is incorporated.
Step 4: Combine Filling & Cream. Now, we gently fold the whipped cream into the cream cheese mixture. This is where you need a light touch. Use a spatula and cut through the middle, folding over the top, rotating the bowl as you go. Keep going until the two are just combined and no white streaks remain. Over-mixing here will knock the air out of your cream, deflating the lovely light texture we’ve worked for.
Step 5: Assemble the First Layers. Grab your serving glasses or jars. Divide the buttery biscuit base evenly among them, pressing it down gently with the back of a spoon to create a compact, even layer. Then, carefully spoon or pipe the cheesecake filling on top of the base, filling the glasses about two-thirds of the way up. Smooth the tops. Pop these in the fridge to start setting up while you make the compote.
Step 6: Prepare the Berry Compote. In a small saucepan, combine your berries, granulated sugar, and lemon juice. Cook over medium heat, stirring occasionally, for about 5-7 minutes. The berries will break down and release their juices, creating a lovely syrup. Once it’s bubbling, give your cornflour slurry a quick stir (it settles) and drizzle it into the berry mixture, stirring constantly. Cook for another minute until the compote thickens noticeably and becomes glossy. Take it off the heat and let it cool completely—this is important so it doesn’t melt the cheesecake layer.
Step 7: Final Assembly and Chill. Once the compote is at room temperature (you can speed this up by spreading it on a plate), take the cups out of the fridge. Spoon the cooled compote over the cheesecake layer. Now, the hardest part: cover the cups and refrigerate them for at least 4 hours, but ideally overnight. This chilling time is crucial for the flavours to meld and the layers to set perfectly.
Serving Suggestions
Complementary Dishes
- A simple green salad with a citrus vinaigrette — The sharp, fresh notes of the salad provide a beautiful, palate-cleansing contrast to the rich, sweet cheesecake, making the whole meal feel balanced.
- Herbed roast chicken or a quiche — A savoury, protein-rich main course sets the stage perfectly, so these cheesecake cups feel like a truly deserved and decadent finale to your meal.
Drinks
- A glass of Prosecco or Champagne — The bubbles and acidity cut through the creaminess of the cheesecake beautifully, while the berry compote echoes the fruity notes in the wine.
- Earl Grey tea, lightly sweetened — The bergamot in the tea has a lovely floral-citrus quality that complements the berries and adds a sophisticated, comforting warmth alongside the cold dessert.
Something Sweet
- Dark chocolate-dipped shortbread fingers — For the ultimate indulgence, serve these on the side. The bitter dark chocolate and buttery shortbread offer a different texture and flavour that somehow makes the cheesecake taste even better.
Top Mistakes to Avoid
- Mistake: Using cold cream cheese. This is the number one reason for a lumpy filling. Cold cream cheese will never blend smoothly, and you’ll be left with tiny bits of cheese throughout your otherwise perfect mousse.
- Mistake: Over-whipping the cream. If you whip the cream until it’s grainy and looks curdled, you’ve gone too far and are on your way to making butter. This will make your final filling heavy and greasy instead of light and airy.
- Mistake: Adding hot compote. I know you’re excited to finish, but if you spoon that warm compote onto the chilled cheesecake layer, it will melt and create a messy, soupy layer. Patience is a virtue here.
- Mistake: Skipping the chill time. These cups need time to set. If you serve them too soon, the layers will be soft and might slump together. The wait is absolutely worth it for that perfect, sliceable texture.
Expert Tips
- Tip: Pipe the filling for a professional look. Instead of spooning the cheesecake mixture, transfer it to a piping bag fitted with a large star tip. You can create beautiful, swirly peaks that look stunning and hold the compote perfectly.
- Tip: Layer a little compote in the middle. For a marbled effect and an extra burst of berry flavour in every bite, try adding a thin layer of cooled compote between the biscuit base and the cheesecake filling.
- Tip: Use frozen berries with confidence. Frozen berries work brilliantly in the compote and are often more economical. There’s no need to thaw them first; just add a minute or two to the cooking time.
- Tip: Garnish just before serving. For a final touch of elegance, top each cup with a few fresh, whole berries and a sprig of mint right before you serve them. It makes all the difference in presentation.
FAQs
Can I make these cheesecake cups dairy-free?
Absolutely! You can use a good-quality, firm dairy-free cream cheese alternative and a plant-based double cream that whips well (look for one with a high fat content). For the butter in the base, a plant-based block butter works best. The method remains exactly the same. Just be sure all your ingredients are at the correct temperatures as outlined in the recipe for the best results.
How long will they keep in the fridge?
These cheesecake cups will keep beautifully for up to 3 days in the refrigerator. Make sure they are covered tightly with cling film or have a lid on the jar to prevent them from absorbing any other fridge odours. The biscuit base might soften a little after day two, but they will still be utterly delicious.
Can I freeze No-Bake Berry Cheesecake Cups?
You can, but with a caveat. The texture of the cheesecake filling can become a little grainy after thawing. If you do freeze them, it’s best to do so without the compote topping. Freeze the cups with just the base and cheesecake layer, then thaw overnight in the fridge and add the fresh compote before serving.
My cream cheese filling is runny. What happened?
This usually points to one of two issues: either your cream cheese was too warm, or your whipped cream was under-whipped. The filling needs the structure from the stiff-ish whipped cream to hold its shape. If it’s too runny to layer, just pop the whole bowl of filling into the fridge for 20-30 minutes to firm up a bit before continuing.
What can I use instead of digestives for the base?
The possibilities are endless! Graham crackers are the classic US alternative. For a chocolate twist, use Oreos (filling included or removed, your choice). Ginger nuts add a lovely warmth, and even plain shortbread biscuits blitzed up would create a wonderfully rich and buttery base. Just keep the ratio of biscuit to melted butter the same.
No Bake Berry Cheesecake Cups
Make these easy No-Bake Berry Cheesecake Cups for a quick, elegant dessert. A creamy filling and fresh berry compote create the perfect treat. Get the simple recipe now!
Ingredients
For the base:
-
150 g digestive biscuits or graham crackers
-
60 g unsalted butter (melted)
For the cheesecake filling:
-
300 g full-fat cream cheese (at room temperature)
-
100 g icing sugar
-
1 tsp vanilla extract
-
250 ml double cream or heavy whipping cream (cold)
For the berry compote:
-
200 g mixed fresh or frozen berries (like strawberries, raspberries, blueberries)
-
2 tbsp granulated sugar
-
1 tbsp lemon juice
-
1 tsp cornflour (mixed with 1 tbsp water to form a slurry)
Instructions
-
Create the Crumb Base. First, we need to turn our biscuits into fine crumbs. You can do this in a food processor for a few pulses, or if you're going the rustic route, pop them into a sturdy zip-top bag and crush them with a rolling pin until you have a sand-like consistency. Pour the crumbs into a bowl and drizzle in the melted butter. Mix it really well with a fork until every last crumb is coated and the mixture holds together when you pinch it. This buttery base is the foundation of our cups.01
-
Whip the Cream. In a clean, cool bowl, pour in your cold double cream. Using an electric mixer, whip the cream on medium-high speed until it forms soft peaks. You'll know it's ready when you lift the beaters and the cream holds its shape but the tip still curls over softly. Be careful not to over-whip it into butter! Scoop this whipped cream into a separate bowl for now. We'll come back to it.02
-
Make the Cheesecake Filling. In the same bowl you used for the cream (no need to wash it!), beat the room-temperature cream cheese, icing sugar, and vanilla extract together. Start on low speed to avoid a sugar cloud, then increase to medium-high. Beat for a good 2-3 minutes until the mixture is completely smooth, pale, and there are absolutely no lumps. Scrape down the sides of the bowl to make sure everything is incorporated.03
-
Combine Filling & Cream. Now, we gently fold the whipped cream into the cream cheese mixture. This is where you need a light touch. Use a spatula and cut through the middle, folding over the top, rotating the bowl as you go. Keep going until the two are just combined and no white streaks remain. Over-mixing here will knock the air out of your cream, deflating the lovely light texture we've worked for.04
-
Assemble the First Layers. Grab your serving glasses or jars. Divide the buttery biscuit base evenly among them, pressing it down gently with the back of a spoon to create a compact, even layer. Then, carefully spoon or pipe the cheesecake filling on top of the base, filling the glasses about two-thirds of the way up. Smooth the tops. Pop these in the fridge to start setting up while you make the compote.05
-
Prepare the Berry Compote. In a small saucepan, combine your berries, granulated sugar, and lemon juice. Cook over medium heat, stirring occasionally, for about 5-7 minutes. The berries will break down and release their juices, creating a lovely syrup. Once it's bubbling, give your cornflour slurry a quick stir (it settles) and drizzle it into the berry mixture, stirring constantly. Cook for another minute until the compote thickens noticeably and becomes glossy. Take it off the heat and let it cool completely—this is important so it doesn't melt the cheesecake layer.06
-
Final Assembly and Chill. Once the compote is at room temperature (you can speed this up by spreading it on a plate), take the cups out of the fridge. Spoon the cooled compote over the cheesecake layer. Now, the hardest part: cover the cups and refrigerate them for at least 4 hours, but ideally overnight. This chilling time is crucial for the flavours to meld and the layers to set perfectly.07