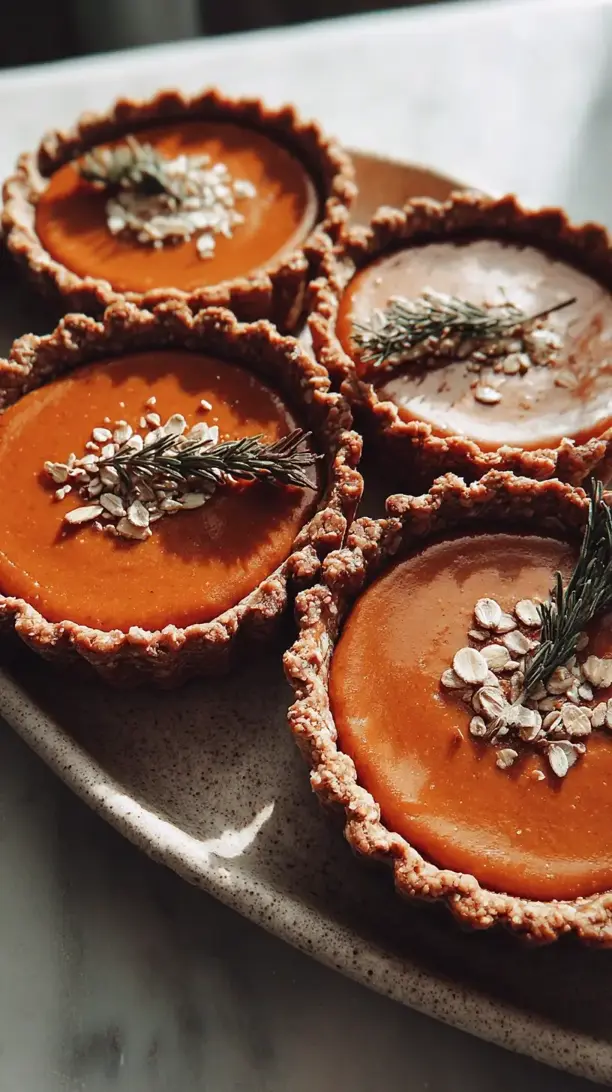
Why You’ll Love This Mini Oat Crust Pumpkin Pies
- Perfectly portioned for everyone. No more messy slicing or serving struggles — each person gets their own adorable, complete little pie. It makes serving at parties or family dinners so much simpler and just feels more special.
- The oat crust is a game-changer. It’s nutty, a little chewy, and has this wonderful rustic texture that pairs so well with the smooth pumpkin filling. Honestly, it’s easier to make than a traditional pastry crust and far more forgiving.
- They’re wonderfully versatile and forgiving. You can play around with the spices, swap in different sweeteners, or get creative with toppings. They bake evenly and are much less likely to crack than a full-sized pie.
- They freeze like a dream. Make a big batch ahead of time and just pull out a few whenever a pumpkin pie craving strikes. They thaw beautifully, so you can have a little taste of autumn anytime.
Ingredients & Tools
- For the Oat Crust:
- 150 g rolled oats (old-fashioned)
- 60 g all-purpose flour
- 75 g light brown sugar, packed
- 1/2 tsp ground cinnamon
- 1/4 tsp fine sea salt
- 115 g unsalted butter, melted and slightly cooled
- For the Pumpkin Filling:
- 1 can (425 g) pure pumpkin puree (not pumpkin pie filling)
- 2 large eggs, at room temperature
- 120 ml pure maple syrup
- 60 ml heavy cream or full-fat coconut milk
- 1 tsp vanilla extract
- 1 1/2 tsp ground cinnamon
- 1/2 tsp ground ginger
- 1/4 tsp ground nutmeg
- 1/8 tsp ground cloves
- 1/4 tsp fine sea salt
Tools: 12-cup standard muffin tin, mixing bowls, whisk, measuring spoons and cups, small saucepan or microwave-safe bowl for melting butter.
A couple of ingredient notes right off the bat — using pure pumpkin puree is key, as the pie filling is already sweetened and spiced. And that melted butter in the crust… it’s what gives the oat mixture that lovely, clumpy texture that presses so perfectly into the tin.
Nutrition (per serving)
- Calories: 215 kcal
- Protein: 3.5 g
- Fat: 10 g
- Carbohydrates: 29 g
- Fiber: 2.5 g
Serves: 12 | Prep Time: 25 minutes | Cook Time: 25 minutes | Total Time: 50 minutes
Before You Start: Tips & Ingredient Notes
- Why room temperature eggs? They incorporate into the filling much more smoothly and evenly, which helps create that signature silky texture. Cold eggs can make the filling a bit grainy and can sometimes cause it to separate.
- Can I use quick oats instead of rolled oats? You can, but the texture will be different. Quick oats are more powdery when processed, so the crust will be denser and less chewy. Rolled oats give you that perfect, rustic bite.
- Don’t skip the salt! It might seem like a small thing, but salt is what makes the flavors pop. It balances the sweetness and enhances all the warm spices, making your mini pies taste truly professional.
- What’s the deal with melting the butter? This is the secret to the crust’s easy, press-in texture. Unlike cutting cold butter into flour, melted butter gets distributed evenly, coating the oat and flour mixture so it clumps together perfectly when you press it into the pan.
How to Make Mini Oat Crust Pumpkin Pies
Step 1: First, let’s make that wonderful oat crust. Preheat your oven to 350°F (175°C). In a medium bowl, whisk together the rolled oats, all-purpose flour, brown sugar, cinnamon, and salt. You’ll notice the mixture is dry and flaky — that’s perfect. Pour the melted, slightly cooled butter over the top. Use a fork to mix everything until it’s well combined and has a crumbly, wet-sand-like texture. It should clump together when you pinch it.
Step 2: Now, divide the crust mixture evenly among the 12 cups of a standard muffin tin. I like to use a heaping tablespoon as a rough guide. Take a small glass, a shot glass, or your fingers, and firmly press the mixture into the bottom and up the sides of each cup to form a little crust shell. You want it to be compact so it holds its shape. Don’t worry if it’s not perfectly even — the rustic look is part of the charm!
Step 3: Par-bake the crusts. Pop the muffin tin into the preheated oven for about 8-10 minutes. You’re not looking to brown them fully, just to set the structure. This step prevents the crust from getting soggy once you add the wet filling. They’ll look a little puffed and smell wonderfully nutty and toasty when they’re ready. Take them out and let them cool on a rack while you make the filling. Leave the oven on.
Step 4: Time for the star of the show — the pumpkin filling. In a large bowl, whisk the pumpkin puree, room-temperature eggs, maple syrup, heavy cream, and vanilla extract together until it’s completely smooth and well-blended. You don’t want any streaks of egg white. The mixture will be a lovely, deep orange color and have a pourable, but not runny, consistency.
Step 5: Add all your spices and salt to the pumpkin mixture. That’s the cinnamon, ginger, nutmeg, cloves, and salt. Whisk vigorously again until everything is fully incorporated and the aroma is just incredible — warm, spicy, and inviting. Give the bowl a final scrape down the sides with a spatula to make sure no pockets of spice are hiding.
Step 6: Carefully pour or ladle the filling into the pre-baked crusts, filling them almost to the top. I find using a liquid measuring cup with a spout makes this process much cleaner. The filling shouldn’t rise much during baking, so it’s safe to fill them quite full. Gently tap the muffin tin on the counter a couple of times to release any air bubbles trapped in the filling.
Step 7: Bake the mini pies for 20-25 minutes. The edges of the filling will look set, and the very center might still have a slight, gentle wobble when you jiggle the pan — that’s exactly what you want. They will continue to set up as they cool. Overbaking is the main cause of cracked tops, so trust the wobble!
Step 8: This is the hardest part — patience. Let the mini pies cool completely in the muffin tin on a wire rack. This will take at least an hour, maybe two. They need this time to firm up fully, which makes them much easier to remove. Trying to take them out while warm is a recipe for crumbly disaster.
Step 9: Once they are completely cool, it’s removal time. Run a thin, small knife or an offset spatula carefully around the edge of each pie to loosen it. Then, gently lift each one out. If they’re being stubborn, you can carefully twist them back and forth to break the suction. They should pop out cleanly, revealing their beautiful, golden oat crust.
Serving Suggestions
Complementary Dishes
- A simple green salad with a sharp vinaigrette — The bright, acidic notes cut through the richness of the pie beautifully and cleanse the palate.
- Whipped sweet potato soup — Serve a small cup as a starter; the earthy, sweet flavors are a natural prelude to the spiced pumpkin.
- Savory herb-roasted turkey or chicken — For a full holiday-style meal, these mini pies are the perfect dessert counterpart to savory roasted meats.
Drinks
- Hot spiced apple cider — The warm apple and spice flavors are a classic, cozy partner for pumpkin pie, enhancing the autumnal vibe.
- A cold glass of whole milk — It’s a timeless pairing for a reason; the creaminess is the perfect contrast to the spiced filling.
- Dark roast coffee with a pinch of cinnamon — The bitterness of the coffee balances the sweetness, and the cinnamon ties it all together.
Something Sweet
- A small scoop of vanilla bean ice cream — The classic à la mode treatment, where the melting ice cream creates little rivers of creaminess over the warm pie.
- Dollop of cinnamon-spiked whipped cream — It adds a light, airy texture and an extra hit of spice that makes each bite feel extra indulgent.
- A drizzle of salted caramel sauce — This introduces a buttery, salty-sweet element that takes the flavor profile to a whole new level of deliciousness.
Top Mistakes to Avoid
- Mistake: Using pumpkin pie filling instead of puree. This is the number one error! Pumpkin pie filling is pre-sweetened and spiced, so if you use it, your pies will be far too sweet and the spice balance will be completely off.
- Mistake: Overmixing the crust. You just want to mix until the butter is incorporated and the mixture clumps. Overworking it can make the crust tough and greasy instead of tender and crumbly.
- Mistake: Skipping the par-bake. I know it’s an extra step, but it’s crucial. If you pour the wet filling into an unbaked crust, the bottom will be soggy and undercooked, and the structural integrity will be compromised.
- Mistake: Overbaking the filling. Remember the wobble! Baking until the center is completely firm will lead to cracks and a denser, rubbery texture. They set up as they cool, so pull them when the center still jiggles slightly.
Expert Tips
- Tip: Toast your oats for a deeper flavor. Before making the crust, spread the rolled oats on a baking sheet and toast them in a 350°F oven for 5-7 minutes until fragrant and lightly golden. Let them cool completely before using. This adds a wonderful nuttiness that elevates the entire crust.
- Tip: Use a cookie scoop for the crust. For perfectly even crust portions, use a medium cookie scoop to distribute the oat mixture into the muffin cups. It’s faster, cleaner, and ensures every mini pie has the same thickness.
- Tip: Infuse your cream for the filling. Gently warm the heavy cream with the spices for the filling before adding it to the pumpkin mixture. This “blooms” the spices, releasing their oils and creating a much more robust and complex flavor in the final pie.
- Tip: Make a double batch and freeze. These mini pies freeze exceptionally well. Once completely cool, place them in a single layer on a baking sheet to freeze solid, then transfer to a freezer bag. They’ll keep for up to 3 months. Thaw in the fridge or warm gently in the oven.
FAQs
Can I make these gluten-free?
Absolutely! The oat crust is already mostly gluten-free, but to make it completely so, just ensure you’re using certified gluten-free oats and swap the all-purpose flour for a 1:1 gluten-free baking blend. The texture will be nearly identical, and they’ll be just as delicious. I’ve done this many times for friends, and no one can tell the difference.
My filling cracked! What did I do wrong?
Don’t worry, it happens to the best of us. Cracking is almost always a sign of overbaking. The proteins in the eggs tighten too much and squeeze out moisture, causing the surface to split. Next time, bake until the edges are set but the center still has a distinct, slight jiggle. Also, avoid drastic temperature changes; let them cool gradually in the turned-off oven with the door cracked open if your kitchen is drafty.
Can I use a different sweetener instead of maple syrup?
You can, but it will change the flavor profile. Honey would be a great substitute, giving a floral sweetness. If you use granulated sugar, like white or more brown sugar, you’ll need to melt it with the butter for the crust and dissolve it thoroughly in the wet ingredients for the filling, and you may need to add a tablespoon or two of milk to maintain the right consistency.
How far in advance can I make these?
They are fantastic make-ahead desserts! You can bake them, cool completely, and store them in an airtight container in the refrigerator for up to 3 days. The crust may soften slightly, but they’ll still taste amazing. For longer storage, freeze them as mentioned in the tips. You can also prepare the crust mixture and the filling separately a day ahead and keep them refrigerated, then just assemble and bake the next day.
Why did my crust stick to the pan?
This usually means one of two things: either the pies weren’t completely cool before you tried to remove them, or the crust wasn’t pressed in firmly enough. The warmth makes them fragile, and a loosely packed crust is more likely to crumble and stick. Always let them cool fully and really press that crust mixture in there with some conviction — you’re not being gentle, you’re building a structure!
Mini Oat Crust Pumpkin Pies
Make these adorable Mini Oat Crust Pumpkin Pies for a perfectly portioned, easy fall dessert. Get the simple recipe with a nutty oat crust and creamy filling now!
Ingredients
For the Oat Crust:
-
150 g rolled oats (old-fashioned)
-
60 g all-purpose flour
-
75 g light brown sugar (packed)
-
1/2 tsp ground cinnamon
-
1/4 tsp fine sea salt
-
115 g unsalted butter (melted and slightly cooled)
For the Pumpkin Filling:
-
425 g pure pumpkin puree (not pumpkin pie filling)
-
2 large eggs (at room temperature)
-
120 ml pure maple syrup
-
60 ml heavy cream or full-fat coconut milk
-
1 tsp vanilla extract
-
1 1/2 tsp ground cinnamon
-
1/2 tsp ground ginger
-
1/4 tsp ground nutmeg
-
1/8 tsp ground cloves
-
1/4 tsp fine sea salt
Instructions
-
First, let's make that wonderful oat crust. Preheat your oven to 350°F (175°C). In a medium bowl, whisk together the rolled oats, all-purpose flour, brown sugar, cinnamon, and salt. You’ll notice the mixture is dry and flaky — that’s perfect. Pour the melted, slightly cooled butter over the top. Use a fork to mix everything until it’s well combined and has a crumbly, wet-sand-like texture. It should clump together when you pinch it.01
-
Now, divide the crust mixture evenly among the 12 cups of a standard muffin tin. I like to use a heaping tablespoon as a rough guide. Take a small glass, a shot glass, or your fingers, and firmly press the mixture into the bottom and up the sides of each cup to form a little crust shell. You want it to be compact so it holds its shape. Don't worry if it's not perfectly even — the rustic look is part of the charm!02
-
Par-bake the crusts. Pop the muffin tin into the preheated oven for about 8-10 minutes. You’re not looking to brown them fully, just to set the structure. This step prevents the crust from getting soggy once you add the wet filling. They’ll look a little puffed and smell wonderfully nutty and toasty when they’re ready. Take them out and let them cool on a rack while you make the filling. Leave the oven on.03
-
Time for the star of the show — the pumpkin filling. In a large bowl, whisk the pumpkin puree, room-temperature eggs, maple syrup, heavy cream, and vanilla extract together until it’s completely smooth and well-blended. You don’t want any streaks of egg white. The mixture will be a lovely, deep orange color and have a pourable, but not runny, consistency.04
-
Add all your spices and salt to the pumpkin mixture. That’s the cinnamon, ginger, nutmeg, cloves, and salt. Whisk vigorously again until everything is fully incorporated and the aroma is just incredible — warm, spicy, and inviting. Give the bowl a final scrape down the sides with a spatula to make sure no pockets of spice are hiding.05
-
Carefully pour or ladle the filling into the pre-baked crusts, filling them almost to the top. I find using a liquid measuring cup with a spout makes this process much cleaner. The filling shouldn’t rise much during baking, so it’s safe to fill them quite full. Gently tap the muffin tin on the counter a couple of times to release any air bubbles trapped in the filling.06
-
Bake the mini pies for 20-25 minutes. The edges of the filling will look set, and the very center might still have a slight, gentle wobble when you jiggle the pan — that’s exactly what you want. They will continue to set up as they cool. Overbaking is the main cause of cracked tops, so trust the wobble!07
-
This is the hardest part — patience. Let the mini pies cool completely in the muffin tin on a wire rack. This will take at least an hour, maybe two. They need this time to firm up fully, which makes them much easier to remove. Trying to take them out while warm is a recipe for crumbly disaster.08
-
Once they are completely cool, it’s removal time. Run a thin, small knife or an offset spatula carefully around the edge of each pie to loosen it. Then, gently lift each one out. If they’re being stubborn, you can carefully twist them back and forth to break the suction. They should pop out cleanly, revealing their beautiful, golden oat crust.09