
Why You’ll Love This Matcha White Chocolate Cookies
- A Flavor Adventure. The earthy, almost grassy notes of high-quality matcha are the perfect counterpoint to the sweet, buttery richness of white chocolate. It’s a balance that’s complex without being overwhelming.
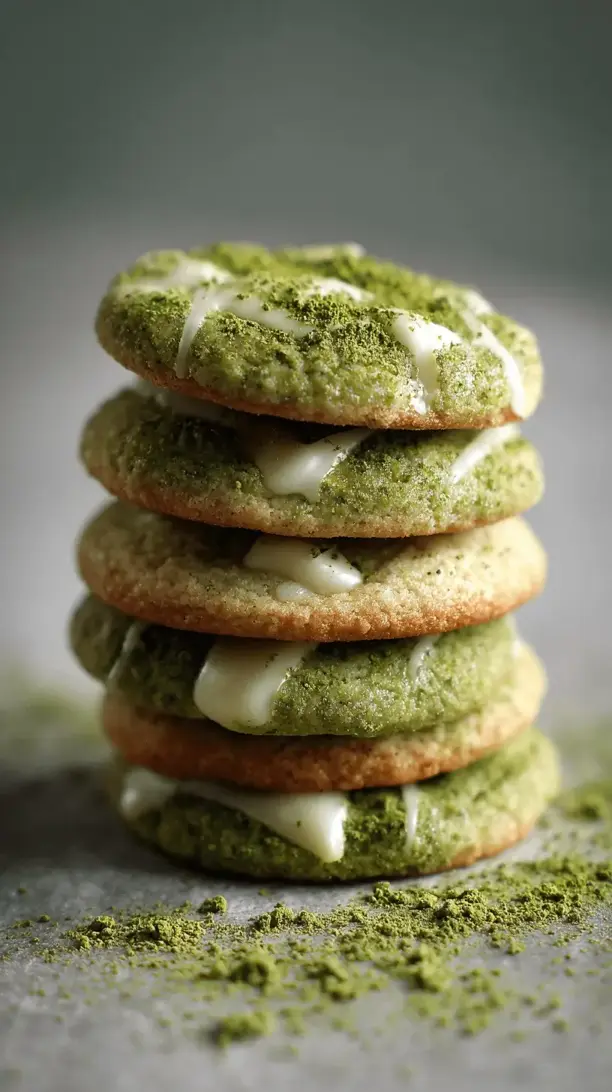
- They’re Simply Gorgeous. That vibrant green hue is a showstopper. These cookies look as incredible as they taste, making them perfect for gifting, parties, or just brightening up your own cookie jar.
- The Perfect Texture. We’re aiming for a cookie that’s soft and chewy with a slightly crisp edge. The brown sugar in the dough helps achieve that perfect, tender bite that just melts in your mouth.
- Surprisingly Simple. Don’t let the fancy ingredient fool you—this is a straightforward drop cookie recipe. If you can cream butter and sugar, you can absolutely make these. It’s a really satisfying baking project with a spectacular payoff.
Ingredients & Tools
- 115 g unsalted butter, at room temperature
- 100 g granulated sugar
- 110 g light brown sugar, packed
- 1 large egg, at room temperature
- 1 tsp vanilla extract
- 180 g all-purpose flour
- 1½ tbsp culinary-grade matcha powder
- ½ tsp baking soda
- ¼ tsp fine sea salt
- 170 g high-quality white chocolate, chopped into chunks
Tools: Mixing bowls, hand mixer or stand mixer, whisk, spatula, baking sheets, parchment paper or silicone baking mats, cooling rack.
Using room temperature butter and egg is non-negotiable here—it helps everything emulsify properly for a smoother, more even dough. And when it comes to matcha, a little goes a long way, but quality is key. A vibrant, ceremonial or high-grade culinary matcha will give you the best color and flavor.
Serves: 12 cookies | Prep Time: 15 minutes | Cook Time: 10-12 minutes | Total Time: 45 minutes (includes chilling)
Before You Start: Tips & Ingredient Notes
- Your Matcha Matters. This is the star of the show! For the brightest green color and most nuanced flavor, splurge on the best culinary or ceremonial-grade matcha you can find. A dull, brownish-green powder will result in muted color and a more bitter taste.
- Chop Your Own Chocolate. I know, it’s an extra step, but honestly, it makes a difference. Pre-made chips contain stabilizers that help them hold their shape, while chopped bars will give you those lovely, irregular pools of melted chocolate throughout the cookie.
- Don’t Skip the Chill. I get it, you want cookies now. But chilling the dough for at least 30 minutes is crucial. It prevents the cookies from spreading too thin and allows the flavors to meld beautifully. It’s the secret to a thick, chewy cookie.
- Room Temperature is Key. I’ll say it again because it’s that important! Using room temperature butter and eggs ensures your dough comes together smoothly and doesn’t curdle, which can affect the final texture.
How to Make Matcha White Chocolate Cookies
Step 1: Start by whisking together your dry ingredients—the flour, matcha powder, baking soda, and salt. You’ll want to whisk this really well to ensure the matcha is evenly distributed throughout the flour. This is the best way to avoid any bitter green speckles in your finished cookies. Set this bowl aside for now.
Step 2: In a separate, larger bowl, cream together the softened butter, granulated sugar, and brown sugar. Use a hand mixer or stand mixer on medium speed until the mixture becomes light, pale, and fluffy. This should take about 2-3 minutes. You’ll notice the texture change—it’s not just combined, it’s aerated. This step is what helps create a tender cookie.
Step 3: Beat in the room temperature egg and vanilla extract. Mix just until they are fully incorporated, scraping down the sides of the bowl as needed. The mixture might look a little curdled at first, but it will come together. The aroma of the vanilla mixing with the butter and sugar is just… classic baking bliss.
Step 4: Now, gradually add your dry ingredients to the wet ingredients. Mix on low speed until the flour is *just* combined. Be careful not to overmix at this stage! Overmixing develops gluten, which can lead to a tougher cookie. The dough will be thick and beautifully green.
Step 5: This is the fun part. Switch to a spatula and gently fold in the white chocolate chunks. Make sure they’re evenly distributed. You’ll have a stiff, gorgeous green dough flecked with white.
Step 6: Cover the bowl with plastic wrap and chill the dough in the refrigerator for at least 30 minutes. This is the patience-testing part, but it’s so worth it. Meanwhile, preheat your oven to 175°C (350°F) and line your baking sheets with parchment paper.
Step 7: Once chilled, scoop the dough onto your prepared baking sheets. I use a medium cookie scoop (about 1.5 tablespoons) for evenly sized cookies. Leave about 2 inches between each dough ball because they will spread as they bake.
Step 8: Bake for 10-12 minutes. The edges should look set and just barely starting to turn golden, but the centers will still look soft and slightly underdone. This is the secret to a chewy cookie! They will continue to cook on the hot baking sheet after you take them out.
Step 9: Let the cookies cool on the baking sheet for 5-10 minutes before transferring them to a wire rack to cool completely. This allows them to set up properly. Resist the urge to eat one straight from the oven—the white chocolate will be molten lava!
Serving Suggestions
Complementary Dishes
- A simple fruit platter — The freshness of berries or sliced mango provides a lovely, light contrast to the rich, sweet cookies, cleansing the palate between bites.
- A cheese board with mild cheeses — A creamy brie or a mild goat cheese can be a surprisingly delicious partner, creating a sophisticated sweet-and-savory moment.
Drinks
- Hot or iced green tea — This is the most natural pairing, amplifying the matcha flavor in the cookie and creating a beautifully harmonious experience.
- A cold glass of milk — A classic for a reason! The creaminess of the milk is the perfect complement to the sweet white chocolate and soft cookie texture.
Something Sweet
- Matcha ice cream — For the ultimate matcha lover, sandwich a scoop of high-quality matcha ice cream between two cookies for an epic ice cream sandwich.
- Fresh berries with a dollop of whipped cream — A simple, elegant dessert that doesn’t compete with the cookies but instead offers a fresh, tart counterpoint.
Top Mistakes to Avoid
- Mistake: Using low-quality or old matcha. This is the number one way to end up with dull, bitter cookies. Matcha is sensitive to light and air, so make sure yours is fresh and vibrant.
- Mistake: Skipping the chilling step. I’ve messed this up before too, thinking I could get away with it. Warm dough spreads rapidly, resulting in thin, flat, greasy cookies instead of the soft, puffy ones we want.
- Mistake: Overbaking the cookies. They continue to cook on the hot tray! Taking them out when the centers still look soft is crucial for that dreamy, chewy texture. If the edges are brown, they’re already overdone.
- Mistake: Overmixing the dough after adding the flour. Once the flour is incorporated, stop mixing. Overworking the dough develops gluten, leading to a tough, cake-like cookie instead of a tender, chewy one.
Expert Tips
- Tip: Weigh your ingredients. For truly consistent results every single time, use a kitchen scale. Flour measured by volume can vary dramatically depending on how you scoop it, which affects the dough’s hydration.
- Tip: Brown your butter for a nutty twist. If you want to take these to the next level, gently brown your butter before creaming it. Let it cool to room temperature first. It adds a wonderful, deep, nutty flavor that pairs amazingly with matcha.
- Tip: Add a sprinkle of flaky salt. Right when the cookies come out of the oven, sprinkle a tiny bit of flaky sea salt on top. It enhances the sweetness and complexity of the chocolate and matcha beautifully.
- Tip: Freeze the dough balls for later. Scoop the dough into balls and freeze them on a tray before transferring to a bag. You can bake frozen cookies anytime, just add a minute or two to the baking time. Fresh cookies on demand!
FAQs
Can I use matcha meant for drinking?
Absolutely, and in fact, you should! Ceremonial-grade matcha, which is typically for drinking, will give you the best, most vibrant color and smoothest flavor. Just avoid “latte” mixes that already contain sugar or milk powder. The purer the matcha, the better your cookies will be.
Why are my cookies not very green?
This usually comes down to two things: the quality/age of your matcha or the quantity used. A high-quality, fresh matcha is essential for a bright green hue. Also, make sure you’re accurately measuring your matcha—a heaping tablespoon is better than a scant one if you want that pop of color.
Can I make these cookies gluten-free?
You can! I’ve had success using a 1:1 gluten-free flour blend. The texture might be slightly more delicate and crumbly, but they will still be delicious. Just be sure your blend contains a binder like xanthan gum for the best structure.
How should I store these cookies?
Keep them in an airtight container at room temperature for up to 5 days. They’re best within the first 2-3 days. For longer storage, you can freeze the baked cookies for up to 3 months, or freeze the dough balls as mentioned in the tips.
My dough is very crumbly and dry. What happened?
This often means you’ve added a bit too much flour. The best way to avoid this is to weigh your flour. If it’s already happened, you can try gently kneading in a teaspoon of milk at a time until the dough comes together. Be careful not to overwork it.
Matcha White Chocolate Cookies
Bake soft, chewy Matcha White Chocolate Cookies! My easy recipe combines earthy matcha & sweet white chocolate for a stunning, gourmet treat. Perfect for home bakers.
Ingredients
Ingredients
-
115 g unsalted butter (at room temperature)
-
100 g granulated sugar
-
110 g light brown sugar (packed)
-
1 large egg (at room temperature)
-
1 tsp vanilla extract
-
180 g all-purpose flour
-
1½ tbsp culinary-grade matcha powder
-
½ tsp baking soda
-
¼ tsp fine sea salt
-
170 g high-quality white chocolate (chopped into chunks)
Instructions
-
Start by whisking together your dry ingredients—the flour, matcha powder, baking soda, and salt. You'll want to whisk this really well to ensure the matcha is evenly distributed throughout the flour. This is the best way to avoid any bitter green speckles in your finished cookies. Set this bowl aside for now.01
-
In a separate, larger bowl, cream together the softened butter, granulated sugar, and brown sugar. Use a hand mixer or stand mixer on medium speed until the mixture becomes light, pale, and fluffy. This should take about 2-3 minutes. You'll notice the texture change—it's not just combined, it's aerated. This step is what helps create a tender cookie.02
-
Beat in the room temperature egg and vanilla extract. Mix just until they are fully incorporated, scraping down the sides of the bowl as needed. The mixture might look a little curdled at first, but it will come together. The aroma of the vanilla mixing with the butter and sugar is just… classic baking bliss.03
-
Now, gradually add your dry ingredients to the wet ingredients. Mix on low speed until the flour is *just* combined. Be careful not to overmix at this stage! Overmixing develops gluten, which can lead to a tougher cookie. The dough will be thick and beautifully green.04
-
This is the fun part. Switch to a spatula and gently fold in the white chocolate chunks. Make sure they're evenly distributed. You'll have a stiff, gorgeous green dough flecked with white.05
-
Cover the bowl with plastic wrap and chill the dough in the refrigerator for at least 30 minutes. This is the patience-testing part, but it's so worth it. Meanwhile, preheat your oven to 175°C (350°F) and line your baking sheets with parchment paper.06
-
Once chilled, scoop the dough onto your prepared baking sheets. I use a medium cookie scoop (about 1.5 tablespoons) for evenly sized cookies. Leave about 2 inches between each dough ball because they will spread as they bake.07
-
Bake for 10-12 minutes. The edges should look set and just barely starting to turn golden, but the centers will still look soft and slightly underdone. This is the secret to a chewy cookie! They will continue to cook on the hot baking sheet after you take them out.08
-
Let the cookies cool on the baking sheet for 5-10 minutes before transferring them to a wire rack to cool completely. This allows them to set up properly. Resist the urge to eat one straight from the oven—the white chocolate will be molten lava!09


