
Why You’ll Love This Maple Walnut Cookies
- Deep, authentic maple flavor. By using both pure maple syrup and a touch of maple extract, we achieve a taste that’s far more complex and rich than any store-bought version.
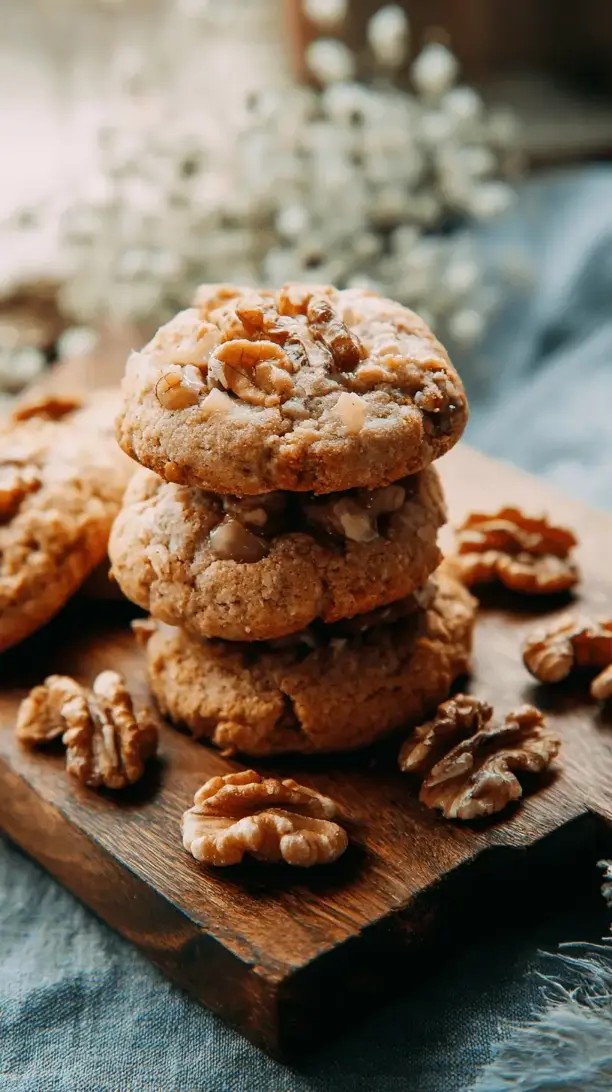
- The most satisfying texture. The secret to their perfect chewiness is a combination of brown sugar and a slightly shorter bake time, while the toasted walnuts provide a wonderful crunch in every single bite.
- Incredibly easy to make. This is a straightforward, one-bowl kind of recipe that doesn’t require any chilling of the dough. You can go from craving to cookie in record time.
- They fill your home with the best aroma. The warm, sweet scent of maple and butter baking together is honestly a form of aromatherapy. It’s an experience as much as it is a treat.
Ingredients & Tools
- 115 g (1/2 cup) unsalted butter, softened to room temperature
- 100 g (1/2 cup) light brown sugar, packed
- 60 ml (1/4 cup) pure maple syrup (Grade A or B, but Grade B has a stronger flavor)
- 1 large egg, at room temperature
- 1 tsp pure vanilla extract
- 1/2 tsp maple extract (highly recommended for that extra oomph)
- 210 g (1 ¾ cups) all-purpose flour
- 1/2 tsp baking soda
- 1/2 tsp salt
- 120 g (1 cup) walnuts, toasted and roughly chopped
Tools: A large mixing bowl, a hand mixer or stand mixer, a baking sheet, parchment paper or a silicone baking mat, and a cooling rack.
Using room temperature butter and egg is non-negotiable here—it helps everything emulsify into a smooth, cohesive dough. And toasting the walnuts? A little goes a long way. It wakes up their oils and gives them a much deeper, nuttier flavor that stands up to the maple.
Serves: Makes about 18 cookies | Prep Time: 15 minutes | Cook Time: 10-12 minutes | Total Time: 30 minutes
Before You Start: Tips & Ingredient Notes
- Why toast the walnuts? Toasting is the secret weapon for nut-based recipes. It transforms walnuts from slightly bitter and soft to fragrant, crunchy, and deeply flavorful. Just spread them on a baking sheet and toast at 175°C (350°F) for 8-10 minutes, watching carefully so they don’t burn.
- The maple extract debate. I know, it’s an extra ingredient. But honestly, it makes all the difference. Maple syrup’s flavor can mellow during baking, and the extract ensures that bold maple taste shines through in the final cookie. It’s worth seeking out.
- Don’t skip the brown sugar. The molasses in brown sugar is what gives these cookies their soft, chewy texture and a hint of caramel notes that pair beautifully with the maple. Using only white sugar would result in a crisper, less complex cookie.
- How to “soften” butter correctly. You want it cool to the touch but soft enough that your finger can leave an indentation. If it’s melted or oily, the cookies will spread too much. If it’s too cold, your dough won’t come together properly.
How to Make Maple Walnut Cookies
Step 1: Prep and Toast. First things first, preheat your oven to 175°C (350°F). While it’s heating up, spread your walnuts on a bare baking sheet and toast them for about 8 minutes. You’ll know they’re done when you can smell that wonderful, nutty aroma. Let them cool slightly before giving them a rough chop. This is also the perfect time to line your baking sheet with parchment paper or a silicone mat.
Step 2: Cream the Wet Ingredients. In your large mixing bowl, add the softened butter, packed brown sugar, and maple syrup. Using your hand mixer or stand mixer fitted with the paddle attachment, beat these together on medium speed for about 2-3 minutes. The goal is to make the mixture light and fluffy—you’ll notice its color pale slightly. Now, beat in the egg, followed by the vanilla and maple extracts, just until they’re fully incorporated. Scrape down the sides of the bowl with a spatula to make sure everything is evenly mixed.
Step 3: Combine the Dry Ingredients. In a separate, smaller bowl, whisk together the flour, baking soda, and salt. This isn’t just busywork—whisking ensures the leavening agent and salt are evenly distributed throughout the flour, which prevents you from getting a bitter bite of baking soda in one cookie. Gradually add these dry ingredients to the wet mixture, mixing on low speed just until the flour disappears. A few streaks are okay; you don’t want to overmix.
Step 4: Fold in the Good Stuff. This is where the magic happens. Take your chopped, toasted walnuts and gently fold them into the cookie dough using a spatula. The trick is to mix until they’re evenly distributed without overworking the dough. The dough will be relatively soft but should hold together easily.
Step 5: Scoop and Bake. Using a tablespoon or a small cookie scoop, portion out the dough onto your prepared baking sheet, leaving about 5 cm (2 inches) between each mound. They will spread a little! Bake for 10-12 minutes. The edges should look set and lightly golden, but the centers will still appear a little soft and puffy. That softness is the key to a chewy center—so resist the urge to overbake!
Step 6: The Crucial Cool Down. As soon as you take the baking sheet out of the oven, let the cookies rest on the hot pan for 5 minutes. This allows them to finish setting up. Then, carefully transfer them to a wire cooling rack. They’ll be very fragile at first but will firm up perfectly as they cool. Try to wait at least 10 minutes before diving in… if you can!
Serving Suggestions
Complementary Dishes
- A sharp cheddar cheese plate — The salty, tangy punch of a good aged cheddar creates an incredible sweet-and-savory contrast that makes the maple flavor pop even more.
- Spiced apple soup — Served warm in a mug, a smooth, lightly spiced apple soup alongside these cookies is the ultimate autumn comfort combination.
- Vanilla bean ice cream — Sandwich a small scoop of high-quality vanilla ice cream between two slightly warm cookies for an epic ice cream sandwich experience.
Drinks
- Dark roast coffee — The bitterness of a strong coffee cuts through the sweetness of the cookie beautifully, making each bite taste fresh and new.
- Chai tea latte — The warm spices in chai—cinnamon, cardamom, ginger—are a match made in heaven with the earthy walnuts and sweet maple.
- A glass of cold milk — It’s a classic for a reason. The creaminess of milk is the perfect partner to a soft, chewy cookie.
Something Sweet
- Maple pecan truffles — Double down on the nutty-maple theme with these no-bake bites for a truly decadent dessert spread.
- Poached pears — Lightly poached pears with a cinnamon stick offer an elegant, fruit-forward ending that doesn’t feel too heavy.
- Dark chocolate bark — A simple piece of dark chocolate with sea salt provides a bitter counterpoint that highlights the cookie’s sweetness.
Top Mistakes to Avoid
- Mistake: Using imitation maple syrup. The flavor will be thin, overly sweet, and lack the deep, woody complexity of pure maple syrup. It’s the star ingredient, so it’s worth using the real deal.
- Mistake: Overmixing the dough after adding the flour. This develops the gluten in the flour and can lead to tough, dense cookies. Mix just until you no longer see streaks of flour.
- Mistake: Baking until the centers look fully done. I’ve messed this up before too! The cookies continue to cook on the hot baking sheet. Pull them out when the edges are golden but the centers are still soft for the perfect chew.
- Mistake: Not letting the cookies cool on the pan. Transferring them immediately to a rack can cause them to break apart. The 5-minute rest on the pan is crucial for them to set properly.
Expert Tips
- Tip: Weigh your flour. If you don’t have a scale, fluff your flour with a spoon, spoon it into your measuring cup, and level it off with a knife. Scooping directly with the cup packs in too much flour, leading to dry cookies.
- Tip: Make them ahead. You can scoop the dough into balls and freeze them on a baking sheet. Once solid, transfer to a freezer bag. Bake straight from frozen, adding 1-2 minutes to the bake time.
- Tip: Add a sprinkle of sea salt. Right when the cookies come out of the oven, flake a tiny bit of flaky sea salt over the top. It elevates the flavor to a whole new level.
- Tip: For uniform cookies, use a scoop. A small ice cream or cookie scoop ensures all your cookies are the same size, which means they’ll bake evenly and look professionally made.
FAQs
Can I use a different type of nut?
Absolutely! Pecans are a fantastic substitute and will give you a very similar texture and a slightly sweeter, buttery flavor. Almonds would work too, though their flavor is a bit more distinct. Just make sure to toast whatever nut you choose—it really is a game-changer for flavor and crunch.
My cookies spread too much. What happened?
This usually points to butter that was too warm. If your butter was melted or even very soft and shiny, it can cause excessive spreading. Another culprit could be an old baking soda that’s lost its lifting power. Next time, ensure your butter is just softened (cool to the touch) and check the expiration date on your leavener.
Can I make these cookies vegan?
You can certainly try! For a vegan version, use a plant-based butter stick (not spread) and a flax egg (1 tbsp ground flaxseed mixed with 3 tbsp water, let sit for 5 minutes). The texture will be slightly different, and you’ll want to use a vegan maple extract, but it should work. The maple syrup, of course, is already vegan.
How should I store these cookies, and how long will they keep?
Store them in an airtight container at room temperature. They’ll be at their peak for about 3-4 days. If you want to keep them longer, they freeze beautifully for up to 3 months. Just thaw at room temperature for an hour or so.
Why did my cookies turn out cakey instead of chewy?
A cakey texture often means there was too much flour or the leavening was too effective. Double-check that you measured your flour correctly (using the spoon-and-level method or a scale) and that your baking soda is fresh. Overmixing can also incorporate too much air, contributing to a cake-like crumb.
Maple Walnut Cookies
Bake the ultimate soft & chewy maple walnut cookies! My easy, one-bowl recipe uses toasted walnuts & real maple for incredible flavor. Ready in 30 minutes!
Ingredients
Ingredients
-
115 g unsalted butter (softened to room temperature (1/2 cup))
-
100 g light brown sugar (packed (1/2 cup))
-
60 ml pure maple syrup (Grade A or B, but Grade B has a stronger flavor (1/4 cup))
-
1 egg (large, at room temperature)
-
1 tsp pure vanilla extract
-
1/2 tsp maple extract (highly recommended for that extra oomph)
-
210 g all-purpose flour (1 ¾ cups)
-
1/2 tsp baking soda
-
1/2 tsp salt
-
120 g walnuts (toasted and roughly chopped (1 cup))
Instructions
-
Prep and Toast. First things first, preheat your oven to 175°C (350°F). While it's heating up, spread your walnuts on a bare baking sheet and toast them for about 8 minutes. You'll know they're done when you can smell that wonderful, nutty aroma. Let them cool slightly before giving them a rough chop. This is also the perfect time to line your baking sheet with parchment paper or a silicone mat.01
-
Cream the Wet Ingredients. In your large mixing bowl, add the softened butter, packed brown sugar, and maple syrup. Using your hand mixer or stand mixer fitted with the paddle attachment, beat these together on medium speed for about 2-3 minutes. The goal is to make the mixture light and fluffy—you'll notice its color pale slightly. Now, beat in the egg, followed by the vanilla and maple extracts, just until they're fully incorporated. Scrape down the sides of the bowl with a spatula to make sure everything is evenly mixed.02
-
Combine the Dry Ingredients. In a separate, smaller bowl, whisk together the flour, baking soda, and salt. This isn't just busywork—whisking ensures the leavening agent and salt are evenly distributed throughout the flour, which prevents you from getting a bitter bite of baking soda in one cookie. Gradually add these dry ingredients to the wet mixture, mixing on low speed just until the flour disappears. A few streaks are okay; you don't want to overmix.03
-
Fold in the Good Stuff. This is where the magic happens. Take your chopped, toasted walnuts and gently fold them into the cookie dough using a spatula. The trick is to mix until they're evenly distributed without overworking the dough. The dough will be relatively soft but should hold together easily.04
-
Scoop and Bake. Using a tablespoon or a small cookie scoop, portion out the dough onto your prepared baking sheet, leaving about 5 cm (2 inches) between each mound. They will spread a little! Bake for 10-12 minutes. The edges should look set and lightly golden, but the centers will still appear a little soft and puffy. That softness is the key to a chewy center—so resist the urge to overbake!05
-
The Crucial Cool Down. As soon as you take the baking sheet out of the oven, let the cookies rest on the hot pan for 5 minutes. This allows them to finish setting up. Then, carefully transfer them to a wire cooling rack. They'll be very fragile at first but will firm up perfectly as they cool. Try to wait at least 10 minutes before diving in… if you can!06


