
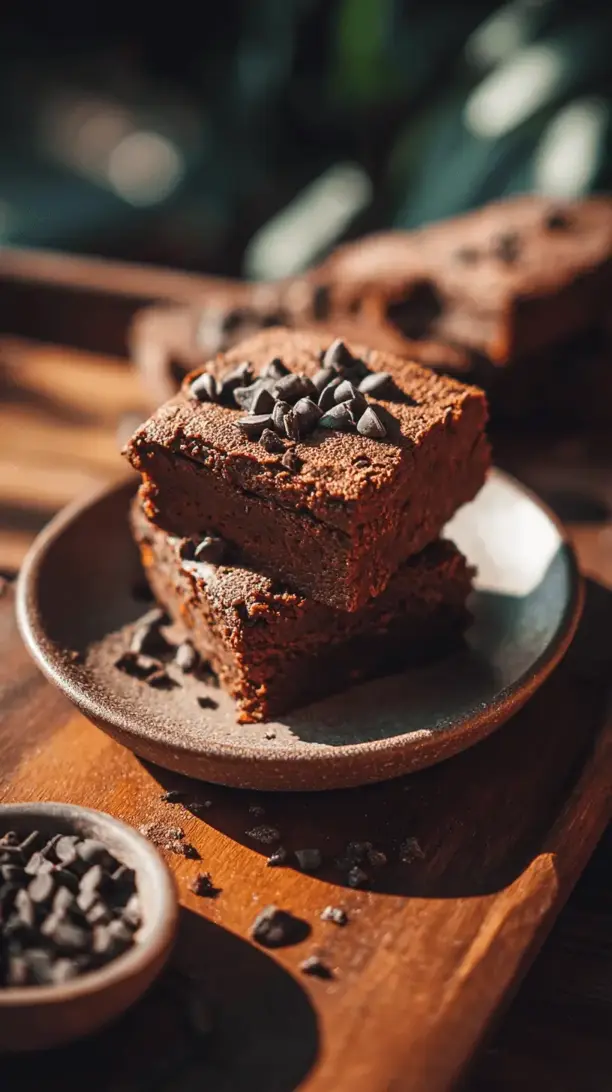
Why You’ll Love These Maple Sweet Potato Brownies
- Unbelievably Fudgy Texture. The secret is the sweet potato puree. It adds so much natural moisture that these brownies stay incredibly soft and dense for days, avoiding that dry, cakey texture that can sometimes plague homemade brownies.
- A Naturally Sweetened Wonder. By using maple syrup as the primary sweetener, we’re getting a more nuanced, caramel-like sweetness that’s far more interesting than plain white sugar. It complements the chocolate and sweet potato so beautifully.
- They Feel Like a Hug. There’s something deeply comforting about these brownies. Maybe it’s the warm spices, the rich chocolate, or the wholesome base—but each bite feels nourishing and satisfying in a way that’s hard to describe until you try them.
- Surprisingly Simple to Make. Don’t let the from-scratch nature intimidate you. If you can roast a potato and stir a bowl, you’re 90% of the way there. It’s a really straightforward process that yields seriously impressive results.
Ingredients & Tools
- 1 cup mashed, roasted sweet potato (from about 1 large sweet potato)
- 1/2 cup pure maple syrup (the darker the grade, the richer the flavor)
- 1/2 cup almond butter (or any nut/seed butter of your choice)
- 1/4 cup melted coconut oil
- 2 large eggs
- 1 tsp pure vanilla extract
- 1/2 cup cocoa powder (unsweetened, for that deep chocolate hit)
- 1/4 cup almond flour
- 1/2 tsp baking soda
- 1/4 tsp sea salt
- 1/2 tsp cinnamon (trust me on this)
- 1/2 cup dark chocolate chips (plus more for sprinkling on top)
Tools: An 8×8 inch baking pan, parchment paper, a mixing bowl, a whisk, a fork for mashing, and a spatula.
The quality of your maple syrup and chocolate chips really makes a difference here. Since they’re the stars of the show, using a good, pure maple syrup and a dark chocolate you love will elevate these brownies from great to absolutely unforgettable. A little goes a long way in terms of flavor impact.
Serves: 9 | Prep Time: 15 mins | Cook Time: 25-30 mins | Total Time: 40-45 mins
Before You Start: Tips & Ingredient Notes
- Roasting vs. Boiling Your Sweet Potato. I highly, highly recommend roasting. Roasting caramelizes the natural sugars in the sweet potato, giving you a much deeper, richer flavor base for your brownies compared to boiling, which can make the potato a bit waterlogged.
- Getting the Right Consistency for Your Puree. After roasting, let your sweet potato cool completely before scooping out the flesh. Mash it until it’s completely smooth—no lumps! A few stubborn bits are okay, but a silky puree ensures an even, fudgy texture throughout the brownies.
- Why Almond Flour? We’re using just a small amount of almond flour to help bind everything together without making the brownies heavy. It keeps them gluten-free and adds a lovely, subtle nuttiness that works well with the other flavors. Don’t be tempted to substitute with a regular flour 1:1, as it will change the texture.
- Don’t Skip the Cinnamon. I know it might seem like an odd addition to a brownie, but it’s the secret weapon. It doesn’t make the brownies taste like cinnamon rolls; instead, it beautifully bridges the gap between the sweet potato and the chocolate, adding a layer of warm, cozy complexity.
How to Make Maple Sweet Potato Brownies
Step 1: Prepare Your Sweet Potato. First things first, you’ll need your mashed sweet potato. Prick a large sweet potato all over with a fork, roast it at 400°F (200°C) for about 45-60 minutes until it’s super tender, and then let it cool completely. Scoop out the flesh and mash it with a fork until smooth. You should have exactly one cup. This is the foundation of our fudgy masterpiece.
Step 2: Combine the Wet Ingredients. In a large mixing bowl, add your one cup of smooth sweet potato puree, the pure maple syrup, almond butter, and melted coconut oil. Whisk these together until you have a beautifully smooth, homogenous mixture. You’ll notice the color is a lovely caramel-orange at this stage. Now, whisk in the eggs and vanilla extract until everything is fully incorporated and the batter looks glossy.
Step 3: Incorporate the Dry Ingredients. It’s time for the chocolate! Sift the cocoa powder, almond flour, baking soda, salt, and cinnamon directly into the wet ingredients. Sifting is key here to avoid any lumps of cocoa powder. Use a spatula to gently fold the dry ingredients into the wet. The trick is to mix until *just* combined—overmixing can lead to tougher brownies. The batter will be thick and luxurious.
Step 4: The Chocolate Chip Finale. Now for the best part: fold in the half cup of dark chocolate chips. Reserve a small handful to sprinkle on top for a picture-perfect finish. This ensures you get little pockets of melted chocolate in every single bite.
Step 5: Bake to Perfection. Preheat your oven to 350°F (175°C). Line your 8×8 inch baking pan with parchment paper, leaving some overhang on two sides—this makes it incredibly easy to lift the whole slab of brownie out later. Pour and spread the batter evenly into the pan. Sprinkle the reserved chocolate chips on top. Bake for 25-30 minutes. You’re looking for the edges to be set and the center to have a slight jiggle, but not be liquid. A toothpick inserted into the center should come out with a few moist crumbs, not clean batter.
Step 6: The Crucial Cool Down. This is the hardest part, honestly. You must let the brownies cool completely in the pan on a wire rack. I know it’s tempting to cut into them right away, but if you do, they’ll be a gooey mess. As they cool, they set up and achieve that perfect, dense, fudgy texture we’re after. For the cleanest cuts, you can even pop them in the fridge for an hour after they’ve cooled to room temperature.
Serving Suggestions
Complementary Dishes
- A Scoop of Vanilla Bean Ice Cream — The classic warm-brownie-and-cold-ice-cream combo is unbeatable. The vanilla provides a beautiful, simple contrast to the complex, spiced chocolate flavors.
- A Dollop of Whipped Coconut Cream — For a dairy-free option, this adds a lovely light, airy texture that melts deliciously into the warm, dense brownie.
- Fresh Berries on the Side — A handful of raspberries or strawberries cuts through the richness with a bright, slightly tart freshness.
Drinks
- A Glass of Cold Milk — It’s a classic for a reason. The creaminess is the perfect partner to a rich, fudgy brownie.
- A Bold Cup of Coffee — The bitterness of a good, strong brew highlights the deep chocolate notes and makes for a truly sophisticated pairing.
- A Spicy Chai Latte — The warm spices in the chai will echo the cinnamon in the brownies, creating a wonderfully cozy and harmonious experience.
Something Sweet
- A Simple Fruit Sorbet — A tangy mango or lemon sorbet served alongside offers a palate-cleansing contrast that makes each bite of brownie taste new again.
- A Dusting of Flaky Sea Salt — Just a tiny sprinkle on top right before serving enhances all the sweet flavors and adds a delightful salty crunch.
- Extra Drizzle of Maple Syrup — For the true maple lover, a little extra drizzle over the top amplifies the signature flavor and adds a gorgeous shine.
Top Mistakes to Avoid
- Mistake: Using warm sweet potato puree. If your puree is even slightly warm when you mix it with the eggs, it can start to cook them, leading to a weird, scrambled-egg texture in your batter. Always, always let it cool completely.
- Mistake: Overbaking. I’ve messed this up before too… it’s so easy to think a few more minutes will make them better. But with these brownies, overbaking is the enemy of fudginess. Take them out when the center still has a slight jiggle—they will continue to set as they cool.
- Mistake: Skipping the parchment paper. These are very moist brownies. Without parchment paper, they can stick to the pan, and you’ll lose that beautiful crispy edge when you try to remove them. The parchment sling is a non-negotiable for clean, easy removal.
- Mistake: Substituting pancake syrup for pure maple syrup. Please don’t! Pancake syrup is usually just corn syrup with flavorings and will make your brownies overly sweet without the depth of flavor that pure maple provides.
Expert Tips
- Tip: Roast an extra sweet potato. I often roast two at a time. You can freeze the extra cup of puree in a labeled bag for the next time a brownie craving strikes—which, let’s be honest, will be soon.
- Tip: Use an ice cream scoop for batter. For getting that thick batter into the pan neatly, a spring-loaded ice cream scoop is your best friend. It’s less messy and helps you spread it evenly.
- Tip: Score your cuts. For picture-perfect squares, take a sharp knife and lightly score the top of the cooled brownies where you want to cut before you actually press down. This gives you a clean guide.
- Tip: Add a pinch of espresso powder. This is a pro baker’s secret. Just a quarter teaspoon of espresso powder (not instant coffee granules) amplified the chocolate flavor without making it taste like coffee. It’s magical.
FAQs
Can I make these brownies vegan?
You can certainly try! The best egg substitute I’ve found for this particular recipe is a “flax egg.” For the two eggs, mix 2 tablespoons of ground flaxseed with 5 tablespoons of water and let it sit for 5-10 minutes until it becomes gelatinous. The texture will be a bit denser and more fudgy (which isn’t a bad thing!), but they may not rise quite as much. Also, ensure your chocolate chips are vegan-friendly.
How should I store these brownies, and how long do they last?
Because they’re so moist, storing them correctly is key. Keep them in an airtight container at room temperature for up to 2 days. After that, I recommend moving them to the refrigerator where they’ll stay fresh for about 5 days. They are delicious cold, right out of the fridge! You can also freeze them for up to 3 months—just wrap individual squares tightly in plastic wrap.
My sweet potato puree seems a bit watery. What should I do?
This can happen, especially if you boil instead of roast. If your puree seems wet, place it in a fine-mesh strainer over a bowl for 10-15 minutes to let some of the excess liquid drain out. You could also gently heat it in a saucepan for a few minutes to evaporate some moisture, stirring constantly. A drier puree will give you a denser, less cake-like brownie.
Can I use a different nut butter?
Absolutely! Almond butter is my favorite for its mild flavor, but cashew butter would work beautifully. Peanut butter will give you a strong peanut flavor, which is delicious if you’re a fan of peanut butter and chocolate. For a nut-free version, sunflower seed butter is a great alternative.
Why did my brownies sink in the middle?
A slight sink is normal with such a fudgy brownie, but a major sink usually points to two things: either the batter was overmixed after the dry ingredients were added (developing too much gluten from the almond flour), or they needed just a minute or two more in the oven. The center might have been too underdone to set properly during cooling. Don’t worry—they’ll still taste incredible!
Maple Sweet Potato Brownies
Discover the ultimate fudgy Maple Sweet Potato Brownies! This easy, naturally sweetened recipe uses roasted sweet potato & pure maple syrup for a decadent, gluten-free treat.
Ingredients
Ingredients
-
1 cup mashed, roasted sweet potato (from about 1 large sweet potato)
-
1/2 cup pure maple syrup (the darker the grade, the richer the flavor)
-
1/2 cup almond butter (or any nut/seed butter of your choice)
-
1/4 cup melted coconut oil
-
2 large eggs
-
1 tsp pure vanilla extract
-
1/2 cup cocoa powder (unsweetened, for that deep chocolate hit)
-
1/4 cup almond flour
-
1/2 tsp baking soda
-
1/4 tsp sea salt
-
1/2 tsp cinnamon (trust me on this)
-
1/2 cup dark chocolate chips (plus more for sprinkling on top)
Instructions
-
Prepare Your Sweet Potato. First things first, you'll need your mashed sweet potato. Prick a large sweet potato all over with a fork, roast it at 400°F (200°C) for about 45-60 minutes until it's super tender, and then let it cool completely. Scoop out the flesh and mash it with a fork until smooth. You should have exactly one cup. This is the foundation of our fudgy masterpiece.01
-
Combine the Wet Ingredients. In a large mixing bowl, add your one cup of smooth sweet potato puree, the pure maple syrup, almond butter, and melted coconut oil. Whisk these together until you have a beautifully smooth, homogenous mixture. You'll notice the color is a lovely caramel-orange at this stage. Now, whisk in the eggs and vanilla extract until everything is fully incorporated and the batter looks glossy.02
-
Incorporate the Dry Ingredients. It's time for the chocolate! Sift the cocoa powder, almond flour, baking soda, salt, and cinnamon directly into the wet ingredients. Sifting is key here to avoid any lumps of cocoa powder. Use a spatula to gently fold the dry ingredients into the wet. The trick is to mix until *just* combined—overmixing can lead to tougher brownies. The batter will be thick and luxurious.03
-
The Chocolate Chip Finale. Now for the best part: fold in the half cup of dark chocolate chips. Reserve a small handful to sprinkle on top for a picture-perfect finish. This ensures you get little pockets of melted chocolate in every single bite.04
-
Bake to Perfection. Preheat your oven to 350°F (175°C). Line your 8x8 inch baking pan with parchment paper, leaving some overhang on two sides—this makes it incredibly easy to lift the whole slab of brownie out later. Pour and spread the batter evenly into the pan. Sprinkle the reserved chocolate chips on top. Bake for 25-30 minutes. You're looking for the edges to be set and the center to have a slight jiggle, but not be liquid. A toothpick inserted into the center should come out with a few moist crumbs, not clean batter.05
-
The Crucial Cool Down. This is the hardest part, honestly. You must let the brownies cool completely in the pan on a wire rack. I know it's tempting to cut into them right away, but if you do, they'll be a gooey mess. As they cool, they set up and achieve that perfect, dense, fudgy texture we're after. For the cleanest cuts, you can even pop them in the fridge for an hour after they've cooled to room temperature.06


