Why You’ll Love This Maple Pecan Baked Apples
- Effortless Elegance. This dessert looks and tastes incredibly impressive, but the process is genuinely simple. There’s no fancy pastry work or complex techniques—just a bit of mixing and stuffing before the oven does the heavy lifting.
- The Perfect Texture Symphony. You get this wonderful contrast in every bite. The apple becomes meltingly soft and almost spoonable, while the pecan filling stays wonderfully nutty and crisp on top. It’s a textural dream.
- Your Kitchen Will Smell Incredible. Honestly, the aroma of baking apples, cinnamon, and maple syrup wafting through your home is half the experience. It creates such a warm, inviting atmosphere that just feels like autumn.
- Incredibly Versatile. You can serve these warm from the oven, at room temperature, or even cold the next day (they’re surprisingly good for breakfast!). They’re fantastic on their own, with ice cream, or with a dollop of yogurt.
Ingredients & Tools
- 4 large baking apples (like Honeycrisp, Granny Smith, or Braeburn)
- 100 g pecans, roughly chopped
- 3 tbsp pure maple syrup
- 2 tbsp unsalted butter, softened
- 2 tbsp old-fashioned rolled oats
- 1 tsp ground cinnamon
- 1/4 tsp ground nutmeg
- A pinch of salt
- 120 ml apple cider or water
Tools: A sharp paring knife or apple corer, a small mixing bowl, a baking dish just large enough to hold the apples snugly.
The quality of your maple syrup really makes a difference here—it’s the star of the show, so go for the real stuff. And don’t skip the pinch of salt; it’s not enough to make things salty, but it works magic in balancing all the sweet, spiced flavors.
Nutrition (per serving)
- Calories: 280 kcal
- Protein: 2 g
- Fat: 16 g
- Carbohydrates: 38 g
- Fiber: 6 g
Serves: 4 | Prep Time: 15 minutes | Cook Time: 45 minutes | Total Time: 1 hour
Before You Start: Tips & Ingredient Notes
- Choosing Your Apples. You want an apple that holds its shape well during baking. Honeycrisp offers a lovely sweet-tart balance, Granny Smith gives a brighter tang, and Braeburn is a fantastic all-rounder. Avoid very soft varieties like Red Delicious.
- To Core or Not to Core? A proper apple corer makes the job neat and easy, but if you don’t have one, a small paring knife works just fine. Just be careful to remove all the tough seeds and core without cutting through the bottom—you want to create a little well for the filling.
- Why Softened Butter? Using butter that’s soft (but not melted) is key. It will mix effortlessly with the other filling ingredients to create a cohesive, crumbly mixture that’s easy to pack into the apples. Cold butter just won’t incorporate as well.
- The Liquid in the Pan. Don’t forget to pour that apple cider or water into the bottom of the baking dish! It creates steam that helps the apples cook through evenly and prevents the juices from burning, leaving you with a lovely, light sauce.
How to Make Maple Pecan Baked Apples
Step 1: First, preheat your oven to 190°C (375°F). This gives it plenty of time to come to the right temperature, which is crucial for even baking. Grab your baking dish and give it a very light coating of butter or a quick spritz of cooking spray—this just prevents any sticky apple juices from welding themselves to the pan.
Step 2: Now, prepare your apples. Wash and dry them thoroughly. Using an apple corer or a small paring knife, carefully remove the core from each apple, creating a well that’s about 3-4 cm wide. The trick is to stop before you cut through the bottom; you’re making a cup, not a tunnel. This keeps all that delicious filling tucked safely inside while they bake.
Step 3: Time to make the magical filling. In your small mixing bowl, combine the chopped pecans, softened butter, maple syrup, rolled oats, cinnamon, nutmeg, and that all-important pinch of salt. Use a fork or your fingers to mix everything together until it’s well-combined and clumps together slightly. You’ll notice the aroma is already incredible—sweet, nutty, and warmly spiced.
Step 4: Divide the pecan filling evenly among the four apples, firmly packing it down into the wells you created. Don’t be shy—really mound it up on top! A little overflow is totally fine and will get deliciously crispy in the oven. Place the stuffed apples upright in your prepared baking dish, arranging them so they’re not touching if possible.
Step 5: Carefully pour the apple cider or water into the bottom of the baking dish, around the apples, not over them. This liquid is your secret weapon for perfectly cooked apples and a simple pan sauce. You can even give the tops of the apples a very light drizzle with an extra teaspoon of maple syrup for extra gloss and flavor.
Step 6: Place the dish in the preheated oven and bake for 40 to 50 minutes. You’re looking for the apples to be tender all the way through—a sharp knife should slide into the side of an apple with little to no resistance. The pecan topping will be golden brown, fragrant, and crisp. The apples might puff up and split a little, which is completely normal and part of their charm.
Step 7: Once they’re out of the oven, let the baked apples rest in the dish for at least 10-15 minutes before serving. They will be dangerously hot inside! This resting time allows the juices to settle and the apples to firm up just enough to handle. The aroma at this stage is honestly the ultimate test of your willpower.
Serving Suggestions
Complementary Dishes
- A simple green salad with a sharp vinaigrette — The crisp, acidic greens provide a refreshing counterpoint to the sweet, rich apples, cleansing the palate beautifully between bites.
- Roasted pork tenderloin or a glazed ham steak — The classic pairing of pork and apples is a winner for a reason; the savory, salty meat complements the sweet spiced fruit perfectly.
- Whipped sweet potatoes with a hint of orange zest — This leans into the cozy, autumnal vibe, creating a warm and harmonious plate full of comforting flavors and textures.
Drinks
- A hot mug of chai tea — The warm spices in the chai—cardamom, cloves, ginger—echo the cinnamon and nutmeg in the apples, creating a wonderfully cohesive flavor experience.
- A glass of off-dry Riesling or hard apple cider — The slight sweetness and bright acidity in these drinks cut through the richness of the dessert without overpowering its delicate apple flavor.
- Strong, black coffee — The bitterness of the coffee provides a fantastic contrast to the sweet maple and soft fruit, making each element taste more pronounced and satisfying.
Something Sweet
- A generous scoop of vanilla bean ice cream — This is the classic for a reason. The cold, creamy ice cream melting into the warm, soft apple is a textural and temperature contrast that’s simply unbeatable.
- A dollop of lightly sweetened mascarpone or Greek yogurt — This offers a tangy, rich creaminess that feels a little more sophisticated than ice cream and balances the sweetness beautifully.
- A drizzle of salted caramel sauce — If you really want to indulge, a little extra caramel sauce takes things over the top in the best way possible, adding a deeper, buttery flavor and a touch of salt.
Top Mistakes to Avoid
- Mistake: Using the wrong apple variety. A very soft or mealy apple will completely collapse into mush during baking, losing its shape and turning watery. Stick to firm, baking-friendly varieties for the best structure and texture.
- Mistake: Forgetting the liquid in the pan. Baking the apples without that bit of cider or water in the bottom can lead to uneven cooking, tough apples, and burnt-on juices. The steam is essential for creating a tender result and a light sauce.
- Mistake: Undercooking the apples. It can be tempting to pull them out as soon as the topping is brown, but if the apple flesh is still firm, the dessert will be disappointing. Test for doneness with a knife—it should slide in easily.
- Mistake: Skipping the rest time. I’ve burned my mouth on molten apple filling more times than I’d like to admit. Letting them sit for 10-15 minutes allows the intense heat to dissipate and the flavors to meld together perfectly.
Expert Tips
- Tip: Toast your pecans first. For an even deeper, nuttier flavor, spread the chopped pecans on a baking sheet and toast them in the oven for 5-7 minutes at 180°C (350°F) before adding them to the filling. Let them cool slightly first. It makes a world of difference.
- Tip: Score the apple waists. To prevent the apples from bursting unpredictably, take a small knife and score a shallow horizontal line around the circumference of each apple, about halfway up. This gives the skin a designated place to split as the fruit expands.
- Tip: Add a flavor boost to the pan liquid. Instead of just water, try using apple juice, a splash of bourbon, or even a combination of orange juice and a cinnamon stick in the bottom of the pan. It will infuse the apples with an extra layer of flavor as they steam.
- Tip: Make them ahead. You can fully assemble the apples—stuffed and in the baking dish—cover them, and refrigerate them for up to 8 hours before baking. Just add 5-10 minutes to the baking time since you’re starting from cold.
FAQs
Can I make these Maple Pecan Baked Apples ahead of time?
Absolutely, and it’s a great timesaver for entertaining. You can prepare them completely up to the point of baking—core the apples, make the filling, stuff them, and place them in the dish. Cover tightly and refrigerate for up to 8 hours. When you’re ready, just pop them in the oven, remembering they might need a few extra minutes to bake since they’ll be going in cold. The texture and flavor are just as wonderful.
What can I use instead of pecans for a nut-free version?
No problem! Sunflower seeds or pumpkin seeds (pepitas) make a fantastic substitute. You’ll want to use the same quantity and give them a rough chop. They provide a very similar crunch and a lovely, toasty flavor that pairs beautifully with the maple and spices. Rolled oats also help bulk out the filling and maintain that essential texture.
My apples didn’t get very soft. What happened?
This usually boils down to one of two things: the oven temperature was a bit low, or the baking time was just a little too short. Oven thermostats can vary, so an oven thermometer is a handy tool to check. Also, different apple varieties and sizes can require slightly different cooking times. Always use the knife test for doneness—if it doesn’t slide in easily, give them another 5-10 minutes.
Can I use a different sweetener instead of maple syrup?
You can, though the flavor profile will change. Honey is the most direct substitute and will work well. If you use a granulated sweetener like brown sugar, you’ll likely need to mix it with a tablespoon of melted butter or a splash of apple juice to get the right consistency for the filling, as it won’t be as liquid as the syrup.
How should I store and reheat leftovers?
Leftover baked apples (lucky you!) can be stored covered in the refrigerator for up to 3 days. To reheat, place them in a baking dish, add a tiny splash of water to the bottom to prevent drying out, and warm them in a 180°C (350°F) oven for 10-15 minutes, or until heated through. You can also microwave them for 60-90 seconds, though the topping will lose some of its crispness.
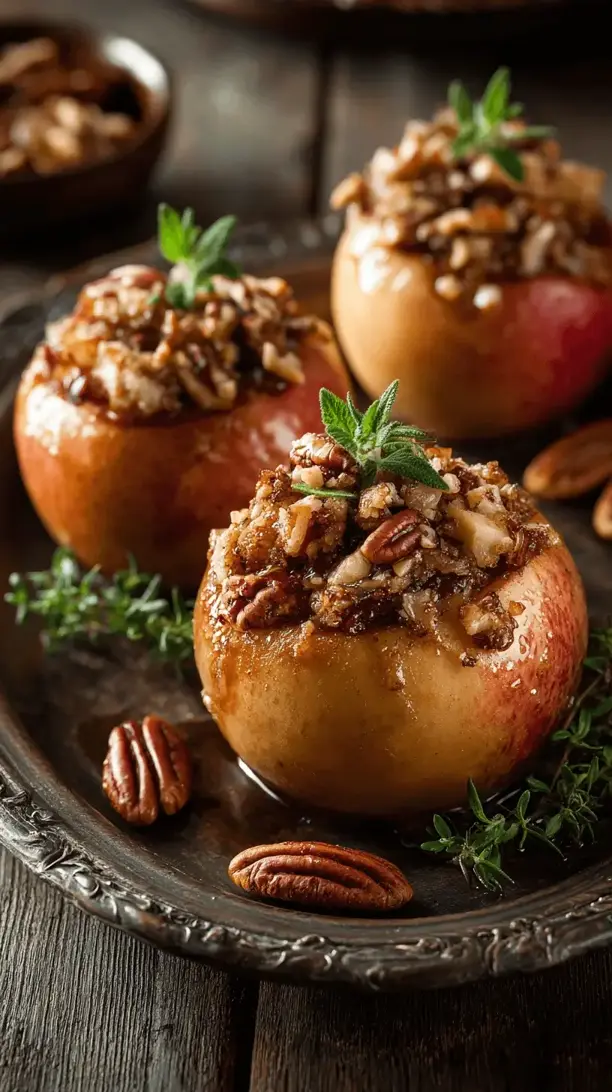
Maple Pecan Baked Apples
Make the best Maple Pecan Baked Apples with this easy recipe! Tender apples stuffed with a buttery maple-pecan filling. Perfect for dessert or a special breakfast. Get the recipe now!
Ingredients
For the Filling:
-
100 g pecans (roughly chopped)
-
3 tbsp pure maple syrup
-
2 tbsp unsalted butter (softened)
-
2 tbsp old-fashioned rolled oats
-
1 tsp ground cinnamon
-
0.25 tsp ground nutmeg
-
salt (A pinch)
For the Apples:
-
4 large baking apples (like Honeycrisp, Granny Smith, or Braeburn)
-
120 ml apple cider or water
Instructions
-
First, preheat your oven to 190°C (375°F). Grab your baking dish and give it a very light coating of butter or a quick spritz of cooking spray—this just prevents any sticky apple juices from welding themselves to the pan.01
-
Now, prepare your apples. Wash and dry them thoroughly. Using an apple corer or a small paring knife, carefully remove the core from each apple, creating a well that’s about 3-4 cm wide. The trick is to stop before you cut through the bottom; you’re making a cup, not a tunnel.02
-
Time to make the magical filling. In your small mixing bowl, combine the chopped pecans, softened butter, maple syrup, rolled oats, cinnamon, nutmeg, and that all-important pinch of salt. Use a fork or your fingers to mix everything together until it’s well-combined and clumps together slightly.03
-
Divide the pecan filling evenly among the four apples, firmly packing it down into the wells you created. Don’t be shy—really mound it up on top! Place the stuffed apples upright in your prepared baking dish, arranging them so they’re not touching if possible.04
-
Carefully pour the apple cider or water into the bottom of the baking dish, around the apples, not over them. You can even give the tops of the apples a very light drizzle with an extra teaspoon of maple syrup for extra gloss and flavor.05
-
Place the dish in the preheated oven and bake for 40 to 50 minutes. You’re looking for the apples to be tender all the way through—a sharp knife should slide into the side of an apple with little to no resistance. The pecan topping will be golden brown, fragrant, and crisp.06
-
Once they’re out of the oven, let the baked apples rest in the dish for at least 10-15 minutes before serving. They will be dangerously hot inside! This resting time allows the juices to settle and the apples to firm up just enough to handle.07