
Why You’ll Love This Maple Pecan Baked Apples
- Effortless Elegance. Seriously, the prep is almost too simple. There’s no fancy dough to make or intricate techniques to master. It’s mostly just stuffing and baking, but the final presentation looks like you fussed for hours.
- The Most Incredible Aroma. While these beauties are in the oven, your kitchen will smell like a perfect autumn day. The combination of warm apples, toasty pecans, cinnamon, and maple is honestly intoxicating—it’s a form of aromatherapy.
- Naturally Sweetened Goodness. We’re letting the apples and the pure maple syrup do all the heavy lifting here. The sweetness is deep and complex, not just one-note sugary, which makes each bite so much more interesting.
- Endlessly Adaptable. You can easily make these your own. Not a fan of pecans? Swap in walnuts. Want a little more texture? Add some rolled oats to the filling. It’s a wonderfully forgiving recipe that invites a little creativity.
Ingredients & Tools
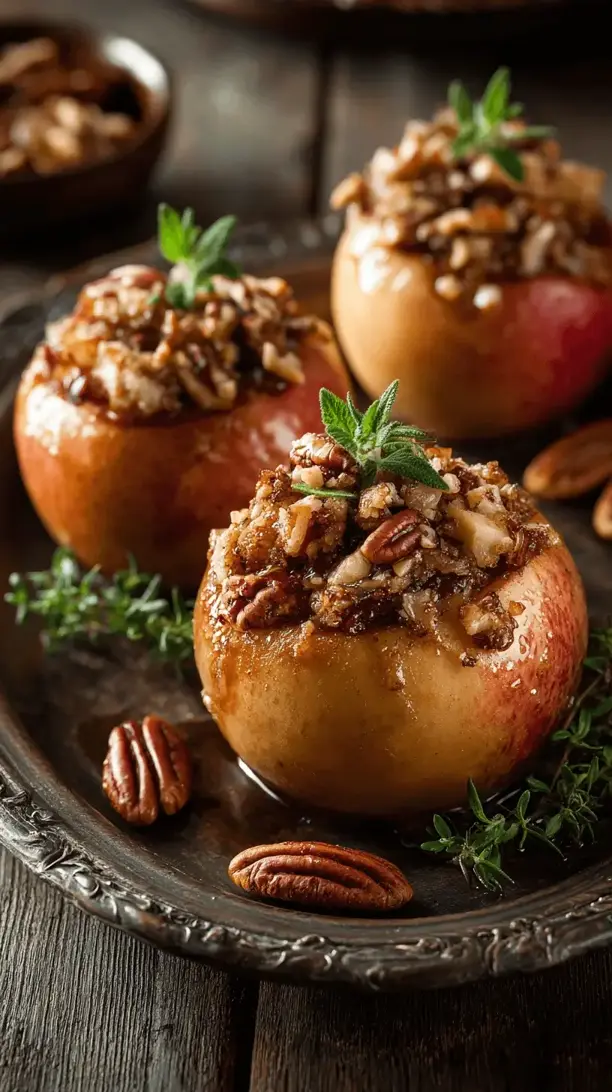
- 4 large baking apples (like Granny Smith, Honeycrisp, or Braeburn)
- ½ cup pecans, roughly chopped
- ¼ cup old-fashioned rolled oats
- 3 tablespoons unsalted butter, softened
- ⅓ cup pure maple syrup, plus more for drizzling
- 1 teaspoon ground cinnamon
- ¼ teaspoon ground nutmeg
- A pinch of fine sea salt
- ¾ cup hot water or apple cider
Tools: A sharp paring knife, a melon baller or small spoon, a small mixing bowl, an 8×8 inch or similar baking dish.
The quality of your maple syrup really is key here—the deeper, amber-grade syrips impart a much richer flavor. And don’t skip the pinch of salt; it’s not about making things salty, but about making all the other flavors pop in the most delightful way.
Serves: 4 | Prep Time: 15 minutes | Cook Time: 45-50 minutes | Total Time: about 1 hour
Before You Start: Tips & Ingredient Notes
- Apple Selection is Everything. You want a firm apple that holds its shape during baking. Granny Smith offers a lovely tart contrast, while Honeycrisp or Braeburn will be a bit sweeter. Avoid varieties like Red Delicious that tend to turn mushy.
- Why Softened Butter? Using softened, not melted, butter is the trick to creating a clumpy, streusel-like filling that bakes up with fantastic texture. If it’s too soft, pop it in the fridge for a few minutes.
- To Toast or Not to Toast? You can use raw pecans, but toasting them first—just for 5-7 minutes in a 350°F (175°C) oven—will unlock a deeper, nuttier flavor that really elevates the whole dish. It’s a small step with a big payoff.
- The Liquid in the Pan. Don’t forget the hot water or cider in the bottom of the baking dish! This creates a steamy environment that helps the apples cook through evenly and prevents them from drying out, plus it makes a lovely light sauce.
How to Make Maple Pecan Baked Apples
Step 1: First, preheat your oven to 375°F (190°C). This gives it plenty of time to come to the right temperature while you prep the apples. Grab your baking dish and give it a light coating of butter or a quick spritz of non-stick spray—this just makes cleanup easier later.
Step 2: Now, let’s prepare the apples. Wash and dry them thoroughly. Using a sharp paring knife or an apple corer, carefully remove the core from each apple, but be sure not to cut all the way through the bottom. You’re creating a little well for the filling. If you don’t have a corer, you can slice off the top third of the apple and use a melon baller or small spoon to scoop out the core. Then, using the tip of your knife, score a shallow line around the circumference of each apple about halfway down. This little trick helps prevent the skin from splitting dramatically as the apple expands during baking.
Step 3: Time for the filling! In your small mixing bowl, combine the softened butter, chopped pecans, rolled oats, cinnamon, nutmeg, and that all-important pinch of salt. Use a fork or your fingers to mash everything together until it’s well combined and crumbly. You’ll notice the butter acts as a glue, holding all the delicious bits together.
Step 4: Divide the pecan-oat mixture evenly among the four apples, firmly packing it into the cavities you created. Don’t be shy—really stuff it in there. Any leftover filling can be sprinkled over the top. Place the stuffed apples upright in your prepared baking dish. Now, drizzle the ⅓ cup of maple syrup evenly over each apple, letting it run down the sides and into the dish.
Step 5: Carefully pour the hot water or apple cider into the bottom of the baking dish, around the apples—not over them. This is the secret to perfectly tender apples. The steam will work its magic while they bake.
Step 6: Bake for 45 to 50 minutes, or until the apples are tender and easily pierced with a knife or skewer. The tops should be golden brown, and the skin will look slightly wrinkled. You’ll see the maple syrup bubbling away beautifully around them. If the pecans are browning too quickly, you can loosely tent the dish with aluminum foil for the last 10-15 minutes of baking.
Step 7: Once they’re out of the oven, let the apples rest in the dish for about 5-10 minutes. They will be incredibly hot! This resting time allows them to set up a bit and cool down to a edible temperature. To serve, spoon some of the syrupy juices from the bottom of the pan over each apple. An extra little drizzle of fresh maple syrup right at the end is never a bad idea.
Serving Suggestions
Complementary Dishes
- A scoop of vanilla bean ice cream — The classic pairing for a reason. The cold, creamy ice cream melting into the warm, spiced apple is a textural dream come true.
- A dollop of lightly sweetened whipped cream — For a slightly lighter option, fresh whipped cream adds a cloud-like richness without being too heavy.
- A side of sharp cheddar cheese — If you’re feeling adventurous, a small slice of aged cheddar cheese alongside the apple is a fantastic sweet-and-salty tradition that really, really works.
Drinks
- A hot mug of chai tea — The warm spices in the chai echo the cinnamon and nutmeg in the apples, creating a wonderfully cohesive flavor experience.
- A glass of cold apple cider — Double down on the apple flavor! A crisp, non-alcoholic cider is refreshing, or a hard cider would be a fun adult twist.
- A rich, dark roast coffee — The bitterness of a good cup of coffee cuts through the sweetness of the dessert perfectly, making for a very satisfying end to a meal.
Something Sweet
- A simple shortbread cookie — The buttery, crumbly texture of a shortbread cookie is a lovely, simple accompaniment that doesn’t compete for attention.
- A small square of dark chocolate — For the ultimate indulgence, a piece of high-quality dark chocolate (70% or higher) enjoyed alongside a bite of apple is sublime.
- Candied ginger — A little nibble of spicy, sweet candied ginger between bites will cleanse your palate and add a exciting zing.
Top Mistakes to Avoid
- Mistake: Using the wrong apple. A mealy apple like Red Delicious will completely fall apart and turn into applesauce—which is delicious, but not what we’re going for here. Stick to firm baking apples for structure.
- Mistake: Cutting all the way through the bottom. If you hollow out the apple and accidentally puncture the bottom, all the delicious filling and juices will leak out into the pan during baking. The goal is a sturdy cup.
- Mistake: Skipping the liquid in the pan. I’ve messed this up before too, thinking the apples had enough moisture. Without that steam, the apples can bake unevenly and the exposed parts might dry out before the center is tender.
- Mistake: Overbaking. You’re looking for tender, not total collapse. Check them at the 40-minute mark with a knife. An overbaked apple will lose its shape and become difficult to serve neatly.
Expert Tips
- Tip: Get creative with the filling. Feel free to add a tablespoon of raisins or dried cranberries for a chewy surprise. A teaspoon of orange zest would also add a beautiful citrus note that pairs wonderfully with the maple.
- Tip: Make them ahead for easy entertaining. You can fully assemble the apples up to a day in advance, cover the dish tightly with plastic wrap, and keep it in the refrigerator. Just add a few extra minutes to the baking time since you’re starting from cold.
- Tip: Don’t waste the pan juices! After serving, if you have any of the syrupy liquid left in the baking dish, it’s liquid gold. Drizzle it over your ice cream or even stir it into your morning oatmeal.
- Tip: For a crispier topping. If you love a bit more crunch, you can broil the apples for the last 1-2 minutes of baking. Watch them like a hawk though—the pecans can go from perfectly toasted to burnt in seconds!
FAQs
Can I make these Maple Pecan Baked Apples gluten-free?
Absolutely! This recipe is very easy to adapt. Just ensure your rolled oats are certified gluten-free, as oats are often processed in facilities that also handle wheat. The rest of the ingredients are naturally gluten-free, so you’re good to go. It’s a fantastic dessert option for anyone with dietary restrictions.
Can I use a different type of nut?
Of course! Walnuts would be a fantastic substitute with a slightly earthier flavor. Almonds, chopped a bit smaller, would also work well. If you have a nut allergy, you could try using sunflower seeds or even just double the amount of oats for a nut-free version. The recipe is very forgiving.
How should I store leftovers, and can I reheat them?
Store any leftover baked apples in an airtight container in the refrigerator for up to 3 days. To reheat, place them in a baking dish, add a tablespoon of water to the bottom to keep them moist, and warm them in a 350°F (175°C) oven for about 15-20 minutes, or until heated through. Microwaving works in a pinch but can make the texture a bit softer.
My maple syrup burned in the pan. What happened?
This can happen if your oven runs hot or if you used a very dark baking dish that absorbs more heat. The sugars in maple syrup caramelize beautifully but can cross over into burning. Next time, try reducing the oven temperature by 25 degrees and/or tenting the apples with foil for the second half of the baking time to protect the topping and the syrup.
Is it possible to make this recipe vegan?
Yes, it’s a very simple swap! Just use a good plant-based butter (the kind that comes in sticks works best for baking) instead of dairy butter. Be sure to check that your maple syrup is vegan (it almost always is, but some flavored syrups might contain dairy). That’s all there is to it!
Maple Pecan Baked Apples
Warm, comforting maple pecan baked apples! This easy recipe creates an incredible autumnal aroma & elegant dessert with minimal effort. Perfect with vanilla ice cream.
Ingredients
Ingredients
-
4 large baking apples (like Granny Smith, Honeycrisp, or Braeburn)
-
½ cup pecans (roughly chopped)
-
¼ cup old-fashioned rolled oats
-
3 tablespoons unsalted butter (softened)
-
⅓ cup pure maple syrup (plus more for drizzling)
-
1 teaspoon ground cinnamon
-
¼ teaspoon ground nutmeg
-
A pinch fine sea salt
-
¾ cup hot water or apple cider
Instructions
-
First, preheat your oven to 375°F (190°C). This gives it plenty of time to come to the right temperature while you prep the apples. Grab your baking dish and give it a light coating of butter or a quick spritz of non-stick spray—this just makes cleanup easier later.01
-
Now, let's prepare the apples. Wash and dry them thoroughly. Using a sharp paring knife or an apple corer, carefully remove the core from each apple, but be sure not to cut all the way through the bottom. You're creating a little well for the filling. If you don't have a corer, you can slice off the top third of the apple and use a melon baller or small spoon to scoop out the core. Then, using the tip of your knife, score a shallow line around the circumference of each apple about halfway down. This little trick helps prevent the skin from splitting dramatically as the apple expands during baking.02
-
Time for the filling! In your small mixing bowl, combine the softened butter, chopped pecans, rolled oats, cinnamon, nutmeg, and that all-important pinch of salt. Use a fork or your fingers to mash everything together until it's well combined and crumbly. You'll notice the butter acts as a glue, holding all the delicious bits together.03
-
Divide the pecan-oat mixture evenly among the four apples, firmly packing it into the cavities you created. Don't be shy—really stuff it in there. Any leftover filling can be sprinkled over the top. Place the stuffed apples upright in your prepared baking dish. Now, drizzle the ⅓ cup of maple syrup evenly over each apple, letting it run down the sides and into the dish.04
-
Carefully pour the hot water or apple cider into the bottom of the baking dish, around the apples—not over them. This is the secret to perfectly tender apples. The steam will work its magic while they bake.05
-
Bake for 45 to 50 minutes, or until the apples are tender and easily pierced with a knife or skewer. The tops should be golden brown, and the skin will look slightly wrinkled. You'll see the maple syrup bubbling away beautifully around them. If the pecans are browning too quickly, you can loosely tent the dish with aluminum foil for the last 10-15 minutes of baking.06
-
Once they're out of the oven, let the apples rest in the dish for about 5-10 minutes. They will be incredibly hot! This resting time allows them to set up a bit and cool down to a edible temperature. To serve, spoon some of the syrupy juices from the bottom of the pan over each apple. An extra little drizzle of fresh maple syrup right at the end is never a bad idea.07


