
Why You’ll Love This Kale Banana Pancakes
- A seriously clever way to eat your greens. Honestly, it feels a little bit like a magic trick. You get all the wonderful benefits of kale in a form that’s downright celebratory. It’s a fantastic option for anyone looking to sneak more veggies into their diet, especially for picky eaters (kids and adults alike!).
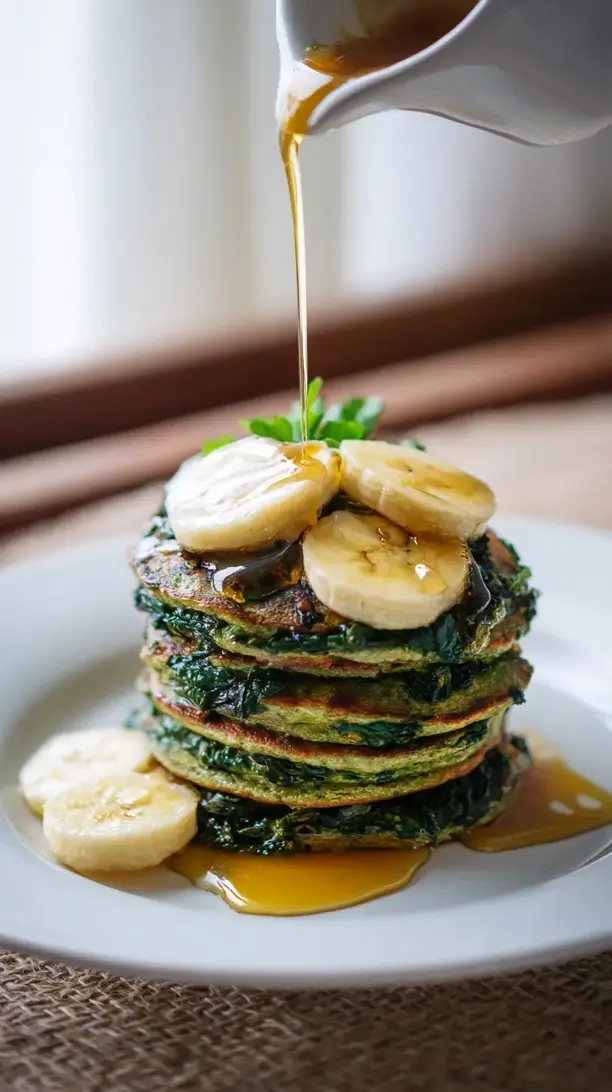
- They’re naturally sweetened and wonderfully fluffy. The ripeness of your banana is the secret weapon here. A spotty, super-ripe banana will give you the best sweetness and help create an incredibly tender crumb. You’ll notice the texture is surprisingly light, not dense or gritty like some healthy pancakes can be.
- Meal prep heaven. These pancakes freeze like a dream. I love making a double batch on a lazy Sunday, then popping them in the freezer for a grab-and-go breakfast all week. A quick toast in the toaster or a warm-up in the oven, and they’re just as good as fresh.
- Endlessly customizable. This recipe is a perfect base. Feel like adding chocolate chips? Go for it. A handful of blueberries? Absolutely. A sprinkle of cinnamon or a dash of vanilla extract? You get the idea. It’s your canvas to play with.
Ingredients & Tools
- 1 large very ripe banana (the spottier, the better!)
- 1 cup packed fresh kale leaves, stems removed
- 2 large eggs
- 1/2 cup milk of your choice (dairy, almond, oat all work)
- 1 cup whole wheat flour or all-purpose flour
- 1 tsp baking powder
- 1/2 tsp baking soda
- 1/4 tsp salt
- 1 tbsp maple syrup or honey (optional, for extra sweetness)
- 1 tbsp coconut oil or butter, for cooking
Tools: A good blender or food processor, a large mixing bowl, a whisk, a non-stick skillet or griddle, and a spatula.
The quality of your kale and banana really matters here. Fresh, vibrant kale will give you that beautiful green color, and a super-ripe banana means you might not even need the extra sweetener. Don’t stress about the flour—I’ve made these with everything from standard all-purpose to spelt flour, and they’ve all turned out great.
Serves: 2 (makes about 8-10 small pancakes) | Prep Time: 10 minutes | Cook Time: 15 minutes | Total Time: 25 minutes
Before You Start: Tips & Ingredient Notes
- Banana Ripeness is Non-Negotiable. This is the most important tip. A green or just-yellow banana won’t be sweet enough and won’t mash as easily. You want a banana that’s covered in brown spots—it should feel soft and smell intensely sweet. This is key for the perfect flavor and texture.
- Don’t Skip the Stems. When prepping your kale, take the extra 30 seconds to strip the leaves away from the tough, fibrous stems. The stems can make the batter a bit stringy and bitter. You’ll be left with tender leaves that blend up beautifully.
- To Blend or Not to Blend? I’m a big fan of blending the wet ingredients for a super smooth, vibrant green batter. But if you prefer a bit more texture, you can simply mash the banana with a fork and finely chop the kale. Both methods work—it just depends on your pancake personality!
- Get Your Pan to the Right Temperature. This is the secret to golden-brown, not-burnt pancakes. The pan should be hot enough that a drop of water sizzles and evaporates quickly, but not so hot that the oil smokes. A medium-low heat is usually the sweet spot.
How to Make Kale Banana Pancakes
Step 1: Wake Up the Kale. First, we need to give our kale a little spa treatment. Place the de-stemmed kale leaves in a colander and pour boiling water over them. This is called blanching, and it does two wonderful things: it wilts the leaves just enough to make them easier to blend, and it helps soften kale’s sometimes-bitter edge. Immediately run the kale under cold water to stop the cooking process, then gently squeeze out any excess water. You’ll be left with a bright green, softened pile of leaves.
Step 2: Create the Green Goddess Base. Now, into your blender go the blanched kale, that all-important very ripe banana, the eggs, and your milk of choice. If you’re using the optional maple syrup or honey, add it now. Blend on high until the mixture is completely smooth and a uniform, gorgeous green color. You shouldn’t see any flecks of kale—it should look like a green smoothie. This is the foundation of our pancake batter.
Step 3: Whisk the Dry Team. In your large mixing bowl, whisk together the flour, baking powder, baking soda, and salt. Give it a good whisk—you want to make sure those leavening agents are evenly distributed throughout the flour. This is what will give our pancakes their lift and fluffiness. You’ll notice the mixture will look light and aerated.
Step 4: The Gentle Merge. Pour the beautiful green wet mixture from the blender into the bowl with the dry ingredients. Now, here’s the trick: use a spatula and fold the batter together. Do not overmix! A few lumps are totally fine. Overmixing develops the gluten in the flour and can lead to tough, rubbery pancakes. You just want everything incorporated until you no longer see dry pockets of flour. The batter will be thick but pourable.
Step 5: The Perfect Pancake Sizzle. Place your skillet or griddle over medium heat and add a teaspoon of coconut oil or butter. Let it melt and coat the surface. To test if the pan is ready, flick a tiny drop of water onto it—if it sizzles and dances, you’re good to go. Pour about 1/4 cup of batter for each pancake. You’ll see bubbles start to form on the surface after about 2-3 minutes. This is your sign that the bottom is cooked.
Step 6: The Flip. Once the edges look set and the bubbles have popped, leaving little holes, it’s time to flip. Slide your spatula underneath with confidence and give it a quick, decisive turn. The second side will cook faster, usually in about 1-2 minutes. It should be a lovely golden brown. Transfer the cooked pancakes to a plate and repeat with the remaining batter, adding more oil to the pan as needed.
Serving Suggestions
Complementary Dishes
- Crispy Turkey Bacon or Tempeh Strips — The salty, savory crunch is a fantastic contrast to the sweet, soft pancakes. It creates a perfectly balanced breakfast plate that feels hearty and complete.
- A Side of Scrambled Eggs or Tofu — For an extra protein boost that will keep you full for hours. The creamy texture of eggs or seasoned tofu scramble pairs wonderfully with the fluffy pancake texture.
- Fresh Berry Compote — Instead of syrup, gently warm some mixed berries with a squeeze of lemon juice for a tangy, vibrant topping that cuts through the sweetness beautifully.
Drinks
- A Strong Cup of Coffee — The bitterness of coffee is a classic pairing with sweet breakfast foods. It just feels right, especially on a slow weekend morning.
- A Ginger Turmeric Tea Latte — The warm, spicy notes of ginger and turmeric complement the earthy kale flavor in a really unique and soothing way.
- A Cold Glass of Milk or Almond Milk — Simple, classic, and always satisfying. The cool creaminess is the perfect partner for warm pancakes.
Something Sweet
- Dark Chocolate Chips Melting on Top — Let a few chips sit on the hot pancakes for a minute before spreading. It creates a instant, decadent chocolate sauce that takes things to the next level.
- A Dollop of Whipped Coconut Cream — For a dairy-free option that feels incredibly indulgent. The light, airy cream against the dense pancake is a textural dream.
- A Drizzle of Almond Butter — This adds a rich, nutty flavor and more healthy fats. It’s a more substantial topping than syrup alone and adds a wonderful depth.
Top Mistakes to Avoid
- Mistake: Using an under-ripe banana. This is the number one reason these pancakes might not taste sweet enough. A green banana lacks the natural sugars that develop as it ripens, and it won’t mash or blend as well, leading to a lumpy batter.
- Mistake: Overmixing the batter. I’ve messed this up before too—you want a smooth batter, right? But vigorous stirring makes the gluten tough. Fold gently until just combined, and embrace a few lumps. They’ll cook out, I promise.
- Mistake> Cooking on too high heat. If your pan is too hot, the outside of the pancake will burn before the inside has a chance to cook through. You’ll be left with a blackened exterior and a raw, gummy center. Patience is key—medium-low heat wins the race.
- Mistake: Pressing down on the pancakes with the spatula. Resist the urge! This doesn’t make them cook faster; it just squeezes out the air bubbles we worked so hard to create, resulting in dense, flat pancakes.
Expert Tips
- Tip: Let the batter rest for 5 minutes. After you’ve mixed it, just walk away. This allows the flour to fully hydrate and the baking powder to start activating, which translates to a lighter, fluffier pancake. You’ll notice the batter thicken slightly.
- Tip: Keep finished pancakes warm in a low oven. If you’re making a big batch, heat your oven to 200°F (95°C) and place cooked pancakes on a baking sheet inside. This keeps everyone warm until you’re ready to serve.
- Tip: For ultra-uniform pancakes, use a measuring cup. A 1/4 cup measure is perfect for consistent size and cooking time. It also helps you get that perfect round shape every single time.
- Tip: Add mix-ins after pouring. If you’re adding blueberries or chocolate chips, sprinkle them onto the pancakes right after you pour the batter into the pan. This prevents them from sinking to the bottom or turning the entire batter purple.
FAQs
Can I make the batter the night before?
You can, but with a caveat. The baking powder will lose some of its potency overnight, so your pancakes might be a bit denser. If you do prep ahead, keep the wet and dry ingredients separate until the morning. Then, just combine them right before cooking. The blended kale and banana mixture holds up fine in the fridge for a night.
Can I use frozen kale?
Absolutely! Thaw it completely and then squeeze out every last drop of water. Frozen kale can be very watery, and excess moisture will make your batter thin and the pancakes gummy. Once it’s thoroughly squeezed, you can use it just like fresh.
My pancakes are turning out gummy. What did I do wrong?
This usually points to two things: too much liquid or not enough heat. First, make sure you squeezed the blanched kale really well. Second, check your pan temperature. If it’s too low, the pancakes will steam instead of fry, leading to a gummy texture. Crank the heat up a tiny bit for the next batch.
Can I make these vegan?
Yes, it’s definitely possible! For the eggs, I’d recommend using a “flax egg” (1 tbsp ground flaxseed mixed with 3 tbsp water per egg, let it sit for 5 minutes to gel). Use a plant-based milk and maple syrup instead of honey. The texture will be a little denser but still delicious.
How do I freeze and reheat them?
Let the pancakes cool completely on a wire rack. Then, place them in a single layer on a baking sheet and “flash freeze” for about an hour. This prevents them from sticking together. Once frozen solid, transfer them to a freezer bag. To reheat, pop them straight into the toaster (like a frozen waffle) or warm them in a 350°F (175°C) oven for 10 minutes. They’re just as good as new!
Kale Banana Pancakes
Whip up fluffy Kale Banana Pancakes in 25 minutes! This easy, healthy breakfast secretly packs in greens. Perfect for busy mornings & picky eaters. Get the recipe!
Ingredients
Ingredients
-
1 large very ripe banana (the spottier, the better!)
-
1 cup fresh kale leaves (packed, stems removed)
-
2 large eggs
-
1/2 cup milk (of your choice (dairy, almond, oat all work))
-
1 cup whole wheat flour or all-purpose flour
-
1 tsp baking powder
-
1/2 tsp baking soda
-
1/4 tsp salt
-
1 tbsp maple syrup or honey (optional, for extra sweetness)
-
1 tbsp coconut oil or butter (for cooking)
Instructions
-
Wake Up the Kale. First, we need to give our kale a little spa treatment. Place the de-stemmed kale leaves in a colander and pour boiling water over them. This is called blanching, and it does two wonderful things: it wilts the leaves just enough to make them easier to blend, and it helps soften kale's sometimes-bitter edge. Immediately run the kale under cold water to stop the cooking process, then gently squeeze out any excess water. You'll be left with a bright green, softened pile of leaves.01
-
Create the Green Goddess Base. Now, into your blender go the blanched kale, that all-important very ripe banana, the eggs, and your milk of choice. If you're using the optional maple syrup or honey, add it now. Blend on high until the mixture is completely smooth and a uniform, gorgeous green color. You shouldn't see any flecks of kale—it should look like a green smoothie. This is the foundation of our pancake batter.02
-
Whisk the Dry Team. In your large mixing bowl, whisk together the flour, baking powder, baking soda, and salt. Give it a good whisk—you want to make sure those leavening agents are evenly distributed throughout the flour. This is what will give our pancakes their lift and fluffiness. You'll notice the mixture will look light and aerated.03
-
The Gentle Merge. Pour the beautiful green wet mixture from the blender into the bowl with the dry ingredients. Now, here's the trick: use a spatula and fold the batter together. Do not overmix! A few lumps are totally fine. Overmixing develops the gluten in the flour and can lead to tough, rubbery pancakes. You just want everything incorporated until you no longer see dry pockets of flour. The batter will be thick but pourable.04
-
The Perfect Pancake Sizzle. Place your skillet or griddle over medium heat and add a teaspoon of coconut oil or butter. Let it melt and coat the surface. To test if the pan is ready, flick a tiny drop of water onto it—if it sizzles and dances, you're good to go. Pour about 1/4 cup of batter for each pancake. You'll see bubbles start to form on the surface after about 2-3 minutes. This is your sign that the bottom is cooked.05
-
The Flip. Once the edges look set and the bubbles have popped, leaving little holes, it's time to flip. Slide your spatula underneath with confidence and give it a quick, decisive turn. The second side will cook faster, usually in about 1-2 minutes. It should be a lovely golden brown. Transfer the cooked pancakes to a plate and repeat with the remaining batter, adding more oil to the pan as needed.06