Why You’ll Love This Honey Roasted Pear and Cranberry Crisp
- It’s the perfect balance of sweet and tart. The natural sweetness of the pears deepens beautifully with the honey, while the cranberries provide a vibrant, tangy counterpoint that keeps every bite interesting and far from cloying.
- The texture is absolutely dreamy. You get the soft, almost jammy fruit layer beneath a crunchy, nutty, and buttery oat topping. That contrast between the yielding fruit and the crisp crumble is what dessert dreams are made of.
- It’s deceptively simple to make. There’s no fussy pastry to roll out or intricate techniques involved. It’s a forgiving recipe that comes together quickly, making it a fantastic confidence-builder for new bakers and a reliable staple for seasoned pros.
- Your kitchen will smell incredible. The aroma of roasting pears, warm cinnamon, and toasting oats and nuts is honestly half the reward. It fills your home with a sense of warmth and anticipation that’s just as wonderful as the first bite.
Ingredients & Tools
- For the Honey Roasted Fruit Filling:
- 4-5 large, ripe but firm pears (about 900 g)
- 150 g fresh or frozen cranberries
- 80 ml honey
- 1 tbsp fresh lemon juice
- 1 tsp vanilla extract
- 1 tsp ground cinnamon
- ¼ tsp ground nutmeg
- 2 tbsp all-purpose flour or cornstarch
- For the Crisp Topping:
- 120 g old-fashioned rolled oats
- 100 g all-purpose flour
- 100 g light brown sugar
- ½ tsp baking powder
- ¼ tsp fine sea salt
- 115 g cold unsalted butter, cubed
- 60 g chopped walnuts or pecans (optional)
Tools: A 9×9 inch (or similar 2-quart) baking dish, a large mixing bowl, a medium mixing bowl, a pastry cutter or your fingers, and a peeler/corer.
Don’t be tempted to skip the lemon juice—it’s not just for flavor, it actually helps prevent the pears from browning too much while you prep everything else. And using cold butter for the topping is non-negotiable for achieving that perfect, craggy crisp texture we all love.
Nutrition (per serving)
- Calories: 380 kcal
- Protein: 4 g
- Fat: 14 g
- Carbohydrates: 65 g
- Fiber: 6 g
Serves: 6 | Prep Time: 20 minutes | Cook Time: 40 minutes | Total Time: 1 hour
Before You Start: Tips & Ingredient Notes
- Picking the perfect pears. You want pears that are ripe but still firm to the touch, like Bosc or Anjou. If they’re too soft, they’ll turn to mush during baking. A little give near the stem is a good indicator.
- Why cold butter is a must. For a crisp topping that’s actually crisp, your butter needs to be straight-from-the-fridge cold. This allows it to create little pockets of steam as it bakes, which gives you that delightful, flaky crunch instead of a greasy, melted layer.
- Don’t skip the thickener. The tablespoon or two of flour (or cornstarch for a gluten-free version) mixed with the fruit is crucial. It absorbs the juices released by the pears and cranberries as they bake, turning them into a lovely, glossy sauce instead of a watery puddle.
- Embrace the cranberry burst. If you’re using frozen cranberries, there’s no need to thaw them. They’ll hold their shape a bit better initially, but they will still burst and release their wonderful tart juice into the filling, which is exactly what you want.
How to Make Honey Roasted Pear and Cranberry Crisp
Step 1: Prep and Combine the Fruit. Start by preheating your oven to 190°C (375°F). Grab your pears, peel them, core them, and slice them into roughly 1.5 cm thick chunks. You’ll notice that as you work, the pears might start to brown a little—that’s where the lemon juice comes in! Toss the pear chunks and cranberries together in your large mixing bowl. Drizzle over the honey, lemon juice, and vanilla extract, then sprinkle in the cinnamon, nutmeg, and your chosen thickener (flour or cornstarch). Give it all a very gentle but thorough mix until every piece of fruit is lightly coated. The mixture will look a little cloudy from the flour, but that’s perfect—it’s the start of your sauce.
Step 2: Make the Crisp Topping. Now, for the best part—the crumble! In your medium bowl, whisk together the rolled oats, flour, brown sugar, baking powder, and salt. The baking powder might seem like an odd addition, but trust me, it gives the topping a little extra lift and lightness. Drop in your cold, cubed butter. Using a pastry cutter, a fork, or (my preferred method) your clean fingertips, work the butter into the dry ingredients. You’re aiming for a mixture that looks like coarse, uneven sand with plenty of pea-sized butter lumps still visible. This is what creates the texture. Stir in the chopped nuts now if you’re using them.
Step 3: Assemble the Crisp. Pour your honeyed fruit mixture into your baking dish and spread it into a fairly even layer. Don’t worry if it looks like a lot of fruit—it will settle and soften as it bakes. Now, take handfuls of your crisp topping and sprinkle it evenly over the entire surface of the fruit. The trick is not to press it down! You want a loose, craggy layer that will brown and crisp up beautifully in the oven. A few gaps are totally fine and actually desirable for steam to escape.
Step 4: Bake to Golden-Brown Perfection. Carefully place your assembled crisp in the preheated oven and bake for 35-45 minutes. You’re looking for a few key signs of doneness. The fruit should be bubbling actively around the edges—you should see those deep red cranberry juices bubbling up through the topping. The crisp itself should be a deep, golden brown and your kitchen will be filled with that unmistakable, heavenly aroma. If the topping is browning too quickly, you can loosely tent it with a piece of aluminium foil for the last 10 minutes of baking.
Step 5: The All-Important Rest. I know it’s tempting to dive right in, but this step is crucial for the texture. Once you pull the crisp from the oven, place it on a wire rack and let it rest for at least 20-30 minutes. This resting time allows the fruit filling to thicken up properly as it cools slightly. If you serve it piping hot, it will be delicious but a bit soupy. Letting it set ensures every scoop holds its shape and you get that perfect jammy fruit layer beneath the crisp topping.
Serving Suggestions
Complementary Dishes
- A simple green salad with a sharp vinaigrette — The crisp, bitter greens and acidic dressing provide a refreshing palate cleanser that cuts through the richness of the dessert beautifully, making the whole meal feel balanced.
- A savory cheese board before dessert — A few slices of sharp cheddar or a creamy blue cheese served alongside the warm crisp is a classic and wonderful pairing. The salty, savory cheese highlights the sweetness of the fruit in the most delightful way.
Drinks
- A hot cup of Earl Grey tea — The bergamot notes in the tea are a fantastic complement to the citrus and spice in the crisp, creating a cozy and sophisticated flavor combination that feels just right for a cool evening.
- A glass of off-dry Riesling or a dessert wine — The slight sweetness and acidity in the wine will mirror the flavors in the crisp and enhance the honeyed pear notes, making each bite feel even more luxurious.
Something Sweet
- A generous scoop of vanilla bean ice cream — This is the non-negotiable classic. The cold, creamy ice cream melting into the warm, spiced fruit and crunchy topping is a textural and temperature contrast that is simply unbeatable.
- A dollop of lightly sweetened whipped cream — For a lighter, airier option, freshly whipped cream with just a hint of vanilla adds a cloud-like richness that doesn’t overpower the delicate flavors of the honey and pear.
Top Mistakes to Avoid
- Mistake: Using overripe, mushy pears. This will result in a filling that lacks structure and turns into a fruit puree rather than distinct, tender pieces. You need that slight firmness to start with so they soften perfectly in the oven without disintegrating.
- Mistake: Mixing the topping until it’s uniform. If you overwork the butter into the oat mixture, you’ll end up with a dense, cookie-like layer on top instead of a light, crumbly crisp. Those visible butter lumps are your friends!
- Mistake: Skipping the rest time after baking. I’ve been guilty of this in my haste, and you’re rewarded with a filling that’s too runny. The resting period is when the thickener does its final work, setting the fruit juices into a lovely, sliceable consistency.
- Mistake: Packing the topping down. When you sprinkle the crumble over the fruit, resist the urge to pat it flat. A loose, uneven layer allows heat to circulate and for the topping to get crispy all the way through, rather than steaming into a doughy blanket.
Expert Tips
- Tip: Add a pinch of black pepper. It sounds wild, but just an eighth of a teaspoon of freshly ground black pepper mixed in with the spices for the filling can add a subtle, warm complexity that makes the honey and cinnamon flavors really pop without being spicy.
- Tip: Brown your butter for the topping. For a next-level nutty, caramelized flavor, melt half of the butter called for in the topping and cook it until it’s golden brown and smells nutty. Let it cool and re-solidify in the fridge before using it in the crumble mixture. The flavor payoff is immense.
- Tip: Make it ahead for easy entertaining. You can assemble the entire crisp, cover it tightly, and keep it in the refrigerator for up to 24 hours before you need to bake it. Just add a few extra minutes to the baking time since it will be going into the oven cold.
- Tip: Use a mix of sweeteners. While honey is the star, using half honey and half maple syrup in the filling introduces another layer of warm, autumnal flavor that pairs wonderfully with the pears and cranberries.
FAQs
Can I use a different type of fruit?
Absolutely! This recipe is wonderfully adaptable. Apples are a natural substitute for pears. You could also use a mix of peaches and blueberries in the summer. The key is to use about the same total weight of fruit and to ensure you have a mix of textures and flavors—something soft and sweet (like the pears) and something with a bit of tartness or pop (like the cranberries) to keep it balanced.
Can I make this gluten-free and/or vegan?
Easily! For a gluten-free version, simply use a 1:1 gluten-free flour blend in place of the all-purpose flour in both the filling and the topping, and ensure your oats are certified gluten-free. For a vegan version, swap the honey for maple syrup and use a solid, plant-based butter (like the block kind, not the spreadable tub kind) for the topping. The results are just as delicious.
How should I store leftovers and can I reheat them?
Leftovers can be covered tightly and stored in the refrigerator for up to 4 days. To reheat, I highly recommend using an oven or toaster oven (around 175°C / 350°F for 10-15 minutes) to recrisp the topping. The microwave will work in a pinch, but it will make the topping soft and steamy, so it’s not the ideal method if you want to preserve that lovely texture.
My crisp topping isn’t browning evenly. What happened?
This usually happens if the topping was applied too thickly in some spots and too thinly in others, or if the butter wasn’t evenly distributed. Next time, try sprinkling it more evenly and don’t be afraid of a few gaps. If you notice it browning unevenly during baking, you can carefully rotate the dish halfway through the cooking time to ensure more even heat distribution.
Can I freeze the unbaked crisp?
You can! Assemble the crisp completely in a freezer-safe baking dish, wrap it very tightly in a couple layers of plastic wrap and then aluminium foil. It will keep for up to 3 months. When you’re ready to bake, you can pop it directly from the freezer into a preheated oven, though you’ll need to add 15-20 minutes to the baking time. There’s no need to thaw it first.
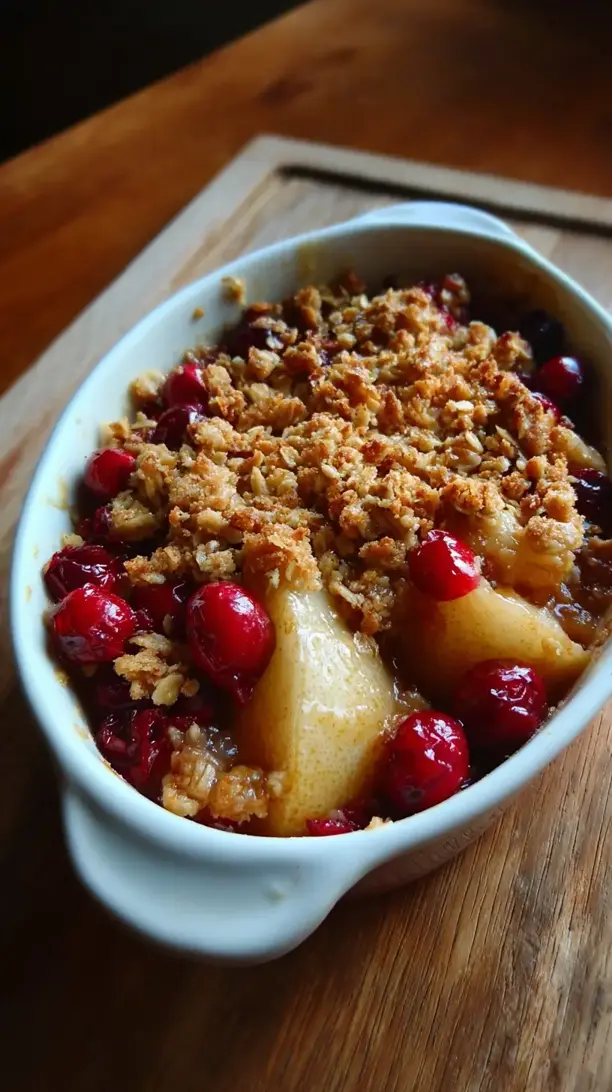
Honey Roasted Pear And Cranberry Crisp
Make this easy Honey Roasted Pear and Cranberry Crisp for a perfect balance of sweet and tart. Get the simple recipe for a comforting dessert everyone will love!
Ingredients
For the Honey Roasted Fruit Filling:
-
4-5 large, ripe but firm pears (about 900 g)
-
150 g fresh or frozen cranberries
-
80 ml honey
-
1 tbsp fresh lemon juice
-
1 tsp vanilla extract
-
1 tsp ground cinnamon
-
0.25 tsp ground nutmeg
-
2 tbsp all-purpose flour or cornstarch
For the Crisp Topping:
-
120 g old-fashioned rolled oats
-
100 g all-purpose flour
-
100 g light brown sugar
-
0.5 tsp baking powder
-
0.25 tsp fine sea salt
-
115 g cold unsalted butter (cubed)
-
60 g chopped walnuts or pecans (optional)
Instructions
-
Start by preheating your oven to 190°C (375°F). Grab your pears, peel them, core them, and slice them into roughly 1.5 cm thick chunks. Toss the pear chunks and cranberries together in your large mixing bowl. Drizzle over the honey, lemon juice, and vanilla extract, then sprinkle in the cinnamon, nutmeg, and your chosen thickener (flour or cornstarch). Give it all a very gentle but thorough mix until every piece of fruit is lightly coated.01
-
In your medium bowl, whisk together the rolled oats, flour, brown sugar, baking powder, and salt. Drop in your cold, cubed butter. Using a pastry cutter, a fork, or (my preferred method) your clean fingertips, work the butter into the dry ingredients. You're aiming for a mixture that looks like coarse, uneven sand with plenty of pea-sized butter lumps still visible. Stir in the chopped nuts now if you're using them.02
-
Pour your honeyed fruit mixture into your baking dish and spread it into a fairly even layer. Now, take handfuls of your crisp topping and sprinkle it evenly over the entire surface of the fruit. The trick is not to press it down! You want a loose, craggy layer that will brown and crisp up beautifully in the oven.03
-
Carefully place your assembled crisp in the preheated oven and bake for 35-45 minutes. You're looking for a few key signs of doneness. The fruit should be bubbling actively around the edges. The crisp itself should be a deep, golden brown. If the topping is browning too quickly, you can loosely tent it with a piece of aluminium foil for the last 10 minutes of baking.04
-
Once you pull the crisp from the oven, place it on a wire rack and let it rest for at least 20-30 minutes. This resting time allows the fruit filling to thicken up properly as it cools slightly.05