Why You’ll Love This Healthy Peppermint Bark
- It’s Surprisingly Simple. Honestly, if you can melt chocolate and stir, you’ve got this. There’s no baking, no fancy equipment, and the whole thing comes together in about 15 minutes of active time, plus a little patience for it to set.
- The Flavor is Pure and Vibrant. By using real peppermint extract and high-quality dark chocolate, you get a depth of flavor that the mass-produced versions just can’t match. It’s rich, it’s minty, and it doesn’t leave a weird artificial aftertaste.
- You Control the Sweetness. This is a big one for me. We’re using just a hint of maple syrup to complement the natural bitterness of the dark chocolate, so you can adjust it to your liking. It’s sweet enough to feel like a treat, but not so much that it overwhelms your palate.
- It’s the Perfect Make-Ahead Gift. This bark is incredibly easy to package beautifully and give to friends, neighbors, teachers… you name it. It looks professional and tastes incredible, and honestly, a homemade gift from the heart always means so much more.
Ingredients & Tools
- 200 g high-quality dark chocolate (70% works beautifully), chopped
- 1 tbsp coconut oil
- 1 tbsp pure maple syrup (or to taste)
- 1/2 tsp pure peppermint extract
- A tiny pinch of sea salt
- 2-3 candy canes or peppermint candies, crushed
Tools: A small saucepan, a heatproof bowl that fits snugly on top (for a double boiler), a baking sheet lined with parchment paper, and a rolling pin or heavy mug for crushing candy.
The quality of your chocolate really is the star here, so choose one you enjoy eating on its own. The coconut oil isn’t just for health reasons—it’s what gives the bark that wonderfully crisp snap when you break it. And that pinch of salt? It might seem small, but it makes all the chocolate flavors pop.
Nutrition (per serving)
- Calories: 120 kcal
- Protein: 1 g
- Fat: 8 g
- Carbohydrates: 12 g
- Fiber: 2 g
Serves: 8 | Prep Time: 10 mins | Cook Time: 5 mins | Total Time: 1 hour 15 mins (includes setting)
Before You Start: Tips & Ingredient Notes
- Chocolate Choice is Key. I really recommend a bar of chocolate that you chop yourself, rather than chocolate chips. Chips often have stabilizers that prevent them from melting as smoothly. A 70% dark chocolate bar provides the perfect balance of bitter and sweet.
- Don’t Skip the Double Boiler. I know, microwaving is tempting, but melting chocolate over direct, gentle heat is the best way to avoid seizing. A glass or metal bowl set over a pot of simmering water gives you so much more control.
- Crush Your Candy Right. Place the candy canes in a sealed plastic bag and use a rolling pin or heavy-bottomed mug to crush them. You’ll want a mix of fine powder and some small chunks for the best texture and visual appeal on top of your bark.
- Peppermint Extract Power. A little goes a very long way! We’re using pure extract, which is much more potent than imitation. Start with the 1/2 teaspoon, taste, and only add more if you really want an extra-strong mint kick.
How to Make Healthy Peppermint Bark
Step 1: Prepare Your Pan. First things first, let’s get our workstation ready. Take a small baking sheet and line it neatly with a piece of parchment paper. You don’t need a huge pan for this—we’re making a lovely, rustic-looking slab of bark. Smooth out any wrinkles in the paper so your bark has a nice, flat surface to set on. This little bit of prep makes the whole process so much smoother later on.
Step 2: Create a Double Boiler. Fill your small saucepan with about an inch or two of water and bring it to a very gentle simmer over medium-low heat. Place your heatproof bowl on top, making sure the bottom of the bowl isn’t actually touching the water—we’re using the steam to melt the chocolate, not direct heat. This is the trick to achieving that beautifully smooth, glossy melted chocolate.
Step 3: Melt the Chocolate. Add your chopped dark chocolate and the tablespoon of coconut oil to the bowl. The coconut oil will help the chocolate melt more evenly and give the final bark a fantastic snap. Stir gently and continuously with a spatula as the chocolate melts. You’ll notice it going from solid, to shinier chunks, to a completely smooth, liquid pool. This should only take 3-5 minutes. Once it’s fully melted, remove the bowl from the heat.
Step 4: Flavor the Chocolate. Now for the fun part! To the warm, melted chocolate, add your maple syrup, the 1/2 teaspoon of peppermint extract, and that all-important tiny pinch of sea salt. Stir everything together until it’s completely combined and the mixture looks glossy and uniform. Take a moment to taste it—this is your chance to adjust the mint level if you want it stronger.
Step 5: Spread and Sprinkle. Pour the chocolate mixture directly onto your prepared parchment-lined baking sheet. Use your spatula to spread it into a thin, even layer, about 1/4-inch thick. It doesn’t have to be a perfect rectangle—the rustic, uneven edges are part of the charm! Immediately, while the chocolate is still wet, take your crushed candy canes and sprinkle them generously over the entire surface.
Step 6: Let it Set. Very carefully, transfer the entire baking sheet to your refrigerator. Let the bark set completely, undisturbed, for at least one hour. You’ll know it’s ready when the surface is completely firm to the touch and it has that signature matte finish. Don’t rush this step—patience is key for that perfect break.
Step 7: Break and Serve. Once the bark is fully set, take it out of the fridge. Lift the entire slab by the parchment paper and place it on a cutting board. Now, use your hands to break it into rustic, irregular pieces. You can also use a knife to score and break it if you prefer more uniform shapes. And there you have it—beautiful, homemade Healthy Peppermint Bark!
Serving Suggestions
Complementary Dishes
- A Cheese Board — The rich, sharp flavors of aged cheddar or a creamy brie create a fantastic savory contrast to the sweet, minty chocolate. It turns your bark into part of a sophisticated dessert spread.
- Fresh Citrus Salad — A simple salad of orange and grapefruit segments cuts through the richness of the chocolate beautifully. The bright, acidic fruit makes each bite of bark taste fresh and new.
- Spiced Nuts — A bowl of warm, cinnamon-dusted almonds or pecans offers a wonderful textural and flavor counterpoint. The warmth of the spices and the crunch of the nuts are just divine with the cool mint.
Drinks
- Peppermint Herbal Tea — It might seem obvious, but a hot cup of caffeine-free peppermint tea actually amplifies the minty freshness of the bark without adding any extra sweetness. It’s a wonderfully soothing combination.
- Rich Hot Chocolate — For the ultimate chocolate experience, pair a piece of bark with a mug of deeply rich, unsweetened hot cocoa. You can even drop a small piece of the bark right into the mug to melt in.
- Chilled Prosecco — The bubbles and slight dryness of a glass of Prosecco or Champagne are a fantastic palate cleanser between bites of the rich chocolate, making for a truly celebratory pairing.
Something Sweet
- Vanilla Bean Ice Cream — Crumble a piece of this bark over a scoop of high-quality vanilla ice cream. The combination of cold, creamy vanilla and crunchy, minty chocolate is an absolute classic for a reason.
- Gingerbread Cookies — The warm, spicy molasses flavor of a soft gingerbread cookie is a match made in holiday heaven with the cool peppermint. It’s like all the best parts of the season on one plate.
- Poached Pears — For an elegant dessert, serve a few pieces of bark alongside a warmly spiced, wine-poached pear. The juicy, soft fruit and the crisp chocolate create a stunning texture contrast.
Top Mistakes to Avoid
- Mistake: Getting water in your melting chocolate. Even a single drop of water can cause the chocolate to “seize,” turning it from smooth and liquid to a grainy, thick paste. Always make sure your bowls and utensils are completely dry. I’ve messed this up before too, and it’s a real heartbreaker!
- Mistake: Using imitation peppermint extract. The flavor is just not the same—it can taste medicinal and artificial. Pure peppermint extract is more expensive, but you use so little and the vibrant, clean flavor it provides is absolutely worth it.
- Mistake: Spreading the bark too thick. If your layer of chocolate is too thick, it becomes difficult to break and can feel a bit overwhelming to eat. A thin, even layer (about 1/4-inch) gives you the perfect crisp snap and a more balanced bite.
- Mistake: Skipping the salt. I know it seems insignificant, but that tiny pinch of sea salt is not optional! It works in the background to enhance the chocolate flavor and balance the sweetness, making the entire treat taste more complex and less one-note.
Expert Tips
- Tip: Temper your chocolate for a professional shine. If you want your bark to have that gorgeous, glossy snap and not bloom (get those white streaks), you can temper it. It sounds fancy, but it’s just about carefully controlling the temperature as you melt and cool it. For a foolproof method, melt 2/3 of your chocolate, then remove from heat and stir in the remaining 1/3 until melted.
- Tip: Add other toppings for fun variations. While crushed candy canes are classic, don’t be afraid to get creative! A sprinkle of flaky sea salt, some chopped toasted almonds, or even a dusting of freeze-dried raspberries can create incredible new flavor profiles.
- Tip: Use a plastic bag for neat drizzling (for a layered look). If you want to make a more traditional dark-and-white-chocolate swirled bark, melt the chocolates separately. Place one in a plastic bag, snip the corner, and drizzle it over the other for a beautiful marbled effect before sprinkling with candy.
- Tip: Store it properly to keep it crisp. Always store your finished bark in an airtight container in the refrigerator. This keeps it firm and prevents it from absorbing any other odors. It also helps the candy cane pieces on top from getting sticky. It will keep beautifully for up to two weeks.
FAQs
Can I use milk chocolate or white chocolate instead?
You absolutely can, but keep in mind it will change the “healthy” profile, as they contain more sugar. If you do use them, you’ll likely want to reduce or omit the maple syrup from the recipe. White chocolate can be particularly tricky to melt, so be extra gentle with the heat. A combination of dark and white chocolate swirled together is also a stunning and delicious option!
My chocolate seized and became grainy. Can I fix it?
Oh no, it happens to the best of us! Don’t panic. The most reliable fix is to stir in a tiny bit more of a neutral fat. Add about a teaspoon of additional coconut oil (or even a flavorless oil like vegetable oil) and stir vigorously. The extra fat can often bring the chocolate back to a smooth consistency. If it doesn’t work, sadly, it’s best to start over.
How far in advance can I make this bark?
This is one of its best features—it’s a fantastic make-ahead treat! Stored properly in an airtight container in the fridge, it will stay fresh and delicious for up to two weeks. This makes it perfect for holiday gifting or for getting a head start on your party prep without any last-minute stress.
Is there a substitute for the candy cane topping?
Of course! If you’re not a fan of candy canes or want to avoid the refined sugar, you have plenty of options. Try crushed freeze-dried strawberries for a tart twist, a sprinkle of cacao nibs for extra chocolate intensity, or even just a mix of chopped pistachios and a little flaky sea salt for a sophisticated, savory-sweet finish.
Why did my bark get white streaks on it after setting?
Those white streaks are called “bloom,” and it’s completely harmless! It’s just the cocoa butter separating and rising to the surface, usually caused by a slight temperature change during setting. It doesn’t affect the taste at all. To prevent it, try to avoid drastic temperature shifts and follow the tempering tip mentioned earlier for a perfectly glossy finish every time.
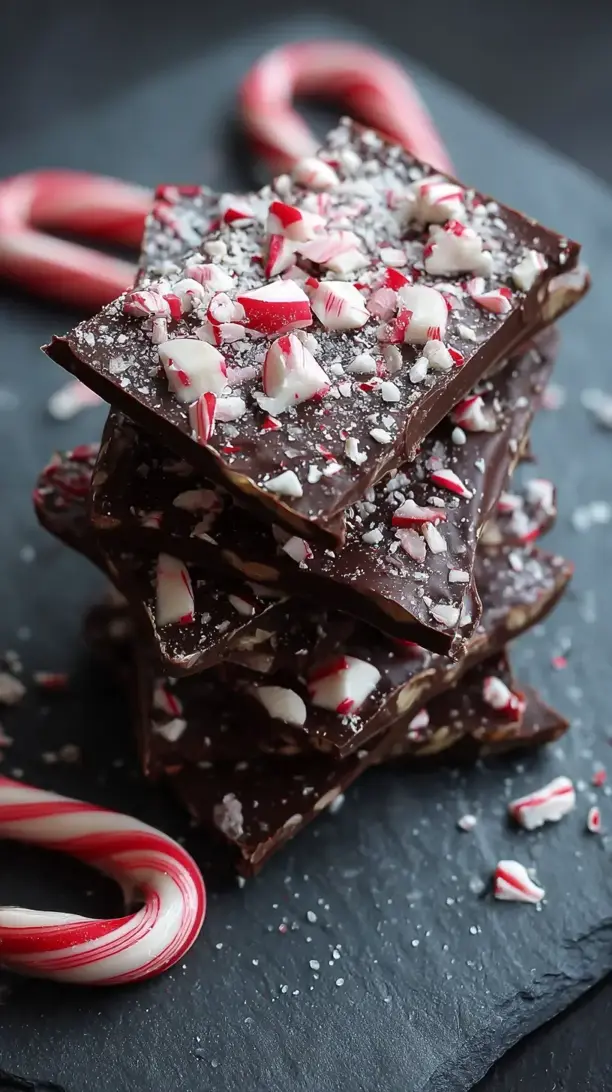
Healthy Peppermint Bark
Make this easy Healthy Peppermint Bark with dark chocolate, real peppermint, and a touch of maple syrup. A festive, guilt-free holiday treat! Get the simple recipe now.
Ingredients
For the bark
-
200 g high-quality dark chocolate (70% works beautifully, chopped)
-
1 tbsp coconut oil
-
1 tbsp pure maple syrup (or to taste)
-
1/2 tsp pure peppermint extract
-
A tiny pinch sea salt
-
2-3 candy canes or peppermint candies (crushed)
Instructions
-
Prepare Your Pan. First things first, let's get our workstation ready. Take a small baking sheet and line it neatly with a piece of parchment paper. You don't need a huge pan for this—we're making a lovely, rustic-looking slab of bark. Smooth out any wrinkles in the paper so your bark has a nice, flat surface to set on. This little bit of prep makes the whole process so much smoother later on.01
-
Create a Double Boiler. Fill your small saucepan with about an inch or two of water and bring it to a very gentle simmer over medium-low heat. Place your heatproof bowl on top, making sure the bottom of the bowl isn't actually touching the water—we're using the steam to melt the chocolate, not direct heat. This is the trick to achieving that beautifully smooth, glossy melted chocolate.02
-
Melt the Chocolate. Add your chopped dark chocolate and the tablespoon of coconut oil to the bowl. The coconut oil will help the chocolate melt more evenly and give the final bark a fantastic snap. Stir gently and continuously with a spatula as the chocolate melts. You'll notice it going from solid, to shinier chunks, to a completely smooth, liquid pool. This should only take 3-5 minutes. Once it's fully melted, remove the bowl from the heat.03
-
Flavor the Chocolate. Now for the fun part! To the warm, melted chocolate, add your maple syrup, the 1/2 teaspoon of peppermint extract, and that all-important tiny pinch of sea salt. Stir everything together until it's completely combined and the mixture looks glossy and uniform. Take a moment to taste it—this is your chance to adjust the mint level if you want it stronger.04
-
Spread and Sprinkle. Pour the chocolate mixture directly onto your prepared parchment-lined baking sheet. Use your spatula to spread it into a thin, even layer, about 1/4-inch thick. It doesn't have to be a perfect rectangle—the rustic, uneven edges are part of the charm! Immediately, while the chocolate is still wet, take your crushed candy canes and sprinkle them generously over the entire surface.05
-
Let it Set. Very carefully, transfer the entire baking sheet to your refrigerator. Let the bark set completely, undisturbed, for at least one hour. You'll know it's ready when the surface is completely firm to the touch and it has that signature matte finish. Don't rush this step—patience is key for that perfect break.06
-
Break and Serve. Once the bark is fully set, take it out of the fridge. Lift the entire slab by the parchment paper and place it on a cutting board. Now, use your hands to break it into rustic, irregular pieces. You can also use a knife to score and break it if you prefer more uniform shapes. And there you have it—beautiful, homemade Healthy Peppermint Bark!07