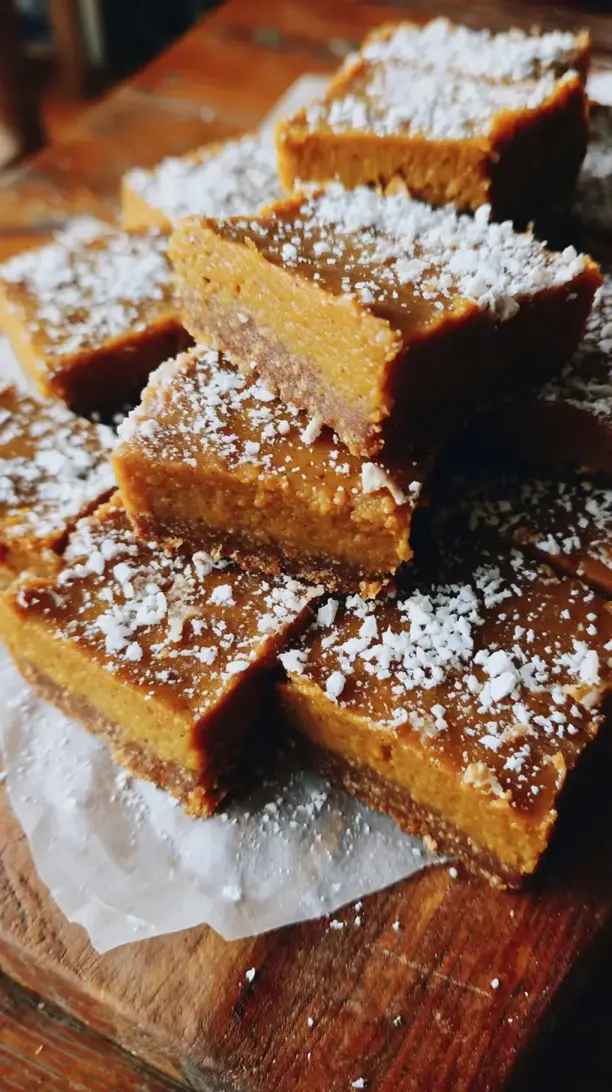
Why You’ll Love This Healthy Gingerbread Cookies
- They’re secretly wholesome. With whole wheat flour, coconut oil, and natural sweeteners, you can enjoy that classic gingerbread experience without the usual guilt. They’re a treat you can feel genuinely good about.
- The flavor is incredibly warm and complex. We’re not skimping on the spices here. The blend of ginger, cinnamon, and a hint of cloves creates a deeply aromatic cookie that’s far from bland.
- They have the perfect soft-and-chewy texture. The trick is in not over-baking them. You’ll pull them out when they’re just set, resulting in a cookie that’s tender and satisfyingly chewy, not crisp or hard.
- They make your whole house smell like the holidays. Honestly, the baking process is half the fun. The scent of warm spices is just… unbeatable. It’s instant festive cheer.
Ingredients & Tools
- 240 g whole wheat pastry flour
- 1 tsp baking soda
- 1.5 tsp ground ginger
- 1 tsp ground cinnamon
- 1/4 tsp ground cloves
- 1/4 tsp salt
- 80 ml coconut oil, solid but soft
- 80 ml pure maple syrup
- 1 large egg, at room temperature
- 1 tsp pure vanilla extract
- 2 tbsp unsulphured molasses
Tools: Mixing bowls, whisk, rolling pin, cookie cutters, baking sheets, parchment paper.
Using whole wheat pastry flour is key here—it gives a lighter texture than regular whole wheat. And don’t be tempted to skip the molasses; it’s what gives gingerbread its signature deep, almost bitter-sweet flavor and that beautiful dark color. A little goes a long way!
Nutrition (per serving)
- Calories: 98 kcal
- Protein: 2 g
- Fat: 4 g
- Carbohydrates: 14 g
- Fiber: 1 g
Serves: 18 | Prep Time: 20 minutes | Cook Time: 8-10 minutes | Total Time: 30 minutes (plus chilling)
Before You Start: Tips & Ingredient Notes
- Your coconut oil texture is everything. You want it solid, like softened butter, not melted or rock-hard. If it’s melted, the dough will be greasy; if it’s too hard, it won’t cream properly with the wet ingredients.
- Don’t have whole wheat pastry flour? You can use a 50/50 blend of all-purpose and regular whole wheat flour. The pastry flour just gives a more delicate crumb, which I really prefer for a soft cookie.
- Why chill the dough? This is a non-negotiable step, honestly. Chilling firms up the fat, which prevents the cookies from spreading too much in the oven. It also allows the flour to fully hydrate, giving you a much better texture.
- Measuring flour correctly. The best way is to spoon the flour into your measuring cup and level it off. Scooping directly from the bag can pack in too much flour, leading to dry cookies.
How to Make Healthy Gingerbread Cookies
Step 1: First, let’s whisk together all our dry ingredients. In a medium bowl, add the whole wheat pastry flour, baking soda, ginger, cinnamon, cloves, and salt. Give this a good whisk for about 30 seconds. You’ll notice the spices becoming evenly distributed, and you’ll get a lovely whiff of that holiday aroma already. This ensures there are no clumps of baking soda or spice in your final dough, which is key for an even bake.
Step 2: Now, in a larger bowl, we’ll cream the wet ingredients. Add the soft (but not melted!) coconut oil and the maple syrup. Using a hand mixer or a good strong whisk, beat them together for a minute or two until they’re well combined and look a little paler and fluffier. Then, beat in the egg, vanilla extract, and molasses. The mixture might look a little separated at first—that’s totally normal, just keep mixing until it’s smooth.
Step 3: Time to bring it all together. Gradually add the dry ingredients to the wet mixture, mixing on low speed or stirring with a spatula until just combined. You’ll see a thick, sticky dough forming. The trick is to stop mixing the moment you no longer see dry flour streaks. Over-mixing can make the cookies tough.
Step 4: This is the most important step for perfect shapes! Divide the dough in half, shape each half into a disc, and wrap them tightly in plastic wrap. You absolutely must chill this dough for at least 2 hours, or even overnight. The dough will firm up significantly, making it much easier to roll out without sticking terribly.
Step 5: When you’re ready to bake, preheat your oven to 350°F (175°C) and line your baking sheets with parchment paper. Take one disc of dough out of the fridge. Lightly flour your surface and rolling pin. Roll the dough out to about a 1/4-inch thickness. If it cracks, let it sit for 5 minutes to warm up slightly.
Step 6: Now for the fun part! Dip your cookie cutters in a little flour to prevent sticking, then press them firmly into the dough. Carefully transfer the shapes to your prepared baking sheet, leaving about an inch between them as they will spread just a little. Re-roll the scraps and keep cutting until you’ve used all the dough.
Step 7: Bake for 8 to 10 minutes. The cookies are done when the edges are just set and the centers still look slightly soft. They will firm up as they cool. Honestly, it’s better to under-bake them slightly than over-bake them if you want that soft, chewy texture. Let them cool on the baking sheet for 5 minutes before moving them to a wire rack to cool completely.
Serving Suggestions
Complementary Dishes
- A warm mug of chai tea — The cardamom and black pepper notes in chai are a beautiful companion to the warm spices in the gingerbread, creating a cozy, spiced experience.
- A sharp, tangy cheese board — The sweetness of the cookie pairs surprisingly well with a slice of aged cheddar or a creamy goat cheese. It’s a fantastic sweet-and-savory bite.
- A simple apple and fennel salad — The crisp, anise-like flavor of fresh fennel provides a refreshing, palate-cleansing contrast to the rich, spiced cookies.
Drinks
- Cold glass of oat milk — Its creamy, slightly sweet flavor is a wonderful, dairy-free way to wash down a cookie and balance the spices.
- Hot black coffee — The bitterness of a good, strong brew cuts through the sweetness perfectly and highlights the deep molasses notes in the cookie.
- Sparkling apple cider — The effervescence and crisp apple flavor make the gingerbread taste even more festive and fun.
Something Sweet
- A small scoop of vanilla bean ice cream — Sandwich a scoop between two cookies for the ultimate treat, or simply serve it on the side. The cold, creamy vanilla is a classic for a reason.
- Dark chocolate-dipped strawberries — The tart berry and rich chocolate offer a different kind of sweetness that doesn’t compete with the gingerbread’s spice profile.
- Poached pears with cinnamon — This feels elegant and light, and the soft, wine-poached pears share that warm, cinnamon-spiced vibe with the cookies.
Top Mistakes to Avoid
- Mistake: Using melted coconut oil. This will create a greasy, overly soft dough that spreads way too much in the oven, resulting in flat, misshapen cookies instead of crisp-edged, defined shapes.
- Mistake: Skipping the chilling time. I know it’s tempting to rush, but this step is crucial. Warm dough spreads rapidly, and your beautiful gingerbread men will turn into gingerbread blobs. Patience is key here.
- Mistake: Over-baking the cookies. They continue to cook on the hot baking sheet after you take them out. If you wait for them to look fully firm in the center, they’ll be hard and crisp once cooled. You want them slightly soft when they come out.
- Mistake: Rolling the dough too thin or too thick. A 1/4-inch thickness is the sweet spot. Too thin, and they’ll burn; too thick, and they won’t cook through properly and will be doughy in the middle.
Expert Tips
- Tip: Use a bench scraper for easy transfer. After you cut your shapes, slide a thin bench scraper or spatula underneath to lift them onto the baking sheet. It prevents them from stretching or tearing in your fingers.
- Tip: Re-chill your dough scraps. After you’ve rolled and cut the first batch, the scraps will be warm and soft. Ball them up, re-wrap them, and pop them back in the fridge for 10-15 minutes before re-rolling for the cleanest cuts.
- Tip: Add a flavor boost with orange zest. The zest of one orange mixed into the wet ingredients adds a beautiful, bright citrus note that cuts through the richness and makes the spices pop even more.
- Tip: For a shiny finish, brush with milk. Before baking, you can lightly brush the cookies with a bit of plant-based milk or an egg wash. This gives them a slightly glossier, more professional-looking finish straight from the oven.
FAQs
Can I make these cookies vegan?
Absolutely! For an egg-free version, you can use a “flax egg.” Simply mix 1 tablespoon of ground flaxseed with 3 tablespoons of warm water and let it sit for 5-10 minutes until it becomes gel-like. Use this in place of the egg. The texture might be a *tiny* bit more crumbly, but they’ll still be delicious and hold their shape well.
How should I store these gingerbread cookies?
Once completely cooled, store them in an airtight container at room temperature. They’ll stay soft and chewy for about 5 days. If you stack them, I’d recommend placing a piece of parchment paper between layers to prevent them from potentially sticking together, especially if your kitchen is warm.
Can I freeze the dough or the baked cookies?
You can do both! The dough discs freeze beautifully for up to 3 months; just thaw in the fridge overnight before rolling. Baked cookies also freeze well for 2-3 months in a freezer-safe bag or container. Let them come to room temperature before serving—they’ll taste freshly baked.
My dough is too sticky to roll. What did I do wrong?
This usually means it needed more chilling time. Pop it back in the fridge for another 30-60 minutes. Also, make sure you’re using enough flour on your rolling surface and pin. Don’t be shy with it—just dust off the excess before baking.
Can I decorate these healthy gingerbread cookies?
Of course! A simple icing made from powdered sugar (or a sugar-free alternative like powdered erythritol) and a little milk or lemon juice works perfectly. You can also just sprinkle them with a little coarse sugar before baking for a sparkly, crunchy top.

Healthy Gingerbread Cookies
Bake the best Healthy Gingerbread Cookies with whole wheat flour and natural sweeteners. This easy recipe delivers soft, chewy, and festive cookies. Get the recipe now!
Ingredients
For the Ingredients
-
240 g whole wheat pastry flour
-
1 tsp baking soda
-
1.5 tsp ground ginger
-
1 tsp ground cinnamon
-
0.25 tsp ground cloves
-
0.25 tsp salt
-
80 ml coconut oil (solid but soft)
-
80 ml pure maple syrup
-
1 large egg (at room temperature)
-
1 tsp pure vanilla extract
-
2 tbsp unsulphured molasses
Instructions
-
First, let's whisk together all our dry ingredients. In a medium bowl, add the whole wheat pastry flour, baking soda, ginger, cinnamon, cloves, and salt. Give this a good whisk for about 30 seconds. You’ll notice the spices becoming evenly distributed, and you’ll get a lovely whiff of that holiday aroma already. This ensures there are no clumps of baking soda or spice in your final dough, which is key for an even bake.01
-
Now, in a larger bowl, we'll cream the wet ingredients. Add the soft (but not melted!) coconut oil and the maple syrup. Using a hand mixer or a good strong whisk, beat them together for a minute or two until they’re well combined and look a little paler and fluffier. Then, beat in the egg, vanilla extract, and molasses. The mixture might look a little separated at first—that's totally normal, just keep mixing until it's smooth.02
-
Time to bring it all together. Gradually add the dry ingredients to the wet mixture, mixing on low speed or stirring with a spatula until just combined. You’ll see a thick, sticky dough forming. The trick is to stop mixing the moment you no longer see dry flour streaks. Over-mixing can make the cookies tough.03
-
This is the most important step for perfect shapes! Divide the dough in half, shape each half into a disc, and wrap them tightly in plastic wrap. You absolutely must chill this dough for at least 2 hours, or even overnight. The dough will firm up significantly, making it much easier to roll out without sticking terribly.04
-
When you're ready to bake, preheat your oven to 350°F (175°C) and line your baking sheets with parchment paper. Take one disc of dough out of the fridge. Lightly flour your surface and rolling pin. Roll the dough out to about a 1/4-inch thickness. If it cracks, let it sit for 5 minutes to warm up slightly.05
-
Now for the fun part! Dip your cookie cutters in a little flour to prevent sticking, then press them firmly into the dough. Carefully transfer the shapes to your prepared baking sheet, leaving about an inch between them as they will spread just a little. Re-roll the scraps and keep cutting until you've used all the dough.06
-
Bake for 8 to 10 minutes. The cookies are done when the edges are just set and the centers still look slightly soft. They will firm up as they cool. Honestly, it's better to under-bake them slightly than over-bake them if you want that soft, chewy texture. Let them cool on the baking sheet for 5 minutes before moving them to a wire rack to cool completely.07