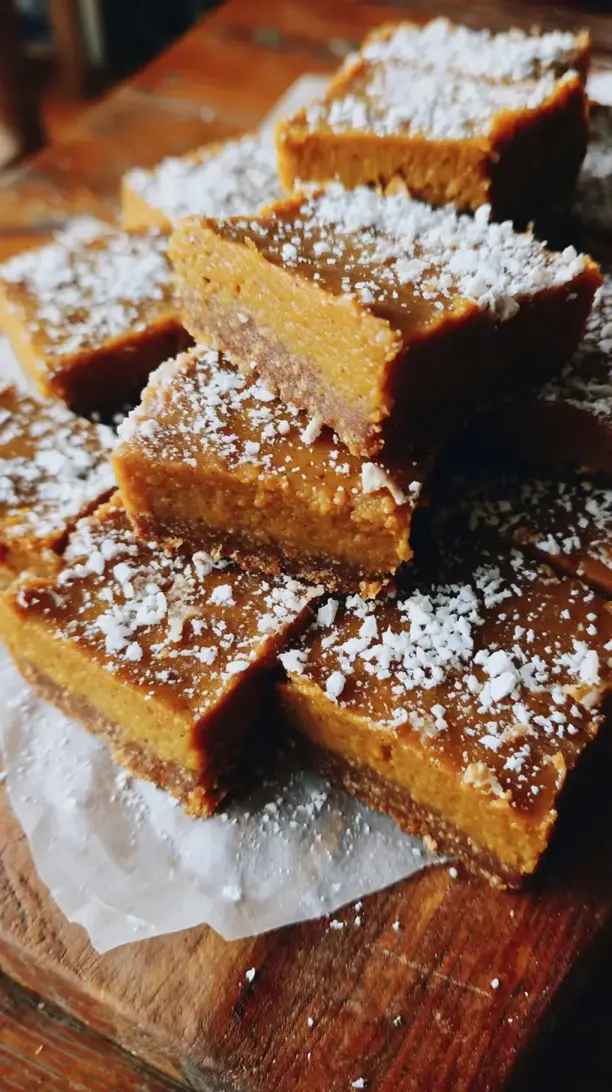
Why You’ll Love This Healthy Chocolate Fudge
- It’s incredibly simple. Honestly, if you can stir ingredients together in a bowl, you can make this fudge. There’s no cooking, no complicated steps—just mix, set, and slice.
- It feels indulgent without the guilt. The rich chocolate flavor and creamy texture will totally satisfy your sweet tooth, but it’s made with wholesome ingredients like almond butter and natural sweeteners.
- It’s wonderfully customizable. You can easily swap the nut butter, add a pinch of sea salt on top, or mix in some chopped nuts or dried fruit for a little texture variation.
- It stores beautifully. This fudge keeps for weeks in the freezer, meaning you always have a ready-made, healthy dessert or snack on hand for when cravings strike.
Ingredients & Tools
- 1 cup smooth almond butter (or cashew butter)
- 1/2 cup coconut oil, softened
- 1/2 cup cocoa powder (unsweetened)
- 1/4 cup maple syrup (or raw honey)
- 1 tsp pure vanilla extract
- 1/4 tsp sea salt (plus more for topping)
Tools: 8×8 inch baking pan, parchment paper, medium mixing bowl, whisk or spatula
The quality of your almond butter and cocoa powder really makes a difference here—since there are so few ingredients, each one shines. Using a good, runny almond butter helps everything blend smoothly, and a high-quality cocoa powder gives that deep, chocolatey aroma we’re after.
Nutrition (per serving)
- Calories: 145 kcal
- Protein: 3 g
- Fat: 12 g
- Carbohydrates: 8 g
- Fiber: 2 g
Serves: 16 | Prep Time: 10 min | Chill Time: 1 hour | Total Time: 1 hour 10 min
Before You Start: Tips & Ingredient Notes
- Get your coconut oil right. It should be soft but not completely melted. If it’s solid, give it a gentle warm-up; if it’s liquid, let it cool a bit. This ensures the fudge sets with the perfect firm-yet-creamy texture.
- Choose your nut butter wisely. A natural, drippy almond or cashew butter works best. Avoid the super thick or dry kinds, as they can make the mixture difficult to blend and result in a grainy fudge.
- Don’t skip the salt. That little bit of sea salt doesn’t just enhance the chocolate flavor—it balances the sweetness and makes the whole thing taste more complex and, well, gourmet.
- Line your pan properly. Using parchment paper with a little overhang on two sides is a game-changer. It makes lifting the whole slab of fudge out so much easier for clean, neat slicing.
How to Make Healthy Chocolate Fudge
Step 1: First, line your 8×8 inch baking pan with parchment paper. You want a little overhang on two opposite sides—this will act as your handles to lift the fudge out later. It makes the whole process so much cleaner. Give yourself that help, trust me.
Step 2: In a medium mixing bowl, combine the softened coconut oil and smooth almond butter. If your coconut oil is very solid, you can gently warm it for a few seconds until it’s soft and stir-able, but not hot. Whisk them together until the mixture is completely smooth and well-blended. You’re looking for a uniform, creamy base here.
Step 3: Now, sift in the cocoa powder. Sifting is worth the extra minute—it prevents any lumps and ensures your fudge will be perfectly silky. Add the maple syrup, vanilla extract, and sea salt. Whisk everything vigorously until it’s thick, glossy, and all the cocoa is fully incorporated. The mixture should look like a rich, dark chocolate batter.
Step 4: Pour the fudge mixture into your prepared pan. Use a spatula to spread it into an even layer, making sure to get into the corners. If you like, now is the time to sprinkle a little extra flaky sea salt over the top for a beautiful finish and a flavor pop.
Step 5: Carefully transfer the pan to the freezer. Let it set for at least one hour, or until it’s completely firm to the touch. The freezer gives it a perfect, sliceable texture that’s just firm enough without being rock-hard.
Step 6: Once set, use the parchment paper handles to lift the entire slab of fudge out of the pan. Place it on a cutting board. Using a sharp knife, slice it into 16 squares (or 32 smaller bites, if you prefer). For clean cuts, you can wipe the knife blade between slices.
Step 7: Your Healthy Chocolate Fudge is ready to enjoy! Store any leftovers in an airtight container in the freezer. It’s best kept frozen to maintain its ideal texture. It’s delicious straight from the freezer—it has a cool, firm bite that slowly melts in your mouth.
Serving Suggestions
Complementary Dishes
- A small bowl of fresh berries — The bright, tart burst of raspberries or strawberries provides a lovely contrast to the rich, creamy chocolate.
- A dollop of coconut whipped cream — It adds a light, airy texture and a touch of extra indulgence that feels truly special.
- A handful of toasted nuts — The crunch of almonds or pecans alongside the smooth fudge creates a wonderful play of textures.
Drinks
- A glass of cold almond milk — Its mild, nutty flavor complements the fudge beautifully without overpowering it.
- A hot cup of peppermint tea — The cool, minty notes are a classic pairing with dark chocolate and make the whole experience feel refreshing.
- A small shot of espresso — The bitterness of the coffee highlights the deep cocoa notes and cuts through the richness perfectly.
Something Sweet
- Frozen banana “nice” cream — Its creamy, ice-cream-like texture and natural sweetness make it a fantastic, healthy partner for the fudge.
- A few dried apricots — Their chewy texture and tangy-sweet flavor provide a lovely, fruity counterpoint to the chocolate.
- A simple orange segment — The citrusy zing is a surprising and delightful pairing that makes the chocolate taste even deeper.
Top Mistakes to Avoid
- Using hard, cold coconut oil. If your oil is solid and chunky, it won’t blend smoothly with the other ingredients, leading to a greasy, separated fudge. Make sure it’s soft and stir-able.
- Overheating the mixture. If you melt the coconut oil until it’s hot and then mix it, it can cause the nut butter to separate and give you an oily texture. Gentle warmth is the key.
- Not using parchment paper. Trying to slice fudge directly in the pan is a nightmare—you’ll end up with messy, crumbly edges. The parchment lift-out method is non-negotiable for pretty squares.
- Rushing the freezing time. If you try to slice it before it’s fully set, the fudge will be too soft and smear. Be patient—let the freezer do its work for a full hour.
Expert Tips
- Tip: For super creamy fudge, use a high-speed blender. If you want an ultra-silky, mousse-like texture, blend all the ingredients for about 30 seconds instead of whisking. It incorporates more air and makes it incredibly smooth.
- Tip: Toast your nut butter first. If you have the time, gently warming your almond butter in a pan for a few minutes before using it will deepen its nutty flavor and make the whole fudge taste more complex.
- Tip: Add mix-ins after blending. If you’re including chopped nuts, cacao nibs, or dried fruit, fold them in with a spatula right before you pour the mixture into the pan. This ensures they’re evenly distributed without being pulverized.
- Tip: Use an ice bath for quick softening. If your coconut oil is rock solid, place the jar in a bowl of warm (not hot) water for 5-10 minutes. It will soften perfectly without melting and disrupting the emulsion.
FAQs
Can I use a different nut butter?
Absolutely! Cashew butter will give you an even creamier, milder flavor, while peanut butter will make a delicious peanut butter cup-style fudge. Just make sure whatever you use is natural and stir-able, without any added sugars or hard fats. The consistency of the butter is key to the final texture of your fudge, so a drippy, oily one is actually what you want here.
Why is my fudge oily or separated?
This usually happens if the coconut oil was too hot when you mixed it, or if your nut butter was too cold, causing the fats to separate. To fix it, you can gently re-whisk the mixture and sometimes it will come back together. For next time, just ensure all your ingredients are at a similar, cool room temperature before combining.
Can I sweeten this with a sugar-free syrup?
You can, but the texture might change slightly. Liquid stevia or monk fruit syrups work, but because they contain more water than maple syrup, your fudge might be a little softer. You might need to reduce the amount slightly and add a tablespoon of almond flour to help it firm up properly in the freezer.
How long does this fudge keep?
Stored in an airtight container in the freezer, it will keep beautifully for up to 2 months. It doesn’t freeze solid like an ice cube; it stays firm but sliceable. I don’t recommend storing it in the fridge for more than a day or two, as it can become too soft and lose its perfect fudge-like consistency.
My fudge is too soft, what did I do wrong?
This is typically a ratio issue. If you used a nut butter with a lot of added oil, or if your measurements were a bit off, it can affect the setting power. You can try re-melting the mixture and adding another tablespoon of cocoa powder to help it firm up. Also, double-check that you used 1/2 cup of coconut oil—it’s the main structuring agent here.

Healthy Chocolate Fudge
Make this easy Healthy Chocolate Fudge with just 5 ingredients and no baking required. A rich, naturally sweetened treat ready in minutes. Get the recipe now!
Ingredients
For the fudge:
-
1 cup smooth almond butter (or cashew butter)
-
1/2 cup coconut oil (softened)
-
1/2 cup cocoa powder (unsweetened)
-
1/4 cup maple syrup (or raw honey)
-
1 tsp pure vanilla extract
-
1/4 tsp sea salt (plus more for topping)
Instructions
-
First, line your 8x8 inch baking pan with parchment paper. You want a little overhang on two opposite sides—this will act as your handles to lift the fudge out later. It makes the whole process so much cleaner. Give yourself that help, trust me.01
-
In a medium mixing bowl, combine the softened coconut oil and smooth almond butter. If your coconut oil is very solid, you can gently warm it for a few seconds until it’s soft and stir-able, but not hot. Whisk them together until the mixture is completely smooth and well-blended. You’re looking for a uniform, creamy base here.02
-
Now, sift in the cocoa powder. Sifting is worth the extra minute—it prevents any lumps and ensures your fudge will be perfectly silky. Add the maple syrup, vanilla extract, and sea salt. Whisk everything vigorously until it’s thick, glossy, and all the cocoa is fully incorporated. The mixture should look like a rich, dark chocolate batter.03
-
Pour the fudge mixture into your prepared pan. Use a spatula to spread it into an even layer, making sure to get into the corners. If you like, now is the time to sprinkle a little extra flaky sea salt over the top for a beautiful finish and a flavor pop.04
-
Carefully transfer the pan to the freezer. Let it set for at least one hour, or until it’s completely firm to the touch. The freezer gives it a perfect, sliceable texture that’s just firm enough without being rock-hard.05
-
Once set, use the parchment paper handles to lift the entire slab of fudge out of the pan. Place it on a cutting board. Using a sharp knife, slice it into 16 squares (or 32 smaller bites, if you prefer). For clean cuts, you can wipe the knife blade between slices.06
-
Your Healthy Chocolate Fudge is ready to enjoy! Store any leftovers in an airtight container in the freezer. It’s best kept frozen to maintain its ideal texture. It’s delicious straight from the freezer—it has a cool, firm bite that slowly melts in your mouth.07