Why You’ll Love This Hazelnut Chocolate Dipped Cookies
- That perfect texture contrast. You get a sandy, melt-in-your-mouth cookie base against the crisp snap of the dark chocolate coating. It’s a textural dream come true.
- Deep, toasty flavor. By toasting the hazelnuts and then grinding them right into the dough, you’re locking in an incredible, warm nuttiness that store-bought versions just can’t match.
- They look professionally made. Dipping just half of each cookie in chocolate is such a simple trick, but it makes them look so elegant and bakery-worthy. No one needs to know how easy it really was.
- Incredibly versatile. These cookies are fantastic on their own, but they also pair beautifully with so many things—a cup of tea, a scoop of ice cream, or even a glass of dessert wine.
Ingredients & Tools
- 150 g raw hazelnuts
- 200 g all-purpose flour
- 115 g unsalted butter, at room temperature
- 100 g granulated sugar
- 1 large egg yolk
- 1 tsp vanilla extract
- ¼ tsp fine sea salt
- 150 g good-quality dark chocolate (around 70%), finely chopped
- 1 tbsp coconut oil or vegetable shortening
Tools: Baking sheets, parchment paper, food processor, stand mixer or hand mixer (optional), small heatproof bowl, cooling rack.
Using room-temperature butter is non-negotiable here—it creams with the sugar to create the airy structure that gives these cookies their lovely texture. And don’t skip the salt; it really makes the nut and chocolate flavors pop.
Nutrition (per serving)
- Calories: 180 kcal
- Protein: 2 g
- Fat: 11 g
- Carbohydrates: 18 g
- Fiber: 1 g
Serves: 18 | Prep Time: 25 minutes | Cook Time: 12 minutes | Total Time: 1 hour 15 minutes (includes cooling)
Before You Start: Tips & Ingredient Notes
- Why toast the hazelnuts? Toasting is what transforms hazelnuts from mild and soft to deeply aromatic and crunchy. It releases their natural oils and gives the entire cookie a much more complex, nutty backbone. You’ll know they’re done when they’re golden and the skins are starting to flake off.
- Can I use a different nut? You absolutely can, though the flavor profile will change. Almonds would work beautifully for a more subtle taste. Just avoid walnuts or pecans, as their higher moisture content can alter the cookie’s texture.
- What’s the deal with the coconut oil in the chocolate? This is my little secret for a perfectly thin, snappy chocolate coating. It helps the melted chocolate flow smoothly and set with a beautiful glossy finish, preventing it from being too thick and clumpy.
- Is creaming the butter and sugar really that important? Honestly, yes. This isn’t just mixing; it’s about incorporating tiny air bubbles that will help leaven your cookies. You’re looking for a mixture that is pale, light, and fluffy—this usually takes a good 2-3 minutes of beating.
How to Make Hazelnut Chocolate Dipped Cookies
Step 1: Start by toasting your hazelnuts. Spread them in a single layer on a baking sheet and pop them into a preheated 175°C (350°F) oven for 8-10 minutes. You’ll know they’re ready when they’re fragrant and the skins have darkened and started to crack. Let them cool for a few minutes, then transfer them to a clean kitchen towel. Rub them vigorously—the towel will help remove most of the bitter skins. Don’t worry about getting every last bit; a few specks are fine.
Step 2: In your food processor, combine the skinned, toasted hazelnuts with the flour. Pulse until the nuts are finely ground and the mixture has a sandy consistency. Be careful not to over-process, or you’ll start to make hazelnut butter! This step is what gives the cookie its uniquely nutty flavor throughout, not just from chunks.
Step 3: In a mixing bowl, use an electric mixer or a sturdy whisk to cream the room-temperature butter and sugar together. You want to beat it for a solid 2-3 minutes until it’s noticeably lighter in color and fluffy. This is the foundation for a tender cookie. Now, beat in the egg yolk and vanilla extract until everything is well combined and smooth.
Step 4: Add your hazelnut-flour mixture and the salt to the wet ingredients. Switch to a spatula or wooden spoon and mix just until a soft dough comes together. It might seem a bit crumbly at first, but it will hold together when you press it. Avoid overmixing at this stage to keep the texture delicate.
Step 5: Turn the dough out onto a lightly floured surface and gently shape it into a log about 5 cm (2 inches) in diameter. Wrap it tightly in plastic wrap and chill it in the refrigerator for at least 30 minutes. This firms up the butter, which prevents the cookies from spreading too much and makes them easier to slice neatly.
Step 6: Preheat your oven to 175°C (350°F) and line your baking sheets with parchment paper. Remove the chilled dough log and use a sharp knife to slice it into rounds just shy of 1 cm thick. If the dough cracks, let it sit at room temperature for 5 minutes. Place the rounds on your prepared sheets, leaving about 2 cm between them as they will spread slightly.
Step 7: Bake for 10-12 minutes, or until the edges are just beginning to turn a light golden brown. The centers might still look a little soft—that’s perfect. Let them cool on the baking sheet for 5 minutes before transferring them to a wire rack to cool completely. They will firm up as they cool.
Step 8: Once the cookies are completely cool, it’s time for the chocolate. Place the chopped chocolate and coconut oil in a heatproof bowl set over a pan of barely simmering water (a double boiler), making sure the bottom of the bowl doesn’t touch the water. Stir gently until completely melted and smooth. Alternatively, you can microwave in 20-second bursts, stirring between each.
Step 9: Carefully dip each cookie halfway into the melted chocolate, letting the excess drip back into the bowl. You can use a spoon to help spread the chocolate evenly over the half. Place the dipped cookies back onto the parchment-lined rack. For a final flourish, you can sprinkle a few extra chopped hazelnuts on the wet chocolate before it sets.
Step 10: Allow the chocolate to set completely at room temperature. If you’re in a hurry, you can speed this up by placing the rack in the refrigerator for about 10 minutes. The chocolate should be firm and glossy to the touch. Then, they’re ready to serve or store!
Serving Suggestions
Complementary Dishes
- A simple vanilla bean ice cream — The cold, creamy sweetness is a fantastic contrast to the nutty, crisp cookie. Let a cookie half melt slightly into a scoop for the ultimate bite.
- A cheeseboard with soft brie and pear slices — The saltiness of the cheese and the sweetness of the pear highlight the sophisticated nutty notes in the cookie, making for a lovely end to a meal.
- Orange and fennel salad — This might sound unusual, but the bright, citrusy notes and subtle anise flavor cut through the richness beautifully, cleansing the palate between bites.
Drinks
- A rich espresso or strong black coffee — The bitterness of the coffee is a classic partner for dark chocolate and really makes the hazelnut flavor sing.
- A glass of Amaretto or Frangelico on the rocks — Going all-in on the nutty theme, these liqueurs mirror and amplify the hazelnut essence in the most delightful way.
- Earl Grey tea — The bergamot in the tea provides a fragrant, citrusy backdrop that complements the chocolate without overpowering it.
Something Sweet
- Raspberry sorbet — The sharp, fruity tang of the raspberries is a brilliant counterpoint to the deep, rich chocolate and nuts, creating a perfectly balanced dessert duo.
- Dried apricots and a piece of dark chocolate — For a simple, no-fuss pairing, the chewy, tart fruit alongside more chocolate enhances the gourmet feel.
- Honey-sweetened Greek yogurt — For a lighter option, the tangy yogurt and floral honey make the cookies feel like a slightly more virtuous treat.
Top Mistakes to Avoid
- Mistake: Using warm cookies for dipping. If the cookies are even slightly warm, the chocolate will melt into a messy, unappealing puddle instead of setting into a clean, crisp shell. Patience is key here.
- Mistake: Over-processing the hazelnut and flour mixture. If you run the food processor for too long, the natural oils from the nuts will release and you’ll end up with a greasy, dense dough instead of a light, crumbly one.
- Mistake: Slicing the dough log when it’s rock hard. If the dough is too cold from the fridge, it can crumble when you try to slice it. Let it sit on the counter for five minutes to become just sliceable.
- Mistake: Baking on a warm baking sheet. Always use a cool baking sheet for each batch. Putting dough onto a hot sheet will cause the butter to melt prematurely, leading to cookies that spread too much.
Expert Tips
- Tip: Weigh your ingredients. For baking, especially with cookies where texture is paramount, using a kitchen scale is a game-changer. It’s far more accurate than cup measurements and ensures perfect results every single time.
- Tip: Roll the dough log in coarse sugar before chilling. For an extra bit of sparkle and crunch, roll your shaped dough log in some demerara or turbinado sugar before you wrap and chill it. It gives the baked cookie edges a lovely, sugary crust.
- Tip: Use a comb for a decorative chocolate finish. After dipping, drag the tines of a fork through the wet chocolate to create beautiful wavy lines. It looks incredibly professional and is so easy to do.
- Tip: Freeze the dough log for future baking. This dough freezes beautifully. Wrap the log tightly in a couple layers of plastic wrap and it will keep for up to 3 months. You can slice and bake frozen cookies straight from the freezer, just add a minute or two to the baking time.
FAQs
Can I make these cookies without a food processor?
You can, but it requires a bit more elbow grease. You’ll need to chop the toasted, skinned hazelnuts as finely as possible by hand with a sharp knife. Then, whisk them into the flour. The texture will be a bit more rustic with tiny nut pieces, which is also lovely, but you won’t get that uniform, sandy consistency throughout the dough.
How should I store these, and how long do they keep?
Store them in an airtight container at room temperature for up to 5 days. Place a sheet of parchment paper between layers to prevent the chocolate from sticking or scratching. They can also be frozen for up to 2 months; just thaw at room temperature. The chocolate might “bloom” (get a whitish coating) but it’s perfectly safe to eat and the taste is unaffected.
My chocolate is too thick for dipping. What can I do?
This is a common issue! Simply add a tiny bit more coconut oil or shortening, about half a teaspoon at a time, and stir until it reaches a dippable consistency. You’re looking for a texture that smoothly coats the back of a spoon. Be careful not to add too much, or the chocolate won’t set properly.
Can I use milk chocolate instead of dark?
Absolutely! Milk chocolate will give you a sweeter, creamier result. Just be aware that it can be a bit softer when set, so you might want to keep the dipped cookies refrigerated until you’re ready to serve them, especially on a warm day.
Why did my cookies spread too much?
This usually points to the butter being too warm. Perhaps your dough wasn’t chilled long enough, or your kitchen was very warm. Next time, ensure your dough log is firm to the touch before slicing, and always use a cool baking sheet. Also, double-check your oven temperature with a thermometer—an oven that runs too cool can cause spreading.
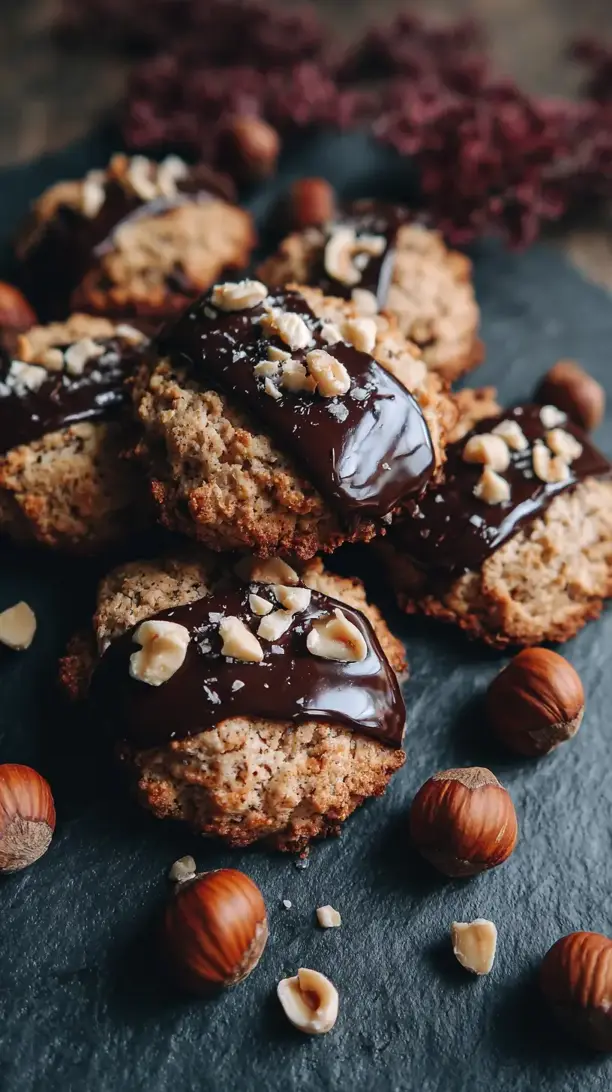
Hazelnut Chocolate Dipped Cookies
Make these irresistible Hazelnut Chocolate Dipped Cookies with a buttery shortbread base and rich chocolate coating. Perfect for gifting or a cozy treat. Get the recipe now!
Ingredients
For the Cookies:
-
150 g raw hazelnuts
-
200 g all-purpose flour
-
115 g unsalted butter (at room temperature)
-
100 g granulated sugar
-
1 large egg yolk
-
1 tsp vanilla extract
-
¼ tsp fine sea salt
For the Chocolate Coating:
-
150 g good-quality dark chocolate (around 70%, finely chopped)
-
1 tbsp coconut oil or vegetable shortening
Instructions
-
Start by toasting your hazelnuts. Spread them in a single layer on a baking sheet and pop them into a preheated 175°C (350°F) oven for 8-10 minutes. You'll know they're ready when they're fragrant and the skins have darkened and started to crack. Let them cool for a few minutes, then transfer them to a clean kitchen towel. Rub them vigorously—the towel will help remove most of the bitter skins. Don't worry about getting every last bit; a few specks are fine.01
-
In your food processor, combine the skinned, toasted hazelnuts with the flour. Pulse until the nuts are finely ground and the mixture has a sandy consistency. Be careful not to over-process, or you'll start to make hazelnut butter! This step is what gives the cookie its uniquely nutty flavor throughout, not just from chunks.02
-
In a mixing bowl, use an electric mixer or a sturdy whisk to cream the room-temperature butter and sugar together. You want to beat it for a solid 2-3 minutes until it's noticeably lighter in color and fluffy. This is the foundation for a tender cookie. Now, beat in the egg yolk and vanilla extract until everything is well combined and smooth.03
-
Add your hazelnut-flour mixture and the salt to the wet ingredients. Switch to a spatula or wooden spoon and mix just until a soft dough comes together. It might seem a bit crumbly at first, but it will hold together when you press it. Avoid overmixing at this stage to keep the texture delicate.04
-
Turn the dough out onto a lightly floured surface and gently shape it into a log about 5 cm (2 inches) in diameter. Wrap it tightly in plastic wrap and chill it in the refrigerator for at least 30 minutes. This firms up the butter, which prevents the cookies from spreading too much and makes them easier to slice neatly.05
-
Preheat your oven to 175°C (350°F) and line your baking sheets with parchment paper. Remove the chilled dough log and use a sharp knife to slice it into rounds just shy of 1 cm thick. If the dough cracks, let it sit at room temperature for 5 minutes. Place the rounds on your prepared sheets, leaving about 2 cm between them as they will spread slightly.06
-
Bake for 10-12 minutes, or until the edges are just beginning to turn a light golden brown. The centers might still look a little soft—that's perfect. Let them cool on the baking sheet for 5 minutes before transferring them to a wire rack to cool completely. They will firm up as they cool.07
-
Once the cookies are completely cool, it's time for the chocolate. Place the chopped chocolate and coconut oil in a heatproof bowl set over a pan of barely simmering water (a double boiler), making sure the bottom of the bowl doesn't touch the water. Stir gently until completely melted and smooth. Alternatively, you can microwave in 20-second bursts, stirring between each.08
-
Carefully dip each cookie halfway into the melted chocolate, letting the excess drip back into the bowl. You can use a spoon to help spread the chocolate evenly over the half. Place the dipped cookies back onto the parchment-lined rack. For a final flourish, you can sprinkle a few extra chopped hazelnuts on the wet chocolate before it sets.09
-
Allow the chocolate to set completely at room temperature. If you're in a hurry, you can speed this up by placing the rack in the refrigerator for about 10 minutes. The chocolate should be firm and glossy to the touch. Then, they're ready to serve or store!10