Perfectly cooked gluten-free shrimp is tender, juicy, and packed with flavor. This Gluten-Free Shrimp recipe uses a simple blend of gluten-free flours for a crispy, golden-brown crust that’s quick enough for a weeknight but impressive for guests. You won’t believe how delicious and easy it is.
Why You’ll Love This Gluten-Free Shrimp
- Incredibly Crispy Texture: Rice flour and cornstarch create a light, shatteringly crisp crust.
- Quick & Easy: Ready in about 20 minutes with straightforward steps.
- Naturally Gluten-Free: Full of flavor with a kick from paprika and garlic.
- Versatile for Any Meal: Great as a main, on salads, or as an appetizer.
Ingredients & Tools
- 450 g large raw shrimp, peeled and deveined (tails on or off)
- 120 g fine white rice flour
- 60 g cornstarch
- 1 tsp garlic powder
- 1 tsp smoked paprika
- 1/2 tsp onion powder
- 1/2 tsp salt, plus more for seasoning
- 1/4 tsp black pepper
- 1/4 tsp cayenne pepper (optional, for heat)
- 1 large egg
- 2 tbsp water or gluten-free beer
- 480 ml neutral oil for frying (like avocado, canola, or vegetable oil)
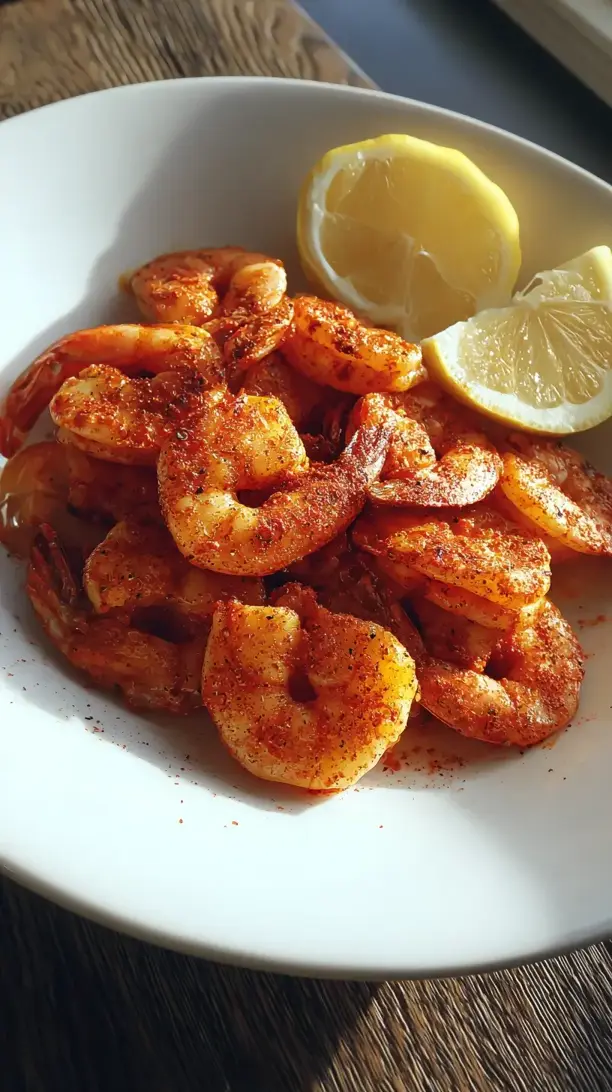
- 1 lemon, cut into wedges for serving
Tools: A large, heavy-bottomed pot or Dutch oven, a deep-fry or candy thermometer, a wire rack set over a baking sheet, tongs, and a few medium bowls.
Notes: Rice flour and cornstarch create signature crispiness without gluten. Use a neutral oil with a high smoke point and don’t skip the thermometer for perfect results.
Nutrition (per serving)
| Calories: | 320 kcal |
| Protein: | 24 g |
| Fat: | 14 g |
| Carbs: | 22 g |
| Fiber: | 1 g |
Serves: 3-4 | Prep Time: 10 minutes | Cook Time: 10 minutes | Total Time: 20 minutes
Before You Start: Tips & Ingredient Notes
- Pat Your Shrimp Dry. This is non-negotiable. Any excess moisture on the shrimp will create steam, which can make the coating soggy instead of crisp. Use paper towels and really press to get them as dry as possible.
- Why Rice Flour & Cornstarch? Rice flour gives a wonderfully crisp, slightly gritty texture that mimics traditional flour, while cornstarch provides an extra layer of crunch and helps the coating adhere. Together, they’re a gluten-free dream team.
- Check Your Spices. While most pure spices are naturally gluten-free, some pre-mixed blends can contain anti-caking agents with gluten. It’s always a good idea to double-check the labels if you’re highly sensitive.
- The Right Oil & Temperature. A neutral oil like avocado or canola won’t impart any off-flavors. And maintaining that oil temperature between 175-180°C is crucial. If it’s too low, the shrimp will be greasy; too high, and they’ll burn before cooking through.
How to Make Gluten-Free Shrimp
Step 1: First, prepare your shrimp. If they aren’t already, peel and devein them, leaving the tails on if you prefer for presentation. Now, take several paper towels and thoroughly pat the shrimp dry. I mean, really get in there—you want the surface to be completely moisture-free. This is the single most important step for a crispy crust. Season the shrimp lightly with a pinch of salt and set them aside while you prepare your coating stations.
Step 2: Let’s make the dredge. In a medium bowl, whisk together the rice flour, cornstarch, garlic powder, smoked paprika, onion powder, salt, black pepper, and cayenne (if using). Whisk it well so all the spices and flours are evenly distributed. You’ll notice the mixture is a lovely pale orange color and smells fantastic. In a separate, shallow bowl, whisk the egg with the 2 tablespoons of water (or gluten-free beer for extra flavor and lift) until it’s smooth and frothy.
Step 3: Now, set up your assembly line: shrimp, then egg wash, then flour mixture, and finally a clean plate or baking sheet for the coated shrimp. Working with one shrimp at a time, dip it fully into the egg wash, letting the excess drip off. Then, drop it into the flour mixture and toss to coat thoroughly. Press the coating on gently to make sure it adheres well. Place the finished shrimp on the clean plate. Repeat with all the shrimp.
Step 4: Time to heat the oil. Pour your neutral oil into a large, heavy-bottomed pot or Dutch oven—you want it to be about 3-4 cm deep. Attach your candy thermometer to the side of the pot. Heat the oil over medium-high heat until it reaches 175°C. This is the sweet spot. While it heats, set a wire rack over a baking sheet—this is for draining the cooked shrimp and will keep them crispy all around.
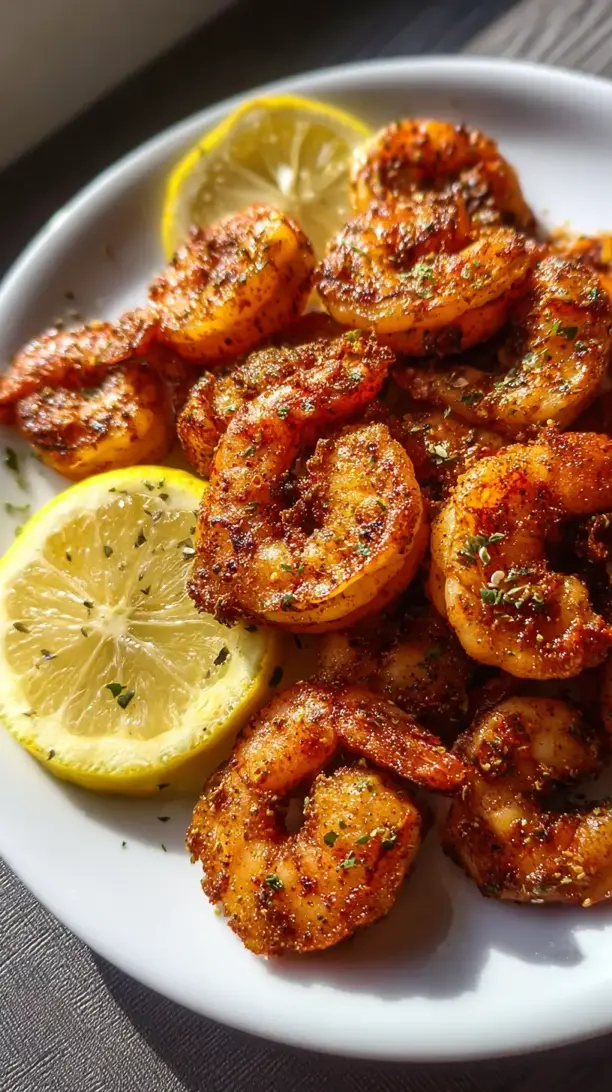
Step 5: Carefully lower a few shrimp into the hot oil using tongs. Don’t overcrowd the pot! You’ll probably need to fry in 2-3 batches. The shrimp should sizzle actively when they hit the oil. Fry for 2-3 minutes, turning once halfway through, until they are a deep golden brown and beautifully crisp. You can tell they’re done when they float and the coating looks set and crunchy.
Step 6: Use your tongs to transfer the cooked shrimp to the wire rack to drain. Let the oil temperature come back up to 175°C before adding the next batch. This ensures every single shrimp is perfectly fried. Once all the shrimp are done, give them a very light sprinkle of salt while they’re still hot. Serve immediately with lemon wedges for squeezing over the top.
Storage & Freshness Guide
- Fridge: Store leftovers in an airtight container for up to 2 days.
- Freezer: Freeze on a baking sheet, then transfer to a bag for up to 1 month.
- Reviving: Re-crisp in a 190°C oven for 5–8 minutes; avoid the microwave.
Serving Suggestions
Complementary Dishes
- Zesty Slaw — The cool, creamy crunch of a vinegar-based slaw provides a fantastic textural and temperature contrast to the hot, crispy shrimp.
- Garlicky Sautéed Greens — Something like kale or spinach quickly wilted with garlic adds a savory, healthy element that balances the meal beautifully.
- Crispy Oven Fries — You can’t go wrong with more crunch! A side of baked potato or sweet potato fries makes this feel like a real treat.
Drinks
- Chilled Sauvignon Blanc — Its crisp, citrusy notes cut through the richness of the fried shrimp and cleanse the palate perfectly between bites.
- Sparkling Water with Lemon — For a non-alcoholic option, the bubbles and acidity are incredibly refreshing and highlight the lemon served with the shrimp.
- Light Lager — A crisp, gluten-free lager is a classic pairing for fried seafood, offering a clean, bubbly counterpoint.
Something Sweet
- Lemon Sorbet — A scoop of bright, tart sorbet is the perfect palate-cleansing finish that continues the citrus theme from the main course.
- Fresh Berry Salad — A simple mix of berries with a hint of mint and a drizzle of honey feels light and satisfying after a savory meal.
- Flourless Chocolate Cake — For a truly decadent end, a rich, fudgy gluten-free chocolate cake is always a crowd-pleaser.
Top Mistakes to Avoid
- Mistake: Overcrowding the Pot. Adding too many shrimp at once causes the oil temperature to plummet. This results in greasy, soggy shrimp instead of light and crispy ones. Patience is key—fry in small batches.
- Mistake: Skipping the Drying Step. I’ve messed this up before too… if the shrimp are wet, the coating will slide right off and you’ll end up with a gloopy mess in your oil. Dry shrimp are happy shrimp.
- Mistake: Not Letting the Oil Reheat. After each batch, give the oil a minute to return to the proper temperature. If you don’t, the second batch will absorb more oil and won’t be as crisp.
- Mistake: Using the Wrong Flour. Don’t try to substitute the rice flour with a single all-purpose gluten-free blend. The specific combo of rice flour and cornstarch is what creates the ideal texture.
Expert Tips
- Tip: For an extra-craggy, pub-style crust, dip the shrimp in the egg wash, then the flour, then back in the egg wash, and finally back in the flour for a double coating. It creates amazing layers of crunch.
- Tip: If you don’t have a thermometer, test the oil with a small piece of bread or a drop of batter. It should sizzle vigorously and turn golden brown in about 30-45 seconds when the oil is ready.
- Tip: To keep the first batch warm while you finish frying, place them on the wire rack in a single layer in a 95°C oven. This keeps them crisp far better than stacking them on a plate.
- Tip: For a flavor twist, add a tablespoon of Old Bay seasoning or grated Parmesan cheese (ensure it’s gluten-free) to the flour mixture. It adds a whole new dimension.
FAQs
Can I bake this gluten-free shrimp instead of frying?
You can, but the texture will be different. For a baked version, arrange the coated shrimp on a wire rack set over a baking sheet, spray generously with cooking spray, and bake at 220°C for 8-10 minutes, flipping halfway. They’ll be more like a firm, oven-baked texture rather than a shatteringly crisp fry. It’s a great healthier alternative, but for that classic crunch, frying is the way to go.
What’s the best dipping sauce for this?
Oh, the possibilities! A classic cocktail sauce is always a winner. For something creamy, a simple sriracha mayo (mix mayo with sriracha and a squeeze of lime) is fantastic. Tartar sauce is another classic choice—just be sure to use a gluten-free brand or make your own. Honestly, a squeeze of fresh lemon is often all you need.
Can I use frozen shrimp?
Absolutely. Just make sure to thaw them completely in the refrigerator overnight first. Then, pat them extra, extra dry, as frozen shrimp tend to release more water. Do not thaw them in warm water or the microwave, as this can make the texture mushy.
How do I store and reheat leftovers?
Leftovers are best stored in an airtight container in the fridge for up to 2 days. To reheat, do not use the microwave—it will make them soft and rubbery. Instead, spread them on a baking sheet and re-crisp them in a 190°C oven for 5-8 minutes until hot and crispy again.
Is this recipe suitable for other seafood?
Definitely! This same coating and method works wonderfully for thin white fish fillets (like cod or tilapia), scallops, or even calamari rings. Just adjust the cooking time accordingly—delicate scallops will cook in just a minute or two, while a thicker piece of fish might take a bit longer.

Gluten Free Shrimp
Make perfectly crispy Gluten-Free Shrimp with this easy 20-minute recipe. A light, golden crust with tender, juicy shrimp inside. Get the foolproof recipe now!
Ingredients
For the Shrimp
-
450 g large raw shrimp (peeled and deveined (tails on or off))
-
1 lemon (cut into wedges for serving)
For the Dredge
-
120 g fine white rice flour
-
60 g cornstarch
-
1 tsp garlic powder
-
1 tsp smoked paprika
-
1/2 tsp onion powder
-
1/2 tsp salt (plus more for seasoning)
-
1/4 tsp black pepper
-
1/4 tsp cayenne pepper (optional, for heat)
For the Egg Wash
-
1 large egg
-
2 tbsp water or gluten-free beer
For Frying
-
480 ml neutral oil for frying (like avocado, canola, or vegetable oil)
Instructions
-
First, prepare your shrimp. If they aren’t already, peel and devein them, leaving the tails on if you prefer for presentation. Now, take several paper towels and thoroughly pat the shrimp dry. I mean, really get in there—you want the surface to be completely moisture-free. This is the single most important step for a crispy crust. Season the shrimp lightly with a pinch of salt and set them aside while you prepare your coating stations.01
-
Let’s make the dredge. In a medium bowl, whisk together the rice flour, cornstarch, garlic powder, smoked paprika, onion powder, salt, black pepper, and cayenne (if using). Whisk it well so all the spices and flours are evenly distributed. You’ll notice the mixture is a lovely pale orange color and smells fantastic. In a separate, shallow bowl, whisk the egg with the 2 tablespoons of water (or gluten-free beer for extra flavor and lift) until it’s smooth and frothy.02
-
Now, set up your assembly line: shrimp, then egg wash, then flour mixture, and finally a clean plate or baking sheet for the coated shrimp. Working with one shrimp at a time, dip it fully into the egg wash, letting the excess drip off. Then, drop it into the flour mixture and toss to coat thoroughly. Press the coating on gently to make sure it adheres well. Place the finished shrimp on the clean plate. Repeat with all the shrimp.03
-
Time to heat the oil. Pour your neutral oil into a large, heavy-bottomed pot or Dutch oven—you want it to be about 3-4 cm deep. Attach your candy thermometer to the side of the pot. Heat the oil over medium-high heat until it reaches 175°C. This is the sweet spot. While it heats, set a wire rack over a baking sheet—this is for draining the cooked shrimp and will keep them crispy all around.04
-
Carefully lower a few shrimp into the hot oil using tongs. Don’t overcrowd the pot! You’ll probably need to fry in 2-3 batches. The shrimp should sizzle actively when they hit the oil. Fry for 2-3 minutes, turning once halfway through, until they are a deep golden brown and beautifully crisp. You can tell they’re done when they float and the coating looks set and crunchy.05
-
Use your tongs to transfer the cooked shrimp to the wire rack to drain. Let the oil temperature come back up to 175°C before adding the next batch. This ensures every single shrimp is perfectly fried. Once all the shrimp are done, give them a very light sprinkle of salt while they’re still hot. Serve immediately with lemon wedges for squeezing over the top.06