Why You’ll Love This Gluten-Free Chocolate Crinkle Cookies
- Incredibly Fudgy Texture. These cookies have a rich, brownie-like center that stays wonderfully soft and chewy for days. The combination of melted chocolate and a touch of oil creates a melt-in-your-mouth experience that’s pure bliss.
- Perfect, Dramatic Crinkles Every Time. The trick is all in the chilling and the generous roll in powdered sugar. You’ll get that beautiful, snow-capped, cracked-top look that makes these cookies so iconic and visually stunning on any cookie platter.
- Surprisingly Simple to Make. Honestly, there’s no fancy equipment needed here. It’s a straightforward dough that comes together in one bowl. The most challenging part is waiting for the dough to chill, but I promise it’s worth it.
- Gluten-Free Without Compromise. You really won’t miss the wheat flour here. The blend we use creates a tender, delicate crumb that holds together beautifully, with no odd aftertastes or strange textures—just pure chocolate indulgence.
Ingredients & Tools
- 150 g high-quality dark chocolate (60-70%), chopped
- 60 ml neutral oil (like avocado or light olive oil)
- 200 g granulated sugar
- 2 large eggs, at room temperature
- 1 tsp pure vanilla extract
- 125 g gluten-free all-purpose flour blend (with xanthan gum)
- 35 g unsweetened cocoa powder (Dutch-processed preferred)
- 1 tsp baking powder
- 1/4 tsp salt
- 100 g powdered sugar, for rolling
Tools: Medium heatproof bowl, saucepan for a double boiler (or microwave), whisk, spatula, baking sheets, parchment paper.
Using a good gluten-free flour blend is key here—look for one that includes xanthan gum, as it helps bind the cookies. And don’t skimp on the chocolate! Since it’s the star flavor, a high-quality bar you’d enjoy eating on its own will make all the difference in the world.
Nutrition (per serving)
- Calories: 145 kcal
- Protein: 2 g
- Fat: 6 g
- Carbohydrates: 23 g
- Fiber: 1 g
Serves: 24 | Prep Time: 15 min (+2 hours chilling) | Cook Time: 10 min | Total Time: 2 hours 25 min
Before You Start: Tips & Ingredient Notes
- Why room temperature eggs? They incorporate into the batter much more smoothly, creating a more homogenous dough that will bake up evenly. Cold eggs can cause the melted chocolate to seize up a little, and we don’t want that.
- Can I use a different gluten-free flour? I really recommend a 1:1 all-purpose blend for the best results. Blends with heavier flours like bean flours can impart a distinct taste and affect the delicate texture we’re after.
- What’s the deal with Dutch-processed cocoa? It’s treated with an alkali, which gives it a darker color and a smoother, less acidic chocolate flavor. It contributes to that deep, rich color and classic taste. In a pinch, natural cocoa will work, but the color and flavor will be slightly different.
- Is the chilling time really that important? Yes, a hundred times yes! Chilling the dough firms it up so the cookies don’t spread into flat puddles in the oven. It also allows the flour to fully hydrate, giving you a chewier, more flavorful cookie with those perfect cracks.
How to Make Gluten-Free Chocolate Crinkle Cookies
Step 1: Melt the Chocolate. Create a double boiler by placing a heatproof bowl over a saucepan with an inch of simmering water (make sure the bottom of the bowl doesn’t touch the water). Add your chopped chocolate and oil, stirring occasionally until the chocolate is completely melted and the mixture is smooth. Alternatively, you can do this in the microwave in 20-second bursts, stirring well between each. Let this mixture cool for about 10 minutes—you don’t want it so hot that it cooks the eggs in the next step.
Step 2: Combine the Wet Ingredients. Whisk the granulated sugar into the slightly cooled chocolate mixture. It might look a little grainy at first, but that’s okay. Next, add the room-temperature eggs one at a time, whisking vigorously after each addition until the mixture is well combined and slightly thickened. Whisk in the vanilla extract. You’ll notice the batter becomes glossy and smooth.
Step 3: Add the Dry Ingredients. In a separate bowl, whisk together the gluten-free flour, cocoa powder, baking powder, and salt. This ensures there are no clumps of baking powder and everything is evenly distributed. Add these dry ingredients to the wet chocolate mixture. Switch to a spatula and fold gently until just combined and no dry streaks remain. Be careful not to overmix here.
Step 4: The Crucial Chill. The dough will be quite soft and sticky—this is normal! Cover the bowl with plastic wrap and press it directly onto the surface of the dough to prevent a skin from forming. Refrigerate for at least 2 hours, or ideally overnight. The dough needs to be firm enough to scoop and roll. You’ll know it’s ready when you can press it and it holds its shape.
Step 5: Preheat and Prep. About 20 minutes before your dough is done chilling, preheat your oven to 175°C (350°F) and line two baking sheets with parchment paper. Place the powdered sugar for rolling in a shallow bowl. This setup makes the assembly line process much smoother.
Step 6: Roll and Coat. Using a tablespoon or a small cookie scoop, portion out the dough and roll it into roughly 1-inch balls. The dough might be a bit firm straight from the fridge, but the warmth of your hands will make it pliable. Roll each ball generously in the powdered sugar until it’s completely covered in a thick, white coat. Don’t be shy—this is what creates that beautiful contrast.
Step 7: Bake to Perfection. Place the coated dough balls about 2 inches apart on your prepared baking sheets. They need space to spread a little. Bake for 10-12 minutes. The cookies are done when the tops have cracked beautifully and the edges look set, but the centers still appear a little soft. They will firm up as they cool. Overbaking will make them cakey instead of fudgy.
Step 8: Cool and Enjoy. Let the cookies cool on the baking sheet for at least 5 minutes before transferring them to a wire rack to cool completely. This resting time on the hot pan helps them set up. They are delicious warm, but the texture and flavor are even better once they’ve fully cooled.
Serving Suggestions
Complementary Dishes
- A scoop of vanilla bean ice cream — The warm cookie paired with cold, creamy ice cream is a classic dessert combination that’s simply unbeatable.
- A warm mug of peppermint tea — The cool, minty flavor provides a lovely, refreshing contrast to the rich, dark chocolate, cleansing the palate between bites.
- A festive holiday cheeseboard — Add a few of these cookies to a board with sharp cheeses and fruits; the chocolate pairs wonderfully with a bold cheddar or a creamy brie.
Drinks
- Cold glass of milk — It’s a timeless pairing for a reason. The creaminess of the milk perfectly balances the intense chocolate flavor.
- Rich hot chocolate — Double down on the chocolate experience! A warm, frothy cup makes these cookies feel even more decadent and cozy.
- Espresso or black coffee — The bitterness of a strong coffee cuts through the sweetness of the cookie, creating a sophisticated and satisfying duo.
Something Sweet
- Orange-scented dark chocolate truffles — The bright, citrusy notes of orange provide a fantastic flavor contrast that makes the chocolate in both treats taste even more complex.
- Cinnamon-spiced poached pears — The soft, warm, and spiced fruit is a lighter option that complements the dense, fudgy texture of the cookies beautifully.
- A simple berry compote — The tartness of raspberries or strawberries cuts through the richness, offering a vibrant and refreshing end to a meal.
Top Mistakes to Avoid
- Mistake: Skipping the chill time. I’ve messed this up before too, in a rush, and ended up with flat, greasy cookies that barely crinkled. The chilled dough is essential for controlling spread and achieving that signature cracked top.
- Mistake: Using hot melted chocolate. If you add the eggs to chocolate that’s too hot, you risk scrambling them slightly, which can give your cookies a grainy texture and affect how they rise.
- Mistake: Under-measuring the powdered sugar for rolling. A light dusting will just get absorbed into the dough while baking. You need a thick, snowy coat to get that stark white and dark chocolate contrast.
- Mistake: Overbaking the cookies. They continue to cook on the hot baking sheet after you take them out. Pull them when the centers still look a bit soft for the ultimate fudgy, chewy center.
Expert Tips
- Tip: Use a cookie scoop for uniformity. This isn’t just for neatness—it ensures all your cookies bake at the same rate, so you don’t end up with some underdone and some overdone.
- Tip: Re-roll in powdered sugar for extra drama. For an even more intense white finish, you can give the dough balls a second roll in the powdered sugar right before baking. It creates an almost snowy, textured look.
- Tip: Let your baking sheets cool between batches. Placing dough balls on a hot baking sheet will cause them to start spreading prematurely, ruining their shape and the crinkle pattern. A cool sheet is your best friend.
- Tip: Sift your cocoa and powdered sugar. Cocoa powder and powdered sugar are notorious for having little lumps. Sifting them before using guarantees a perfectly smooth batter and an flawless, lump-free white coating.
FAQs
Can I make the dough ahead of time?
Absolutely, and honestly, I often recommend it! The flavor develops even more. You can keep the dough, well-wrapped, in the refrigerator for up to 3 days. If it gets too firm, let it sit at room temperature for 15-20 minutes until it’s scoopable. You can also freeze the shaped, unbaked dough balls on a tray before transferring to a bag. Bake from frozen, adding a minute or two to the baking time.
Why didn’t my cookies crinkle?
This usually comes down to two things: the dough wasn’t chilled enough, or there wasn’t enough powdered sugar. The dough needs to be cold so the outside sets quickly in the oven, forcing the expanding interior to crack through the sugar coating. A thin layer of sugar will just melt in, so be generous! Using a blend with the right amount of leavening is also key.
How should I store these cookies?
Once completely cooled, store them in an airtight container at room temperature. They’ll stay soft and chewy for about 4-5 days. You can place a piece of bread in the container with them—it sounds strange, but the cookies will draw moisture from the bread, helping them stay soft. Just replace the bread if it gets hard.
Can I use coconut oil instead of a neutral oil?
You can, but it will impart a slight coconut flavor to the cookies. If you enjoy that combination, go for it! Just make sure it’s in a liquid state when you mix it with the chocolate. For a pure, unadulterated chocolate taste, a flavorless oil is your best bet.
My cookies came out cakey. What happened?
This is typically a sign of overmixing or overbaking. When you add the flour, mix only until the ingredients are just combined. Overmixing develops the starches and can lead to a tougher, more cake-like texture. Also, be vigilant with the bake time—the centers should look soft when you take them out. They finish setting as they cool.
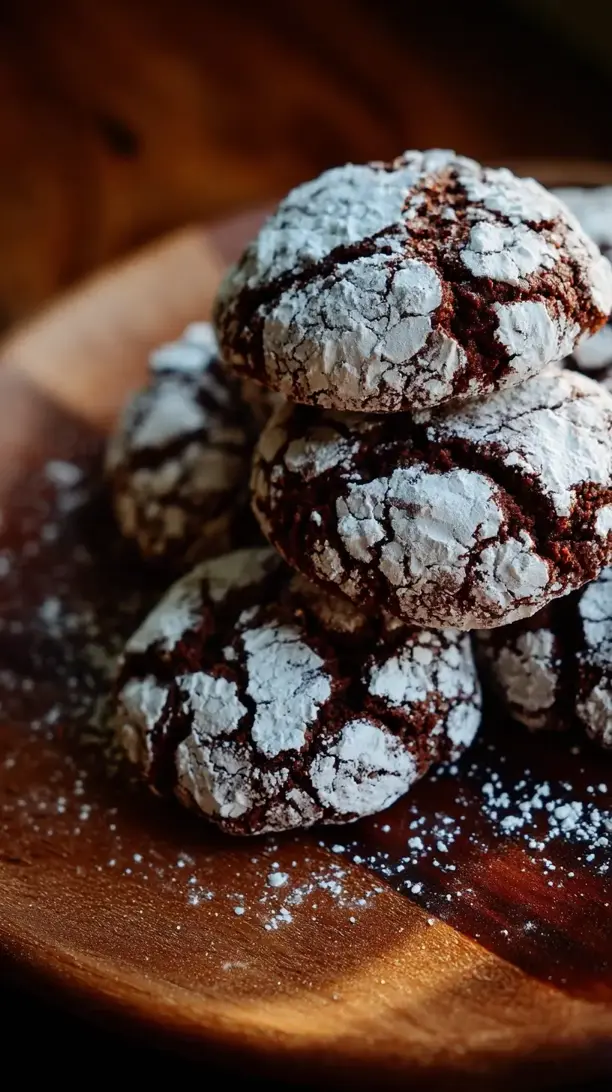
Gluten Free Chocolate Crinkle Cookies
Make perfect Gluten-Free Chocolate Crinkle Cookies with this easy recipe. Fudgy, chewy, and stunningly crackled—no one will guess they're gluten-free! Get baking now.
Ingredients
For the cookie dough:
-
150 g high-quality dark chocolate (60-70%, chopped)
-
60 ml neutral oil (like avocado or light olive oil)
-
200 g granulated sugar
-
2 large eggs (at room temperature)
-
1 tsp pure vanilla extract
-
125 g gluten-free all-purpose flour blend (with xanthan gum)
-
35 g unsweetened cocoa powder (Dutch-processed preferred)
-
1 tsp baking powder
-
0.25 tsp salt
-
100 g powdered sugar (for rolling)
Instructions
-
Create a double boiler by placing a heatproof bowl over a saucepan with an inch of simmering water (make sure the bottom of the bowl doesn't touch the water). Add your chopped chocolate and oil, stirring occasionally until the chocolate is completely melted and the mixture is smooth. Alternatively, you can do this in the microwave in 20-second bursts, stirring well between each. Let this mixture cool for about 10 minutes—you don't want it so hot that it cooks the eggs in the next step.01
-
Whisk the granulated sugar into the slightly cooled chocolate mixture. It might look a little grainy at first, but that's okay. Next, add the room-temperature eggs one at a time, whisking vigorously after each addition until the mixture is well combined and slightly thickened. Whisk in the vanilla extract. You'll notice the batter becomes glossy and smooth.02
-
In a separate bowl, whisk together the gluten-free flour, cocoa powder, baking powder, and salt. This ensures there are no clumps of baking powder and everything is evenly distributed. Add these dry ingredients to the wet chocolate mixture. Switch to a spatula and fold gently until just combined and no dry streaks remain. Be careful not to overmix here.03
-
The dough will be quite soft and sticky—this is normal! Cover the bowl with plastic wrap and press it directly onto the surface of the dough to prevent a skin from forming. Refrigerate for at least 2 hours, or ideally overnight. The dough needs to be firm enough to scoop and roll. You'll know it's ready when you can press it and it holds its shape.04
-
About 20 minutes before your dough is done chilling, preheat your oven to 175°C (350°F) and line two baking sheets with parchment paper. Place the powdered sugar for rolling in a shallow bowl. This setup makes the assembly line process much smoother.05
-
Using a tablespoon or a small cookie scoop, portion out the dough and roll it into roughly 1-inch balls. The dough might be a bit firm straight from the fridge, but the warmth of your hands will make it pliable. Roll each ball generously in the powdered sugar until it's completely covered in a thick, white coat. Don't be shy—this is what creates that beautiful contrast.06
-
Place the coated dough balls about 2 inches apart on your prepared baking sheets. They need space to spread a little. Bake for 10-12 minutes. The cookies are done when the tops have cracked beautifully and the edges look set, but the centers still appear a little soft. They will firm up as they cool. Overbaking will make them cakey instead of fudgy.07
-
Let the cookies cool on the baking sheet for at least 5 minutes before transferring them to a wire rack to cool completely. This resting time on the hot pan helps them set up. They are delicious warm, but the texture and flavor are even better once they've fully cooled.08