
Why You’ll Love These Gingerbread Molasses Cookies
- The Perfect Texture. We’re not making crunchy gingerbread men here. These cookies are engineered for a soft, chewy, almost cake-like center with a slight crispness on the outside. It’s the textural dream team.
- Deep, Complex Flavor. By using a blend of fresh and ground ginger, along with a generous pour of robust molasses, we create a flavor profile that’s far from one-note. It’s warm, spicy, slightly bitter, and wonderfully rich.
- Incredibly Aromatic. Your kitchen will smell like a holiday boutique. The combination of ginger, cinnamon, and cloves baking is honestly half the joy of making these. It’s aromatherapy you can eat.
- Surprisingly Simple. While the flavor is complex, the method is straightforward. No fancy equipment or complicated steps—just good, honest baking that’s perfect for a lazy weekend afternoon.
Ingredients & Tools
- 280 g all-purpose flour
- 1 tsp baking soda
- 1 ½ tsp ground ginger
- 1 tsp ground cinnamon
- ½ tsp ground cloves
- ¼ tsp salt
- 115 g unsalted butter, softened
- 100 g dark brown sugar
- 1 large egg, at room temperature
- 120 ml unsulphured molasses (not blackstrap!)
- 1 tbsp freshly grated ginger
- 50 g granulated sugar (for rolling)
Tools: Mixing bowls, whisk, electric hand mixer or stand mixer, baking sheets, parchment paper or silicone baking mats, cooling rack.
You’ll notice I specify unsulphured molasses—it’s milder and sweeter than the sulphured kind, which can be overly bitter. And that fresh ginger? It might seem like a small thing, but it adds a bright, zesty punch that really lifts the whole cookie. A little goes a long way.
Serves: 18-20 cookies | Prep Time: 20 minutes (plus 1 hour chilling) | Cook Time: 10-12 minutes | Total Time: about 1 hour 30 minutes
Before You Start: Tips & Ingredient Notes
- Why chill the dough? This is non-negotiable, I’m afraid. Chilling the dough solidifies the butter, which prevents the cookies from spreading too much in the oven. It also allows the flavors to meld together beautifully, resulting in a deeper, more developed taste.
- What’s the deal with molasses? The type of molasses you use is crucial. Unsulphured molasses (like Grandma’s brand) is light, sweet, and perfect for baking. Blackstrap molasses is intensely bitter and will overpower the other flavors. If it’s all you have, use half the amount and add a tablespoon of honey.
- Room temperature ingredients are key. Using a room temperature egg and properly softened butter (yielding slightly to a gentle press, not melted) ensures your dough emulsifies correctly. This means a smoother, more uniform cookie without any greasy streaks.
- Don’t skip the fresh ginger. I know it’s an extra step, but grating that knob of fresh ginger adds a vibrant, almost floral note that dried ginger powder alone can’t achieve. It’s the secret to a truly exceptional gingerbread cookie.
How to Make Gingerbread Molasses Cookies
Step 1: Combine the Dry Ingredients. In a medium bowl, whisk together the flour, baking soda, ground ginger, cinnamon, cloves, and salt. Whisking, rather than just stirring, is important here—it aerates the flour and ensures the leavening and spices are evenly distributed throughout. You’ll end up with a much more consistent bake. Set this fragrant bowl aside.
Step 2: Cream the Butter and Sugars. In a larger bowl, using an electric mixer on medium speed, beat the softened butter and dark brown sugar together for about 2-3 minutes. The mixture should become pale, fluffy, and well-combined. The trick is to beat it until it no longer feels gritty when you rub a bit between your fingers. This step incorporates air, which helps with the cookie’s rise.
Step 3: Add the Wet Ingredients. Beat in the egg until fully incorporated, then scrape down the sides of the bowl. Now, pour in the molasses and add the freshly grated ginger. The dough will look a bit lumpy and separated at this point—that’s perfectly normal, so don’t worry! Just mix until everything is combined.
Step 4: Bring the Dough Together. Reduce the mixer speed to low and gradually add the dry ingredients to the wet ingredients. Mix only until the flour streaks have just disappeared. It’s crucial not to overmix at this stage, as that can develop the gluten in the flour and lead to tougher cookies. The dough will be quite soft and sticky.
Step 5: The All-Important Chill. Cover the bowl with plastic wrap and refrigerate for at least 1 hour, or up to 2 days. The dough needs to be firm enough to handle. You’ll notice the aroma is already incredible—imagine that, but baked!
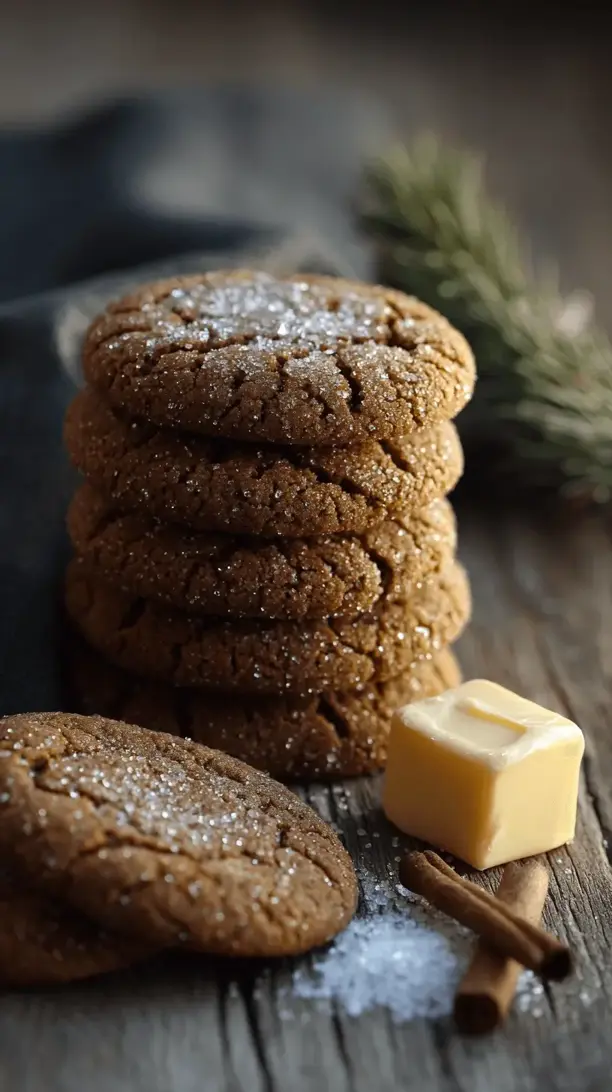
Step 6: Preheat and Portion. When you’re ready to bake, preheat your oven to 350°F (175°C) and line baking sheets with parchment paper. Place the granulated sugar in a small bowl. Scoop out tablespoons of the chilled dough and roll them into balls between your palms. Roll each ball in the granulated sugar to coat it completely. This gives the cookies a delightful sparkly, crackly top.
Step 7: Bake to Perfection. Place the sugared dough balls about 2 inches apart on the prepared baking sheets. They will spread! Bake for 10-12 minutes. The cookies are done when the tops look crackled and the edges are set. The centers will still look quite soft—this is what gives you that chewy texture. Don’t overbake them looking for a firm center.
Step 8: Cool and Enjoy. Allow the cookies to cool on the baking sheet for 5 minutes before transferring them to a wire rack to cool completely. This resting time on the hot pan is the final stage of cooking and helps them set up properly. Then, dig in. That first bite of warm, spicy, chewy goodness is pure bliss.
Serving Suggestions
Complementary Dishes
- A simple cheese board — The sharpness of an aged cheddar or a creamy blue cheese creates a fantastic sweet-and-salty contrast that really makes the spices in the cookie pop.
- Spiced pumpkin soup — Serve these cookies on the side for a cozy, autumnal lunch. The earthy sweetness of the soup and the spicy cookies are a match made in heaven.
Drinks
- Strong black coffee — The bitterness of a good, dark roast is the perfect counterpoint to the sweet, spicy molasses. It’s a classic pairing for a reason.
- Chai latte — Double down on the cozy spices! A warm, milky chai complements the ginger and cinnamon in the cookies beautifully, creating a truly soothing experience.
- Cold glass of milk — You can’t go wrong with the timeless combo. The cold, creamy milk is the ultimate palate cleanser between each richly spiced bite.
Something Sweet
- Vanilla bean ice cream — Sandwich a scoop between two slightly warm cookies for the most incredible ice cream sandwich of your life. The warm cookie, cold ice cream, and simple vanilla flavor are just… wow.
- Citrus-forward dessert — A bright lemon tart or orange-scented panna cotta provides a zesty, refreshing finish that cuts through the deep, warm spices of the cookies perfectly.
Top Mistakes to Avoid
- Mistake: Using melted butter. If your butter is melted or too soft, your cookies will spread into thin, flat discs in the oven. We want soft, puffy cookies, so proper softened butter (cool to the touch but indents easily) is a must.
- Mistake: Skipping the chill time. I’ve messed this up before too, thinking I could get away with it. You can’t. The dough will be too sticky to handle, and the cookies will spread excessively, resulting in a greasy, thin cookie instead of a soft, thick one.
- Mistake: Overbaking. The number one culprit for hard gingerbread cookies. They continue to cook on the hot baking sheet after you take them out. Pull them when the edges are set but the centers still look soft and underdone for that perfect chew.
- Mistake: Overmixing the flour. Once you add the flour, mix only until it’s just combined. Overmixing develops gluten, which leads to a tough, bread-like texture instead of a tender, delicate crumb.
Expert Tips
- Tip: Grate your ginger directly over the bowl. This catches all the precious ginger juice that comes out during grating. That juice is packed with flavor and will make your cookies even more aromatic.
- Tip: Use a cookie scoop. For perfectly uniform cookies that bake evenly, a small cookie scoop (about 1.5 tablespoons) is your best friend. It also makes the process much faster and less messy.
- Tip: Bake one sheet at a time. I know it’s tempting to crowd the oven, but for the most consistent results, bake on the center rack one sheet at a time. This ensures even heat circulation and browning.
- Tip: For extra-spicy cookies, let the dough rest overnight. Chilling the dough for 24-48 hours allows the spices to really bloom and deepen. The flavor difference is remarkable and well worth the wait if you have the time.
FAQs
Can I make these cookies ahead of time?
Absolutely! The dough balls can be scooped, rolled in sugar, and then frozen solid on a baking sheet before being transferred to a freezer bag. They’ll keep for up to 3 months. When you’re ready to bake, just place the frozen dough balls on a parchment-lined sheet—you might need to add a minute or two to the baking time. You can also store the baked cookies in an airtight container at room temperature for up to 5 days, though they’re best within the first 2-3.
My dough is really sticky, even after chilling. What should I do?
Don’t panic! This can happen depending on the humidity or your specific flour. Dust your hands lightly with flour before rolling the dough balls. The little bit of extra flour on the outside won’t hurt the final product. You can also chill the dough for another 15-30 minutes if it’s still too soft to handle comfortably.
Can I use all ground ginger instead of fresh?
You can, but you’ll be missing that bright, zesty top note that fresh ginger provides. If you must substitute, use a total of 2 teaspoons of ground ginger. The flavor will be deeper and earthier, but still delicious. I really encourage you to try it with the fresh stuff at least once!
Why did my cookies come out cakey instead of chewy?
This usually points to a little too much flour. The most common cause is scooping the flour directly from the bag with the measuring cup, which packs it down. Next time, try spooning the flour into your measuring cup and leveling it off with a knife for a more accurate, lighter measure. Overmixing the dough after adding the flour can also lead to a cakier texture.
Can I decorate these with icing?
Of course! Once the cookies are completely cool, you can drizzle them with a simple powdered sugar glaze (just mix powdered sugar with a tiny bit of milk or lemon juice until drizzling consistency) or a royal icing. They make for a beautifully festive treat. Just remember, these are soft cookies, so a thick layer of hard icing might not be the best textural match—a simple drizzle is perfect.
Gingerbread Molasses Cookies
Bake the ultimate soft & chewy gingerbread molasses cookies! My foolproof recipe delivers deep, spicy flavor & perfect texture. Your new holiday tradition starts here.
Ingredients
Ingredients
-
280 g all-purpose flour
-
1 tsp baking soda
-
1 ½ tsp ground ginger
-
1 tsp ground cinnamon
-
½ tsp ground cloves
-
¼ tsp salt
-
115 g unsalted butter (softened)
-
100 g dark brown sugar
-
1 large egg (at room temperature)
-
120 ml unsulphured molasses (not blackstrap!)
-
1 tbsp freshly grated ginger
-
50 g granulated sugar (for rolling)
Instructions
-
Combine the Dry Ingredients. In a medium bowl, whisk together the flour, baking soda, ground ginger, cinnamon, cloves, and salt. Whisking, rather than just stirring, is important here—it aerates the flour and ensures the leavening and spices are evenly distributed throughout. You'll end up with a much more consistent bake. Set this fragrant bowl aside.01
-
Cream the Butter and Sugars. In a larger bowl, using an electric mixer on medium speed, beat the softened butter and dark brown sugar together for about 2-3 minutes. The mixture should become pale, fluffy, and well-combined. The trick is to beat it until it no longer feels gritty when you rub a bit between your fingers. This step incorporates air, which helps with the cookie's rise.02
-
Add the Wet Ingredients. Beat in the egg until fully incorporated, then scrape down the sides of the bowl. Now, pour in the molasses and add the freshly grated ginger. The dough will look a bit lumpy and separated at this point—that's perfectly normal, so don't worry! Just mix until everything is combined.03
-
Bring the Dough Together. Reduce the mixer speed to low and gradually add the dry ingredients to the wet ingredients. Mix only until the flour streaks have just disappeared. It's crucial not to overmix at this stage, as that can develop the gluten in the flour and lead to tougher cookies. The dough will be quite soft and sticky.04
-
The All-Important Chill. Cover the bowl with plastic wrap and refrigerate for at least 1 hour, or up to 2 days. The dough needs to be firm enough to handle. You'll notice the aroma is already incredible—imagine that, but baked!05
-
Preheat and Portion. When you're ready to bake, preheat your oven to 350°F (175°C) and line baking sheets with parchment paper. Place the granulated sugar in a small bowl. Scoop out tablespoons of the chilled dough and roll them into balls between your palms. Roll each ball in the granulated sugar to coat it completely. This gives the cookies a delightful sparkly, crackly top.06
-
Bake to Perfection. Place the sugared dough balls about 2 inches apart on the prepared baking sheets. They will spread! Bake for 10-12 minutes. The cookies are done when the tops look crackled and the edges are set. The centers will still look quite soft—this is what gives you that chewy texture. Don't overbake them looking for a firm center.07
-
Cool and Enjoy. Allow the cookies to cool on the baking sheet for 5 minutes before transferring them to a wire rack to cool completely. This resting time on the hot pan is the final stage of cooking and helps them set up properly. Then, dig in. That first bite of warm, spicy, chewy goodness is pure bliss.08


