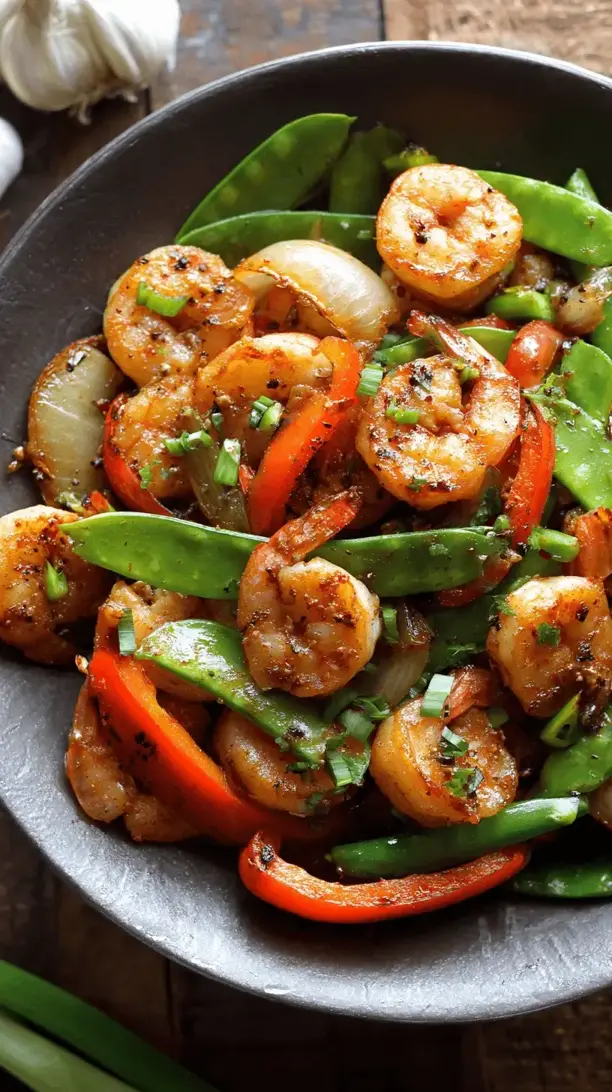
Why You’ll Love This Garlic Butter Shrimp Stir Fry
- It’s unbelievably fast. From the moment you pull the shrimp out of the fridge to sitting down at the table, you’re looking at about 20 minutes, tops. It’s the perfect solution for those nights when hunger strikes with a vengeance and patience is in short supply.
- The flavor is restaurant-quality, but so simple. The magic lies in the garlic butter sauce. It’s decadent and rich, clinging to every piece of shrimp and vegetable, creating a glossy, flavorful coating that feels incredibly luxurious without any complicated techniques.
- It’s incredibly versatile. Have some bell peppers that need using up? Toss them in. Prefer broccoli over snap peas? Go for it. This recipe is more of a template for deliciousness, allowing you to adapt it to what you have on hand.
- It feels like a treat. Let’s be honest, anything with a generous amount of garlic butter feels a little special. It’s a dish that’s perfect for a quick weeknight dinner but also impressive enough to serve to guests with a nice glass of white wine.
Ingredients & Tools
- 450 g large raw shrimp, peeled and deveined
- 3 tbsp unsalted butter
- 1 tbsp olive oil
- 6-8 large garlic cloves, minced
- 1 medium red bell pepper, sliced
- 150 g sugar snap peas or snow peas
- 2 tbsp soy sauce (or tamari for gluten-free)
- 1 tbsp fresh lemon juice
- 1/4 tsp red pepper flakes (optional, for heat)
- 2 tbsp fresh parsley, chopped
- To taste: salt and black pepper
Tools: A large skillet or wok, a sharp knife, and a microplane or garlic press.
A couple of notes on the ingredients—using raw shrimp is key here, as pre-cooked shrimp will become tough and rubbery when reheated. And for the garlic, don’t be shy! Mincing it finely ensures it infuses the butter beautifully without burning, creating that deep, aromatic base flavor we’re after.
Serves: 3-4 | Prep Time: 10 minutes | Cook Time: 10 minutes | Total Time: 20 minutes
Before You Start: Tips & Ingredient Notes
- Pat your shrimp DRY. This might seem like a small step, but it’s a game-changer. Moisture on the surface of the shrimp will cause them to steam instead of getting a nice sear. A quick pat with a paper towel ensures they cook up perfectly.
- Mise en place is your best friend. Since stir-frying happens so quickly, having all your ingredients prepped and within arm’s reach is essential. Chop your veggies, mince your garlic, and mix your sauce components before you even turn on the heat.
- Butter temperature matters. I recommend using cold butter, cut into small pieces. Adding it cold at the end of cooking helps create a slightly thickened, emulsified sauce that clings to the shrimp beautifully, rather than just melting into a pool of oil.
- Don’t overcrowd the pan. If your skillet isn’t large enough to hold all the shrimp in a single layer, cook them in two batches. Overcrowding will drop the pan’s temperature, leading to steamed, soggy shrimp instead of ones with a nice caramelized surface.
How to Make Garlic Butter Shrimp Stir Fry
Step 1: Prep and Season the Shrimp. Start by ensuring your shrimp are thoroughly patted dry with paper towels. This is the secret to getting a good sear. Place them in a bowl and season lightly with a pinch of salt and black pepper. Toss them gently to coat evenly. While you’re at it, go ahead and mince your garlic, slice the bell pepper, and have your snap peas ready. Having everything prepped makes the cooking process seamless and stress-free.
Step 2: Sauté the Aromatics. Place your large skillet or wok over medium-high heat. Add the olive oil and one tablespoon of the butter. Once the butter has melted and the mixture is hot (you should see it shimmering), add the minced garlic. Stir constantly for just about 30 seconds to one minute—you want it to become fragrant and golden, but be vigilant! Burnt garlic tastes bitter, and we definitely don’t want that. The aroma at this stage is absolutely heavenly.
Step 3: Cook the Shrimp. Increase the heat to high and add the shrimp to the skillet in a single layer. Let them cook undisturbed for about 1-2 minutes, until the bottoms turn pink and get a slight sear. Then, flip them over and cook for another 1-2 minutes. You’ll know they’re done when they curl into a loose “C” shape and are opaque throughout. Be careful not to overcook them, as they can become tough. Transfer the shrimp to a clean plate—they’ll finish cooking in the sauce later.
Step 4: Cook the Vegetables. In the same skillet, add the sliced bell pepper and snap peas. Stir-fry them for 2-3 minutes. You’re aiming for a vibrant color and a tender-crisp texture—they should still have a nice bite to them. This quick cook in the flavorful garlicky butter left in the pan will give them an incredible head start on flavor.
Step 5: Create the Sauce and Bring It All Together. Reduce the heat to medium-low. Pour in the soy sauce and lemon juice, scraping up any browned bits from the bottom of the pan—that’s pure flavor! Add the remaining two tablespoons of cold butter, cut into small pieces, and the optional red pepper flakes. Swirl the pan or stir continuously until the butter melts and emulsifies into a glossy, luxurious sauce.
Step 6: Final Combine and Garnish. Return the cooked shrimp and any accumulated juices back to the skillet. Toss everything together gently to coat every single piece in that glorious garlic butter sauce. Let it heat through for just another 30 seconds. Turn off the heat, stir in the fresh parsley, and give it one final toss. Taste and adjust seasoning if needed—sometimes a tiny extra squeeze of lemon really makes it sing.
Serving Suggestions
Complementary Dishes
- Steamed jasmine rice — The fluffy, slightly sticky grains are the perfect vehicle for soaking up every last drop of that incredible garlic butter sauce. It’s a classic pairing for a reason.
- Buttery egg noodles — For a richer, more comforting meal, serve the stir fry over a bed of soft egg noodles. The flavors meld together beautifully.
- Simple arugula salad — A light salad with a sharp lemon vinaigrette provides a fresh, peppery contrast that cuts through the richness of the dish perfectly.
Drinks
- A crisp Sauvignon Blanc — The wine’s citrusy and herbal notes act as a fantastic palate cleanser against the garlic and butter, enhancing the overall dining experience.
- A light lager or pilsner — The carbonation and mild bitterness of a cold beer are incredibly refreshing and help balance the savory, umami-rich flavors of the stir fry.
- Sparkling water with lemon — A non-alcoholic option that still provides the effervescence and acidity needed to refresh your palate between bites.
Something Sweet
- Lemon sorbet — The ultimate palate cleanser. Its bright, sharp citrus flavor is a wonderfully light and refreshing way to end the meal after something so savory.
- Fresh mango slices — The natural sweetness and tropical flavor of ripe mango provide a simple, healthy, and delightful contrast that feels just right.
- Ginger cookies — A few spicy, chewy ginger cookies offer a warm, cozy finish that complements the meal without being too heavy.
Top Mistakes to Avoid
- Mistake: Using pre-cooked shrimp. This is the number one error. Pre-cooked shrimp will become incredibly tough and rubbery when reheated in the stir-fry. Always start with raw, peeled, and deveined shrimp for the best texture.
- Mistake: Burning the garlic. Garlic cooks in a flash and burns even faster. If you add it to scorching hot oil and walk away, you’ll come back to a bitter, acrid mess. Keep the heat at medium when sautéing the garlic and stir constantly.
- Mistake: Overcooking the shrimp. Shrimp cook very quickly. The moment they curl into a tight “C” and turn opaque, they’re done. Any longer and they’ll start to get tough and chewy. It’s better to slightly undercook them when you set them aside, as they’ll finish cooking when added back to the hot sauce.
- Mistake: Skipping the step of patting the shrimp dry. I know I mentioned it before, but it’s worth repeating! Wet shrimp steam instead of sear, which prevents the development of that lovely caramelized flavor and can make the sauce watery.
Expert Tips
- Tip: Add a splash of white wine. After cooking the vegetables and before adding the soy sauce, deglaze the pan with a quarter cup of dry white wine. Let it reduce by half. This adds a wonderful layer of acidity and complexity to the sauce.
- Tip: Brown your butter. For a deeper, nuttier flavor, start by browning the first tablespoon of butter before adding the garlic. Watch it carefully as it foams and you see little brown specks form—the aroma will be incredible. Then proceed with the recipe as written.
- Tip: Finish with a knob of cold butter. After you’ve turned off the heat and returned the shrimp to the pan, add one last small, cold piece of butter and swirl it in. This French technique, called *monter au beurre*, gives the sauce an unbelievably rich, velvety sheen.
- Tip: Use frozen shrimp efficiently. No time to thaw? Place frozen raw shrimp in a colander and run cold water over them for 5-10 minutes, moving them around, until they’re thawed. Then, pat them very, very dry before cooking.
FAQs
Can I use frozen shrimp?
Absolutely! Frozen shrimp are often fresher than “fresh” shrimp at the counter, which are typically previously frozen and thawed. The key is to thaw them properly. The best method is to transfer them from the freezer to the fridge the night before. If you’re short on time, place the sealed bag in a bowl of cold water for 20-30 minutes. Just remember—and I can’t stress this enough—to pat them thoroughly dry with paper towels before seasoning and cooking to ensure a good sear.
What other vegetables can I add?
This recipe is a fantastic canvas for all sorts of veggies. Thinly sliced carrots, broccoli florets, sliced mushrooms, or baby corn would all work wonderfully. Just keep in mind their cooking times. Harder vegetables like carrots or broccoli should be added a minute or two before the softer peppers and snap peas to ensure they become tender-crisp. The goal is to have everything finish cooking at the same time.
How do I store and reheat leftovers?
Store any leftovers in an airtight container in the refrigerator for up to 2 days. Reheating is a bit tricky because shrimp can easily become overcooked. The best method is to reheat gently in a skillet over low heat, adding a tiny splash of water or broth to loosen the sauce. Avoid the microwave if you can, as it tends to make the shrimp rubbery. The vegetables might soften a bit upon reheating, but the flavor will still be great.
Is there a dairy-free alternative to butter?
Yes, you can achieve a delicious result with a good vegan butter substitute that has a high fat content and a rich flavor. Alternatively, using all olive oil will work, though the sauce will be less rich and creamy. For a different flavor profile, a tablespoon of toasted sesame oil added at the end along with the regular oil can provide a lovely nuttiness.
My sauce looks a bit separated. What happened?
This usually occurs if the heat is too high when you add the cold butter or if the pan is too hot when you combine the acidic elements (lemon juice, soy sauce) with the fat. Don’t worry, it will still taste fine! To fix it or prevent it next time, make sure to reduce the heat to low when creating the sauce and add the cold butter in pieces, swirling continuously until it emulsifies. If it does separate, a teaspoon of cold water whisked in vigorously can sometimes bring it back together.