
Why You’ll Love This Frozen Yogurt Chocolate Cups
- They’re the perfect portion-controlled treat. Each cup is a self-contained delight, so there’s no scooping or mess. It’s the ideal way to satisfy a sweet tooth without overindulging.
- The texture contrast is absolutely dreamy. You get the initial snap from the dark chocolate shell, followed by the smooth, creamy, and slightly tangy frozen yogurt filling. It’s a party in your mouth, honestly.
- They are incredibly versatile and customizable. You can use any flavor of yogurt you love, swirl in some fruit puree or nut butter, and top them with anything from sea salt to crushed nuts. It’s your dessert, your rules.
- They feel fancy but are secretly easy. These look like you picked them up from a gourmet chocolatier, but the process is straightforward and fun—a great little project for a quiet afternoon.
Ingredients & Tools
- 200 g high-quality dark chocolate (around 70%), chopped
- 1 tsp coconut oil
- 500 g thick, full-fat Greek yogurt or Skyr
- 3-4 tbsp maple syrup or honey, to taste
- 1 tsp pure vanilla extract
- A pinch of fine sea salt
Tools: 12-cup standard muffin tin, paper or silicone muffin liners, two medium mixing bowls, a whisk or spatula, a small saucepan or heatproof bowl for a double boiler.
The quality of your chocolate really is the star here, so choose one you enjoy eating on its own. As for the yogurt, going for a full-fat, extra-thick variety is key—it ensures a creamy, non-icy final texture that’s just sublime.
Serves: 12 | Prep Time: 25 minutes | Cook Time: 0 minutes | Total Time: 4+ hours (including freezing)
Before You Start: Tips & Ingredient Notes
- Why full-fat yogurt? The higher fat content prevents the yogurt from freezing into a solid, icy block. It stays creamier and is much more pleasant to eat straight from the freezer.
- Can I use milk chocolate? You absolutely can, but dark chocolate provides a lovely bitter contrast to the sweet yogurt. If using milk chocolate, you might want to reduce the sweetener in the yogurt filling slightly.
- The importance of the coconut oil. This little teaspoon is not for flavor, but for function. It makes the chocolate shell more fluid for coating and gives it a cleaner snap once frozen. Don’t skip it!
- Taste your yogurt mixture! Before you fill the cups, give the sweetened yogurt a quick taste. Yogurt tartness can vary, so adjust the maple syrup or honey until it’s perfectly sweet for you.
How to Make Frozen Yogurt Chocolate Cups
Step 1: Prepare Your Station. First things first, line your muffin tin with paper or silicone liners. This is non-negotiable—it makes removing the frozen cups an absolute breeze. Having everything set up before you start melting chocolate is the key to a smooth, stress-free process.
Step 2: Melt the Chocolate. Create a double boiler by placing a heatproof bowl over a saucepan of gently simmering water, ensuring the bottom of the bowl doesn’t touch the water. Add your chopped chocolate and coconut oil. Stir gently and continuously as it melts. You’ll notice it becoming glossy and smooth. Once fully melted, remove the bowl from the heat and let it cool for just a minute or two.
Step 3: Create the Chocolate Shells. Using a spoon, dollop about two teaspoons of the melted chocolate into the bottom of each muffin liner. Now, here’s the fun part: tilt and swirl the tin to coax the chocolate up the sides of the liners, creating a little chocolate bowl. You don’t need perfect coverage—a rustic look is charming! Once done, pop the entire tin into the freezer for about 15-20 minutes, or until the chocolate shells are completely solid.
Step 4: Mix the Yogurt Filling. While the shells are setting, grab your other bowl. Add the thick yogurt, maple syrup (start with 3 tablespoons), vanilla extract, and that pinch of salt. Whisk everything together until it’s perfectly smooth and well-combined. This is your moment to taste and adjust the sweetness. Remember, cold dulls sweetness, so it should taste a touch sweeter than you’d like at room temperature.
Step 5: Fill the Cups. Take the tin with the solid chocolate shells out of the freezer. Divide the yogurt mixture evenly among the twelve cups, spooning it right into the chocolate bowls. Leave a little space at the top—about a centimeter—for the final chocolate layer. Use the back of your spoon to smooth the tops nicely.
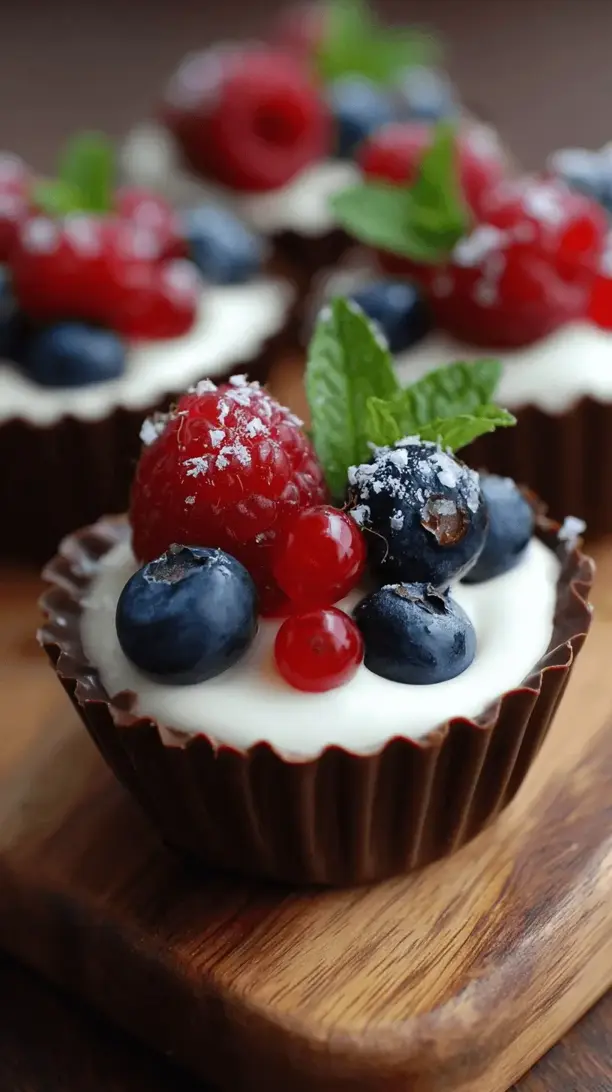
Step 6: The Final Seal. If your remaining melted chocolate has thickened up, you can gently re-warm it for a few seconds. Spoon a thin layer over each yogurt-filled cup, sealing the yogurt inside its chocolate capsule. This is where you can add a flaky sea salt sprinkle or some crushed nuts for extra flair.
Step 7: The Big Freeze. Carefully transfer the muffin tin back to the freezer. Now, the hardest part: waiting. Let them freeze completely for at least 4 hours, but ideally overnight. This ensures the yogurt is frozen through and the texture is perfect.
Step 8: Serve and Enjoy. When you’re ready, simply peel away the paper liners. You might need to let them sit on the counter for just 2-3 minutes to soften slightly for the perfect bite. Then, dig in and enjoy that incredible snap and creamy center!
Serving Suggestions
Complementary Dishes
- A fresh berry salad — The bright, juicy acidity of mixed berries cuts through the richness of the chocolate and yogurt beautifully, creating a refreshing balance.
- A warm, spiced coffee — There’s something magical about the combination of cold, creamy dessert and a hot, aromatic cup of coffee. The spices echo the warmth of the vanilla.
Drinks
- A glass of cold-brew coffee — The smooth, low-acidity notes of cold brew complement the chocolate without overpowering the delicate yogurt flavor.
- A crisp, sparkling rosé — For a more celebratory feel, the slight sweetness and bubbles of a rosé make for a surprisingly perfect pairing.
Something Sweet
- A small bowl of macerated strawberries — Toss sliced strawberries with a tiny bit of sugar and let them sit until syrupy. Spooning this over the cup adds a lovely, fresh fruitiness.
- A drizzle of salted caramel sauce — If you’re feeling extra indulgent, a little warm caramel sauce takes these cups to a whole new level of decadence.
Top Mistakes to Avoid
- Mistake: Using a thin, watery yogurt. This is the number one reason for icy, disappointing cups. The yogurt needs enough body and fat to freeze creamily. Stick to Greek yogurt or Skyr.
- Mistake: Rushing the chocolate shell freeze. If the shell isn’t completely solid before you add the yogurt, the two layers will mix and you’ll lose that beautiful, clean contrast. Patience is key!
- Mistake: Not tasting the filling. Yogurt tartness varies wildly by brand. Skipping the taste test can lead to cups that are too tangy or not sweet enough for your preference.
- Mistake: Freezing in a single layer. Trying to make these without the muffin tin and liners is a recipe for frustration. The structure is essential for easy removal and neat presentation.
Expert Tips
- Tip: Add a flavor swirl. Before sealing with the final chocolate layer, try swirling a teaspoon of raspberry puree, peanut butter, or even a little espresso powder into each yogurt-filled cup for a flavor surprise.
- Tip: Use an ice cream scoop. For perfectly even and neat yogurt portions, a small cookie scoop or ice cream scoop is your best friend. It’s faster and less messy than using two spoons.
- Tip: Grate a little orange zest. Stirring the finely grated zest of one orange into the yogurt mixture along with the vanilla creates a fantastic chocolate-orange flavor combination that’s simply classic.
- Tip: Store them properly. Once fully frozen and de-lined, transfer the cups to an airtight container separated by layers of parchment paper. This prevents them from sticking together and protects them from freezer odors.
FAQs
Can I make these dairy-free or vegan?
Absolutely! The beauty of this recipe is its adaptability. For a vegan version, use a thick, creamy plant-based yogurt (coconut-based works wonderfully) and ensure your chocolate is dairy-free. Agave syrup can be used in place of honey. The method remains exactly the same.
How long do these keep in the freezer?
Stored correctly in an airtight container, they will keep beautifully for up to 2 months. The chocolate might develop a slight “bloom” over time (harmless white spots from temperature changes), but the taste and texture will still be great.
My chocolate cracked when I bit into it. What happened?
This usually happens if the yogurt filling was too warm when you added the final chocolate seal, causing the base shell to contract and crack as it re-froze. Make sure your yogurt mixture is cold, and your base shell is fully solid, before filling.
Can I use a different type of sweetener?
You can, but liquid sweeteners like maple syrup and honey integrate best and don’t crystallize when frozen. If using a granulated sweetener like coconut sugar, I’d recommend blending it with the yogurt first to ensure it dissolves completely.
Why did my yogurt filling sink in the middle?
A slight dip is normal as the yogurt settles while freezing. But a significant sinkhole usually means the yogurt was over-whipped, incorporating too much air which then deflated. Just mix until smooth and combined—no need to whip it into a frenzy!
Frozen Yogurt Chocolate Cups
Whip up easy Frozen Yogurt Chocolate Cups! A creamy Greek yogurt center in a dark chocolate shell. A healthy-ish, make-ahead frozen treat that's perfect for satisfying cravings.
Ingredients
Ingredients
-
200 g high-quality dark chocolate (around 70%) (chopped)
-
1 tsp coconut oil
-
500 g thick, full-fat Greek yogurt or Skyr
-
3-4 tbsp maple syrup or honey (to taste)
-
1 tsp pure vanilla extract
-
A pinch fine sea salt
Instructions
-
Prepare Your Station. First things first, line your muffin tin with paper or silicone liners. This is non-negotiable—it makes removing the frozen cups an absolute breeze. Having everything set up before you start melting chocolate is the key to a smooth, stress-free process.01
-
Melt the Chocolate. Create a double boiler by placing a heatproof bowl over a saucepan of gently simmering water, ensuring the bottom of the bowl doesn't touch the water. Add your chopped chocolate and coconut oil. Stir gently and continuously as it melts. You'll notice it becoming glossy and smooth. Once fully melted, remove the bowl from the heat and let it cool for just a minute or two.02
-
Create the Chocolate Shells. Using a spoon, dollop about two teaspoons of the melted chocolate into the bottom of each muffin liner. Now, here's the fun part: tilt and swirl the tin to coax the chocolate up the sides of the liners, creating a little chocolate bowl. You don't need perfect coverage—a rustic look is charming! Once done, pop the entire tin into the freezer for about 15-20 minutes, or until the chocolate shells are completely solid.03
-
Mix the Yogurt Filling. While the shells are setting, grab your other bowl. Add the thick yogurt, maple syrup (start with 3 tablespoons), vanilla extract, and that pinch of salt. Whisk everything together until it's perfectly smooth and well-combined. This is your moment to taste and adjust the sweetness. Remember, cold dulls sweetness, so it should taste a touch sweeter than you'd like at room temperature.04
-
Fill the Cups. Take the tin with the solid chocolate shells out of the freezer. Divide the yogurt mixture evenly among the twelve cups, spooning it right into the chocolate bowls. Leave a little space at the top—about a centimeter—for the final chocolate layer. Use the back of your spoon to smooth the tops nicely.05
-
The Final Seal. If your remaining melted chocolate has thickened up, you can gently re-warm it for a few seconds. Spoon a thin layer over each yogurt-filled cup, sealing the yogurt inside its chocolate capsule. This is where you can add a flaky sea salt sprinkle or some crushed nuts for extra flair.06
-
The Big Freeze. Carefully transfer the muffin tin back to the freezer. Now, the hardest part: waiting. Let them freeze completely for at least 4 hours, but ideally overnight. This ensures the yogurt is frozen through and the texture is perfect.07
-
Serve and Enjoy. When you're ready, simply peel away the paper liners. You might need to let them sit on the counter for just 2-3 minutes to soften slightly for the perfect bite. Then, dig in and enjoy that incredible snap and creamy center!08


