
Why You’ll Love This Frozen Chocolate Banana Squares
- They’re deceptively simple. With just a handful of whole-food ingredients and no baking required, these squares come together with minimal effort for a maximum payoff. You’ll be amazed at how something so easy can taste so decadent.
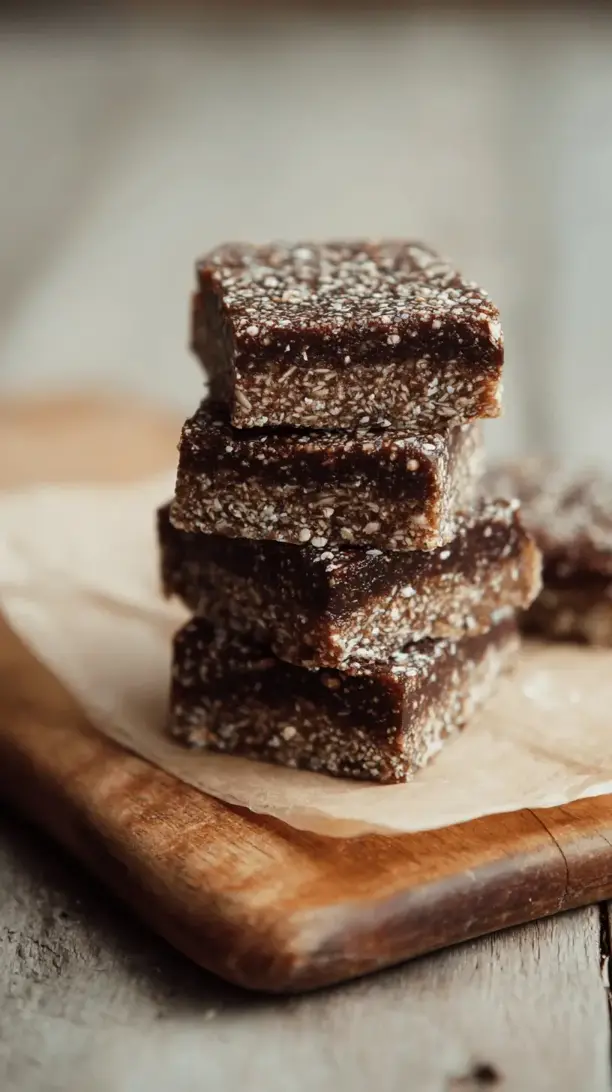
- The texture is a dream. You get this fantastic contrast in every bite—the firm, crunchy chocolate coating gives way to the soft, frozen banana center, which sits on a chewy, date-sweetened base. It’s a real textural adventure.
- They’re a brilliant way to use up ripe bananas. We’ve all been there with spotted bananas on the counter. Instead of making yet another loaf of banana bread, transform them into this elegant frozen dessert. It feels like a real upgrade.
- Perfect for make-ahead convenience. These squares are meant to live in the freezer, making them the ultimate ready-to-eat dessert or snack. Having a stash means you’re always prepared for an impromptu treat or unexpected guests.
Ingredients & Tools
- For the Base: 1 cup rolled oats (gluten-free if needed), 1 cup pitted Medjool dates (soaked in hot water for 10 minutes if not super soft), 1/4 cup almond flour, 2 tbsp melted coconut oil, Pinch of sea salt.
- For the Banana Layer: 3 large, very ripe bananas (the spottier, the sweeter!), 1 tsp pure vanilla extract, 1 tbsp creamy almond butter (or any nut/seed butter).
- For the Chocolate Topping: 1 cup dark chocolate chips (dairy-free if desired), 1 tbsp coconut oil.
Tools: 8×8 inch baking pan, parchment paper, food processor or high-speed blender, small saucepan or microwave-safe bowl.
The quality of your bananas really is the star here—the riper they are, the sweeter and more flavorful your middle layer will be. And don’t skip the pinch of salt in the base; it really makes the other flavors pop.
Serves: 9 squares | Prep Time: 25 minutes | Freeze Time: 4 hours (or overnight) | Total Time: 4 hours 25 minutes
Before You Start: Tips & Ingredient Notes
- Banana Ripeness is Key. You want those bananas to be covered in brown spots. This isn’t just for sweetness; super-ripe bananas blend into a much creamier, smoother texture, which is essential for that perfect “nice cream” layer.
- Why the Coconut Oil in the Chocolate? Adding a bit of coconut oil to the melted chocolate is a little pro-hack. It makes the chocolate shell thinner, so it sets with a satisfying snap and is less likely to shatter into pieces when you bite into the frozen square.
- Press that Base Firmly! When you’re assembling, really take a moment to press the oat-and-date base into the pan firmly and evenly. This creates a solid foundation that won’t crumble when you slice through the frozen layers later. The back of a measuring cup works perfectly for this.
- Parchment Paper is Non-Negotiable. Seriously, don’t try to skip it or use wax paper. Lining your pan with parchment paper, with some overhang on two sides, is the only way you’ll be able to lift the entire block of frozen squares out for clean, easy slicing.
How to Make Frozen Chocolate Banana Squares
Step 1: Create the Crust. Start by lining your 8×8 inch pan with parchment paper, leaving some overhang on two opposite sides—this will be your “sling” for lifting the squares out later. In your food processor, combine the rolled oats, pitted dates, almond flour, melted coconut oil, and pinch of salt. Pulse until the mixture starts to clump together and looks like coarse sand. You should be able to pinch a bit between your fingers and have it hold its shape. If it seems too dry, you can add a teaspoon of water and pulse again.
Step 2: Press and Freeze the Base. Transfer the crumbly mixture into your prepared pan. Using your fingers or the flat bottom of a measuring cup, press the mixture down firmly and evenly into one compact layer. You want it to be nice and tight. Once it’s pressed, pop the pan into the freezer for about 15 minutes. This quick chill helps the base set, making it easier to spread the next layer on top without disturbing it.
Step 3: Whip Up the Banana Layer. While the base is chilling, clean out your food processor. Add the peeled ripe bananas, vanilla extract, and almond butter. Blend on high until the mixture is completely smooth, creamy, and almost whipped in texture. You’ll notice the almond butter adds a subtle richness and helps prevent the banana layer from freezing rock-solid. Scrape down the sides if needed to make sure everything is incorporated.
Step 4: Assemble the Middle Layer. Take the pan with the chilled base out of the freezer. Pour the creamy banana mixture over the top. Use a spatula or the back of a spoon to spread it into a perfectly even layer, making sure it reaches all the way to the corners. A little wobble in the pan is fine—it will firm up in the freezer. Once it’s smooth, return the pan to the freezer. This time, you’ll need to freeze it for at least 3-4 hours, or ideally overnight, until the banana layer is completely firm to the touch.
Step 5: The Chocolate Magic. When the banana layer is fully frozen, it’s time for the chocolate coating. Combine the dark chocolate chips and tablespoon of coconut oil in a microwave-safe bowl. Heat in 30-second bursts, stirring well after each interval, until the chocolate is completely melted and glossy. Alternatively, you can melt them together in a small saucepan over very low heat, stirring constantly. Let the melted chocolate cool for just a minute or two—you don’t want it to be so hot that it melts the banana layer.
Step 6: The Final Coat and Slice. Remove the pan from the freezer. Using the parchment paper sling, carefully lift the entire block out of the pan and place it on a cutting board. Pour the melted chocolate over the frozen banana layer, using an offset spatula or knife to spread it quickly and evenly across the top and sides. The chocolate will start to set almost immediately. Working swiftly, use a sharp knife to score the chocolate and slice the block into 9 squares before the chocolate fully hardens. This prevents it from cracking later. If the chocolate does set completely, just dip your knife in hot water and wipe it dry before each cut for clean edges.
Serving Suggestions
Complementary Dishes
- A simple berry compote — The bright, tart acidity of warmed raspberries or strawberries cuts through the sweetness and richness of the chocolate and banana beautifully, creating a more complex dessert plate.
- A dollop of coconut whipped cream — For an extra-indulgent feel, a spoonful of light, airy coconut whip adds a lovely creamy contrast and makes these squares feel truly restaurant-worthy.
Drinks
- A glass of cold almond milk — It’s a classic pairing for a reason. The mild, nutty flavor of the milk complements the dessert without overpowering it, and it’s wonderfully refreshing.
- A hot cup of coffee — The bitterness of a good, strong brew is the perfect counterpoint to the frozen, sweet squares, making for a fantastic afternoon pick-me-up.
Something Sweet
- A few fresh raspberries on the side — Their pop of color and sharp flavor provide a perfect little palate cleanser between bites of the rich, frozen square.
- A sprinkle of flaky sea salt — Just a tiny pinch on top right before serving enhances the chocolate flavor and adds a sophisticated salty-sweet finish.
Top Mistakes to Avoid
- Mistake: Using under-ripe bananas. Pale yellow, firm bananas lack the necessary sweetness and starch conversion needed for a creamy texture. They will result in a bland, slightly icy middle layer instead of a smooth, sweet one.
- Mistake: Spreading warm chocolate on a semi-frozen base. If the banana layer isn’t completely frozen solid, the heat from the melted chocolate will cause it to melt and create a messy, uneven layer. Patience is key here—wait for that firm touch.
- Mistake: Not scoring the chocolate before fully setting. If you pour the chocolate and then wait until it’s rock-hard to slice, you’ll end up with shattered chocolate and messy edges. Scoring it while it’s still slightly soft is the trick to perfect squares.
- Mistake: Skipping the parchment paper sling. Trying to chisel frozen squares directly out of a pan is a recipe for broken desserts and frustration. The parchment sling is your best friend for a clean, stress-free release.
Expert Tips
- Tip: For a nut-free version, simply swap the almond flour in the base for more rolled oats or sunflower seed flour, and use sunflower seed butter instead of almond butter in the banana layer. It works just as beautifully.
- Tip: Add some crunch. For an extra dimension, stir a tablespoon or two of chopped toasted nuts or coconut flakes into the banana mixture before spreading it over the base. It adds a lovely surprise in the middle.
- Tip: Get creative with toppings. Before the chocolate sets, you can sprinkle the top with a little flaky sea salt, crushed freeze-dried raspberries, or even a dusting of cinnamon for a personalized touch.
- Tip: Storage is simple. Keep these squares in a single layer in an airtight container in the freezer, with a piece of parchment paper between layers if you stack them. They’ll keep perfectly for up to 2 months—if they last that long!
FAQs
Can I use a different type of oat?
You can, but the texture will change. Quick oats will create a finer, denser base, while steel-cut oats won’t break down properly in the food processor. Old-fashioned rolled oats are the gold standard here because they provide the perfect chewy texture and hold together well. If you’re gluten-free, just make sure your oats are certified GF.
My banana mixture is a bit liquidy. What did I do wrong?
This usually happens if the bananas were very large or particularly juicy. Don’t worry! Just pour it over the base as best you can and pop it in the freezer. It will still set solid; it might just take a little bit longer—perhaps an extra hour. The result will still be deliciously creamy.
Why did my chocolate topping turn white or blotchy?
That’s called “bloom,” and it’s completely harmless! It happens when the chocolate is exposed to temperature changes or moisture (like condensation from the frozen banana layer). It doesn’t affect the taste at all. To minimize it, just make sure your chocolate isn’t too hot when you pour it, and let the melted mixture cool for a minute or two first.
How long should I let a square thaw before eating?
This is a matter of personal preference! For a fir, ice-cream-like texture, eat it straight from the freezer. For a softer, creamier bite, let it sit on the counter for 5-7 minutes. I find that’s the sweet spot where the chocolate has a slight give and the banana layer is wonderfully soft.
Can I make these without a food processor?
It’s a bit trickier, but possible. For the base, you could try mashing the dates very thoroughly with a fork and then mixing everything by hand—it just won’t be as uniform. For the banana layer, a very powerful blender will work, or you can simply mash the bananas extremely well with a fork and whisk in the other ingredients, though the texture will be more like banana mush than whipped cream.
Frozen Chocolate Banana Squares
Whip up these easy Frozen Chocolate Banana Squares! A no-bake, vegan-friendly treat with a crunchy base, creamy banana layer & rich chocolate shell. Perfect healthy dessert!
Ingredients
Ingredients
-
1 cup rolled oats (gluten-free if needed)
-
1 cup pitted Medjool dates (soaked in hot water for 10 minutes if not super soft)
-
1/4 cup almond flour
-
2 tbsp coconut oil (melted)
-
Pinch sea salt
-
3 large, very ripe bananas (the spottier, the sweeter!)
-
1 tsp pure vanilla extract
-
1 tbsp creamy almond butter (or any nut/seed butter)
-
1 cup dark chocolate chips (dairy-free if desired)
-
1 tbsp coconut oil
Instructions
-
Line an 8×8 inch pan with parchment, leaving overhang as handles. In a food processor, pulse oats, pitted dates, almond flour, melted coconut oil, and a pinch of salt until it starts to clump (add 1 tsp water if too dry).01
-
Press mixture very firmly and evenly into the lined pan to form the base. Freeze 15 minutes to set.02
-
Banana layer: in a cleaned processor, blend ripe bananas, vanilla extract, and almond butter until completely smooth and creamy.03
-
Spread banana mixture evenly over the chilled base. Freeze 3–4 hours (or overnight) until the banana layer is fully firm.04
-
Melt dark chocolate chips with 1 Tbsp coconut oil (microwave in 30-sec bursts or over very low heat), stirring until glossy. Let cool 1–2 minutes.05
-
Lift the block out with the parchment. Pour melted chocolate over the frozen banana layer and spread quickly and evenly. Score and slice into 9 squares before the chocolate fully sets (or warm the knife if set).06


