
Why You’ll Love This Dill Roasted Chickpeas
- They’re incredibly versatile. Think beyond just a snack. These little flavor bombs add a fantastic crunch to so many dishes, from creamy yogurt bowls to simple green salads.
- The texture is everything. When roasted just right, they achieve this perfect balance—crispy on the outside with a slightly tender, nutty interior. It’s a texture you’ll crave.
- They’re a pantry hero. This recipe is a lifesaver when you need a quick, impressive snack. It turns basic, shelf-stable ingredients into something truly special with minimal effort.
- You have total control over the flavor. Love dill? Add more! Want a bit of heat? A pinch of chili flakes works wonders. This recipe is a wonderful canvas for your own taste preferences.
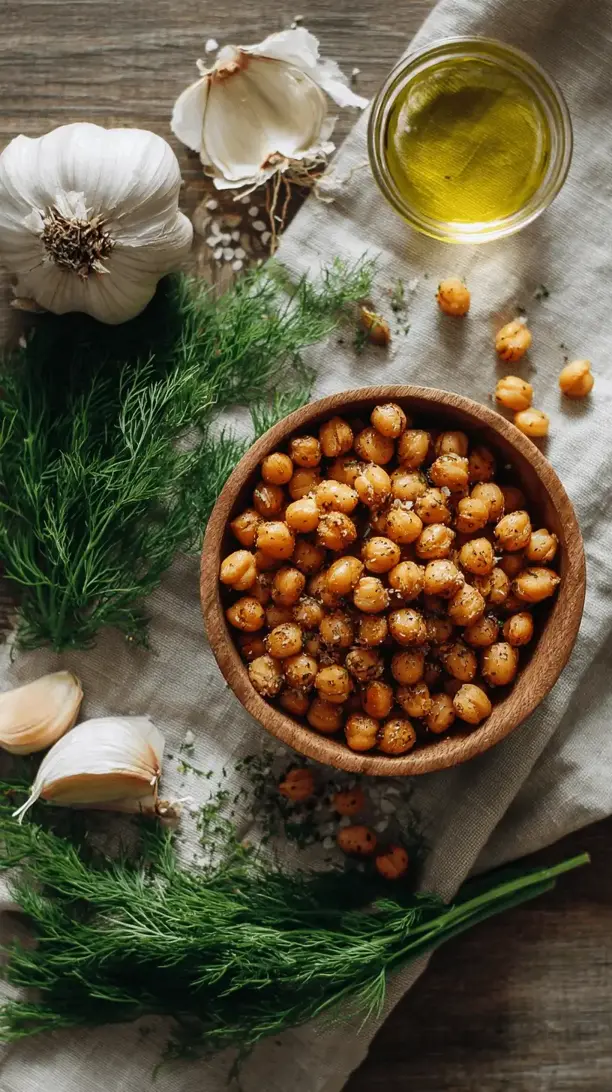
Ingredients & Tools
- 2 cans (15 oz each) chickpeas (garbanzo beans)
- 2 tablespoons olive oil (or avocado oil)
- 1/4 cup fresh dill, finely chopped
- 2 cloves garlic, minced
- 1 teaspoon onion powder
- 1/2 teaspoon sea salt, plus more to taste
- 1/4 teaspoon black pepper, freshly ground
- 1/4 teaspoon smoked paprika (optional, for a hint of smokiness)
Tools: A large baking sheet, parchment paper or a silicone baking mat, a large mixing bowl, a clean kitchen towel or paper towels.
A quick note on the chickpeas—rinsing and drying them thoroughly is the single most important step for achieving maximum crispiness. Don’t skip it! And using fresh dill really makes a difference here, its bright, grassy flavor is what makes these chickpeas sing.
Serves: 4 (as a snack) | Prep Time: 10 minutes | Cook Time: 30-40 minutes | Total Time: 40-50 minutes
Before You Start: Tips & Ingredient Notes
- Dry those chickpeas! This is the golden rule. After rinsing, spread them on a clean kitchen towel and pat them gently but thoroughly. Any excess moisture will steam the chickpeas instead of roasting them.
- Why fresh dill? While dried dill can work in a pinch, fresh dill has a much more vibrant, aromatic quality that doesn’t get bitter when roasted. It’s worth seeking out for this recipe.
- Don’t crowd the pan. Make sure your chickpeas are in a single, even layer with a little space between them. Overcrowding will cause them to steam and become soft rather than crispy.
- Seasoning timing is key. We’re adding the dill and garlic partway through cooking. This protects those delicate flavors from burning in the high heat, ensuring they stay fragrant and tasty.
How to Make Dill Roasted Chickpeas
Step 1: First, preheat your oven to 400°F (200°C). Line your baking sheet with parchment paper or a silicone mat—this makes cleanup a breeze and prevents any sticking. Now, drain and rinse your two cans of chickpeas in a colander. Give them a good shake to remove the excess liquid.
Step 2: This is the crucial step! Spread the rinsed chickpeas onto a clean kitchen towel. Gently roll them around and pat them dry. You’ll want to get them as dry as possible; you can even leave them to air-dry for 10 minutes if you have the time. Don’t worry if some of the thin skins come off—you can discard those. The goal is dry chickpeas for a crispy result.
Step 3: Transfer the dried chickpeas to your large mixing bowl. Drizzle with the olive oil and toss until every chickpea is lightly and evenly coated. Then, sprinkle over the onion powder, salt, pepper, and smoked paprika (if using). Toss again until the spices are well distributed. The chickpeas should look shiny and speckled with spice.
Step 4: Pour the seasoned chickpeas onto your prepared baking sheet and spread them into a single, even layer. This is important for even cooking. Pop them into the preheated oven and roast for 20 minutes. You’ll start to hear a faint popping sound—that’s a good sign!
Step 5: While the chickpeas are roasting, prepare your fresh additions. Finely chop the dill and mince the garlic. After the first 20 minutes, carefully remove the baking sheet from the oven. The chickpeas will have shrunk slightly and started to turn golden.
Step 6: Sprinkle the chopped dill and minced garlic directly over the hot chickpeas. Give the pan a gentle shake to distribute everything. The heat will wake up the aromas of the garlic and dill beautifully. Return the pan to the oven for another 10-20 minutes.
Step 7: Keep a close eye on them during this final stretch. They’re done when they are deep golden brown and crispy to your liking. Some might be crunchier than others, and that’s part of the charm! Let them cool on the baking sheet for at least 5-10 minutes—they’ll continue to crisp up as they cool.
Serving Suggestions
Complementary Dishes
- A simple Greek yogurt dip — Stir together some plain Greek yogurt, lemon juice, and a pinch of salt. The cool, creamy dip is a perfect contrast to the warm, crunchy chickpeas.
- Over a vibrant grain bowl — Scatter them over a bowl of quinoa or farro with roasted vegetables and a lemony tahini dressing for an incredible textural element.
- As a salad topper — Forget croutons! These chickpeas add a protein-packed crunch to any green salad, especially one with cucumber and feta cheese.
Drinks
- A crisp, cold lager — The lightness of a lager cleanses the palate between bites, making each chickpea taste as delicious as the first.
- Sparkling water with lemon — The effervescence and citrus notes are a fantastic non-alcoholic pairing that highlights the herby flavors.
- A dry rosé — The subtle berry notes and acidity in a good rosé complement the earthy chickpeas and fresh dill surprisingly well.
Something Sweet
- Dark chocolate-covered almonds — A few pieces of something rich and slightly bitter after the savory snack feels like a perfectly balanced ending.
- Lemon sorbet — The bright, clean flavor of lemon sorbet is a refreshing palate cleanser that doesn’t overwhelm.
- Fresh strawberries — Simple, sweet, and juicy, strawberries provide a lovely, natural contrast to the savory, salty snack.
Top Mistakes to Avoid
- Mistake: Skipping the drying step. I’ve been impatient and skipped this before, and you end up with soft, steamed chickpeas instead of crispy ones. The towel-dry is non-negotiable for the best texture.
- Mistake: Adding the fresh dill too early. If you add the delicate dill and garlic at the beginning, they will burn in the oven and turn bitter. Adding them halfway through preserves their fresh flavor.
- Mistake: Using too much oil. You just need enough to coat the chickpeas. Excess oil will make them greasy and prevent them from getting truly crunchy.
- Mistake: Not shaking the pan. Giving the pan a shake when you add the dill helps ensure even browning. Chickpeas on the edges can cook faster than those in the center.
Expert Tips
- Tip: Experiment with spices. This recipe is a fantastic base. Try adding a teaspoon of cumin or coriander with the initial spices, or a pinch of cayenne for heat. The possibilities are endless.
- Tip: For extra crispiness, leave the oven door ajar. After turning off the oven, you can prop the door open slightly with a wooden spoon and let the chickpeas cool inside. This helps any residual moisture escape.
- Tip: Make a big batch. These chickpeas are best eaten the day they’re made, but they can be stored in a paper bag (not an airtight container, which traps steam) for a day or two. They may soften, but you can re-crisp them in a 350°F oven for 5-10 minutes.
- Tip: Save the aquafaba. The liquid from the chickpea can is called aquafaba and is a fantastic egg white substitute in vegan baking. Don’t just pour it down the drain!
FAQs
Can I use dried chickpeas instead of canned?
Absolutely! You’ll need to start with about 1 cup of dried chickpeas. Soak them overnight in plenty of water, then drain and cook until tender (but not mushy) before roasting. This method gives you more control over the texture and can result in an even crispier chickpea, but it does add significant prep time.
Why are my roasted chickpeas not crunchy?
The most common culprit is moisture. Did you dry them thoroughly enough? Also, overcrowding the pan can cause steaming. Finally, they will crisp up more as they cool, so give them that crucial 10-minute resting period on the counter before you dig in. If they’re still soft, they might just need a few more minutes in the oven.
Can I make these oil-free?
You can try, but the oil is key for conducting heat and achieving that crispy, golden exterior. Without it, they tend to dry out and become very hard rather than pleasantly crunchy. If you must avoid oil, a light spritz of cooking spray can work, but the results won’t be quite the same.
How long do they stay fresh?
Honestly, they are best enjoyed the same day. Their crispiness is at its peak right after cooling. If you store them, keep them in a paper bag at room temperature for up to 2 days. An airtight container will trap steam and make them soft. If they lose their crunch, a quick trip back to a hot oven will help.
Can I use dried dill instead of fresh?
You can, but the flavor profile will be different. Use about 1 tablespoon of dried dill. I’d recommend adding it with the initial spices since dried herbs are less prone to burning. The flavor will be more concentrated and slightly less bright than fresh dill, but it will still be delicious.
Dill Roasted Chickpeas
Whip up crispy, addictive Dill Roasted Chickpeas! This easy snack recipe uses pantry staples for a healthy, flavorful treat. Perfect for salads, soups, or munching straight from the bowl.
Ingredients
Ingredients
-
2 cans chickpeas (garbanzo beans) (15 oz each)
-
2 tablespoons olive oil (or avocado oil)
-
1/4 cup fresh dill (finely chopped)
-
2 cloves garlic (minced)
-
1 teaspoon onion powder
-
1/2 teaspoon sea salt (plus more to taste)
-
1/4 teaspoon black pepper (freshly ground)
-
1/4 teaspoon smoked paprika (optional, for a hint of smokiness)
Instructions
-
First, preheat your oven to 400°F (200°C). Line your baking sheet with parchment paper or a silicone mat—this makes cleanup a breeze and prevents any sticking. Now, drain and rinse your two cans of chickpeas in a colander. Give them a good shake to remove the excess liquid.01
-
This is the crucial step! Spread the rinsed chickpeas onto a clean kitchen towel. Gently roll them around and pat them dry. You’ll want to get them as dry as possible; you can even leave them to air-dry for 10 minutes if you have the time. Don’t worry if some of the thin skins come off—you can discard those. The goal is dry chickpeas for a crispy result.02
-
Transfer the dried chickpeas to your large mixing bowl. Drizzle with the olive oil and toss until every chickpea is lightly and evenly coated. Then, sprinkle over the onion powder, salt, pepper, and smoked paprika (if using). Toss again until the spices are well distributed. The chickpeas should look shiny and speckled with spice.03
-
Pour the seasoned chickpeas onto your prepared baking sheet and spread them into a single, even layer. This is important for even cooking. Pop them into the preheated oven and roast for 20 minutes. You’ll start to hear a faint popping sound—that’s a good sign!04
-
While the chickpeas are roasting, prepare your fresh additions. Finely chop the dill and mince the garlic. After the first 20 minutes, carefully remove the baking sheet from the oven. The chickpeas will have shrunk slightly and started to turn golden.05
-
Sprinkle the chopped dill and minced garlic directly over the hot chickpeas. Give the pan a gentle shake to distribute everything. The heat will wake up the aromas of the garlic and dill beautifully. Return the pan to the oven for another 10-20 minutes.06
-
Keep a close eye on them during this final stretch. They’re done when they are deep golden brown and crispy to your liking. Some might be crunchier than others, and that’s part of the charm! Let them cool on the baking sheet for at least 5-10 minutes—they’ll continue to crisp up as they cool.07


