Why You’ll Love These Date and Nut Energy Bars
- Incredibly simple to make. Honestly, if you can operate a food processor, you’re 90% of the way there. There’s no baking involved, just a bit of pulsing and pressing.
- They’re naturally sweetened. The dates do all the heavy lifting here, providing a deep, caramel-like sweetness that binds everything together without a single grain of refined sugar.
- Endlessly customizable. This recipe is a fantastic blueprint. Not a fan of almonds? Use pecans. Want a chocolate hit? Throw in some cacao nibs. It’s your bar, your rules.
- The perfect grab-and-go snack. They’re sturdy, not overly messy, and packed with natural energy. Toss one in your bag before a hike, a long work session, or a busy afternoon of errands.
Ingredients & Tools
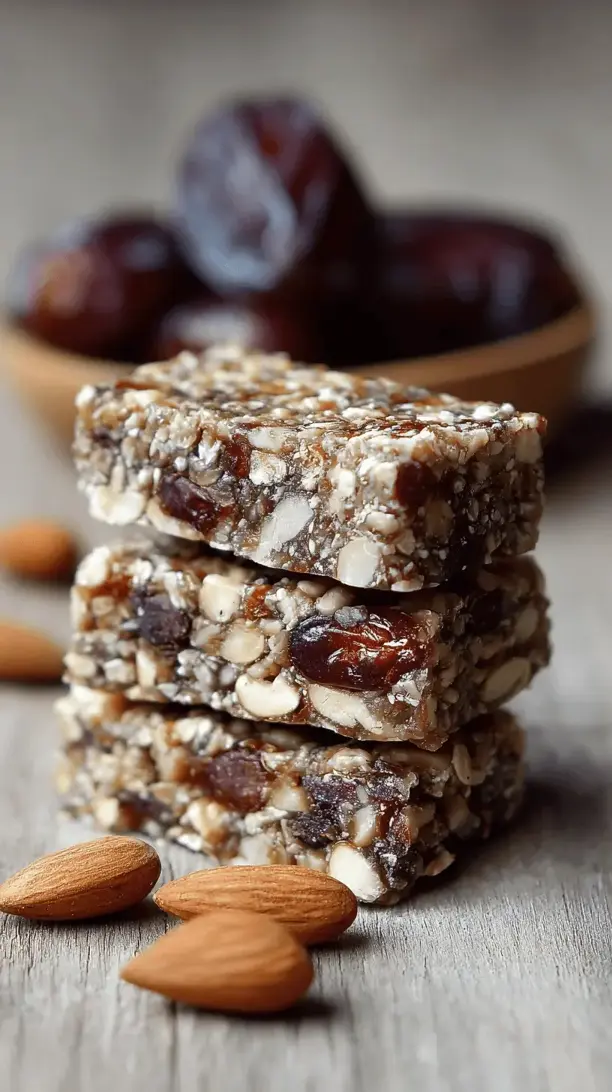
- 300 g (about 2 cups) pitted Medjool dates
- 150 g (1 ½ cups) raw almonds
- 80 g (¾ cup) raw walnuts
- 50 g (½ cup) rolled oats
- 2 tablespoons chia seeds or flax seeds
- 1 tablespoon coconut oil, melted
- 1 teaspoon pure vanilla extract
- A generous pinch of fine sea salt
Tools: A food processor (this is essential), an 8×8 inch baking pan, parchment paper.
The quality of your dates really matters here—squishy, fresh Medjool dates will create the perfect sticky-sweet base. And don’t skip the pinch of salt; it’s the secret weapon that makes all the other flavors pop.
Serves: 10 bars | Prep Time: 15 minutes | Chill Time: 1 hour | Total Time: 1 hour 15 minutes
Before You Start: Tips & Ingredient Notes
- Are your dates dry? If your dates seem a little hard or have been in the cupboard for a while, soak them in warm water for 10 minutes before using. Just be sure to drain them thoroughly and pat them dry, or your bars might be too wet.
- Toasting the nuts is a game-changer. I highly recommend spreading the almonds and walnuts on a baking sheet and toasting them at 175°C (350°F) for 8-10 minutes until fragrant. It deepens their flavor immensely and makes the bars taste more complex.
- Why the oats? The rolled oats aren’t just filler; they add a lovely chewy texture and help absorb a little of the natural oils from the nuts, giving the bars a better structure. Quick oats will work in a pinch, but the texture will be less pronounced.
- The binding power of dates. When pulsed, dates create a magical, sticky paste called “date paste.” This is what holds our bars together, so don’t be shy about processing them until they form a ball against the side of the processor.
How to Make Date and Nut Energy Bars
Step 1: First, prepare your pan. Line your 8×8 inch baking pan with parchment paper, leaving some overhang on two opposite sides. This creates little “handles” that will make it super easy to lift the whole slab of bars out later. Trust me, this small step saves a lot of frustration.
Step 2: Now, let’s pulse the dry ingredients. If you toasted your nuts, let them cool completely first. Add the almonds and walnuts to the bowl of your food processor. Pulse 8-10 times, until the nuts are broken down into a coarse meal with some larger, pea-sized pieces remaining. You’ll notice the aroma is just incredible. This texture variety is key for a satisfying bite. Transfer this nut mixture to a separate bowl for now.
Step 3: It’s date time! Place the pitted dates into the empty food processor (no need to wash it). Add the melted coconut oil, vanilla extract, and that all-important pinch of salt. Process until the dates break down into a thick, smooth, and very sticky paste. This might take a minute or two—you’ll know it’s ready when it clumps together into a ball.
Step 4: Bringing it all together. Add the reserved nut mixture back into the food processor with the date paste. Add the rolled oats and chia seeds as well. Now, pulse everything together. The trick is to pulse just until the mixture looks evenly combined and starts to clump together again. Be careful not to over-process it into a uniform paste; you want to retain some of that lovely texture.
Step 5: Press it in, firmly! Turn the mixture out into your prepared pan. Now, this is the most important part for getting bars that hold their shape: press, press, press! Use the flat bottom of a measuring cup or a glass, and really compact the mixture into an even, tight layer. Apply firm pressure across the entire surface. The more you press now, the less they’ll crumble later.
Step 6: The waiting game. Place the pan in the refrigerator for at least one hour, uncovered. This chilling time is non-negotiable—it allows the fats to firm up and the bars to set completely, making them sliceable and sturdy.
Step 7: Slice and serve. Using the parchment paper handles, lift the entire slab out of the pan. Place it on a cutting board and use a sharp knife to slice it into 10 rectangular bars, or whatever size you prefer. They’re ready to enjoy!
Serving Suggestions
Complementary Dishes
- A simple fruit platter — The fresh, juicy acidity of berries or apple slices provides a lovely contrast to the rich, dense sweetness of the bars.
- A bowl of Greek yogurt — Crumble a bar over a bowl of thick, tangy yogurt for a breakfast that feels decadent but is packed with protein and fiber.
Drinks
- A strong cup of black coffee — The bitterness of the coffee is a perfect partner for the sweet, nutty flavors of the bar. It’s my favorite mid-morning combination.
- A cold glass of almond milk — For a lighter, truly nutty pairing, a creamy glass of your favorite plant-based milk complements these bars beautifully.
Something Sweet
- Dark chocolate-covered orange slices — If you’re serving these as part of a dessert platter, the bright, citrusy chocolate offers a sophisticated and refreshing finish.
Top Mistakes to Avoid
- Mistake: Using old, dry dates. If your dates aren’t soft and sticky, they won’t form a proper paste to bind the bars. The mixture will be crumbly and won’t hold together. I’ve learned this the hard way!
- Mistake: Not pressing the mixture firmly enough. A gentle pat won’t do it. You need to use some serious muscle to compact the mixture in the pan. Lazy pressing equals crumbly bars.
- Mistake: Skipping the chill time. Impatience is the enemy here. If you try to slice the bars before they’ve fully set in the fridge, they’ll just fall apart. Set a timer and walk away.
- Mistake: Over-processing the final mixture. You want a textured bar, not a homogeneous nut butter. Pulse just until combined to keep those delightful little crunchy bits.
Expert Tips
- Tip: Get creative with add-ins. After pulsing the main ingredients, you can stir in ¼ cup of other goodies by hand. Think unsweetened coconut flakes, cacao nibs for a chocolate crunch, or even a sprinkle of cinnamon or cardamom for a warm spice note.
- Tip: For perfectly neat bars, score them before chilling. After pressing the mixture into the pan, use your knife to lightly score the surface into bars. After chilling, they’ll break apart along these pre-cut lines for a super clean look.
- Tip: Make them nut-free. Simply replace the almonds and walnuts with an equal amount of toasted sunflower seeds and pumpkin seeds. The result is just as delicious and gives you a great seed-based energy bar.
- Tip: Storage is key. Keep these bars in an airtight container in the refrigerator for up to two weeks. For longer storage, they freeze beautifully for up to three months. Just wrap them individually in parchment paper and pop them in a freezer bag.
FAQs
Can I use a different type of nut?
Absolutely! This recipe is very flexible. Pecans, cashews, hazelnuts, or pistachios would all be wonderful. Just try to keep the total quantity of nuts roughly the same. A mix is always nice for complexity. If using salted nuts, you might want to reduce or omit the added pinch of salt.
My mixture is too dry and crumbly. What can I do?
This usually happens if the dates weren’t quite sticky enough. The easy fix is to add a little more binding agent. Add another tablespoon of melted coconut oil, or even a teaspoon of water, and pulse again. If it’s really stubborn, you can add 1-2 more pitted dates and process until it comes together.
Can I make these without a food processor?
It’s challenging, but not entirely impossible. You would need to very finely chop the dates and nuts by hand, which is quite a workout. A high-powered blender might work if you pulse very carefully, but a food processor is really the ideal tool for the job to get the right texture without turning everything to powder.
Are these bars suitable for vegans?
Yes, they are! As written, this recipe is completely plant-based, using dates and coconut oil as the natural binders. They’re a fantastic vegan-friendly snack option.
Why are my bars too soft and sticky?
This could be due to a couple of reasons. First, the dates might have been very fresh and high-moisture. Second, you might have added a bit too much oil or liquid. Finally, ensure they are chilled for the full hour—this firms them up significantly. If they’re still too sticky after chilling, you can roll individual portions into balls instead of bars and coat them in desiccated coconut or cocoa powder to handle easier.