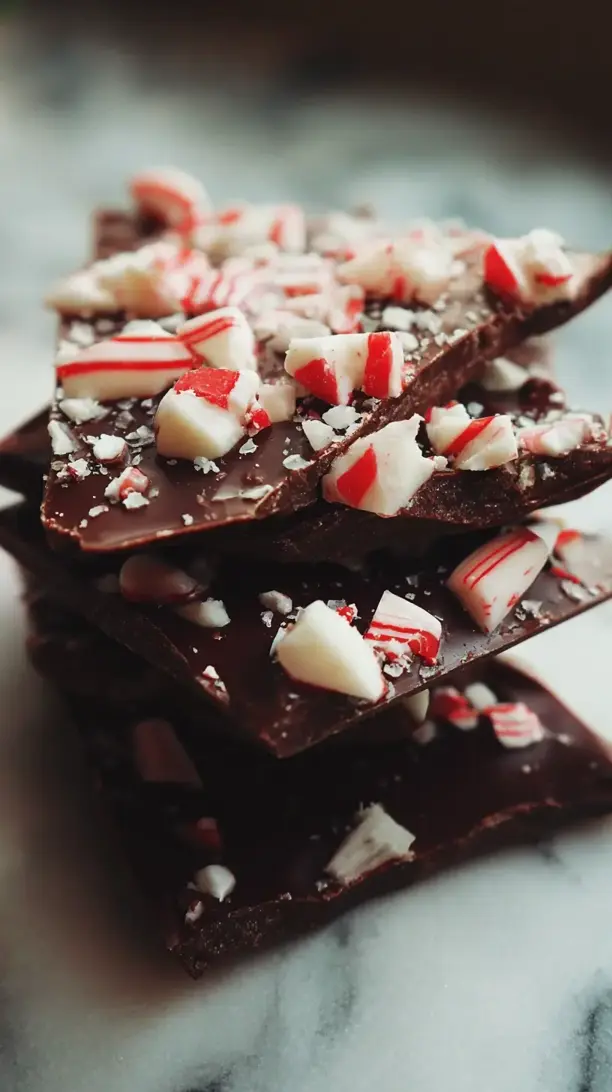
Why You’ll Love This Dark Chocolate Peppermint Bark
- It’s incredibly simple. Honestly, this is a no-fuss, no-bake recipe that comes together in under 30 minutes of active time. If you can melt chocolate, you can make this bark.
- The flavor combination is a classic. Rich, slightly bitter dark chocolate paired with bright, cool peppermint is a match made in holiday heaven. It’s refreshing and indulgent all at once.
- It makes a gorgeous homemade gift. Packaged in a cute box or tin, this bark looks professional and thoughtful. It’s a delicious way to show someone you care during the holidays.
- It’s wonderfully customizable. Feel free to get creative! You can use milk chocolate, add a drizzle of white chocolate, or even sprinkle on some sea salt for a sophisticated twist.
Ingredients & Tools
- 450 g high-quality dark chocolate (around 60-70% cocoa), chopped
- 6-8 candy canes or peppermint candies, crushed
- 1 tsp peppermint extract
- 1/4 tsp coarse sea salt (optional, but recommended)
Tools: A medium-sized heatproof bowl, a baking sheet, parchment paper, a rolling pin or heavy-bottomed pan for crushing, a spatula
The quality of your dark chocolate really is the star here, so choose one you enjoy eating on its own. For the candy canes, you can find pre-crushed peppermint bits, but honestly, smashing them yourself is half the fun and gives you more control over the texture.
Nutrition (per serving)
- Calories: 180 kcal
- Protein: 2 g
- Fat: 10 g
- Carbohydrates: 22 g
- Fiber: 2 g
Serves: 12 | Prep Time: 15 mins | Cook Time: 5 mins | Total Time: 1 hour 20 mins (includes setting)
Before You Start: Tips & Ingredient Notes
- Chocolate Choice Matters. Using a good quality chocolate bar that you chop yourself will give you a much smoother melt and a better final texture than chocolate chips, which contain stabilizers.
- Don’t Skip the Parchment. Seriously, this is your best friend for easy bark removal. Wax paper can sometimes stick, so parchment is the safer bet for a flawless release.
- Crush to Your Liking. You can have a mix of fine peppermint “dust” for flavor and larger chunks for visual appeal and crunch. A zip-top bag and a rolling pin make this task clean and easy.
- Work in a Cool, Dry Space. Humidity is the enemy of melting chocolate! It can cause it to “seize” and become grainy. Make sure your bowls and tools are completely dry.
How to Make Dark Chocolate Peppermint Bark
Step 1: First, line your baking sheet with parchment paper. Make sure it lies flat—you don’t want any wrinkles creating weird shapes in your bark. Set this aside. Now, for the fun part: place your unwrapped candy canes into a sturdy zip-top bag, seal it tightly, and use a rolling pin or the bottom of a heavy pan to crush them. You’ll hear a very satisfying crunch! Aim for a mix of sizes, from fine powder to small pebbles.
Step 2: Next, it’s time to melt the chocolate. Chop your dark chocolate bar into small, uniform pieces—this helps it melt evenly. Place the chocolate in a completely dry heatproof bowl. You can melt it using a double boiler (a bowl set over a pot of gently simmering water, making sure the bottom of the bowl doesn’t touch the water) or in short bursts in the microwave. If microwaving, do it in 20-second intervals, stirring thoroughly each time. The chocolate should be smooth and glossy.
Step 3: Once the chocolate is perfectly melted and smooth, take it off the heat. Now, stir in the peppermint extract. Be careful here—a little goes a long way! You want a clear minty flavor that complements the chocolate, not overpowers it. Give it a good stir until it’s fully incorporated and you can smell that wonderful minty aroma.
Step 4: Immediately pour the melted chocolate onto your prepared parchment-lined baking sheet. Use a spatula to spread it into an even layer, about 1/4-inch thick. You don’t need to make a perfect rectangle; the rustic, free-form shape is part of its charm. Work relatively quickly as the chocolate will start to set.
Step 5: Now, for the grand finale! While the chocolate is still wet and shiny, generously sprinkle all of your crushed candy canes over the top. Press down gently with your hands or the back of a spoon to help them adhere. If you’re using it, now is the time to sprinkle a tiny bit of flaky sea salt over everything—it will cut the sweetness beautifully.
Step 6: The hardest part: waiting. Carefully transfer the entire baking sheet to the refrigerator. Let the bark set completely, which will take about an hour. You’ll know it’s ready when the surface is firm to the touch and has lost its shine. Don’t rush this step by putting it in the freezer, as that can cause condensation.
Step 7: Once the bark is fully set, remove it from the fridge. Lift the entire slab by the parchment paper edges and place it on a cutting board. Use your hands to break it into rustic, uneven pieces, or for cleaner lines, carefully use a sharp knife to cut it. You’ll hear that glorious, crisp snap!
Serving Suggestions
Complementary Dishes
- A Cheese Board — The sharpness of a good aged cheddar or a creamy brie provides a lovely savory contrast to the sweet, minty bark.
- Fresh Citrus Salad — The bright acidity of oranges or grapefruit cleanses the palate and makes each bite of bark taste new again.
- Spiced Nuts — A bowl of warm, cinnamon-toasted almonds or pecans offers a cozy, spiced counterpart to the cool peppermint.
Drinks
- Peppermint Hot Chocolate — Double down on the cozy mint-chocolate vibe for the ultimate winter treat.
- Earl Grey Tea — The bergamot in the tea creates a surprisingly elegant and sophisticated pairing with the dark chocolate.
- Cold Brew Coffee — The low acidity and smooth, bold flavor of cold brew is a fantastic, non-clashing partner for rich chocolate.
Something Sweet
- Vanilla Bean Ice Cream — Crumble the bark over a scoop for an instant, decadent sundae with fantastic texture.
- Chewy Gingerbread Cookies — The warm spices of gingerbread and the cool mint create a dynamic and festive flavor dance.
- Simple Shortbread — The buttery, crumbly shortbread is a neutral, rich base that lets the bark truly shine.
Top Mistakes to Avoid
- Using Low-Quality Chocolate: The flavor of your bark is only as good as the chocolate you start with. A waxy or overly sweet chocolate will result in a less sophisticated final product.
- Getting Water in the Chocolate: Even a single drop of water can cause melted chocolate to “seize,” turning it from smooth and liquid to a grainy, solid mass. Always ensure your bowls and tools are bone-dry.
- Overheating the Chocolate: If you blast it in the microwave for too long, the chocolate can burn or develop a scorched taste. Low and slow is the way to go, with frequent stirring.
- Adding Toppings Too Late: If you wait until the chocolate has started to set, the candy cane pieces won’t stick properly and will just fall off when you break the bark.
Expert Tips
- Tip: Temper Your Chocolate (Optional). If you want a super glossy, snappy bark that stays firm at room temperature, you can temper your chocolate. It involves carefully controlling the temperature during melting and cooling. It’s a bit more work, but it’s the professional secret to perfect bark.
- Tip: Create Layers. For a stunning visual effect, melt some white chocolate separately. After you spread the dark chocolate, drizzle the white chocolate over the top and then swirl it with a toothpick before adding the peppermint crunch.
- Tip: Add Other Crunchy Elements. Don’t be afraid to mix in other textures! Toasted coconut flakes, crushed pretzels for a salty-sweet kick, or even freeze-dried raspberries can add a wonderful and unique twist.
- Tip: Use a Bench Scraper for Cutting. For perfectly clean, straight edges, press a large bench scraper or a sharp chef’s knife straight down through the set bark. Don’t use a sawing motion, as this can cause it to splinter.
FAQs
Can I use milk chocolate or white chocolate instead?
Absolutely! This recipe is very adaptable. Milk chocolate will make it sweeter and creamier, while white chocolate will offer a beautiful contrast with the red and white candy canes. Just be aware that white chocolate is more delicate and can burn even more easily than dark chocolate, so melt it with extra care on very low heat.
How far in advance can I make this bark?
You can make this bark up to two weeks in advance, which is fantastic for getting ahead on holiday prep. Just store it in an airtight container in a cool, dry place. If your kitchen is warm, the refrigerator is best, but let it come to room temperature for about 10 minutes before serving for the best snap and flavor.
My chocolate seized and became grainy. Can I fix it?
It’s tricky, but sometimes you can save it! Immediately stir in a teaspoon of a neutral oil (like coconut or vegetable oil) for every 100g of chocolate. This can sometimes coax it back to a smoother state, though it won’t be quite as perfect as before. It’s really best to just start over with dry equipment to avoid the heartache.
What’s the best way to package this for gifting?
I love using cellophane bags tied with a festive ribbon or stacking the pieces in a decorative tin with layers of parchment paper in between. You can also use small cardboard boxes lined with waxed tissue paper. A little tag with storage instructions is a thoughtful final touch.
Can I make this bark vegan?
Easily! Just ensure you are using a high-quality dark chocolate that is certified vegan (many are, but always check the label for milk solids). Also, double-check that your candy canes are vegan, as some brands use confectioner’s glaze or other non-vegan ingredients.
Dark Chocolate Peppermint Bark
Make this easy Dark Chocolate Peppermint Bark for a festive holiday treat. Only 4 ingredients & no baking required! Get the simple recipe now.
Ingredients
For the bark:
-
450 g high-quality dark chocolate (chopped, around 60-70% cocoa)
-
6-8 candy canes or peppermint candies (crushed)
-
1 tsp peppermint extract
-
1/4 tsp coarse sea salt (optional, but recommended)
Instructions
-
First, line your baking sheet with parchment paper. Make sure it lies flat—you don't want any wrinkles creating weird shapes in your bark. Set this aside. Now, for the fun part: place your unwrapped candy canes into a sturdy zip-top bag, seal it tightly, and use a rolling pin or the bottom of a heavy pan to crush them. You'll hear a very satisfying crunch! Aim for a mix of sizes, from fine powder to small pebbles.01
-
Next, it's time to melt the chocolate. Chop your dark chocolate bar into small, uniform pieces—this helps it melt evenly. Place the chocolate in a completely dry heatproof bowl. You can melt it using a double boiler (a bowl set over a pot of gently simmering water, making sure the bottom of the bowl doesn't touch the water) or in short bursts in the microwave. If microwaving, do it in 20-second intervals, stirring thoroughly each time. The chocolate should be smooth and glossy.02
-
Once the chocolate is perfectly melted and smooth, take it off the heat. Now, stir in the peppermint extract. Be careful here—a little goes a long way! You want a clear minty flavor that complements the chocolate, not overpowers it. Give it a good stir until it's fully incorporated and you can smell that wonderful minty aroma.03
-
Immediately pour the melted chocolate onto your prepared parchment-lined baking sheet. Use a spatula to spread it into an even layer, about 1/4-inch thick. You don't need to make a perfect rectangle; the rustic, free-form shape is part of its charm. Work relatively quickly as the chocolate will start to set.04
-
Now, for the grand finale! While the chocolate is still wet and shiny, generously sprinkle all of your crushed candy canes over the top. Press down gently with your hands or the back of a spoon to help them adhere. If you're using it, now is the time to sprinkle a tiny bit of flaky sea salt over everything—it will cut the sweetness beautifully.05
-
The hardest part: waiting. Carefully transfer the entire baking sheet to the refrigerator. Let the bark set completely, which will take about an hour. You'll know it's ready when the surface is firm to the touch and has lost its shine. Don't rush this step by putting it in the freezer, as that can cause condensation.06
-
Once the bark is fully set, remove it from the fridge. Lift the entire slab by the parchment paper edges and place it on a cutting board. Use your hands to break it into rustic, uneven pieces, or for cleaner lines, carefully use a sharp knife to cut it. You'll hear that glorious, crisp snap!07