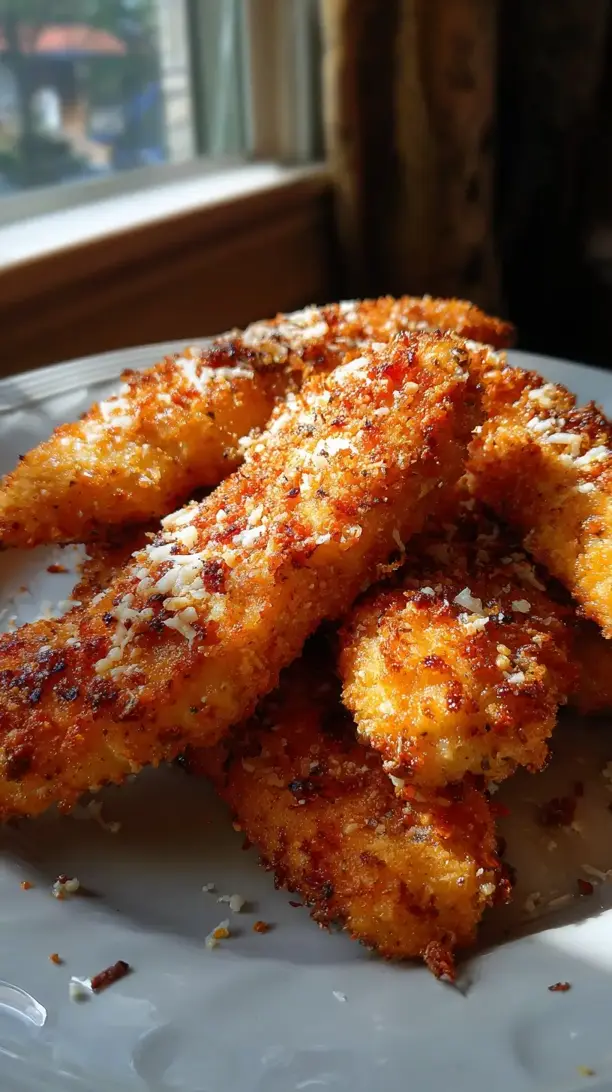
Why You’ll Love This Crispy Air Fryer Chicken Tenders
- Seriously Crispy, Not Greasy. The air fryer works its magic by circulating hot air, creating an incredibly crunchy exterior that shatters when you bite into it, all while keeping the inside wonderfully moist. You get that fried texture without the heavy, greasy feeling afterwards.
- Effortless and Quick. From prep to plate, you’re looking at under 20 minutes. There’s no need to heat up a big vat of oil or deal with a messy cleanup. It’s a straightforward process that delivers fantastic results with minimal fuss.
- Wildly Versatile. These tenders are a perfect blank canvas. Enjoy them as-is with your favorite dip, slice them over a salad, or tuck them into a soft bun for an epic sandwich. They adapt to whatever meal you’re dreaming up.
- Kid-Approved Magic. If you have little ones (or let’s be honest, adults who are kids at heart), this recipe is a guaranteed hit. It’s a healthier way to enjoy a classic favorite that everyone will be excited to see on the dinner table.
Ingredients & Tools
- 1 lb chicken tenderloins
- 1 cup panko breadcrumbs
- 1/2 cup grated Parmesan cheese
- 1/2 cup all-purpose flour
- 2 large eggs
- 1 tsp garlic powder
- 1 tsp paprika
- 1/2 tsp onion powder
- 1/2 tsp dried oregano
- 1/2 tsp salt
- 1/4 tsp black pepper
- Olive oil spray
Tools: An air fryer, three shallow bowls, and a pair of tongs.
A little note on the panko—it’s lighter and flakier than traditional breadcrumbs, which is exactly what gives these tenders their signature, extra-crispy texture. And don’t skip the olive oil spray; it’s the final touch that helps the coating turn a beautiful, deep golden brown.
Nutrition (per serving)
- Calories: 320 kcal
- Protein: 35 g
- Fat: 9 g
- Carbohydrates: 22 g
- Fiber: 1 g
Serves: 4 | Prep Time: 10 mins | Cook Time: 12 mins | Total Time: 22 mins
Before You Start: Tips & Ingredient Notes
- Pat your chicken dry. This might seem like a tiny step, but it’s a game-changer. Any excess moisture on the surface of the chicken will create steam, which can prevent the coating from getting truly crispy. A quick pat with a paper towel makes all the difference.
- The power of panko. I really recommend sticking with panko breadcrumbs for this recipe. Their larger, flakier texture creates more surface area and nooks for browning, which translates directly into a lighter, crunchier crust compared to finer, sandier traditional breadcrumbs.
- Don’t skip the Parmesan. It’s not just for flavor—though the salty, umami kick is fantastic. The cheese also helps the coating brown beautifully and adds to the overall crispiness. It’s a secret weapon for texture and taste.
- Season every layer. Make sure your flour mixture and your panko mixture are both well-seasoned. This builds layers of flavor from the very first bite right down to the chicken itself, ensuring every single part is delicious.
How to Make Crispy Air Fryer Chicken Tenders
Step 1: First, set up your breading station. You’ll need three shallow bowls. In the first one, place your all-purpose flour and season it with half of the salt and pepper. In the second bowl, crack the two eggs and whisk them vigorously until they’re smooth and uniform—you want a nice, even egg wash to act as your glue. In the third bowl, combine the panko breadcrumbs, grated Parmesan, garlic powder, paprika, onion powder, dried oregano, and the remaining salt and pepper. Use a fork to mix it all together, making sure the herbs and cheese are evenly distributed. You’ll notice the mixture already smells amazing.
Step 2: Now, prepare your chicken. Take your tenderloins and pat them completely dry with paper towels. This is the single most important step for achieving maximum crispiness. Once they’re dry, you can start the breading process. The classic method is key here: one hand for the dry ingredients, one hand for the wet, if you can manage it. It helps prevent your fingers from becoming a clumpy, breaded mess.
Step 3: Time to get coating! Take one chicken tender and dredge it thoroughly in the seasoned flour, shaking off any excess. A light, even dusting is what you’re after. Next, dip it into the beaten egg, making sure it’s fully coated and letting any extra drip back into the bowl. Finally, press the tender firmly into the panko-Parmesan mixture. Really press it in to ensure a good, thick, even coating that will adhere during cooking. Place the finished tender on a clean plate and repeat with the rest.
Step 4: Preheat your air fryer to 400°F (200°C) for about 3 minutes. A hot air fryer is crucial for getting that instant sizzle and seal on the coating. While it’s heating, lightly spray the air fryer basket with olive oil to prevent any sticking. Arrange the breaded tenders in a single layer in the basket, making sure they aren’t touching or overlapping. Crowding is the enemy of crispiness! You’ll likely need to cook in two batches.
Step 5: Lightly spray the tops of the tenders with olive oil. This mimics the effect of frying oil, helping the panko brown and become incredibly crunchy. Cook for 10-12 minutes, pausing halfway through to flip them over. When you flip, give the other side a quick spray of oil as well. You’re looking for a deep, golden-brown color and a firm, crispy texture when tapped.
Step 6: Once they’re beautifully golden and crisp, carefully remove the tenders from the air fryer basket using tongs. Let them rest on a wire rack for a couple of minutes before serving. This brief rest allows the crust to set and the juices in the chicken to redistribute, ensuring every bite is as perfect as the last. You’ll hear that satisfying crunch the moment you bite into one.
Serving Suggestions
Complementary Dishes
- Classic Creamy Coleslaw — The cool, creamy crunch of the slaw provides a fantastic textural and temperature contrast to the hot, crispy chicken.
- Crispy Air Fryer French Fries — Keep the theme going! A batch of golden fries cooked right in the air fryer makes for the ultimate comfort food plate.
- A Simple Arugula Salad — Tossed with a lemony vinaigrette, the peppery arugula cuts through the richness of the tenders beautifully.
Drinks
- An Ice-Cold Lager — There’s nothing quite like the crisp, clean taste of a cold beer to complement the savory, herby flavors of the chicken.
- Sparkling Lemonade — The bright, bubbly acidity is wonderfully refreshing and helps cleanse the palate between each delicious bite.
- Iced Herbal Tea — A subtly sweet or minty iced tea is a lovely non-alcoholic option that doesn’t overpower the meal.
Something Sweet
- Warm Chocolate Chip Cookies — You can’t go wrong with this classic. The warm, melty chocolate is the perfect sweet ending after a savory feast.
- Vanilla Bean Ice Cream — Simple, creamy, and always a crowd-pleaser. It’s a smooth and cool finish that everyone will love.
- Fresh Berry Crumble — The tartness of the berries baked with a buttery, oat topping feels both homey and a little bit special.
Top Mistakes to Avoid
- Overcrowding the basket. I know it’s tempting to cram them all in, but if the tenders are touching, the hot air can’t circulate properly. This leads to steaming instead of frying, and you’ll end up with a soggy coating rather than a crispy one. Cook in batches for the best results.
- Skipping the preheat. Putting cold tenders into a cold air fryer is a surefire way to get uneven cooking and a less-crispy exterior. That initial blast of heat is what seals the coating and kicks off the browning process immediately.
- Not pressing the coating on. A gentle dip in the panko won’t cut it. You need to firmly press the chicken into the crumbs to create a solid, adhered layer that won’t fall off during the flipping process. A good press makes all the difference.
- Forgetting the oil spray. The panko needs a little help to achieve that golden-brown, fried-like color and texture. A light spritz of oil is non-negotiable for the perfect final crunch.
Expert Tips
- Tip: Use a wire rack for resting. If you place your freshly cooked tenders directly on a plate, the bottom steam can make the underside soft. Letting them rest on a wire rack allows air to circulate all around, keeping the entire tender crispy from top to bottom.
- Tip: Get creative with seasonings. This recipe is a fantastic base. Feel free to mix it up! Add a pinch of cayenne for heat, some smoked paprika for a deeper flavor, or even some dried dill for a different herby profile. Make it your own.
- Tip: For extra crunch, double-dip. If you’re a true crunch fanatic, try a double coating. After the first round of flour, egg, and panko, repeat the egg and panko steps one more time. It creates an even thicker, more shatteringly crisp shell.
- Tip: Make a big batch for meal prep. These tenders reheat remarkably well in the air fryer. Cook a double batch, let them cool completely, and store them in an airtight container. To reheat, just pop them back in the air fryer at 375°F for 3-4 minutes to bring back the crunch.
FAQs
Can I use chicken breasts instead of tenderloins?
Absolutely! Just slice one large chicken breast horizontally into strips that are about 1-inch thick. The key is to make sure all your pieces are roughly the same size so they cook evenly. You might need to adjust the cooking time by a minute or two, depending on the thickness of your strips. The goal is an internal temperature of 165°F.
Can I make these gluten-free?
Yes, it’s an easy swap. Use a 1:1 gluten-free all-purpose flour blend for the first dredge, and substitute the panko with gluten-free panko-style breadcrumbs, which you can find in most well-stocked grocery stores. The method and cooking time remain exactly the same, and you’ll still get a wonderfully crispy result.
Why are my chicken tenders not crispy?
The most common culprits are not patting the chicken dry, overcrowding the air fryer basket, or forgetting the oil spray. Moisture is the enemy of crispiness, so starting with dry chicken and allowing space for steam to escape is vital. That final spritz of oil is what gives the coating its golden, fried texture.
Can I prepare these ahead of time?
You can bread the tenders up to a few hours ahead of time. Arrange them in a single layer on a baking sheet, cover loosely with plastic wrap, and keep them in the refrigerator until you’re ready to cook. This is a great timesaver for parties or busy weeknights. I don’t recommend freezing them before cooking, as the coating can become soggy when it thaws.
What’s the best way to reheat leftovers?
The air fryer is your best friend here, too! To bring back that just-cooked crispiness, reheat the tenders in a single layer at 375°F for 3-4 minutes. The microwave will make them soft and rubbery, so avoid that if you can. The air fryer does a miraculous job of reviving that initial crunch.
Crispy Air Fryer Chicken Tenders
Make perfectly Crispy Air Fryer Chicken Tenders in under 20 minutes! This easy recipe delivers golden, crunchy tenders with minimal oil. Get the recipe now!
Ingredients
For the Ingredients
-
1 lb chicken tenderloins
-
1 cup panko breadcrumbs
-
1/2 cup grated Parmesan cheese
-
1/2 cup all-purpose flour
-
2 large eggs
-
1 tsp garlic powder
-
1 tsp paprika
-
1/2 tsp onion powder
-
1/2 tsp dried oregano
-
1/2 tsp salt
-
1/4 tsp black pepper
-
1 Olive oil spray
Instructions
-
First, set up your breading station. You’ll need three shallow bowls. In the first one, place your all-purpose flour and season it with half of the salt and pepper. In the second bowl, crack the two eggs and whisk them vigorously until they’re smooth and uniform—you want a nice, even egg wash to act as your glue. In the third bowl, combine the panko breadcrumbs, grated Parmesan, garlic powder, paprika, onion powder, dried oregano, and the remaining salt and pepper. Use a fork to mix it all together, making sure the herbs and cheese are evenly distributed. You’ll notice the mixture already smells amazing.01
-
Now, prepare your chicken. Take your tenderloins and pat them completely dry with paper towels. This is the single most important step for achieving maximum crispiness. Once they’re dry, you can start the breading process. The classic method is key here: one hand for the dry ingredients, one hand for the wet, if you can manage it. It helps prevent your fingers from becoming a clumpy, breaded mess.02
-
Time to get coating! Take one chicken tender and dredge it thoroughly in the seasoned flour, shaking off any excess. A light, even dusting is what you're after. Next, dip it into the beaten egg, making sure it’s fully coated and letting any extra drip back into the bowl. Finally, press the tender firmly into the panko-Parmesan mixture. Really press it in to ensure a good, thick, even coating that will adhere during cooking. Place the finished tender on a clean plate and repeat with the rest.03
-
Preheat your air fryer to 400°F (200°C) for about 3 minutes. A hot air fryer is crucial for getting that instant sizzle and seal on the coating. While it’s heating, lightly spray the air fryer basket with olive oil to prevent any sticking. Arrange the breaded tenders in a single layer in the basket, making sure they aren’t touching or overlapping. Crowding is the enemy of crispiness! You’ll likely need to cook in two batches.04
-
Lightly spray the tops of the tenders with olive oil. This mimics the effect of frying oil, helping the panko brown and become incredibly crunchy. Cook for 10-12 minutes, pausing halfway through to flip them over. When you flip, give the other side a quick spray of oil as well. You’re looking for a deep, golden-brown color and a firm, crispy texture when tapped.05
-
Once they’re beautifully golden and crisp, carefully remove the tenders from the air fryer basket using tongs. Let them rest on a wire rack for a couple of minutes before serving. This brief rest allows the crust to set and the juices in the chicken to redistribute, ensuring every bite is as perfect as the last. You’ll hear that satisfying crunch the moment you bite into one.06