
Why You’ll Love This Coconut Macaroons with Dark Chocolate
- Unbeatable Texture. We’re aiming for that perfect contrast here: a lightly crisp shell that shatters just enough to reveal a soft, tender, and incredibly moist interior. It’s a textural experience that store-bought versions just can’t replicate.
- Surprisingly Simple. With only five core ingredients for the macaroons themselves, this recipe is wonderfully straightforward. You’ll be amazed at how such an elegant-looking treat can be so easy to whip up—it’s a fantastic confidence-builder for new bakers.
- The Chocolate Factor. The dark chocolate dip isn’t just a garnish; it’s an essential component. The slight bitterness of the dark chocolate cuts through the sweetness of the coconut beautifully, creating a more complex and sophisticated flavor profile that keeps you coming back for just one more.
- Naturally Gluten-Free. Because these macaroons are built on a foundation of shredded coconut and sweetened condensed milk, they’re naturally gluten-free. This makes them a fantastic go-to dessert for sharing with friends who have dietary restrictions, without anyone feeling like they’re missing out.
Ingredients & Tools
- 1 can (14 oz / 400 g) sweetened condensed milk
- 1 large bag (14 oz / 400 g) sweetened shredded coconut
- 2 large egg whites, at room temperature
- 1 tsp pure vanilla extract
- 1/4 tsp fine sea salt
- 6 oz (170 g) high-quality dark chocolate (60-70% cacao), finely chopped
- 1 tsp coconut oil (optional, for a glossier chocolate coating)
Tools: 2 large baking sheets, parchment paper or silicone baking mats, a large mixing bowl, electric hand mixer or stand mixer with whisk attachment, a medium heatproof bowl, a small saucepan for a double boiler, two spoons or a small offset spatula for dipping, a wire cooling rack.
Don’t be tempted to use unsweetened coconut here—the sweetened condensed milk needs that extra sweetness from the coconut to balance out. And for the chocolate, honestly, a little goes a long way in terms of quality. A good bar of dark chocolate will melt more smoothly and taste infinitely better than chocolate chips, which contain stabilizers.
Serves: Makes about 18-20 macaroons | Prep Time: 20 minutes | Cook Time: 20 minutes | Total Time: 1 hour (includes cooling)
Before You Start: Tips & Ingredient Notes
- Room temperature egg whites are key. Cold egg whites don’t whip up to the same volume as room temperature ones. Just take them out of the fridge about 30 minutes before you start, or place the whole eggs in a bowl of warm water for 5-10 minutes before separating.
- Don’t pack the coconut. When measuring your shredded coconut, fluff it up in the bag first, then gently spoon it into your measuring cup. Packing it down will result in a denser, drier macaroon, and we’re all about that moist, chewy center.
- The salt is not optional. I know it seems like a tiny amount, but that quarter teaspoon of fine sea salt is crucial. It enhances all the other flavors and keeps the macaroons from tasting one-dimensionally sweet. It’s the secret weapon!
- Chop your chocolate finely. Whether you’re using a bar or blocks, take a moment to chop the chocolate into small, relatively uniform pieces. This helps it melt evenly and smoothly, preventing any frustrating lumps in your dipping chocolate.
How to Make Coconut Macaroons with Dark Chocolate
Step 1: First, preheat your oven to 325°F (165°C). This is a little lower than many cookie recipes, and that’s intentional—we want the macaroons to cook through and turn golden without burning the delicate coconut. Line your baking sheets with parchment paper or silicone mats. This is non-negotiable for easy removal!
Step 2: In your large mixing bowl, combine the entire can of sweetened condensed milk, the vanilla extract, and the salt. Give it a good stir with a spatula until everything is well incorporated. You’ll notice the salt dissolves into the thick milk. Now, dump in all of the shredded coconut. Use the spatula to fold it in until every last strand of coconut is thoroughly coated and glistening. The mixture will be very thick and sticky—that’s exactly what you want.
Step 3: Now, for the secret to that perfect texture! In a separate, clean, dry bowl, use your electric mixer to beat the room-temperature egg whites. Start on low speed and gradually increase to high. Beat them until they form stiff, glossy peaks. This means when you lift the beaters out, the peaks stand straight up and don’t flop over. This step incorporates air, giving the macaroons a lighter, less dense chew.
Step 4: Here’s where a gentle hand is important. Add about a third of the whipped egg whites to the coconut mixture. Fold it in gently with your spatula to lighten the base. Then, carefully fold in the remaining egg whites until no white streaks remain. Don’t overmix or you’ll deflate all that lovely air you just whipped in.
Step 5: It’s scooping time! I like to use a medium cookie scoop (about 1.5 tablespoons) for uniformity, but two spoons work just fine. Scoop up the mixture and press it lightly into a mound—this helps it hold together. Place the mounds about an inch apart on your prepared baking sheets. You can leave them rustic or use damp fingers to gently shape them into neat pyramids.
Step 6: Bake for 18-22 minutes, rotating the sheets halfway through. You’re looking for the tops and edges to be a beautiful, toasty golden brown. The bottoms will be a deeper gold. They will still feel a bit soft to the touch, but they’ll firm up as they cool. Let them cool on the baking sheet for 5 minutes before transferring them to a wire rack to cool completely. This is crucial—if you dip them while warm, the chocolate will melt everywhere.
Step 7: While the macaroons cool, melt the chocolate. Create a double boiler by placing about an inch of water in a small saucepan and bringing it to a simmer. Place your finely chopped chocolate (and the teaspoon of coconut oil, if using) in a heatproof bowl that sits snugly on top of the saucepan, ensuring the bottom of the bowl doesn’t touch the water. Stir gently with a dry spatula until the chocolate is completely smooth and glossy. Turn off the heat.
Step 8: The final, fun part! Once the macaroons are completely cool, dip the bottoms into the melted chocolate. You can also drizzle chocolate over the tops with a spoon for a more decorative look. Place them back on the parchment-lined rack to allow the chocolate to set. This can take about an hour at room temperature, or you can pop them in the fridge for 15 minutes to speed things up.
Serving Suggestions
Complementary Dishes
- A simple fruit platter with pineapple and mango — The bright, acidic sweetness of tropical fruit cuts through the richness of the coconut and chocolate, creating a wonderfully balanced dessert spread.
- A scoop of vanilla bean or coconut ice cream — For the ultimate indulgence, serve a warm macaroon (just a few seconds in the microwave) alongside a cold scoop. The contrast in temperatures and textures is absolutely divine.
- A sharp, tangy cheeseboard — The saltiness of a good aged cheddar or a creamy goat cheese provides a stunning savory counterpoint to the sweet macaroons, making for a sophisticated end to a meal.
Drinks
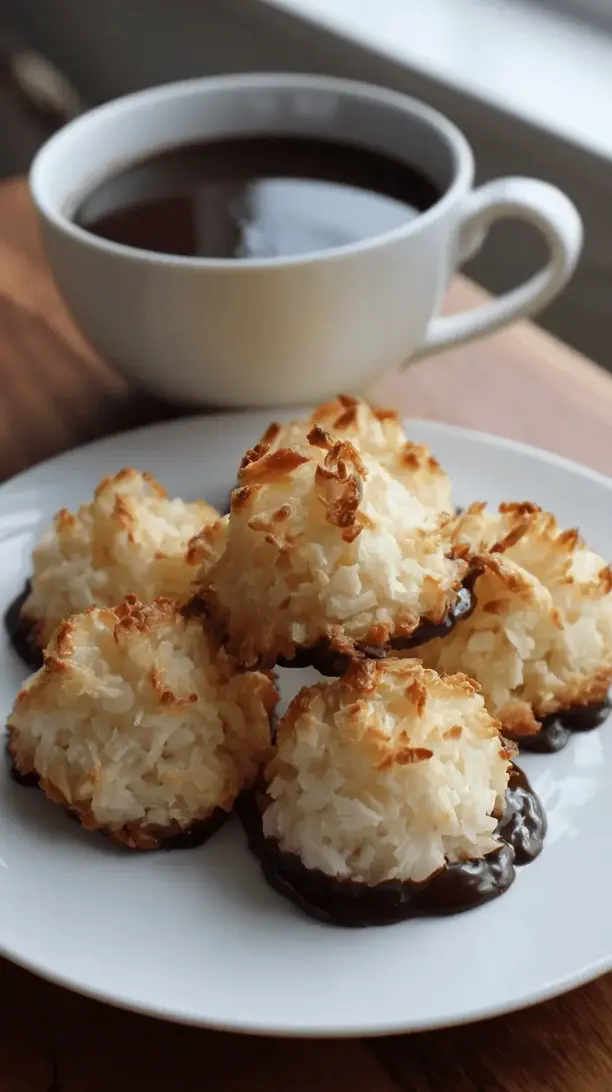
- A strong cup of black coffee — This is the classic pairing for a reason. The bitterness of the coffee enhances the dark chocolate and balances the sweetness of the coconut perfectly.
- A glass of cold whole milk — Sometimes, the simple, nostalgic route is the best. The creaminess of the milk is a comforting partner to the chewy texture of the macaroon.
- A glass of Prosecco or Champagne — The bubbles and acidity in a dry sparkling wine act as a fantastic palate cleanser, making each bite of macaroon taste like the first.
Something Sweet
- Lemon bars — The zesty, puckeringly tart flavor of a good lemon bar provides a brilliant, refreshing contrast to the rich, sweet macaroons on a dessert table.
- Almond biscotti — The nutty, crunchy texture of biscotti complements the soft chew of the macaroon, and both are excellent for dipping into your coffee or tea.
- Fresh berries with a dollop of whipped cream — A light, fresh option that adds a pop of color and a burst of juiciness alongside the dense, chewy macaroons.
Top Mistakes to Avoid
- Mistake: Using cold egg whites. This is the number one reason macaroons can turn out dense. Cold egg whites simply won’t whip up to the same volume, so they can’t provide that essential lift and lightness.
- Mistake: Overbaking. It’s easy to think they need more time because they’re still soft, but they continue to set as they cool. Overbaked macaroons become dry and crumbly instead of moist and chewy. Trust the golden color as your guide.
- Mistake: Dipping while warm. I’ve been impatient and messed this up before too! If the macaroons are even slightly warm, the chocolate will not set properly and will slide right off, creating a messy puddle instead of a elegant coating.
- Mistake: Getting water in the chocolate. When melting chocolate, even a single drop of water can cause it to “seize,” turning it into a grainy, clumpy mess. Ensure all your tools are completely dry.
Expert Tips
- Tip: Toast a portion of the coconut. For an even deeper, nuttier coconut flavor, spread about a half cup of the shredded coconut on a baking sheet and toast it at 325°F for 5-7 minutes until lightly golden. Let it cool completely before adding it to the rest of the ingredients.
- Tip: Add a flavor twist to the macaroon base. Along with the vanilla, try folding in the zest of one lime or lemon, or a half teaspoon of almond extract. These subtle additions can really make the flavor pop in a new direction.
- Tip: Use a piping bag for a different shape. If you prefer a more classic, peaked macaroon look, you can spoon the mixture into a large piping bag fitted with a large round tip and pipe tall mounds onto the baking sheet.
- Tip: Sprinkle with flaky sea salt. After dipping the macaroons in chocolate, but before the chocolate sets, sprinkle the tops with a tiny pinch of flaky sea salt. It elevates them to a whole new level of deliciousness.
FAQs
Can I make these macaroons ahead of time?
Absolutely! They are a fantastic make-ahead treat. Once the chocolate has fully set, store them in an airtight container at room temperature for up to 5 days. You can also freeze them for up to 3 months. Layer them between sheets of parchment paper in a freezer-safe container. Thaw at room temperature for an hour or so before serving.
My mixture seems too wet/too dry. What happened?
This usually comes down to the coconut. Different brands can have slightly different moisture levels and flake sizes. If it seems too wet and won’t hold a shape, add another handful of coconut. If it seems too dry and crumbly, add a tiny bit more sweetened condensed milk, a teaspoon at a time, until it comes together. The mixture should be very sticky but hold its shape when scooped.
Can I use unsweetened coconut and add more sugar?
I wouldn’t recommend it for this specific recipe. The texture and moisture content of sweetened coconut are integral to the final result. Using unsweetened coconut would require significant adjustments to the liquid and sugar ratios, which can be tricky. It’s best to stick with sweetened shredded coconut for guaranteed success.
Why did my chocolate coating turn white or streaky?
That’s called “bloom.” It happens when the chocolate is tempered incorrectly or experiences temperature fluctuations. It’s perfectly safe to eat—it’s just the cocoa butter separating and rising to the surface—but it doesn’t look as pretty. Using the double boiler method and adding a little coconut oil helps prevent this. Bloom is more of a cosmetic issue than a taste one.
Is there a way to make these dairy-free?
Yes! You can easily make these dairy-free by using a dairy-free sweetened condensed coconut milk alternative, which is available in many grocery stores. Just ensure your dark chocolate is also dairy-free (check the label, as some brands include milk solids). The method remains exactly the same.
Coconut Macaroons With Dark Chocolate
Learn to make perfect coconut macaroons with dark chocolate! My easy recipe delivers crisp, chewy texture & rich flavor. Gluten-free, simple ingredients, bakery-quality results at home.
Ingredients
Ingredients
-
1 can sweetened condensed milk (14 oz / 400 g)
-
1 large bag sweetened shredded coconut (14 oz / 400 g)
-
2 large egg whites (at room temperature)
-
1 tsp pure vanilla extract
-
1/4 tsp fine sea salt
-
6 oz high-quality dark chocolate (170 g, 60-70% cacao, finely chopped)
-
1 tsp coconut oil (optional, for a glossier chocolate coating)
Instructions
-
First, preheat your oven to 325°F (165°C). This is a little lower than many cookie recipes, and that's intentional—we want the macaroons to cook through and turn golden without burning the delicate coconut. Line your baking sheets with parchment paper or silicone mats. This is non-negotiable for easy removal!01
-
In your large mixing bowl, combine the entire can of sweetened condensed milk, the vanilla extract, and the salt. Give it a good stir with a spatula until everything is well incorporated. You'll notice the salt dissolves into the thick milk. Now, dump in all of the shredded coconut. Use the spatula to fold it in until every last strand of coconut is thoroughly coated and glistening. The mixture will be very thick and sticky—that's exactly what you want.02
-
Now, for the secret to that perfect texture! In a separate, clean, dry bowl, use your electric mixer to beat the room-temperature egg whites. Start on low speed and gradually increase to high. Beat them until they form stiff, glossy peaks. This means when you lift the beaters out, the peaks stand straight up and don't flop over. This step incorporates air, giving the macaroons a lighter, less dense chew.03
-
Here's where a gentle hand is important. Add about a third of the whipped egg whites to the coconut mixture. Fold it in gently with your spatula to lighten the base. Then, carefully fold in the remaining egg whites until no white streaks remain. Don't overmix or you'll deflate all that lovely air you just whipped in.04
-
It's scooping time! I like to use a medium cookie scoop (about 1.5 tablespoons) for uniformity, but two spoons work just fine. Scoop up the mixture and press it lightly into a mound—this helps it hold together. Place the mounds about an inch apart on your prepared baking sheets. You can leave them rustic or use damp fingers to gently shape them into neat pyramids.05
-
Bake for 18-22 minutes, rotating the sheets halfway through. You're looking for the tops and edges to be a beautiful, toasty golden brown. The bottoms will be a deeper gold. They will still feel a bit soft to the touch, but they'll firm up as they cool. Let them cool on the baking sheet for 5 minutes before transferring them to a wire rack to cool completely. This is crucial—if you dip them while warm, the chocolate will melt everywhere.06
-
While the macaroons cool, melt the chocolate. Create a double boiler by placing about an inch of water in a small saucepan and bringing it to a simmer. Place your finely chopped chocolate (and the teaspoon of coconut oil, if using) in a heatproof bowl that sits snugly on top of the saucepan, ensuring the bottom of the bowl doesn't touch the water. Stir gently with a dry spatula until the chocolate is completely smooth and glossy. Turn off the heat.07
-
The final, fun part! Once the macaroons are completely cool, dip the bottoms into the melted chocolate. You can also drizzle chocolate over the tops with a spoon for a more decorative look. Place them back on the parchment-lined rack to allow the chocolate to set. This can take about an hour at room temperature, or you can pop them in the fridge for 15 minutes to speed things up.08


