
Why You’ll Love This Coconut Cream Pie Chia Cups
- It’s a make-ahead marvel. Honestly, the hardest part is remembering to make them the night before. Once you do the quick mix, the fridge does all the work, leaving you with a ready-to-eat breakfast or dessert.
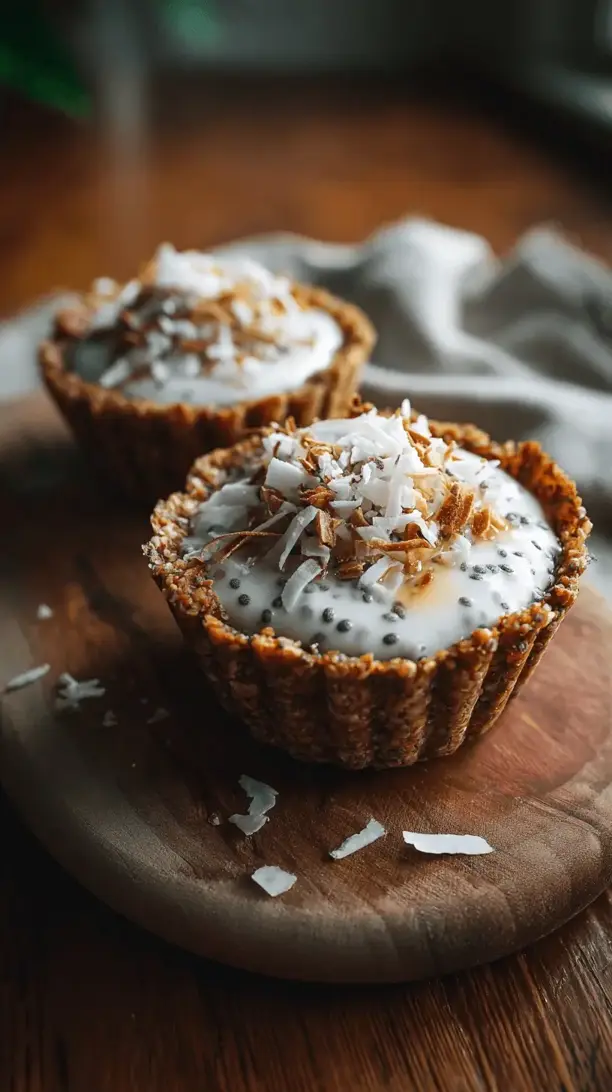
- The texture is pure magic. The chia seeds create this wonderfully thick, creamy, and luxurious pudding that mimics a traditional pastry cream so well, you might not believe there’s no cooking involved.
- Endlessly customizable. Feel like adding a swirl of mango puree? A sprinkle of dark chocolate chips? A dash of cardamom? Go for it! This base recipe is your playground.
- It feels fancy without the fuss. Serving dessert in individual glasses just makes everything feel more special. It’s a simple touch that says you put in effort, even when you really didn’t.
Ingredients & Tools
- 1 can (13.5 oz / 400 ml) full-fat coconut milk
- 1/2 cup chia seeds
- 1/4 cup pure maple syrup or agave nectar
- 1 tsp pure vanilla extract
- 1/4 tsp fine sea salt
- 1/2 cup unsweetened shredded coconut, toasted
- For serving: whipped coconut cream, extra toasted coconut, and fresh berries
Tools: A medium mixing bowl, a whisk, a spatula, and 4 small jars or glasses (about 8 oz each).
Using full-fat coconut milk is non-negotiable here—it’s what gives the pudding its rich, creamy body. Light coconut milk will leave you with a sad, watery situation. And toasting the coconut… it’s a small step that makes a world of difference, bringing out a deep, nutty aroma that elevates the entire cup.
Serves: 4 | Prep Time: 10 minutes (+ overnight setting) | Cook Time: 5 minutes (for toasting coconut) | Total Time: 8 hours+
Before You Start: Tips & Ingredient Notes
- Shake that can! Before you open your coconut milk, give it a really good shake. This helps redistribute the cream that often separates and settles at the top, ensuring a consistently creamy mixture.
- Toasting coconut is a game-changer. It takes a few minutes in a dry pan, but it transforms the flavor from bland and chewy to fragrant, nutty, and wonderfully crisp. Don’t skip it—your future self will thank you.
- Sweetener flexibility. I love maple syrup for its earthy notes, but honey, agave, or even a few pitted dates blended with the coconut milk would work beautifully. Adjust the amount to your taste.
- Patience is a virtue. Chia pudding needs time to set properly. A minimum of 4 hours is okay, but a full 8 hours or overnight is ideal for the best, thickest texture.
How to Make Coconut Cream Pie Chia Cups
Step 1: Toast the Coconut. Place your shredded coconut in a dry skillet over medium heat. Stir it constantly—I mean it, don’t walk away!—for 3 to 5 minutes. You’ll watch it go from white to a beautiful, fragrant golden brown. As soon as it’s evenly colored, transfer it to a plate to stop the cooking. This toasty flavor is the secret weapon.
Step 2: Combine the Pudding Base. In your mixing bowl, whisk together the full-fat coconut milk, maple syrup, vanilla extract, and salt. Keep whisking until it’s completely smooth and the sweetener is fully dissolved. You’ll notice the mixture is quite liquid at this stage—that’s exactly what we want.
Step 3: Add the Chia Seeds. Now, sprinkle the chia seeds into the liquid while whisking continuously. This is the trick to avoiding clumps! Whisk for a good minute or two to ensure every seed is suspended. Let it sit for 5 minutes, then come back and give it one more good whisk. This second whisking breaks up any seeds that decided to stick together.
Step 4: The First Layer. Grab your jars or glasses. Stir about three-quarters of your toasted coconut into the chia mixture. Then, divide this mixture evenly among the four jars. You should fill them about halfway. This creates our delicious coconut-infused base layer.
Step 5: Chill and Set. Screw on the lids or cover the glasses with plastic wrap. Pop them in the refrigerator for at least 4 hours, but honestly, overnight is best. You’ll know it’s ready when the mixture is thick and spoonable, not runny.
Step 6: Assemble and Serve. When you’re ready to serve, top each cup with a dollop of whipped coconut cream, a sprinkle of the remaining toasted coconut, and maybe a few fresh berries for a burst of color and freshness. Dive in!
Serving Suggestions
Complementary Dishes
- A fresh fruit salad with mint — The bright, juicy acidity of fruits like pineapple and mango cuts through the richness of the coconut cream beautifully, creating a perfectly balanced bite.
- Simple grilled shrimp skewers — If serving these as a dessert after a light summer meal, the savory, smoky shrimp provide a fantastic contrast to the sweet, cool cups.
Drinks
- A cold-brew coffee or iced latte — The bitter notes of coffee are a classic partner for creamy, sweet desserts, making this a sophisticated and refreshing combination.
- A crisp Riesling or Moscato d’Asti — The slight sweetness and effervescence of these wines complement the tropical coconut flavors without overpowering them.
Something Sweet
- Dark chocolate-dipped strawberries — This is a match made in heaven. The bitter dark chocolate and sweet berry add another layer of decadence without much extra work.
- A simple shortbread cookie — For a little textural crunch, serving a buttery shortbread cookie on the side is just perfect. It’s like having the pie crust without actually making one.
Top Mistakes to Avoid
- Mistake: Using light coconut milk. This is the number one reason for a runny pudding. Full-fat coconut milk provides the necessary fat and body for the chia seeds to swell into a proper, creamy consistency.
- Mistake: Not whisking enough after the initial mix. Chia seeds love to clump. If you just whisk once and walk away, you might end up with gelatinous blobs in a thin liquid. That second whisk after 5 minutes is crucial for a smooth texture.
- Mistake: Not letting it set long enough. Impatience can lead to disappointment. Four hours is the bare minimum. For the best, spoon-standing-up texture, give it the full overnight rest.
- Mistake: Skipping the salt. Salt isn’t just for savory food! It makes the sweet and vanilla flavors pop, preventing the dessert from tasting flat or one-dimensional.
Expert Tips
- Tip: Blend for ultimate silkiness. If you want a completely smooth, tapioca-like pudding without any chia seed texture, mix all the ingredients (except the toasted coconut) in a blender for a minute or two before pouring into jars. It’s a game-changer for texture purists.
- Tip: Infuse the coconut milk. For an extra flavor boost, gently warm the coconut milk with a strip of lime zest or a split vanilla bean pod before mixing. Let it steep for 15 minutes, then strain and proceed with the recipe.
- Tip: Create swirled layers. For a visually stunning effect, make a plain chia pudding layer and a separate layer blended with a handful of raspberries or blueberries. Alternate them in the jar for a beautiful ombre or marbleized look.
- Tip: Make a big batch. This recipe doubles or even triples perfectly. Keep a large container of the base pudding in the fridge and assemble individual cups throughout the week for quick, healthy snacks or desserts.
FAQs
How long do these chia cups last in the fridge?
They keep wonderfully for up to 4-5 days when stored in a sealed container. The texture might continue to thicken a bit each day, which is perfectly normal. I’d recommend adding any fresh toppings like whipped cream or berries right before you serve them, so they stay fresh and vibrant.
Can I use a different type of milk?
You can, but the results will be different. Almond or oat milk will make a much lighter, less rich pudding. If you go this route, I’d suggest reducing the quantity slightly (by about 1/4 cup) as these milks are thinner, and maybe adding a tablespoon of coconut cream to bring back some of that decadent mouthfeel.
My pudding is still runny! What happened?
This usually boils down to one of three things: not enough chia seeds, not enough time to set, or using a thin, light milk. First, make sure you’re using the full 1/2 cup of chia seeds. If you did and it’s still thin after 8 hours, try whisking in another tablespoon of chia seeds and letting it sit for another few hours. It’s a very forgiving recipe!
Is there a way to make this sugar-free?
Absolutely! You can easily replace the maple syrup with a liquid monk fruit sweetener or stevia drops to taste. Another great option is to use a mashed, very ripe banana, which will add natural sweetness and a lovely flavor that pairs well with coconut.
Can I freeze these for later?
You can, but the texture will change. Thawed chia pudding can become a bit watery and separate. If you do freeze it, give it a really vigorous stir after it thaws to reincorporate everything. It’ll still taste great, but the silky-smooth texture is best enjoyed fresh from the fridge.
Coconut Cream Pie Chia Cups
Craving coconut cream pie without the work? These easy chia cups deliver all the creamy, tropical flavor in a no-bake jar. Your make-ahead dessert dream is here!
Ingredients
Ingredients
-
1 can full-fat coconut milk (13.5 oz / 400 ml)
-
1/2 cup chia seeds
-
1/4 cup pure maple syrup or agave nectar
-
1 tsp pure vanilla extract
-
1/4 tsp fine sea salt
-
1/2 cup unsweetened shredded coconut (toasted)
-
whipped coconut cream (for serving)
-
extra toasted coconut (for serving)
-
fresh berries (for serving)
Instructions
-
Toast the Coconut. Place your shredded coconut in a dry skillet over medium heat. Stir it constantly—I mean it, don't walk away!—for 3 to 5 minutes. You'll watch it go from white to a beautiful, fragrant golden brown. As soon as it's evenly colored, transfer it to a plate to stop the cooking. This toasty flavor is the secret weapon.01
-
Combine the Pudding Base. In your mixing bowl, whisk together the full-fat coconut milk, maple syrup, vanilla extract, and salt. Keep whisking until it's completely smooth and the sweetener is fully dissolved. You'll notice the mixture is quite liquid at this stage—that's exactly what we want.02
-
Add the Chia Seeds. Now, sprinkle the chia seeds into the liquid while whisking continuously. This is the trick to avoiding clumps! Whisk for a good minute or two to ensure every seed is suspended. Let it sit for 5 minutes, then come back and give it one more good whisk. This second whisking breaks up any seeds that decided to stick together.03
-
The First Layer. Grab your jars or glasses. Stir about three-quarters of your toasted coconut into the chia mixture. Then, divide this mixture evenly among the four jars. You should fill them about halfway. This creates our delicious coconut-infused base layer.04
-
Chill and Set. Screw on the lids or cover the glasses with plastic wrap. Pop them in the refrigerator for at least 4 hours, but honestly, overnight is best. You'll know it's ready when the mixture is thick and spoonable, not runny.05
-
Assemble and Serve. When you're ready to serve, top each cup with a dollop of whipped coconut cream, a sprinkle of the remaining toasted coconut, and maybe a few fresh berries for a burst of color and freshness. Dive in!06


