
Why You’ll Love This Coconut Cashew Bliss Balls
- Incredibly Simple to Make. Honestly, if you can press a button on a food processor, you can make these. There’s no baking, no complicated techniques—just blend, roll, and enjoy. It’s the perfect recipe for when you need a quick win in the kitchen.
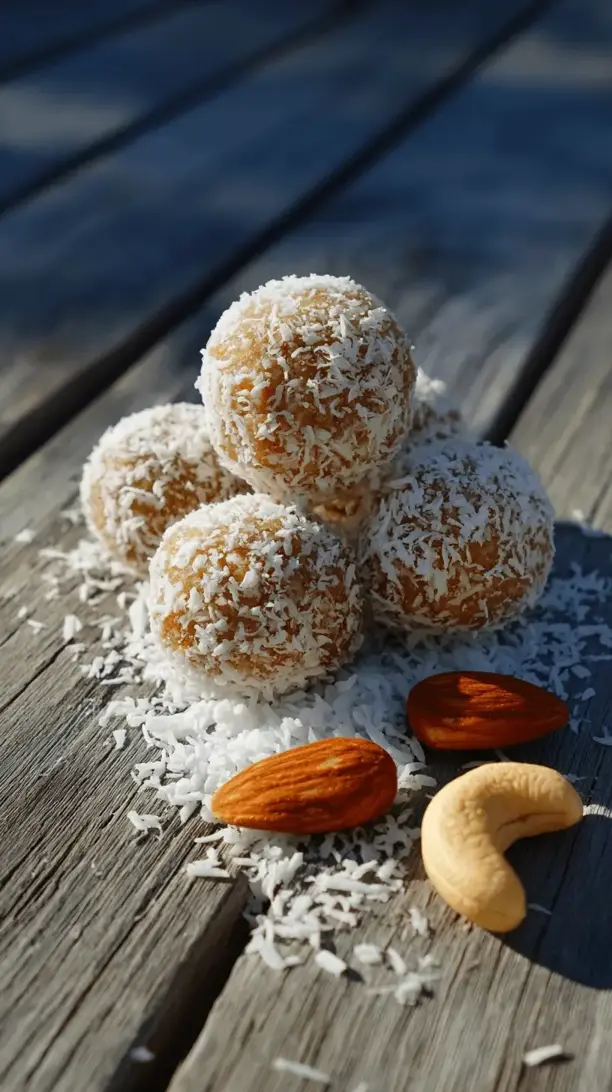
- The Perfect Texture Harmony. You get the creamy, buttery base from the cashews, the sticky sweetness from the dates, and a delightful crunch from the shredded coconut coating. It’s a little party of textures in every single bite.
- Endlessly Customizable. Think of this recipe as a fantastic starting point. Feel like adding a spoonful of cocoa powder? Go for it. A dash of cinnamon? Absolutely. It’s your bliss ball canvas to paint on.
- Meal-Prep Friendly. These little guys are champions of the fridge and freezer. Making a double batch on a Sunday means you’re set with healthy snacks for the entire week, which is a game-changer for busy mornings or hectic afternoons.
Ingredients & Tools
- 1 cup raw cashews
- 1 cup medjool dates, pitted
- 2 tablespoons maple syrup (or agave nectar)
- 1 teaspoon vanilla extract
- A pinch of sea salt
- 1/2 cup unsweetened shredded coconut, plus more for rolling
Tools: A food processor (a high-powered blender can work in a pinch, but a processor is easier), a small bowl for the extra coconut, and a baking sheet or plate lined with parchment paper.
The quality of your ingredients really shines here, so try to use fresh, soft medjool dates if you can—they provide the best natural sweetness and sticky binding power. That pinch of salt isn’t just for show, either; it truly makes the cashew and coconut flavors pop.
Serves: Makes 12-14 balls | Prep Time: 15 minutes | Cook Time: 0 minutes | Total Time: 15 minutes (+ chilling time)
Before You Start: Tips & Ingredient Notes
- Are your dates a little dry? If your medjool dates have been sitting in the pantry for a while and feel firm, simply soak them in hot water for about 10 minutes before using. Just be sure to drain them thoroughly and pat them dry—excess water will make the mixture too sticky.
- The Cashew Conundrum. You really want to use raw, unsalted cashews here. Roasted and salted ones will alter the flavor profile significantly and can make the balls too salty. Raw cashews give you that clean, buttery canvas we’re after.
- Toasting Coconut for Extra Flavor. This is a completely optional but highly recommended step! Lightly toasting the shredded coconut you’ll use for rolling in a dry skillet over medium heat for 2-3 minutes until fragrant adds a wonderful nutty depth. Just let it cool completely before rolling.
- Sticky Situation Solution. If you find the mixture is sticking to your hands too much when rolling, a little pro-tip is to lightly dampen your palms with water. It creates a barrier that makes rolling so much easier.
How to Make Coconut Cashew Bliss Balls
Step 1: First, let’s get our cashews ready. Add the raw cashews to your food processor. Pulse them several times until they break down into a fine, sandy crumb. You don’t want cashew butter, so stop before it gets too oily and pasty. You’re aiming for a texture that looks like coarse sand. This gives the bliss balls their structural base.
Step 2: Now, add in the pitted medjool dates, maple syrup, vanilla extract, and that all-important pinch of sea salt. Pop the lid back on and start processing again. You’ll notice it will go from a crumbly mess to a big clump that sort of rolls around the bowl. This is exactly what you want! It should look like a sticky, uniform dough.
Step 3: Here comes the coconut. Add the 1/2 cup of shredded coconut to the food processor. Pulse just a few more times until the coconut is evenly distributed throughout the mixture. Be careful not to over-process at this stage—we just want to incorporate it, not pulverize it completely.
Step 4: Time for the fun part—rolling! Scoop out about a tablespoon of the mixture. It should hold together easily when you squeeze it. Roll it firmly between your palms to form a tight, smooth ball. If the mixture feels too dry and crumbly, add a tiny bit more maple syrup. If it’s too wet and sticky, a sprinkle of extra coconut or cashew meal will help.
Step 5: Pour some extra shredded coconut into a small bowl. Take each ball and roll it around in the coconut until it’s nicely coated. Place each finished bliss ball on your parchment-lined plate or baking sheet. Repeat until all the mixture is used up.
Step 6: This final step is crucial for the perfect texture. Pop the tray of bliss balls into the refrigerator for at least 30 minutes to firm up. This chilling time allows the fats from the cashews to set a little, making them easier to handle and giving them that satisfying, firm-yet-chewy bite. Then, they’re ready to enjoy!
Serving Suggestions
Complementary Dishes
- A Fresh Fruit Platter — The simplicity of sliced mango, pineapple, or berries provides a juicy, bright contrast to the rich, dense bliss balls, making for a lovely light dessert or snack spread.
- A Cup of Greek Yogurt — Crumble a bliss ball over a bowl of plain Greek yogurt for a breakfast that feels decadent but is packed with protein and sustained energy.
Drinks
- Iced Coffee or Cold Brew — The bitter notes of coffee are a fantastic partner for the sweet, coconutty balls. It’s my favorite mid-afternoon pick-me-up combination.
- A Spicy Chai Latte — The warm spices in chai—cinnamon, cardamom, ginger—complement the tropical flavors beautifully, especially if you’ve added a pinch of cinnamon to your bliss ball mixture.
Something Sweet
- Dark Chocolate-Dipped Strawberries — For a more elaborate dessert, serve these alongside. The combination of dark chocolate, fresh berry, and coconut cashew ball is honestly a little bit heavenly.
- A Simple Berry Sorbet — The tartness of a raspberry or mango sorbet cleanses the palate between bites of the rich bliss balls, making each taste feel new and exciting.
Top Mistakes to Avoid
- Mistake: Using old, hard dates. This is the number one reason bliss ball mixtures fail to bind. If your dates aren’t soft and sticky, the mixture will be crumbly and impossible to roll. Remember the hot water soak trick!
- Mistake: Over-processing the cashews. If you run the food processor for too long initially, you’ll start making cashew butter. While delicious, it will make your bliss balls greasy and heavy. Pulse until sandy, then stop.
- Mistake: Skipping the chill time. I know it’s tempting to eat one right away, but that 30 minutes in the fridge is non-negotiable. It transforms them from a sticky mass into a perfectly portable, firm snack.
- Mistake: Rolling the balls too large. These are rich and satisfying! A tablespoon-sized ball is perfect. Making them too big can be a bit overwhelming and they might not hold their shape as well.
Expert Tips
- Tip: Get creative with add-ins. Once you’ve mastered the base, the world is your oyster. Try adding a tablespoon of cacao powder for a chocolate version, a handful of cacao nibs for crunch, or even a scoop of collagen peptides or protein powder for an extra boost.
- Tip: Freeze for long-term storage. These freeze beautifully! Place the rolled balls on a parchment-lined tray, freeze until solid (about 2 hours), then transfer to a freezer bag. They’ll keep for up to 3 months. Thaw in the fridge or eat straight from the freezer for a firmer, almost ice-creamy texture.
- Tip: For a super-smooth texture, use cashew pieces. They are often cheaper than whole cashews and will break down into a finer meal more quickly in the food processor, giving you an ultra-smooth bliss ball interior.
- Tip: Make it a nut-free version. Simply replace the cashews with an equal amount of sunflower seeds or pumpkin seeds. The flavor profile changes, but you’ll still get a delicious, nutrient-dense snack.
FAQs
How long do these bliss balls last?
Stored in an airtight container in the refrigerator, they will stay fresh and delicious for up to two weeks. The coconut coating might lose a little of its crispness over time, but the flavor will still be great. They also freeze perfectly for up to 3 months.
Can I use a different type of nut?
Absolutely! Almonds work wonderfully here—just make sure they are raw and unsalted. You could also use a combination of nuts, like almonds and macadamias. The method remains exactly the same. The flavor will just have a different, but equally delicious, character.
My mixture is too wet/sticky. How can I fix it?
Don’t worry, this happens! If it’s too sticky to handle, it usually means your dates were very fresh and moist. Simply add a bit more of the “dry” ingredients to balance it out. A tablespoon or two of extra shredded coconut, almond flour, or even oat flour will help absorb the excess moisture and make it easier to roll.
My mixture is too dry and crumbly. What did I do wrong?
This is almost always due to dates that weren’t soft enough. To fix it, add a little more liquid binder. An extra teaspoon of maple syrup or even a tiny splash of water (start with half a teaspoon) can help. Process again, and it should come together.
Are these suitable for a vegan diet?
Yes, they are! This recipe, as written, is naturally vegan, dairy-free, and egg-free. Just double-check that your maple syrup is 100% pure maple syrup to be sure. They’re a fantastic plant-based snack for everyone.
Coconut Cashew Bliss Balls
Whip up these no-bake Coconut Cashew Bliss Balls in just 15 minutes! A healthy, energy-boosting snack with creamy cashews, sweet dates & coconut. Perfect for meal prep!
Ingredients
Ingredients
-
1 cup raw cashews
-
1 cup medjool dates (pitted)
-
2 tablespoons maple syrup (or agave nectar)
-
1 teaspoon vanilla extract
-
A pinch sea salt
-
1/2 cup unsweetened shredded coconut (plus more for rolling)
Instructions
-
First, let's get our cashews ready. Add the raw cashews to your food processor. Pulse them several times until they break down into a fine, sandy crumb. You don't want cashew butter, so stop before it gets too oily and pasty. You're aiming for a texture that looks like coarse sand. This gives the bliss balls their structural base.01
-
Now, add in the pitted medjool dates, maple syrup, vanilla extract, and that all-important pinch of sea salt. Pop the lid back on and start processing again. You'll notice it will go from a crumbly mess to a big clump that sort of rolls around the bowl. This is exactly what you want! It should look like a sticky, uniform dough.02
-
Here comes the coconut. Add the 1/2 cup of shredded coconut to the food processor. Pulse just a few more times until the coconut is evenly distributed throughout the mixture. Be careful not to over-process at this stage—we just want to incorporate it, not pulverize it completely.03
-
Time for the fun part—rolling! Scoop out about a tablespoon of the mixture. It should hold together easily when you squeeze it. Roll it firmly between your palms to form a tight, smooth ball. If the mixture feels too dry and crumbly, add a tiny bit more maple syrup. If it's too wet and sticky, a sprinkle of extra coconut or cashew meal will help.04
-
Pour some extra shredded coconut into a small bowl. Take each ball and roll it around in the coconut until it's nicely coated. Place each finished bliss ball on your parchment-lined plate or baking sheet. Repeat until all the mixture is used up.05
-
This final step is crucial for the perfect texture. Pop the tray of bliss balls into the refrigerator for at least 30 minutes to firm up. This chilling time allows the fats from the cashews to set a little, making them easier to handle and giving them that satisfying, firm-yet-chewy bite. Then, they're ready to enjoy!06


