Why You’ll Love This Chocolate Pomegranate Clusters
- Effortless Elegance. Honestly, these look like they came from a fancy chocolatier, but they require zero technical skill. The messy, rustic clusters are part of their charm, and they come together in minutes.
- The Perfect Texture Symphony. You get the crisp “snap” of the dark chocolate shell, followed by the immediate, juicy burst of the pomegranate seeds. It’s a little party of contrasting textures in your mouth that is just so satisfying.
- Customizable and Fun. This is a fantastic recipe to make with kids or to adapt to your own tastes. Feel like adding a sprinkle of sea salt or a dusting of cocoa? Go for it. The basic formula is your playground.
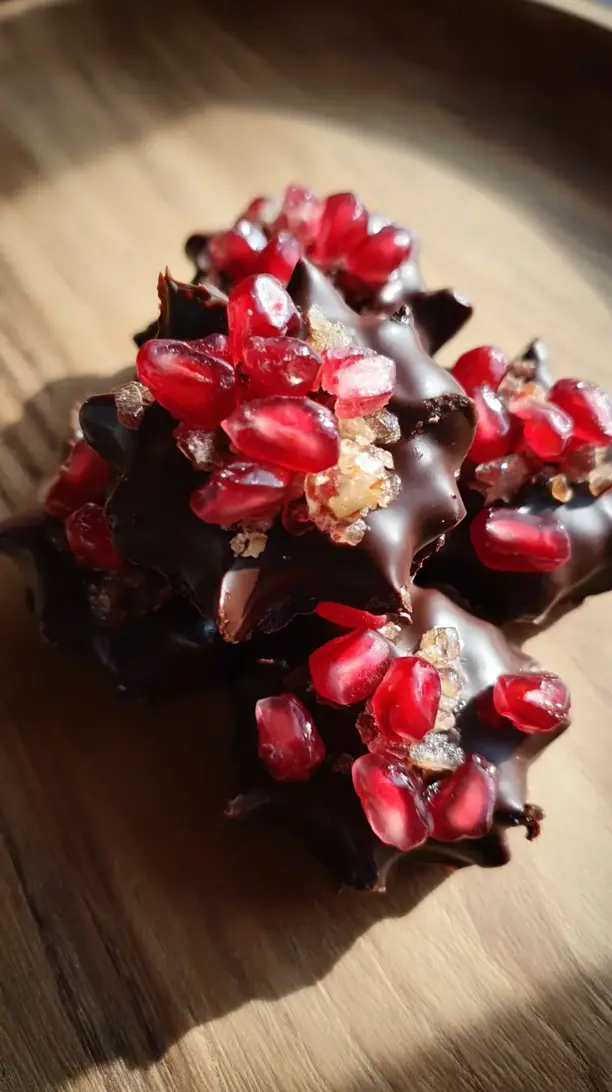
- Naturally Beautiful. The deep brown chocolate and the brilliant ruby-red pomegranate arils create a stunning visual contrast. They’re almost too pretty to eat… almost. They make any plate or gift box look instantly more festive.
Ingredients & Tools
- 200 g high-quality dark chocolate (around 70% cocoa works beautifully)
- 1 cup pomegranate arils (seeds from about 1 medium pomegranate)
- 1/4 tsp flaky sea salt (optional, but highly recommended)
- 1 tbsp coconut oil (optional, for a smoother melt and shinier finish)
Tools: A double boiler (or a heatproof bowl set over a pot of simmering water), a baking sheet, parchment paper or a silicone baking mat, a small spoon or cookie scoop.
The quality of your chocolate really is the star here, so use one you enjoy eating on its own. As for the pomegranate arils, you can certainly seed a fresh pomegranate yourself—it’s a wonderfully meditative kitchen task—but pre-packaged arils are a fantastic time-saver and work just as well. The little bit of coconut oil isn’t strictly necessary, but it helps the chocolate melt more evenly and gives the finished clusters a lovely glossy sheen.
Nutrition (per serving)
- Calories: 120 kcal
- Protein: 2 g
- Fat: 7 g
- Carbohydrates: 14 g
- Fiber: 2 g
Serves: 8 | Prep Time: 10 mins | Cook Time: 5 mins | Total Time: 15 mins (plus setting time)
Before You Start: Tips & Ingredient Notes
- Chocolate Choice is Key. Please, don’t use chocolate chips meant for cookies. They contain stabilizers that prevent them from melting smoothly. A good bar of dark chocolate, chopped, will give you a much superior texture and flavor.
- Keep Everything Dry. This is the golden rule of working with chocolate. Even a single drop of water can cause it to “seize” and become a grainy, clumpy mess. Ensure your bowl, spoon, and pomegranate arils are completely dry.
- To Seed a Pomegranate. If you’re using a whole fruit, cut it in half horizontally. Hold one half over a bowl, cut-side down in your palm, and whack the back firmly with a wooden spoon. The arils will rain right out into the bowl, with minimal mess.
- The Magic of Tempering (Sort Of). We’re not doing full, professional tempering, but melting the chocolate gently over indirect heat and adding a touch of coconut oil helps it set with a nice snap and shine, rather than a soft, dull finish.
How to Make Chocolate Pomegranate Clusters
Step 1: First, get your workstation ready. Line a baking sheet with parchment paper or a silicone mat. This is crucial because it prevents sticking and makes cleanup a breeze. Have your pomegranate arils measured out and ready to go, and make sure they are patted completely dry with a paper towel if they seem at all damp. You’ll want to do this before you even start melting the chocolate, so you can move quickly later.
Step 2: Now, let’s melt the chocolate. Chop your dark chocolate bar into small, uniform pieces—this helps it melt evenly. Set up a double boiler by bringing a small pot of water to a gentle simmer, then placing a heatproof bowl on top, ensuring the bottom of the bowl doesn’t touch the water. Add the chocolate (and the coconut oil, if using) to the bowl. Stir continuously and gently as it melts. You’ll notice it will go from solid, to shards, to a beautifully smooth, glossy liquid. This should only take 3-5 minutes. Remove the bowl from the heat as soon as it’s fully melted.
Step 3: It’s mixing time! Let the melted chocolate cool for just a minute off the heat. Then, pour in about three-quarters of your pomegranate arils. Reserve the rest for topping. Fold them gently into the chocolate using a spatula, making sure each little jewel gets a good coating. You want them distributed evenly, but be careful not to overmix and crush too many of the arils.
Step 4: Time to form the clusters. Using a small spoon or a cookie scoop, drop tablespoon-sized mounds of the chocolate-pomegranate mixture onto your prepared baking sheet. Don’t worry about making them perfectly round—the rustic, uneven shapes are part of their charm. Leave a little space between each one so they don’t run into each other.
Step 5: Now for the finishing touches. Take the reserved pomegranate arils and gently press a few onto the top of each cluster. This makes them look extra pretty and ensures every bite has a visible pop of color. If you’re using the flaky sea salt, now is the time to sprinkle just a tiny pinch over the top of each cluster. The salt will cut through the richness of the chocolate beautifully.
Step 6: The final, and hardest, step: waiting. Carefully transfer the entire baking sheet to the refrigerator. Let the clusters set completely, which will take at least 30-45 minutes. You’ll know they’re ready when the chocolate is firm to the touch and has a satisfying snap when you break one. Once set, they can be stored in an airtight container in the fridge.
Serving Suggestions
Complementary Dishes
- A Simple Cheese Board — The sharpness of an aged cheddar or a creamy goat cheese provides a lovely savory counterpoint to the sweet and tart clusters.
- Citrus-Infused Salads — A bright salad with orange segments and a light vinaigrette cleanses the palate and makes the chocolate taste even richer afterwards.
- Spiced Nuts — A bowl of warm, cinnamon-dusted almonds or pecans shares a similar cozy, festive vibe and makes for a wonderful textural companion.
Drinks
- Earl Grey Tea — The bergamot in the tea has a natural citrusy floral note that dances beautifully with the dark chocolate and fruit.
- Rich Hot Chocolate — Go all in on the chocolate theme! A cup of deeply flavorful hot chocolate turns this into a decadent, cocoa-filled experience.
- Sparkling Rosé — The bubbles and slight sweetness of a dry rosé cut through the chocolate’s richness and highlight the fruity pomegranate.
Something Sweet
- Vanilla Bean Panna Cotta — The silky, cool, and simple panna cotta is a dreamy base that lets the bold flavor of the clusters truly shine.
- Orange & Cardamom Biscotti — Dunking a spiced, crunchy biscotti into your tea alongside a bite of a cluster is a textural dream.
- Lemon Sorbet — The intense, clean tartness of a good lemon sorbet is a fantastic palate-cleanser that makes you appreciate the chocolate all over again.
Top Mistakes to Avoid
- Mistake: Using a microwave to melt the chocolate. It’s just too easy to overheat it, even in short bursts. Burnt chocolate is bitter and grainy, and you can’t come back from it. The gentle, controlled heat of a double boiler is your best friend here.
- Mistake: Adding wet pomegranate arils. I’ve messed this up before too… a little moisture on the fruit can introduce just enough water to make the chocolate seize up into a thick, unworkable paste. A quick pat-down with a paper towel is all it takes to prevent disaster.
- Mistake: Skipping the parchment paper. Trying to pry set chocolate off a bare baking sheet is a recipe for broken clusters and a lot of frustration. The parchment or silicone mat is non-negotiable for easy release.
- Mistake> Rushing the setting process. Don’t be tempted to put them in the freezer to speed things up (unless it’s very humid). This can cause the chocolate to bloom—that whitish, streaky appearance. It’s still edible, but it loses its beautiful glossy finish.
Expert Tips
- Tip: Add a touch of spice. When melting the chocolate, stir in a tiny pinch of cayenne pepper or cinnamon. It adds a subtle, warm complexity that lingers on the palate and makes the clusters feel even more special.
- Tip: Create a “drizzle effect.” After you’ve spooned out your clusters, take any leftover melted chocolate and use a fork to flick fine lines of chocolate over the top. It adds a professional-looking finish with zero extra effort.
- Tip: Use different chocolates. Try a mix of dark and white chocolate for a marbled effect, or use a ruby chocolate for a stunning pink-hued treat that complements the pomegranate color.
- Tip: Make them ahead for gifting. These clusters keep beautifully in the fridge for up to a week. Layer them between sheets of parchment in a pretty tin or box for a truly impressive homemade gift.
FAQs
Can I use milk chocolate instead of dark?
Absolutely, you can! Milk chocolate will give you a sweeter, creamier result. Just be aware that it can be a bit softer when set, so the clusters might be more delicate. The same rule applies: use a good-quality bar, not chips. The flavor pairing with the tart pomegranate is a little different—more like a classic candy—but still utterly delicious.
How long do these clusters last?
Stored in an airtight container in the refrigerator, they will keep perfectly for about one to two weeks. The chocolate acts as a great preservative. You can also freeze them for up to two months. Just let them thaw in the fridge for an hour or so before serving to prevent condensation from making them sticky.
My chocolate seized! Can I fix it?
Oh no, it happens to the best of us. If you’ve introduced a tiny bit of moisture and it’s turned thick and grainy, you can sometimes rescue it by immediately stirring in a teaspoon of neutral oil (like vegetable or coconut oil) off the heat. It won’t be perfect, but it can make it spreadable enough to salvage the batch.
Can I add nuts or other dried fruit?
Please do! This recipe is a wonderful base. Chopped toasted almonds, pistachios, or hazelnuts would be fantastic. You could also add some chopped dried cranberries or apricots. Just keep the total add-in volume roughly the same as the pomegranate called for, so the chocolate can still hold everything together.
Why did my chocolate get a white, powdery coating?
That’s called “bloom.” It happens when chocolate is exposed to temperature changes or moisture. It’s completely safe to eat—it’s just the cocoa butter or sugar separating and rising to the surface—but it does affect the texture and appearance. To prevent it, always let your clusters set in a cool, dry place like the fridge, not the freezer, and store them properly.
Chocolate Pomegranate Clusters
Make easy Chocolate Pomegranate Clusters with just 3 ingredients! A perfect sweet-tart treat for gifting or snacking. Get the simple recipe here.
Ingredients
For the Clusters
-
200 g high-quality dark chocolate (around 70% cocoa works beautifully)
-
1 cup pomegranate arils (seeds from about 1 medium pomegranate)
-
1/4 tsp flaky sea salt (optional, but highly recommended)
-
1 tbsp coconut oil (optional, for a smoother melt and shinier finish)
Instructions
-
First, get your workstation ready. Line a baking sheet with parchment paper or a silicone mat. This is crucial because it prevents sticking and makes cleanup a breeze. Have your pomegranate arils measured out and ready to go, and make sure they are patted completely dry with a paper towel if they seem at all damp. You'll want to do this before you even start melting the chocolate, so you can move quickly later.01
-
Now, let's melt the chocolate. Chop your dark chocolate bar into small, uniform pieces—this helps it melt evenly. Set up a double boiler by bringing a small pot of water to a gentle simmer, then placing a heatproof bowl on top, ensuring the bottom of the bowl doesn't touch the water. Add the chocolate (and the coconut oil, if using) to the bowl. Stir continuously and gently as it melts. You'll notice it will go from solid, to shards, to a beautifully smooth, glossy liquid. This should only take 3-5 minutes. Remove the bowl from the heat as soon as it's fully melted.02
-
It's mixing time! Let the melted chocolate cool for just a minute off the heat. Then, pour in about three-quarters of your pomegranate arils. Reserve the rest for topping. Fold them gently into the chocolate using a spatula, making sure each little jewel gets a good coating. You want them distributed evenly, but be careful not to overmix and crush too many of the arils.03
-
Time to form the clusters. Using a small spoon or a cookie scoop, drop tablespoon-sized mounds of the chocolate-pomegranate mixture onto your prepared baking sheet. Don't worry about making them perfectly round—the rustic, uneven shapes are part of their charm. Leave a little space between each one so they don't run into each other.04
-
Now for the finishing touches. Take the reserved pomegranate arils and gently press a few onto the top of each cluster. This makes them look extra pretty and ensures every bite has a visible pop of color. If you're using the flaky sea salt, now is the time to sprinkle just a tiny pinch over the top of each cluster. The salt will cut through the richness of the chocolate beautifully.05
-
The final, and hardest, step: waiting. Carefully transfer the entire baking sheet to the refrigerator. Let the clusters set completely, which will take at least 30-45 minutes. You'll know they're ready when the chocolate is firm to the touch and has a satisfying snap when you break one. Once set, they can be stored in an airtight container in the fridge.06